To avoid these ads, REGISTER NOW!

Above 1200 Sq/FT The Warthog Hidey Hole

Wokspaces above 1200 squarefeet.
OP
J

jbmatth

Well-known member
Joined
Jun 3, 2013
Messages
5,681
Location
Northern Ok.
JB I have no idea how I forgot about that. As soon as I was reading the response I was thinking DUH I remember the flare gun. I would love a lathe. Haven't really used them much though. Hopefully you find a nice brake. They are around. The guy I bought my shear from had a HUGE straight brake, and a nice Tinnsmith 4 foot finger brake. If I had more funds the 4 footer would have followed me home. I have a Enco brake, and I believe it is rated for 16 gauge, but after doing a little work with 16 gauge I have my doubts to it's ability to really handle it. May have to get a spool gun for the welder so I can do aluminum.

Keep up the good work.

JP,
I have found a few around here but not quite for the price I was willing to pay at the time. I need to let my tool fund grow as I've blown it all recently and am sitting on a wallet with moths right now. I want to eventually get into aluminum for lots of reasons and chrome-moly for roll cages but that will be down the road when I can afford a good tig machine and all the ancillary bits that go along with them. 16 gauge is no joke for shearing or braking it is way heavier duty than it really needs to be for most of my projects.

That's looks like CL Smith vacuum bonded hex tile. That stuff while last for years.

Mysticalflight,
I see this is your first post, I'm honored you would make it in my thread. :bowdown: Hopefully you can stick around and read many of the other great threads on this board. As for the refractory and hex mesh I assume you have some experience with it as well. I don't know much about it but do know when it is applied right it works wonders, if it goes away for whatever reason the metal doesn't stand a chance in cat crackers.

All,
I received word that the RPV has been delivered. Hopefully by some point this weekend Herb's Hearse will be ready for a test drive. :beer:
JB
 
To avoid these ads, REGISTER NOW!

jp828108

Well-known member
Joined
Jun 28, 2011
Messages
484
Location
Ohio
JB,

I totally agree 16 gauge is some serious "sheet" metal. I can imagine a few places where it will come in handy, but I imagine I will seldom push the shear or brake to work with 16 gauge steel very often. The tools to support the hobby are expensive, but I look at them as an investment. I hope to use them to save or make money at some point. I know you have been able to use your garage to accomplish a lot of big projects. Hopefully you get that TIG machine soon. I would love to see some projects that could be accomplished in your shop.
 

oldironfarmer

Well-known member
Joined
Jun 25, 2016
Messages
6,664
Location
Terlton, Oklahoma
That's looks like CL Smith vacuum bonded hex tile. That stuff while last for years.

Not familiar with that product. But I can assure you this is Resco AA-22 abrasion resistant refractory rammed into the hexagon pattern stainless mesh which is first welded to the vessel wall. There are anchor slots in the hex mesh and the refractory is rammed with a pneumatic tool. It gets tight ramming in refractory in a small vessel like this. Around 24 hour dryout is then required at slowly increasing temperatures then ramped up to operating temperature. Maximum service temperature is 2,600 F however most refinery services are below 2,000 F.
 
OP
J

jbmatth

Well-known member
Joined
Jun 3, 2013
Messages
5,681
Location
Northern Ok.
JB,

I totally agree 16 gauge is some serious "sheet" metal. I can imagine a few places where it will come in handy, but I imagine I will seldom push the shear or brake to work with 16 gauge steel very often. The tools to support the hobby are expensive, but I look at them as an investment. I hope to use them to save or make money at some point. I know you have been able to use your garage to accomplish a lot of big projects. Hopefully you get that TIG machine soon. I would love to see some projects that could be accomplished in your shop.

Speaking of sheet metal if I remember right it is considered sheet if it is measured in gauge, and plate if in fractions of an inch. Usually plate is 1/8" and thicker however, 10 gauge is thicker than 1/8" or .125" (3.175mm) at .1345" (3.363 mm). Just a random thought that I figured was worth mentioning. I enjoy the projects I work on and the building of projects as I go however, I really look forward to the day I can start on my own dream projects such as building cars and trucks to do things the factory never intended them to do.

Not familiar with that product. But I can assure you this is Resco AA-22 abrasion resistant refractory rammed into the hexagon pattern stainless mesh which is first welded to the vessel wall. There are anchor slots in the hex mesh and the refractory is rammed with a pneumatic tool. It gets tight ramming in refractory in a small vessel like this. Around 24 hour dryout is then required at slowly increasing temperatures then ramped up to operating temperature. Maximum service temperature is 2,600 F however most refinery services are below 2,000 F.

I'll just nod and agree as Andy knows more about refractory than I. :thumbup:

You can afford moths? You rich guys. :bounce:

They come free with the territory, I've just gotten fast and will catch them just in case they become a future currency. LOL
JB
 
OP
J

jbmatth

Well-known member
Joined
Jun 3, 2013
Messages
5,681
Location
Northern Ok.
I didn't really get much accomplished this weekend for some reason. I also didn't take pictures like I'd imagined in my head. Oh senility. I did manage to install the RPV in Herb's Hearse. It decided it didn't want to work and leaked like a sieve, removed it re-flared the ends and had to make a new tube or two. Installed it and started to bleed the brakes when I realized the vacuum bleeder will not work with the RPV. :(

I stole some of the parts from the vacuum bleeder and used a clean bottle to begin the bleeding process. Two rounds around and the brakes are firm...on the second push of the pedal. I guess that means I have more bleeding to do but I was just tired of it so I took a break from the brakes. :dunno:

On Sunday Andy (OldIronFarmer or OIF) came by with his transit to shoot elevations for some drainage work he has volunteered to help me with. Once again no real pictures as I'm failing miserably recently. Here is what we came up with:
attachment.php


In my very armature opinion it doesn't look like it'll take a huge amount of dirt work especially if he and Bob the Bobcat are doing all of the heavy lifting.

I enjoyed getting to see him again and discuss all of the plans and future problem solving I'll run into as time goes on. He also taught me about transits and shooting elevations which I've never done before. He tried to talk me out of a few of my pieces of equipment like the sheer but I couldn't let it go. :evil:

I would be willing to part with this if he can remove it without damaging the tree:
attachment.php


We looked at it a little closer and he determined it is an International Harvester wheat thrasher. Hopefully that is right but he will let me know if I miss-remembered. I also managed to recycle about 50 pounds of aluminum that he will be able to use in his foundry once fully operational. All in all it was a great visit and we could have talked for hours if time wasn't working against us. Great man I tell you what!
JB
 

Attachments

  • IMG_5598.jpg
    IMG_5598.jpg
    63.9 KB · Views: 742
  • IMG_3380.jpg
    IMG_3380.jpg
    153.8 KB · Views: 748

jp828108

Well-known member
Joined
Jun 28, 2011
Messages
484
Location
Ohio
I didn't really get much accomplished this weekend for some reason. I also didn't take pictures like I'd imagined in my head. Oh senility. I did manage to install the RPV in Herb's Hearse. It decided it didn't want to work and leaked like a sieve, removed it re-flared the ends and had to make a new tube or two. Installed it and started to bleed the brakes when I realized the vacuum bleeder will not work with the RPV. :(

I stole some of the parts from the vacuum bleeder and used a clean bottle to begin the bleeding process. Two rounds around and the brakes are firm...on the second push of the pedal. I guess that means I have more bleeding to do but I was just tired of it so I took a break from the brakes. :dunno:

On Sunday Andy (OldIronFarmer or OIF) came by with his transit to shoot elevations for some drainage work he has volunteered to help me with. Once again no real pictures as I'm failing miserably recently. Here is what we came up with:


In my very armature opinion it doesn't look like it'll take a huge amount of dirt work especially if he and Bob the Bobcat are doing all of the heavy lifting.

I enjoyed getting to see him again and discuss all of the plans and future problem solving I'll run into as time goes on. He also taught me about transits and shooting elevations which I've never done before. He tried to talk me out of a few of my pieces of equipment like the sheer but I couldn't let it go. :evil:

I would be willing to part with this if he can remove it without damaging the tree:


We looked at it a little closer and he determined it is an International Harvester wheat thrasher. Hopefully that is right but he will let me know if I miss-remembered. I also managed to recycle about 50 pounds of aluminum that he will be able to use in his foundry once fully operational. All in all it was a great visit and we could have talked for hours if time wasn't working against us. Great man I tell you what!
JB

I had a great afternoon! Nice shop!

JB that is awesome that you guys are going to be able to get some grading issues figured out. The bobcat doing the heavy lifting makes the project pretty easy.

Thanks for the info on plate vs sheet. I know 16 gauge is really nowhere near plate, but it's pretty stout stuff.

Will be looking forward to see what OldIronFarmer and Bob can accomplish. I need to get over to his thread and catch up on his projects.
 
OP
J

jbmatth

Well-known member
Joined
Jun 3, 2013
Messages
5,681
Location
Northern Ok.
JB that is awesome that you guys are going to be able to get some grading issues figured out. The bobcat doing the heavy lifting makes the project pretty easy.

Thanks for the info on plate vs sheet. I know 16 gauge is really nowhere near plate, but it's pretty stout stuff.

Will be looking forward to see what OldIronFarmer and Bob can accomplish. I need to get over to his thread and catch up on his projects.

I'm pretty excited about it and looking forward to what comes of it once completed. Now just to be safe don't take my word as gospel but that is what I seem to remember one or two drinks ago. :beer:

If you expect to catch up on Andy's thread you may want to get moving, his is longer than my thread and is just over 6 months old now.
:shocking:
JB
 

Grumblebum

Well-known member
Joined
Aug 10, 2015
Messages
1,940
Location
Wollongong Australia
Good to see a long term plan come to fruition, 4 years in the making :)

People don't understand it when I tell them my Dad and I shot levels for the vegetable garden beds :headscrat

GB
 

krcoomer

Well-known member
Joined
Jul 22, 2016
Messages
379
Location
Bluegrass region
Using a transit is a skill that is being replaced by lasers too quickly. I have only done it a couple of times on the dummy end of things (Probably where JB was holding the marking stick), but once I worked with a guy who shot over 100' with less than 1/32" of variance in a footer per water level.
 
OP
J

jbmatth

Well-known member
Joined
Jun 3, 2013
Messages
5,681
Location
Northern Ok.
Good to see a long term plan come to fruition, 4 years in the making :)

People don't understand it when I tell them my Dad and I shot levels for the vegetable garden beds :headscrat

GB

Maybe my afternoon coffee hasn't kicked in yet but I'm not following your mention of a 4 year plan.

If the ground is uneven enough or the garden big enough I could see doing the same thing.

Using a transit is a skill that is being replaced by lasers too quickly. I have only done it a couple of times on the dummy end of things (Probably where JB was holding the marking stick), but once I worked with a guy who shot over 100' with less than 1/32" of variance in a footer per water level.

How did you know which end I was holding? :wtf: That is a very accurate measurement, well done on your part.
JB
 

OutlawDrifter

Well-known member
Joined
Jan 20, 2015
Messages
3,870
Location
KS
We used an ancient transit setup for running our gated pipe and "plastic gut" for gravity irrigation where I grew up in western NE. I have moved a grading rod/stick/ruler many many miles.
 

jp828108

Well-known member
Joined
Jun 28, 2011
Messages
484
Location
Ohio
I'm pretty excited about it and looking forward to what comes of it once completed. Now just to be safe don't take my word as gospel but that is what I seem to remember one or two drinks ago. :beer:

If you expect to catch up on Andy's thread you may want to get moving, his is longer than my thread and is just over 6 months old now.
:shocking:
JB


Sounds like it may be a battle to catch up over on Andy's thread, but the weather has cooled down again this week, so I will have some free evenings.
 

oldironfarmer

Well-known member
Joined
Jun 25, 2016
Messages
6,664
Location
Terlton, Oklahoma
Shooting levels with a transit is really pretty simple. Getting the guy to hold the stick plumb, however, can be a challenge. JB did really well. And this will be an easy job, there is plenty of fall to the NE and nothing apparently in the way of grading a good ditch around the building. We'll see!!
 
OP
J

jbmatth

Well-known member
Joined
Jun 3, 2013
Messages
5,681
Location
Northern Ok.
We used an ancient transit setup for running our gated pipe and "plastic gut" for gravity irrigation where I grew up in western NE. I have moved a grading rod/stick/ruler many many miles.

That is a great place to use a transit, I've never used one before this but can easily see how handy it would be to have one around. Now what was my ebay password again...

Sounds like it may be a battle to catch up over on Andy's thread, but the weather has cooled down again this week, so I will have some free evenings.

Perhaps a battle but well worth the time investment, you will be rewarded with more than you could imagine.

Shooting levels with a transit is really pretty simple. Getting the guy to hold the stick plumb, however, can be a challenge. JB did really well. And this will be an easy job, there is plenty of fall to the NE and nothing apparently in the way of grading a good ditch around the building. We'll see!!

Andy gave me a compliment on a "skill" I have, woo hoo, check another item off the bucket list! Thank you, it took some thought but eventually got the hang of it. Now if the wind were blowing like normal I don't think I would have has as much success.
The year in the old diary you scribbled on is 2013 ;)

I'm smelling what you are stepping in now. I bought that for my wife as a day planner. It was underutilized a bit and is now my scratch pad for when I need to think long and hard about adding and subtracting numbers. :headscrat
JB
 

dlcwent

Member Emeritus
Joined
Feb 24, 2014
Messages
8,427
Location
coastal maine
I'm pretty excited about it and looking forward to what comes of it once completed. Now just to be safe don't take my word as gospel but that is what I seem to remember one or two drinks ago. :beer:

:lol_hitti:lol_hitti:lol_hitti

If you expect to catch up on Andy's thread you may want to get moving, his is longer than my thread and is just over 6 months old now.
:shocking:
JB

Andy has come to the GJ as a good ole Oklahoman tornado would breeze through town. It brings a lot of unknown things along with it. I don't think anyone has had a thread that has ever moved that fast here on the GJ.:dunno:
 
OP
J

jbmatth

Well-known member
Joined
Jun 3, 2013
Messages
5,681
Location
Northern Ok.
There are a few really fast moving threads early on, Tom's Restored 1930's auto shop is one of them. However, I think Andy's is moving much quicker that's for sure.
JB
 

shortykorte

Well-known member
Joined
Sep 1, 2014
Messages
8,034
Location
Tallahassee, Fl
Someone looking for a level and tripod? Ummmm?

They are very handy if you have to people. Around your place, probably quite handy when you need it. Did you hold the rod upside down? A rod man can drive the instrument man crazy if he wants. :eyecrazy:
 
To avoid these ads, REGISTER NOW!
OP
J

jbmatth

Well-known member
Joined
Jun 3, 2013
Messages
5,681
Location
Northern Ok.
Someone looking for a level and tripod? Ummmm?

They are very handy if you have to people. Around your place, probably quite handy when you need it. Did you hold the rod upside down? A rod man can drive the instrument man crazy if he wants. :eyecrazy:

Well then Shorty, if you have one up for grabs I might be a little interested. :) I never thought of holding it upside down but that would have been a fun little trick.

All,
I actually have some updates to make so hold tight and I'll get them put up.
JB
 
OP
J

jbmatth

Well-known member
Joined
Jun 3, 2013
Messages
5,681
Location
Northern Ok.
I managed to get a few things knocked out this weekend but started more projects I hadn't planned on. First off I'm still fighting the brakes on Herb's Hearse and believe the rear brake cylinders are shot. I'm trying to find either a rebuild kit or new units so more to come eventually. I did start checking over the lights as only one headlight would come on with the high beams and nothing on low beams, and only one brake light worked. I pulled out the multi-meter and to my surprise everything was getting power that was supposed to. :rocker: 
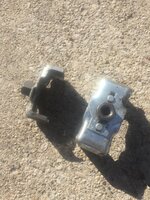
Here is a picture of the wiring, it is in great shape:
View media item 68776
Here is one of the head lights, I think it might even be original to the car :scared:
View media item 68775
I then decided to pull the Green Dragon in and clean a few things in preparation for some tuneup parts. I have new plugs and wires on the way along with new mounts for the engine and trans. I used some seafoam on the intake to see if I could clean some of the junk out of it. I've heard stories of lots of smoke and they weren't joking. WOW I decided to pull the throttle body and clean it as I'm sure it has never been cleaned before, glad I did:
View media item 68772
After about a can of carb cleaner it is much better now:
View media item 68773
Before I installed it I decided to look into the intake and was shocked!
View media item 68774
The log portion is about 1/3 of the way full of that junk. :scared::scared::scared: That will have to wait for another day as I needed the car back together to use.

Next on the list my father-in-law asked me to help out with his truck. The transmission was slipping and I wasn't comfortable rebuilding a trans for someone else so he bought a truck just for parts:
View media item 68771
I pulled his truck in to begin the work:
View media item 68769
Trans pan told me all I needed to know:
View media item 68770
We discussed it and decided that he would give me the red truck for my labor, so now it looks like I need to learn how to rebuild an auto trans. :sad:

Needless to say my shop is packed, I have 4 vehicles and a tractor and too many other things taking up lots of space. I'll have to pull the '57 out so I can have both truck in at the same time to do the work properly.
Keep moving forward,
JB
 

oldironfarmer

Well-known member
Joined
Jun 25, 2016
Messages
6,664
Location
Terlton, Oklahoma
Funny how having a shop can get you busy doing things for others. It's rewarding. If you don't have a good transmission supply house in Wichita try Lester's Gear and Automatic Parts in Tulsa. Nice guys and they have all the parts including good books. When I fixed the TH350 in my 73 Chevy pickup it cost me $20 for a book and $27 for low-reverse clutch. That has been a while, but parts are relatively cheap.

Good luck!
 

oldironfarmer

Well-known member
Joined
Jun 25, 2016
Messages
6,664
Location
Terlton, Oklahoma
JB, a picture speaks a thousand words, that transmission is past its used by date.

As for rebuilding an auto that is one thing I do not have the confidence to even touch one..:scared:

Regards

Sounds like you need to get your feet wet. It is, after all, just a machine. Not nearly so complicated, I might add, as that engine you just finished. Learning how one works is half the job, then the pieces all come out and go back together rather easily.
 
OP
J

jbmatth

Well-known member
Joined
Jun 3, 2013
Messages
5,681
Location
Northern Ok.
Funny how having a shop can get you busy doing things for others. It's rewarding. If you don't have a good transmission supply house in Wichita try Lester's Gear and Automatic Parts in Tulsa. Nice guys and they have all the parts including good books. When I fixed the TH350 in my 73 Chevy pickup it cost me $20 for a book and $27 for low-reverse clutch. That has been a while, but parts are relatively cheap.

Good luck!

Thanks for the tip, I may order the book first so I can pull it apart and find what needs replaced so I don't have to buy a "complete master kit" for $175 that doesn't include some parts I would have expected it to include. :headscrat

JB, a picture speaks a thousand words, that transmission is past its used by date.

As for rebuilding an auto that is one thing I do not have the confidence to even touch one..:scared:

Regards

Just as Andy said when it comes down to it is is just a piece of equipment, anyone who can put together an all out race engine can surely rebuild a transmission if they have a guide to go by. I know people have rebuilt them for years when that is the only option and a can do attitude so that is what I'm going for. Now ask me in a month if I still feel the same way. :scared:

Sounds like you need to get your feet wet. It is, after all, just a machine. Not nearly so complicated, I might add, as that engine you just finished. Learning how one works is half the job, then the pieces all come out and go back together rather easily.

Well Andy I did manage to bend a crowbar so surely I can break this too right. :)

All,
I worked on the trans removal again this morning and managed to actually pull the one hard to reach bolt out...and that was it. The last bolt is behind the oil filter and I can't get it off by hand or one of those band tools so I picked up a tool like this:
attachment.php


I'll give it another go in the morning and hope for the best. Also a note, I've used the screwdriver pierced through the housing before and had good success sometimes and other where I really start to wonder if it'll come off. So this time I don't want to get stuck with a filter I still can't remove on someone elses vehicle.
JB
 

Attachments

  • TF76_2.jpg
    TF76_2.jpg
    38.5 KB · Views: 729
Last edited:

OutlawDrifter

Well-known member
Joined
Jan 20, 2015
Messages
3,870
Location
KS
JB, that type of "filter wrench" is awesome, I have a few in my box, covers all of our vehicles.

Automatic transmissions are full of witchcraft, black magic, and voodoo. But as you've stated, with the correct tools and a proper guide, anyone with some mechanical ability should be able to repair/rebuild one. I've never had to take the leap...yet.
 

krcoomer

Well-known member
Joined
Jul 22, 2016
Messages
379
Location
Bluegrass region
Don't forget your old friend YouTube when it comes to figuring out the auto trans. My barber was asking me about the one on his Ram. Transmissions are one thing I have always outsourced due to not having a backup vehicle. I asked him the next time and he said a YouTube video, 2 hours and $20 plus the fluid he knew he needed to change fixed his problem.
 
OP
J

jbmatth

Well-known member
Joined
Jun 3, 2013
Messages
5,681
Location
Northern Ok.
JB, that type of "filter wrench" is awesome, I have a few in my box, covers all of our vehicles.

Automatic transmissions are full of witchcraft, black magic, and voodoo. But as you've stated, with the correct tools and a proper guide, anyone with some mechanical ability should be able to repair/rebuild one. I've never had to take the leap...yet.

Outlaw,
I love those wrenches too and have 2 others that didn't fit, for $3.37 it is something I'll have and won't have to worry about in the future. Auto transmission work is certainly one of if not the most daunting task I've ever had on a vehicle but surely it'll work out between a good book, youtube, and google I'll be able to take a sometimes working trans and turn it into a never working trans. :lol_hitti

Don't forget your old friend YouTube when it comes to figuring out the auto trans. My barber was asking me about the one on his Ram. Transmissions are one thing I have always outsourced due to not having a backup vehicle. I asked him the next time and he said a YouTube video, 2 hours and $20 plus the fluid he knew he needed to change fixed his problem.

Coomer,
I am a YouTube certified mechanic! :thumbup: Glad that was easy enough for him and I hope for similar results.
JB
 

jp828108

Well-known member
Joined
Jun 28, 2011
Messages
484
Location
Ohio
Nice update JB. Making me feel lazy. I enjoyed the weekend and didn't accomplish much. Glad to see you stayed busy and got some work done.
 
OP
J

jbmatth

Well-known member
Joined
Jun 3, 2013
Messages
5,681
Location
Northern Ok.
I am hoping the same for you, but I don't think he had as much **** in his pan though. :dunno:

Coomer,
It'll just need more cleaning and new parts probably, hopefully, maybe, I sure hope so...I'm getting worried again now. Transmission rebuild book is on order.

Nice update JB. Making me feel lazy. I enjoyed the weekend and didn't accomplish much. Glad to see you stayed busy and got some work done.

JP,
Really I only spent about 6 hours total doing all of that and some of that was last week so don't feel lazy, you've accomplished a lot of work at your place over the past couple of years.

I've seen those wrenches but never bought one. Now you've got me wanting a set.:headscrat

Andy,
I will say you should get a few of the common sizes, well worth the money, actually well worth more than they cost. I had a really tough time with this oil filter, probably the hardest one I've ever removed. I installed the wrench, connected it to my 3/8" ratchet then strained pretty hard to turn it. Part of the reason is when it was installed they didn't put oil on the gasket. I was taught to always put a couple of drops of oil on your finger then wipe the oil filter gasket to coat it, it really makes removal much easier!

JB
 
OP
J

jbmatth

Well-known member
Joined
Jun 3, 2013
Messages
5,681
Location
Northern Ok.
All,
Before I could remove any more of the bell-housing to engine bolts in my FIL's Dakota I needed to unbolt the torque converter from the flexplate. In order to do this I had to remove the starter and a dust shield. One of the bolts that holds the starter on is actually a stud with threads on both ends. Of course when I removed it the stud stayed in the bell-housing and I couldn't remove the dust shield. My first thought was to use pliers or vise-grips that would surely destroy some threads, then I remember the double nut method:
View media item 68795
If you aren't familiar this is where you install two nuts and tighten them against each other effectively creating a regular bolt. You then turn the nut that tightens it against the other, in the above picture that is the older looking one. Out it came no problems whatsoever. I then dropped the truck onto some jack stands so I could remove the trans closer to the ground, and out it came with little drama:
View media item 68796
Lifted the truck back up and ready get the trans out of the way, but wanted to show where the trans previously lived:
View media item 68797
Next up is to use the red Dakota to pull the '57 out, push Herb's Hearse forward, roll my FIL's truck forward, drive the red Dakota to the lift, pull that trans, roll that one back out, push my FIL's truck back onto the lift, roll the Herb's Hearse back, push the '57 back inside, replace the trans in my FIL's truck, hope everything works, drive it out, roll Herb's Hearse back onto the lift, roll the '57 back and have room at the front of the shop again to work on replacing the engine and trans mounts on the Greeen Dragon then get back to the brakes on Herb's Hearse. I'm tired just typing all of that, I really need to get some projects completed so I can get some breathing room back in there.
JB
 

krcoomer

Well-known member
Joined
Jul 22, 2016
Messages
379
Location
Bluegrass region
JB: I used to rely on these wrenches for over tightened filters but the diameters have shrunk or the metal in the newer filters is not strong enough for them most of the time now. They work on a cam action and will work with either a 3/8 ratchet or a wrench. Had to use the wrench on the Mazda with the filter on the back of the block to clear the firewall. I have had the unlubricated filter experience and it is fun. (Make sure the old gasket came off). Not that I know anything about that. 161376c798bfb97c4835cf2664d1c248.jpg


Sent from my iPhone using Tapatalk
 

Attachments

  • 161376c798bfb97c4835cf2664d1c248.jpg
    161376c798bfb97c4835cf2664d1c248.jpg
    991.1 KB · Views: 0
OP
J

jbmatth

Well-known member
Joined
Jun 3, 2013
Messages
5,681
Location
Northern Ok.
JB: I used to rely on these wrenches for over tightened filters but the diameters have shrunk or the metal in the newer filters is not strong enough for them most of the time now. They work on a cam action and will work with either a 3/8 ratchet or a wrench. Had to use the wrench on the Mazda with the filter on the back of the block to clear the firewall. I have had the unlubricated filter experience and it is fun. (Make sure the old gasket came off). Not that I know anything about that.


Sent from my iPhone using Tapatalk

Coomer,
Thanks for the info on that tool, I may have to check them out. In hindsight I should have already picked one up but too late now, more on this later. I managed to remove the trans from the red truck without issue, rolled it outside and starting installing it on my FIL's truck. I had little fits here and there but nothing major until I got back to the oil filter again. :scared: The tool I had wouldn't move it and it started to slip then rounded the ridges off. Great I thought, well now to use the screw driver method, nope that didn't work either:
View media item 68942
View media item 68943
I tried to use and air hammer on the little holes but it didn't work, I also pried the gasket area up from the block as best I could. Then finely managed to get it off by peeling the can away and removing the element, and using a punch and hammer off it came. Oops, note to file never tighten one up like that again! So it looks like I'm doing an oil change now too.

JB
 
OP
J

jbmatth

Well-known member
Joined
Jun 3, 2013
Messages
5,681
Location
Northern Ok.
Wow! That is the first time I have ever seen an oil filter that was that stubborn to come off.

I agree, I've only ever had one that I slightly struggled with using a screwdriver, but this one takes the cake. Oh well, Now I know a few more ways on how to remove an oil filter. As well as a few ways on how not to remove one. :mad:

JB
 

BUGTHUG

Well-known member
Joined
Nov 12, 2010
Messages
2,960
Location
Kansas
I'm almost positive you voided the warranty on that!:dunno:
I'm planning on getting with you this week end or whatever day you want, let me know.
 
To avoid these ads, REGISTER NOW!
Top Bottom