To avoid these ads, REGISTER NOW!

The wet garage raise

OP
S

Sparkynutz

Well-known member
Joined
Jul 16, 2017
Messages
409
Location
Wisconsin
Sounds like you have an idea to follow for pouring the walls. I think I might have considered laying block under three walls and then core filling them. The front wall with the O/H door, I'd pour that and carefully tie it together with the old floor/foundation.

When I did the new floor in my garage, I was worried about the water making it's way under the new floor and trying to push it up. If you follow the link in my "Garage Refurb" thread, you can see how I tried to tie it all together and followed it up with an apron to cover it up.
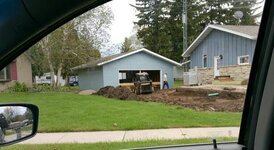
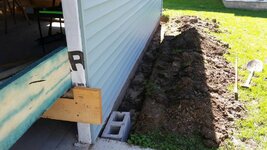
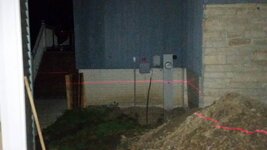
I was initially going to do block but block would be very labor intensive, definitely a huge pain to fill every core with bracing in way for some blocks. Would have been more difficult to install rebar too. Blocks are more porous and probably more likely to crack at joints. Pouring should be much easier and not cost much more. It should be stronger with ability to run a lot of rebar in it and bolts all the way from existing up.
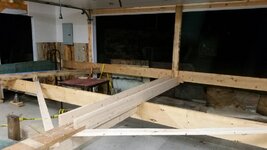
Next year I will be adding an 8x10 garage door on side wall and eventually in a few years a driveway to street on side of my house. I was going to pour slab into door openings and only have top 7 inches of wall 4 inches wide so that slab went wall to wall but that added an immense amount of extra framing to the forms. It would give easier chance for top part of wall to crack or break off if anything settles or shifts and chance for cracks from corner protrusions at doors. My old 1952 garage had frost walls poured 8 inches wide all the way around outside perimeter including doors and slab was poured inside after. It didn't look the greatest but I lived there 15 years and cared more about the cracks in the crappy floor than I did the transition joint from footing to slab. The added strength and ease of forming that way out-weighs the minor cosmetic issue of seeing a joint all the way around. I'll get some good self leveling caulk and ignore it's there.

Sent from my SM-G900V using Tapatalk
 
To avoid these ads, REGISTER NOW!
OP
S

Sparkynutz

Well-known member
Joined
Jul 16, 2017
Messages
409
Location
Wisconsin
Did mostly digging today getting ready for forms around outside of garage and forming up a window well to hold back the 2ft grade raise. I also raised my AC unit 3ft up on blocks and dug all the dirt out under it all the way up to driveway. I'm going to pour a 3ftx9ft slab along house between door and antenna tower. Might look a little wonky some day if I pave to garage but I need to raise AC now and might as well make a spot to store my garbage cans while I'm at it. 6df7687da8bcba295136bb8f29ee60c4.jpg1fe4b2c66923540d3cd73d1c4953374b.jpgec75f3beb631d8050c37bbd8762bf4ea.jpg

Sent from my SM-G900V using Tapatalk
 

Attachments

  • 1fe4b2c66923540d3cd73d1c4953374b.jpg
    1fe4b2c66923540d3cd73d1c4953374b.jpg
    86.5 KB · Views: 6
  • 6df7687da8bcba295136bb8f29ee60c4.jpg
    6df7687da8bcba295136bb8f29ee60c4.jpg
    107.4 KB · Views: 6
  • ec75f3beb631d8050c37bbd8762bf4ea.jpg
    ec75f3beb631d8050c37bbd8762bf4ea.jpg
    110 KB · Views: 7
OP
S

Sparkynutz

Well-known member
Joined
Jul 16, 2017
Messages
409
Location
Wisconsin
I'm trying to decide how to hold the forms against outside of garage slab. Thinking maybe blocks filled with screenings and pull the blocks out when removing forms. My uncle says put 2ft of screenings against ot with stakes but I'm dreading digging that all back out in order to put foundation coating on joint between wall and old slab.

Sent from my SM-G900V using Tapatalk
 

wssix99

Well-known member
Joined
Mar 2, 2011
Messages
5,160
Location
Chicago, IL
I'm trying to decide how to hold the forms against outside of garage slab.

Pound stakes into the ground and then use wedges as shims to push the form away from the stake and keep it tight to the slab. When you are done, knock the wedges out and it all falls apart.
 
OP
S

Sparkynutz

Well-known member
Joined
Jul 16, 2017
Messages
409
Location
Wisconsin
I am pretty sure my cement guy is going to be a no show from his text today. Now it's going to be a mad scramble trying to get everything done and new guy lined up. I have vacation next week and a big project following 2-3 weeks at work so pushing back 1 week isn't possible if I want to have the majority of it done and cleaned up before cold weather hits. My friend that would have helped has to work overtime most of next week so he can't help now either.
It's nice the economy is doing well but I swear it just results in more contractors doing shoddy work or backing out not being able to count on them because there's so much work available they don't bat an eye. Can only count on 3 things in life. Death, taxes, and if you want something done right do it yourself.

Sent from my SM-G900V using Tapatalk
 

lakeroadster

Well-known member
Joined
Jan 19, 2015
Messages
5,166
Location
Central Colorado
and if you want something done right do it yourself.

Agreed.

Seems the same way, nationwide :headscrat

Call the concrete mix plant, tell them your story, ask them to help you pick out a reputable flatwork guy. Or better yet, go there in person, and take some photo's. I am betting you'll be glad you did.
 
OP
S

Sparkynutz

Well-known member
Joined
Jul 16, 2017
Messages
409
Location
Wisconsin
I was up till 1am last night after work with laser level and tape measure. I wrote down about 20 spots in my yard elevation in relation to the base of fire pit in center of back yard. I was way off on my string and level measuring. The slab on side of garage is a full 30 inches higher than my current detatched garage slab. See pics of laser lines 24 inches above current slab. Way to high to be raising dirt and still have a useable basement window. After talking it over with the wife we will put a retaining wall corner of garage to corner of house at 24 inch red line mark with steps down to the back yard. The window well will be retaining wall block 12 inches higher than existing and slope down to current grade at sidewalk by deck. I will put some steps up into garage man door and only raise grade around the rest of the garage 12 inches or so except front where garage door is will be a full 24 inches higher.
Next year or year after I'd like to widen driveway to the detatched garage and lower it 8-10 inches than it currently is with a gradual slope from detatched garage to the road. Where both driveways meet at different elevations near attatched garage I'd like to put a sloped curb like pic.
This morning I got all remaining bracing complete. Extra 4" screws installed into wall boards and metal jack plates installed at bottom of beams.
I work 12 hours next two days and won't get much done. I do plan on a test lift maybe 3 inches or so tomorrow morning and I'll place a pair of 2x6 under sill plate in corners to see how bad things flex once up. I lined up a new concrete guy that said he can pour beginning of following week. Not while I'm on vacation but that will give me enough time to get everything squared away on end beforehand. 4c69b0f110c667aab58641c67123cccc.jpge31380f1e6e02c35f9ed0d1a0c6d4764.jpgb69d81acf9896b6d7864a7388681f301.jpgfe11d61641124c34d56cbcd3eab4e79f.jpg781bcd7a7d6d567867cfbfb28667caeb.jpg

Sent from my SM-G900V using Tapatalk
 

Attachments

  • fe11d61641124c34d56cbcd3eab4e79f.jpg
    fe11d61641124c34d56cbcd3eab4e79f.jpg
    58.6 KB · Views: 10
  • b69d81acf9896b6d7864a7388681f301.jpg
    b69d81acf9896b6d7864a7388681f301.jpg
    63.7 KB · Views: 10
  • 781bcd7a7d6d567867cfbfb28667caeb.jpg
    781bcd7a7d6d567867cfbfb28667caeb.jpg
    21.4 KB · Views: 12
  • 4c69b0f110c667aab58641c67123cccc.jpg
    4c69b0f110c667aab58641c67123cccc.jpg
    64.8 KB · Views: 10
  • e31380f1e6e02c35f9ed0d1a0c6d4764.jpg
    e31380f1e6e02c35f9ed0d1a0c6d4764.jpg
    63.3 KB · Views: 8

Vintage Veloce

Well-known member
Joined
Feb 27, 2015
Messages
1,076
Location
San Diego
Be sure your laser level actually works right. I had some real trouble with that.

I had one that if you pointed it straight at a wall, would draw a level horizontal line on the wall. But the line on the wall was higher than the unit! So if you aimed it at the wall from an angle, the line would no longer would be level.
If you aren't confident in the level, I recommend a few quick tests. (I can describe them if you want, or invent your own).

I did a bunch of work like you are doing with a water level (water in a tube). That was a drag, but worked too.

It's hard to get it right, but worth all the effort before you pour the concrete!
 
OP
S

Sparkynutz

Well-known member
Joined
Jul 16, 2017
Messages
409
Location
Wisconsin
I actually did use a water level when I came up with driveway 22 inches higher and sidewalk 9 inches higher. It was a pain in the **** and honestly doesn't matter which one was correct. Garage is going up 24 inches either way. Grade can be changed easily after the fact. Laser level is a better auto leveling unit with pretty good reviews. I used it to shoot lines all the way around garage walls to mount LVLs level. After getting back around to starting point it was still off by less than my marker thickness. Good enough for me anyways.
Concrete guy can check my forms once I get them up with his level and compare. That's the only thing that really matters and needs to be level.

Sent from my SM-G900V using Tapatalk
 
OP
S

Sparkynutz

Well-known member
Joined
Jul 16, 2017
Messages
409
Location
Wisconsin
I'll be starting forms soon and realized I'd need an insane amount of lumber to build them like a regular 16" on center wall with plywood on one side. Curious if I can get away with less wood and just put 3 runners length ways and use stakes every 24" or so with angled braces every 4ft. Would be nice to build everything ahead of time but would most likely be quicker and less lumber building as needed in location.

Sent from my SM-G900V using Tapatalk
 

Vintage Veloce

Well-known member
Joined
Feb 27, 2015
Messages
1,076
Location
San Diego
You might be able to rent forms or other parts, like the stakes. But I think the forming costs are part of the reason some guys sub it all out...
 
OP
S

Sparkynutz

Well-known member
Joined
Jul 16, 2017
Messages
409
Location
Wisconsin
Went over my form idea with my uncle and he suggested that not be an area to skimp on. 16" on center it is with double top plate.
Time to buy more wood.

Sent from my SM-G900V using Tapatalk
 
OP
S

Sparkynutz

Well-known member
Joined
Jul 16, 2017
Messages
409
Location
Wisconsin
Had a very productive day. Picked up my uncle and his skid loader but ground was too wet from 3 days of rain to get any dirt moved so we set up table saw and cut all the forms and all short 2x6's. Realized I was really short on wood so took another trip to Menards and got $600 in lumber and enough retaining block for 3 courses around my basement window. It got dark pretty early and I'm usually at work until midnight so I started working in garage. I made sure all bolts were off and had enough random cribbing to jack up the garage 3 inches. It went right up no problems at all. Soffet made a little noise but relatively quiet raise so far. I went up an inch and a half on one side then up 3 inches other side followed by another inch and a half original side. Looks cool from outside with ground all lit up. Tomorrow is a busy day. I'm hoping ground is dry enough to move some of the dirt and try and get someone to deliver a load of screenings to put at bottom of window well and under ac unit. My uncle is coming over in the afternoon to help work on forms and bring his saw to work on the retaining blocks.

Sent from my SM-G900V using Tapatalk
 

Bib Overalls

Well-known member
Joined
Dec 4, 2006
Messages
3,318
Location
Jonesboro, Arkansas
There is a house down the road from me with a sizeable out building that is not close to square with the mane structure. Drives my military mind crazy every time I see it. Your detached garage is the same sort of thing. It would have been easy, abet more expensive, to get the site right before erection but I doubt if the builders had any idea how dysfunctional the result would be. Good to see you are making yours right. Will you be finishing out the inside next?
 
OP
S

Sparkynutz

Well-known member
Joined
Jul 16, 2017
Messages
409
Location
Wisconsin
Definitely finishing inside when time and funds allow. The lot is goofy rounded triangle corner lot and house was built too far in back corner. The front and side yard are huge and wasteful. Backyard was small and now garage is cramped at the only angle that would allow lot line set backs at the size builder wanted.

Today was so so. I did a lot of digging. The ground was still too wet but luckily dried just enough by afternoon that when my uncle got done with work he was able to dig out half of the black dirt in front of garage and move the underlying clay up to garage so that any water seeping through the gravel installed still drains away from the garage. I really wish I hadn't dug all the dirt out around window because it's too narrow for bobcat to fit between house and garage without falling in the hole. We had to put all of the dirt next to driveway for now and any dirt for back yard will have to be hauled all the way around the house one bucket at a time. We had a gas leak on the bobcat and stopped to try find where then couldn't get it started again. Battery was dropping voltage bad and didn't seem to take a charge. Now I have to run and get a battery so we can finish tomorrow. I hope it doesn't rain. I jacked up the garage another 2 inches and the front is sagging almost 2 inches lower than the rest and my brace is bent badly. I'm not sure how to reinforce it but I'll try something tomorrow. For now I raised it up a little extra and put some blocks under sill plate next to garage door sill and let back down. I got all the wood for forms and blocks for retaining wall but with two major projects going on locally the quarry is out of screenings. Kinda bites cuz that's what I wanted to use as base under the retaining wall blocks.
Also scrounging up random wood for cribbing isn't going to cut it for lifting and I'm starting to think cement blocks aren't the way to go so one more trip to Menards for another $400 in wood. This project sure is getting expensive and way more labor intensive than I realized.
5eba8a78127e383e5fcfdc4333537aea.jpg

Sent from my SM-G900V using Tapatalk
 

Attachments

  • 5eba8a78127e383e5fcfdc4333537aea.jpg
    5eba8a78127e383e5fcfdc4333537aea.jpg
    107.5 KB · Views: 7

Platonic Solid

Well-known member
Joined
Nov 29, 2014
Messages
3,587
Location
CT-USA
My shed/garage is half your size and my lifting frame is starting to bow. I have 6 contact/lifting points. Front and rear are sistered PT 2x8s, middle is PT 4x6. It's been airborn for 10 days now.

I feel your pain. As with any construction project, what you lack in time you make up for in money. What you lack in money you make up for in time. Then add work and weather and contractors with crews start looking real appealing.
 
OP
S

Sparkynutz

Well-known member
Joined
Jul 16, 2017
Messages
409
Location
Wisconsin
How long did it take before stuff started to bow? I got almost no sleep last night and so stressed I could puke. The front 2x10 across garage door is bowed and brace looks like it's ready to snap. I think I'm going to let it back down until I have a better plan and cribbing figured out. Even if that means wait till spring. I don't want to but risk of life and garage just isn't worth it.

Sent from my SM-G900V using Tapatalk
 

Platonic Solid

Well-known member
Joined
Nov 29, 2014
Messages
3,587
Location
CT-USA
Hard to say how long it took. There was an initial slight bow, but it is steadily getting worse to the point now where I'm thinking I'll soon have to put a temporary jack post in and install extra bracing. Nothing is happening as fast as I need it to and available daylight is getting less everyday.
 

wssix99

Well-known member
Joined
Mar 2, 2011
Messages
5,160
Location
Chicago, IL
I think I'm going to let it back down until I have a better plan and cribbing figured out.

Where are your jacking points? Your two walls perpendicular to your garage door wall are going to have much more load on them because they carry the roof load transferred from the trusses. The garage door wall and back wall will only have the weight of those two walls on them. (So, if you are trying to lift the garage primarily on the door and back wall braces, you'll get in to a ton of trouble.)

I would think the best thing to do would be to have your door wall braces transfer their loads to the braces on the long load bearing walls and then lift from four points at each end of the long load bearing walls. (The garage door brace should have easy duty - that's the lightest wall. It's also the weakest wall, so you don't want to lift with it!)
 
Last edited:
To avoid these ads, REGISTER NOW!

spudley

Well-known member
Joined
Dec 27, 2016
Messages
702
Location
Northeast Wisconsin
I could kick myself around the block for not taking pictures but I moved a 14 x 24 heavy, (hardboard sided, full 1x sheathing sidewalls and roof, five windows) across the street on a 16' utility trailer and left it sit for nearly 10 weeks. For primary lifting, I used 8-PT 2x8x14' that "sandwiched" the wall studs every 4'. I also built ladders out of 2x4's extended out the back of the trailer to pickup some back wall load.
Without a slab poured, those 2x8's were screaming for relief after about two weeks sitting on that trailer so I jacked up the sides a bit, taking a little pressure off those 2x8's and built some sidewall supports out of additional 2x4's to take away a little strain.
I have since moved the garage to it's new home on a new slab. All is good and well worth the effort.
You guys are doing fine, just add a little more support.
Next spring the bent 2x8's will be cut down and used for a new dock...crown side up!:)
 
OP
S

Sparkynutz

Well-known member
Joined
Jul 16, 2017
Messages
409
Location
Wisconsin
Where are your jacking points? Your two walls perpendicular to your garage door wall are going to have much more load on them because they carry the roof load transferred from the trusses. The garage door wall and back wall will only have the weight of those two walls on them. (So, if you are trying to lift the garage primarily on the door and back wall braces, you'll get in to a ton of trouble.)

I would think the best thing to do would be to have your door wall braces transfer their loads to the braces on the long load bearing walls and then lift from four points at each end of the long load bearing walls. (The garage door brace should have easy duty - that's the lightest wall. It's also the weakest wall, so you don't want to lift with it!)
My jacking points are sidewalls. The bowing boards were from my center bracing to the end walls. Today I stacked a pair of 12ft 2x10's on each side of the bowing board after jacking up enough and standing on them to get it screwed on straight. Screws will fail before it bows again. I had a very productive day. 7.5 yards of screenings hauled to piles around garage to put pressure on concrete forms when installed. 3 quad axle loads of gravel and my uncle running skid loader all placed in driveway. Ac unit back down and level on original cement pad. After garage is raised we'll have to regrade and push a lot of the gravel up to new wall but for now I left about a couple feet to get forms mounted. Definitely going to be a pain getting stuff in and out of garage for a while. It started to rain pretty hard just as we finished up and it's supposed to rain again tomorrow. I'm glad driveway is done before it turned into a muddy soup hole. A couple before pics. I'll post pics of driveway tomorrow if it's not raining. 40dc9faa204b018ae9a449ec089a2076.jpg53de997d5018e176db1e2119f9baea25.jpg3531e45bfff2fd15ccadac1a54f2fb74.jpg

Sent from my SM-G900V using Tapatalk
 

Attachments

  • 40dc9faa204b018ae9a449ec089a2076.jpg
    40dc9faa204b018ae9a449ec089a2076.jpg
    129.4 KB · Views: 7
  • 53de997d5018e176db1e2119f9baea25.jpg
    53de997d5018e176db1e2119f9baea25.jpg
    97.5 KB · Views: 5
  • 3531e45bfff2fd15ccadac1a54f2fb74.jpg
    3531e45bfff2fd15ccadac1a54f2fb74.jpg
    132.4 KB · Views: 5
OP
S

Sparkynutz

Well-known member
Joined
Jul 16, 2017
Messages
409
Location
Wisconsin
Here's two pics my wife had of driveway before we filled it in. We removed all the black dirt and dug a big hole even with the green pvc downspout. Kinda like a dry well and put all the clay up by garage sloped down to the hole so that any infiltrated water runs away from garage instead of towards it like it did before.
Also a link to a video of my initial bracing before I added a few things which will be in my next video.
Today I also jacked it up a little more and set garage directly on 12 oak 4x6's under sill plate until I figure out what to do for cribbing. I'm still trying to find someone to rent from to avoid cutting up $800+ of treated 4x6 lumber instead of using cement blocks.

e5012e59a611dcd651edb5f402defe89.jpg3e6fd09c13d5b48fee4e6000f74a305c.jpg

Sent from my SM-G900V using Tapatalk
 

Attachments

  • 3e6fd09c13d5b48fee4e6000f74a305c.jpg
    3e6fd09c13d5b48fee4e6000f74a305c.jpg
    73.4 KB · Views: 6
  • e5012e59a611dcd651edb5f402defe89.jpg
    e5012e59a611dcd651edb5f402defe89.jpg
    58.6 KB · Views: 6
OP
S

Sparkynutz

Well-known member
Joined
Jul 16, 2017
Messages
409
Location
Wisconsin
How are you transferring the load of the short walls on to the sidewalls if the sidewall supports don't bear on top of your sidewall beams? (That could be causing some odd stresses.)
I don't follow you. The garage is square 26x26. No short walls. Watch my video of bracing hopefully that answers your question.

Sent from my SM-G900V using Tapatalk
 

Platonic Solid

Well-known member
Joined
Nov 29, 2014
Messages
3,587
Location
CT-USA
How are you transferring the load of the short walls on to the sidewalls if the sidewall supports don't bear on top of your sidewall beams? (That could be causing some odd stresses.)
Good point, same issue for the back wall. The supports on front and back walls aren't actually doing anything.

ee6996ddab7c9ffeb47a45ae51affe96.jpg
 

Attachments

  • ee6996ddab7c9ffeb47a45ae51affe96.jpg
    ee6996ddab7c9ffeb47a45ae51affe96.jpg
    55.2 KB · Views: 5
Last edited:
OP
S

Sparkynutz

Well-known member
Joined
Jul 16, 2017
Messages
409
Location
Wisconsin
I would assume center brace would carry some load of front and back wall as well as L brace in each corner. What would you suggest adding?64c2e02df3613fc2418485649cca4707.jpg4bd88a5147b1d9fafa3f565f5624121f.jpg23ea6ecb2a4c3d534a20215a230eccae.jpg

Sent from my SM-G900V using Tapatalk
 

Attachments

  • 64c2e02df3613fc2418485649cca4707.jpg
    64c2e02df3613fc2418485649cca4707.jpg
    60.7 KB · Views: 6
  • 4bd88a5147b1d9fafa3f565f5624121f.jpg
    4bd88a5147b1d9fafa3f565f5624121f.jpg
    66 KB · Views: 5
  • 23ea6ecb2a4c3d534a20215a230eccae.jpg
    23ea6ecb2a4c3d534a20215a230eccae.jpg
    59.1 KB · Views: 6

Platonic Solid

Well-known member
Joined
Nov 29, 2014
Messages
3,587
Location
CT-USA
The front and rear beams should be resting on top of the side beams. Not sure how to accomplish that at this stage.

Edit - I would find a way to structurally connect the front and rear beams to the side beams at the corners.
 
Last edited:
OP
S

Sparkynutz

Well-known member
Joined
Jul 16, 2017
Messages
409
Location
Wisconsin
There is bracing in the rafters and all the roof sheeting. Is it wrong of me to assume that would carry the end wall load the same way it is already built to take snow load of the 2ft overhang?

Sent from my SM-G900V using Tapatalk
 

Platonic Solid

Well-known member
Joined
Nov 29, 2014
Messages
3,587
Location
CT-USA
There is bracing in the rafters and all the roof sheeting. Is it wrong of me to assume that would carry the end wall load the same way it is already built to take snow load of the 2ft overhang?

Sent from my SM-G900V using Tapatalk
That's all downward force and you're lifting up, which means the front and rear will want to sag down, Though not really much to worry about in front.

How about this: If your lucky and the dimensions work out I would sister boards to both LVL and rear beam such that they both attach to the same garage framing studs.

Edit - You could also maybe sister boards to front beam and attach to same garage stud as end of blue LVL beam.
 
Last edited:
OP
S

Sparkynutz

Well-known member
Joined
Jul 16, 2017
Messages
409
Location
Wisconsin
railroad ties, etc would work fine for cribbing.
Thought that too but then there's cutting them and they aren't even close to uniform thickness with cracks like crazy. I bought a bunch of 8x8 and 10x10 barn beams I cut 3-4' with my chainsaw but nothing over 6 inches fits in planer.

Sent from my SM-G900V using Tapatalk
 
OP
S

Sparkynutz

Well-known member
Joined
Jul 16, 2017
Messages
409
Location
Wisconsin
That's all downward force and you're lifting up, which means the front and rear will want to sag down, Though not really much to worry about in front.

How about this: If your lucky and the dimensions work out I would sister boards to both LVL and rear beam such that they both attach to the same garage framing studs.

Edit - You could also maybe sister boards to front beam and attach to same garage stud as end of blue LVL beam.
Might be easier to just get 2 more jacks and jack under the middle of end walls. I oy plan on going up .75" maybe 1.5" per side max per round of lifts and trying to keep my plumb bobs centered on original x I marked with them on the floor before lifting.

Raising it up shouldn't be too much problem. Keeping it up for weeks safely on the other hand. I need some type of cribbing in the uneven soggy messed up yard if I put 4x6's under the sills 2-3 per wall while I build, install forms and pour concrete. My other idea is put an accessory crib stack in each corner and run a 4x6 or two between on each adjoining corner sills. Supported by a single crib. Pouring into corner is going to be impossible then and will have to be shoveled in from outside them more than likely. Rain tomorrow. Remove power and downspouts then lift thursday.

Sent from my SM-G900V using Tapatalk
 
OP
S

Sparkynutz

Well-known member
Joined
Jul 16, 2017
Messages
409
Location
Wisconsin
New thought. Scrapping the idea of concrete walls. Too dangerous with my questionable bracing working under it if something fails even if I add more bracing outside each corner. Garage is currently supported in 11 places around garage sill by oak 4x6's 2-3 ft long and seems solid as a rock.
It would definitely be safer if I had multiple cribs under sill like this and do partial block wall where the cribs aren't and keep working my way up setting on top of already done blocks with cribbing on top. ***** all my plywood and 2x6's are already cut for forms but now I can use the 2x6 for cribbing and plywood for lots and lots of garage cabinets.

Sent from my SM-G900V using Tapatalk
 

wssix99

Well-known member
Joined
Mar 2, 2011
Messages
5,160
Location
Chicago, IL
I don't follow you. The garage is square 26x26. No short walls.

When I said short walls, I meant your front and back (non-load bearing) walls.


The front and rear beams should be resting on top of the side beams. Not sure how to accomplish that at this stage.

Correct.


There is bracing in the rafters and all the roof sheeting. Is it wrong of me to assume that would carry the end wall load the same way it is already built to take snow load of the 2ft overhang?

Yea. The structure is built for snow and other loads acting down on the structure, into the walls, and down into the foundation. When you lift the structure up with this bracing configuration, you are asking the ceiling assembly to carry the weight of some of the walls hanging down from it, which it was not designed to do. It will bend and wave under the stresses.


New thought. Scrapping the idea of concrete walls. Too dangerous with my questionable bracing working under it if something fails even if I add more bracing outside each corner.

What are you going to do for the walls, then? Could you lower the structure, redo the bracing, so the loads are carried more favorably, and then re-jack it? If you can get the loads of the front and back walls to rest on top of the side wall braces, which are near your jacking points; everything should be steady and strong.
 

Lunker

Well-known member
Joined
Feb 6, 2012
Messages
350
Am I correct that your essentially going to raise it then block walls. Run gravel and dirt to fill then pour a new floor.

Why would doing block be more safer than forming and doing a pour?
 
OP
S

Sparkynutz

Well-known member
Joined
Jul 16, 2017
Messages
409
Location
Wisconsin
Am I correct that your essentially going to raise it then block walls. Run gravel and dirt to fill then pour a new floor.

Why would doing block be more safer than forming and doing a pour?
Because I can support under the sill in multiple places while doing block. With poured wall I can't support within 6 inches of each wall because forms would be there and I don't trust only having my beams support entire structure for weeks installing forms, pouring walls, and waiting for them to cure enough to set back down.
We had a couple inches of rain last night and this morning and there's standing water in the skid loader ruts next to garage. I st supposed to rain friday, Saturday and Sunday now and the ground is already mushy. There is no way I'd trust cribbing on the ground outside the garage to not sink into the mud with all that rain. Even with a bunch of gravel down first all that extra work just isn't worth taking that chance. If it starts to tip I won't be able to do anything about it next week I'm back to work. I just need to try and find a block layer and figure out how to utilize the rebar somehow yet. I have yet to find a YouTube video that shows rebar horizontal between courses and I've only seen one with some kind of wire mesh. I'm not sure where to buy something like that tho.
With all the rain hopefully I can find someone slow that can come lay block. Should be dry ish and under the garage roof to lay even if it does rain.

Sent from my SM-G900V using Tapatalk
 
OP
S

Sparkynutz

Well-known member
Joined
Jul 16, 2017
Messages
409
Location
Wisconsin
I would like to do 3 courses of 8 inch block and one course of 4 inch block where walls are. Set down on 4x4s on top of built wall then fill and compact with gravel and pour a new slab. The extra space will allow easier finishing near walls and under garage door track. I'll have to frame up the outside of garage doors to pour all the way out but shouldn't be too hard and I have plenty of plywood and 2x6's to do that.

Sent from my SM-G900V using Tapatalk
 

spudley

Well-known member
Joined
Dec 27, 2016
Messages
702
Location
Northeast Wisconsin
I would like to do 3 courses of 8 inch block and one course of 4 inch block where walls are. Set down on 4x4s on top of built wall then fill and compact with gravel and pour a new slab. The extra space will allow easier finishing near walls and under garage door track. I'll have to frame up the outside of garage doors to pour all the way out but shouldn't be too hard and I have plenty of plywood and 2x6's to do that.

Sent from my SM-G900V using Tapatalk
On the garage I moved, I planned on doing what you suggest, as my garage had a 2 course block wall originally. However I was able to pour a fresh slab, slightly oversized to allow for misalignment, before I moved my garage on it. So after waiting for the slab to cure for four weeks, I placed the garage on it. My buddy talked me out of concrete blocks and instead of block, I used PT built 2'- 2X6" stem walls.
I think using block in your application would work. How thick is the concrete under the existing sidewalls?
 
To avoid these ads, REGISTER NOW!
Top Bottom