Dick in Wisconsin
Well-known member
Just found this tonight. I'll share with you what we did.
Where the 1000sf race shop was built, we had a 14x20 detached garage on a slab. I offered to a neighbor who agreed to take "take it". Another neighbor was the contractor on the race shop, another neighbor has a rock crawler that he hauls on a very heavy duty two axle steel trailer.
Contractor had a concrete guy come and measure the garage foot print who then poured a concrete pad where the garage would be moved with bolts in the pad to fasten garage to.
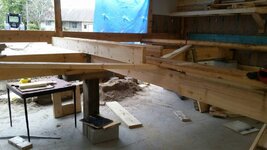
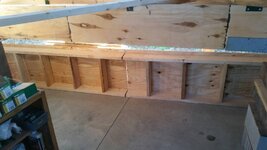
On the morning of the move (we were out of town) all the neighbors got together, sandwiched pairs of 2x12s on three or four sets of studs on opposite walls just high enough for the trailer to slide under. They used LOTS of diagonal cross bracing. Then they released the bolts holding the sill plates to the original slab, used a reciprocating saw to "release" the sill plates from the slab. Then they used bottle jacks to slowly jacked up the pairs of 2x12s until the garage was up off the slab a reasonable amount (I think they said 18"). They cribbed the 2x12's to the trailer bed and used ratchet straps to "fasten the garage to the trailer."
The trailer was hooked to the contractor's 3/4 ton P/U. They slowly went up our driveway, drove onto our town road and headed to Donnie's driveway. They had a guy on the roof spotting for low hanging wires, they said plenty of clearance.
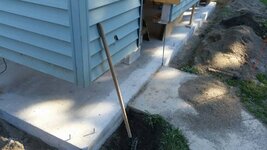
Everything went fine until they got to the end of Donnie's driveway where the new slab was. Slab was about eight feet from the driveway and they had to build a bridge to get the trailer axles to the new slab. They set the garage down, drilled holes for the bolts, it was a perfect fit.
Then they declared, IT'S MILLER TIME!
Unless the OP is too far into his deal, considering moving the garage away from the existing slab (up onto the driveway should be enough), build your raised slab, and back the garage back down onto the raised slab. I would think it will be easier to build the raised slab without having the raised up garage over the slab.
Keep us posted.
BTW ... where in Wisconsin are you?
Where the 1000sf race shop was built, we had a 14x20 detached garage on a slab. I offered to a neighbor who agreed to take "take it". Another neighbor was the contractor on the race shop, another neighbor has a rock crawler that he hauls on a very heavy duty two axle steel trailer.
Contractor had a concrete guy come and measure the garage foot print who then poured a concrete pad where the garage would be moved with bolts in the pad to fasten garage to.
On the morning of the move (we were out of town) all the neighbors got together, sandwiched pairs of 2x12s on three or four sets of studs on opposite walls just high enough for the trailer to slide under. They used LOTS of diagonal cross bracing. Then they released the bolts holding the sill plates to the original slab, used a reciprocating saw to "release" the sill plates from the slab. Then they used bottle jacks to slowly jacked up the pairs of 2x12s until the garage was up off the slab a reasonable amount (I think they said 18"). They cribbed the 2x12's to the trailer bed and used ratchet straps to "fasten the garage to the trailer."
The trailer was hooked to the contractor's 3/4 ton P/U. They slowly went up our driveway, drove onto our town road and headed to Donnie's driveway. They had a guy on the roof spotting for low hanging wires, they said plenty of clearance.
Everything went fine until they got to the end of Donnie's driveway where the new slab was. Slab was about eight feet from the driveway and they had to build a bridge to get the trailer axles to the new slab. They set the garage down, drilled holes for the bolts, it was a perfect fit.
Then they declared, IT'S MILLER TIME!
Unless the OP is too far into his deal, considering moving the garage away from the existing slab (up onto the driveway should be enough), build your raised slab, and back the garage back down onto the raised slab. I would think it will be easier to build the raised slab without having the raised up garage over the slab.
Keep us posted.
BTW ... where in Wisconsin are you?