AMCguy
Well-known member
This could be the ultimate welding table, or it could end up being very average.
Either way it will be the culmination of many days of viewing the welding table threads here on the Garage Journal, surfing the web, lying in bed at night thinking and struggling in my garage without a proper one. I have seen some cool ideas here and come up with a few good ones of my own, so if this is a success some of you can take partial credit for it.
First Picture;
Here is my main inspiration. It's a crappy class room or office table I got from a neighbor's garage sale about ten years ago. It's 30''x60'' and it's 30'' tall. The top is warped, the legs are wiggly and its rusty, but the size is ideal for what I want to do. I have used it a lot and also cursed it a lot.
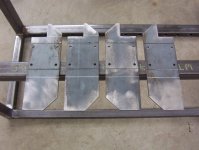
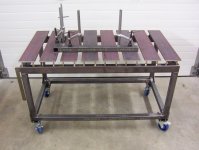
I wanted a top I could could clamp to anywhere on its surface. So this one will have a grid of eight 6''x1/2'' flat bar planks 30'' long. They will be spaced 1 1/2'' apart. Much like the Strong Hand fab table that costs more than I make in a year.
Second Picture;
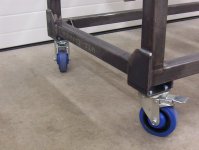
So here we go. I cut all my metal. Got some good casters that lock solid both ways.
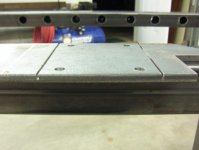
I started by drilling all the holes to mount the top. Each plank will sit on a set of four 1/2''x2 1/2'' fine thread jacking bolts. There will be one near the corner of each plank. This way I can adjust them individually, have them all dead even or I can remove one or more if I need to. There will be a 1/2'' hole in the top flange of the 3''x2'' top rail for each bolt and a pair of nuts will sandwich the flange to hold the bolt into place. A corresponding 1 1/8'' hole in the bottom so I can get a socket on the bottom nut.
Third Picture;
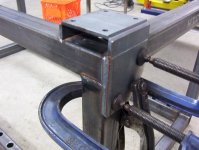
Here is the hole sawing operation. I consumed a cheap Canadian Tire hole saw. I hope I can use it for an Exchange a Blade hole saw.
I actually screwed up here. I forgot that the end hole wasn't needed. I can get to the bottom nut from the opening in the end of the tube and the upright attaches where the hole shouldn't be. I had to weld the holes shut because I didn't want debris to find its way in.
Fourth Picture;
Here is the side ready to weld. It could be the front or the back as the two are identical. It's hard to get set up for welding together a welding table when you don't have a proper welding table to do it on.
The welding will have to wait until tomorrow. It was getting late at this point. More to follow.
Either way it will be the culmination of many days of viewing the welding table threads here on the Garage Journal, surfing the web, lying in bed at night thinking and struggling in my garage without a proper one. I have seen some cool ideas here and come up with a few good ones of my own, so if this is a success some of you can take partial credit for it.
First Picture;
Here is my main inspiration. It's a crappy class room or office table I got from a neighbor's garage sale about ten years ago. It's 30''x60'' and it's 30'' tall. The top is warped, the legs are wiggly and its rusty, but the size is ideal for what I want to do. I have used it a lot and also cursed it a lot.
I wanted a top I could could clamp to anywhere on its surface. So this one will have a grid of eight 6''x1/2'' flat bar planks 30'' long. They will be spaced 1 1/2'' apart. Much like the Strong Hand fab table that costs more than I make in a year.
Second Picture;
So here we go. I cut all my metal. Got some good casters that lock solid both ways.
I started by drilling all the holes to mount the top. Each plank will sit on a set of four 1/2''x2 1/2'' fine thread jacking bolts. There will be one near the corner of each plank. This way I can adjust them individually, have them all dead even or I can remove one or more if I need to. There will be a 1/2'' hole in the top flange of the 3''x2'' top rail for each bolt and a pair of nuts will sandwich the flange to hold the bolt into place. A corresponding 1 1/8'' hole in the bottom so I can get a socket on the bottom nut.
Third Picture;
Here is the hole sawing operation. I consumed a cheap Canadian Tire hole saw. I hope I can use it for an Exchange a Blade hole saw.
I actually screwed up here. I forgot that the end hole wasn't needed. I can get to the bottom nut from the opening in the end of the tube and the upright attaches where the hole shouldn't be. I had to weld the holes shut because I didn't want debris to find its way in.
Fourth Picture;
Here is the side ready to weld. It could be the front or the back as the two are identical. It's hard to get set up for welding together a welding table when you don't have a proper welding table to do it on.
The welding will have to wait until tomorrow. It was getting late at this point. More to follow.
Attachments


Last edited: