To avoid these ads, REGISTER NOW!

Threshold Installation

moparfreak

Well-known member
Joined
Jan 24, 2005
Messages
853
Location
Milwaukee, WI
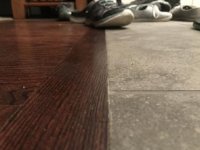
Not sure if this belongs in here or Free Parking, but I am doing a minor WW project, which is to make a custom threshold to jump from our kitchen tile floor to our dining room hardwood floor.

The trouble really is with the height between floors, due to the way the subfloor needed to be built up to support the tile, it ends up raised about 3/8" - 1/2" from the finished wood floor height.

The transition length is rather long, about 7'2", so any of the transitions that were sold with that particular line of wood to match perfectly were too short (6' lenghts) and I didn't want a seam for visual reasons. The profiles they offered also weren't quite what I was looking for.

So, I decided to go with Mahogany, mainly because I really love the tight consistent grain pattern. I think that matches well with the solid bamboo grain that the wood floor is. I'll be stain matching it as well.

So I've got the profile I like cut and the piece fits nicely, but what I'm not sure of is what is the best way to install this. You can see here a view of how it rests on the transition from the sample piece I cut:

y4mIXG8qP3BpO1tASZa5Hcc7tPLZEFyyrPJyJ_iDkNBoP21QxMj0I4T-YAGoIIY_bU9MwFvKPiRsqNJnu62c9Qu6WpMkVTJRdJShwNvwNwSlBZKMC_xySaeRbYB8IElJMOAH2-Gk8MZTSg7XPq_7tD9R06g5t-HmujxNlVYrq4D9ITHXkx4PWIPSSbrde64Odu8Y07vzhcWU-g5QyHuraAQUQ


I know that adhesive such as PL won't stand up the foot traffic. It will need some sort of mechanical fastening such as nail or screw. The bamboo is incredibly hard & dense, but I can finish nail through it if I pre-drill the holes. I keep going back to screwing it in but I've always hated how transitions look when you can see those screw heads every 8". Finish nails would be more hidden and I could probably putty them over easier, but not as good holding power.

Either way, nails or screws, I have a 1/4" flat section before it angles down where the fastener would be installed.

While I'm typing this, another idea came to me, about possibly drilling & fastening up from the bottom up, where I have an exposed rafter basement. But that would be ooooh sooo tricky to get it lined up perfect! I could pre-drill holes down from the top first I suppose, but man that would be a feat....

Any suggestions on what the best way is to approach this? I feel a bit stumped.
 
To avoid these ads, REGISTER NOW!

SteveH-CO

Well-known member
Joined
Aug 29, 2014
Messages
283
Location
Southern Colorado
I can't believe that a urethane adhesive (PL) on the tile section wouldn't hold just fine. I would not glue it to the adjacent wood floor - let it float on that. Do full contact gluing on the tile portion. Also, if the glue pops loose at some point, then use nails or screws as plan B.

I think blind-attachment from underneath is unlikely to work well (but I understand why you might try to go that way).
 
OP
M

moparfreak

Well-known member
Joined
Jan 24, 2005
Messages
853
Location
Milwaukee, WI
I think PL is really good stuff, no qualms about that. I use it for many things. Reason being is I used it for a similar application last winter when I re-did the kids hallway bathroom. It was the factory bamboo finished transition, only about 32" long, jumping from the tile across to the wood. Used PL to set it as I wanted fastener-less. It lasted about 7 months and has since popped loose.

I think when you're gluing onto tile, and with each tile slightly off in heights from each other, there ends up being gaps throughout, and when those gaps get stepped on, the cured glue just starts to end up getting cracked and de-bonds from the floor or transition piece. if it was slightly flexible / elastomeric then maybe but I'm skeptical of that route now that I've tried it once.

Yes, I'll admit I'm thinking seriously about screwing it down from underneath. I don't think it'd be quite so "blind" so to speak, as I'd be pre-drilling all the holes prior to setting the transition, so then I come in from the basement and pop screws into the holes that are already there and perfectly positioned, and as long as I have someone firmly keeping the transition in perfect place then I think it'd work? Or am I just trying to convince myself? I dunno...:headscrat
 
OP
M

moparfreak

Well-known member
Joined
Jan 24, 2005
Messages
853
Location
Milwaukee, WI
The joists run perpendicular to the threshold, so that shouldn't be a problem, but there is a large I-beam in the basement that runs along the length of the house parallel w/ the threshold. Question is does the threshold lie directly over that steel I-beam? I don't think it does but it might be close...yes that would eliminate that option, but I'll look more closely at it tonight...
 

volksnick

Well-known member
Joined
Jun 29, 2012
Messages
56
Location
Chattanooga, TN
Use finish screws!

Or recess and plug for wood screws. A plug cutter isn't going to break the bank.

I did a glue down on mine and it ended up breaking the transition strip in two when it finally gave away. I was on a concrete slab, so I didn't have much choice.


Most walls are built on top of joists, so I doubt you'd get that lucky to blind nail it.
 
OP
M

moparfreak

Well-known member
Joined
Jan 24, 2005
Messages
853
Location
Milwaukee, WI
If I can't get this to line up from the bottom I think I might have to get a plug cutter...getting the plugs to disappear might be tricky. I'll have to pre-finish the threshold then come back and do some touchup on the plugs. Not an area I've dabbled in before but I'll do it if it's my last resort.
 

larry4406

Well-known member
Joined
Jan 27, 2006
Messages
19,516
Location
Northern Virginia
Well the ship has sailed, but I like the surfaces to plane out without use of a reducer (aka trip hazard).

If in your shoes, I would lower it so it abuts the ceramic vertical edge vs topping it. Then grout your tile to the reducer as needed. You will hit the raised edge repeatedly if you leave it high.

Attached picture from my foyer where I used 3/8” AC plywood as the ceramic substrate which planes out perfect with 3/4” sand on site hardwood thus no reducer needed. Won’t help you this time though.

Since you are a wood worker, drill it, screw it, and plug it. Make sure your plug pattern is visually pleasing.
 

Attachments

  • 1F12A6B6-7740-4221-8686-8C1B57314AFB.jpg
    1F12A6B6-7740-4221-8686-8C1B57314AFB.jpg
    14.5 KB · Views: 145
Last edited:

johno

Well-known member
Joined
Oct 16, 2009
Messages
2,418
Location
Southern Ont.
Well the ship has sailed, but I like the surfaces to plane out without use of a reducer (aka trip hazard).

If in your shoes, I would lower it so it abuts the ceramic vertical edge vs topping it. Then grout your tile to the reducer as needed. You will hit the raised edge repeatedly if you leave it high.

Attached picture from my foyer where I used 3/8” AC plywood as the ceramic substrate which planes out perfect with 3/4” sand on site hardwood thus no reducer needed. Won’t help you this time though.

Since you are a wood worker, drill it, screw it, and plug it. Make sure your plug pattern is visually pleasing.


What he said about trip hazard.
My first thought when I saw it, instead of tripping going into the room, now you trip coming out of it.
Not a big improvement imo.
 
OP
M

moparfreak

Well-known member
Joined
Jan 24, 2005
Messages
853
Location
Milwaukee, WI
The lead edge is getting a back bevel along w/ a nose radius to reduce the lip that can cause trip hazard. Once all the lines are sanded it actually ends up looking more like a sweeping arc across from one edge to the other. The tiles unfortunately are not quite straight and level enough for me to do that type of reducer and come out happy w/ how it looks across the 7' opening. Originally way back when I had intended the floors to be level, but the subfloor under the tile needed an additional layer of OSB for reinforcement and stability before tiling, which raised it up & thus needing a step down.

Underneath from the basement, the subfloor is clean and accessible, so I'll try that and post some pictures once it's done hopefully.

SW did a great job stain matching, so once I'm done profiling it'll be several days of staining and poly 3 or 4 coats before I can set it in place.
 
OP
M

moparfreak

Well-known member
Joined
Jan 24, 2005
Messages
853
Location
Milwaukee, WI
Finished profiling it. With the back bevel, then round over, and a general sanding has it a gentle sweep from the top to the bottom. Now stain and a bunch of coats of poly.

y4mzWOz1q02NCUxw9_XlkgT_cmMRqMUAlU8SbPzpyao8z3Abgzl5kpNfAL2yLwqqTcEfydqC2fIrCkSdbRG4RG50V1C6URNTqNozAh2SsR406RmTlPkKFD5cEHoJ4rbf-xrVsxFjmogSHQA8nerSu8tVPXh55q_SEc2O2aChvH6kBHbW1PqfkpUKuFfaK32byolojbx3u-TfJeVqJ5fQpkAqg


y4m9BHEojy0itaIu3lahEtr9YwJGUSVKeUhPK6qK99HntsyPC_5SbIrbdKMzRGJmaLW7JqnPX5No82nxDfa_Q_OyJrZM1jvOaf4AdSm2DevWzXk7XX9bNwRv566QAuQg3co9HQr1ota7u4NJgs_v36q1iCEKtQc1GDE6fUG8tIYQvRBHEWw5AMswV5ngX0LuGIpbagXGj3K_bITrfm8RwmxUg


y4mlIJkoRk6QN4ZUuMnwHonF-NkUi8Xmy2gYDbNgaqgUf3yAcpbzXC8V60-XK_hLQff8vm43l89BuBlIWkA1e5A9Jwuj4KhcGVOPL8G1FoqjRwaCNdH5P67CdtWBcRiY11GMV9T-Cfgur9l6pzCAi0rqfsTM9hswcY9nt4K3GJECW9Cvh4a4jojy-dF4aLEV83RK8ILqKMK6AaQ5vuLEPDmMQ
 
To avoid these ads, REGISTER NOW!

Hammer1963

Well-known member
Joined
Jan 2, 2011
Messages
2,048
Location
Kentucky
Double sided tape for automotive trim use works extremely well. If you ever have the need to remove the strip, you simply warm with a blow dryer or heat gun and use a plastic wedge and gently pry up
 

rustyjames

Well-known member
Joined
Dec 28, 2008
Messages
1,077
Location
central nj
I second the two sided tape. It comes in different thicknesses, you'll probably want to go as thin as possible.
 

Slednut

Well-known member
Joined
Dec 20, 2012
Messages
2,554
Location
Washington state
I like the, pre-drill and use finish nails. Fill the holes and you'll never see them.

It'll get marred up and will need to be removed and refinished or replaced.
 
OP
M

moparfreak

Well-known member
Joined
Jan 24, 2005
Messages
853
Location
Milwaukee, WI
I looked at this more closely. It looks like awesome stuff, but it's 0.045" thick which is just too much, I need the threshold pulled down tightly to the floor, no gaps. If it comes thinne I haven't been able to find it.

Ugh, in other news, I let the stain dry a day, then started with wiping polyurethane onto it, and it started pulling the stain off. So, I either needed to wait longer for the stain to fully dry out, or use a spray method. Now I've got to sand through a bit and re-stain, then recoat w/ a spray method rather than wiping method. Sets me back a few days.....:mad:
 
OP
M

moparfreak

Well-known member
Joined
Jan 24, 2005
Messages
853
Location
Milwaukee, WI
With the stain & finishing finally done, I installed it last night. I have to say, installing from underneath worked out beautifully. Tight and snug.

I predrilled the holes, each time determining the right spacing to make sure it didn't line up with a joist or utility or anything.

Then, I drilled pilot holes up into the threshold set to proper depth and drove the screws. I took the screws to the bench grinder and knocked off the first two threads on the tip. They don't have any holding power anyways and it reduced my risk of accidentally overdriving and coming up through the top of the threshold.

Used 2-1/2" Grex cabinet screws.

y4m7KY9d87Vw61h-rXHQpt3slAueX1yNzTW7BgLCA3yB6TPjMdH4rqZjwBnG8eHZ8Js9mb7f0zREZ-0Ba2RS9-NdOdM0_d59Mq6OgcYYCJKIeEwi9hGQHbq0tlBf0SX9X10Jtlc6lKvkikVWpbiDi-WQ-xnpXSLFTLADzCwIQ7KWimtkiZudDY76b5D5pkl8XYM7TZijmVP8DDVk3mahjPpeA


y4mcHTyoxqM5aWWkxi-n_BO6btOgPwWG-zKw1MOQMs5gA1vE7nbN-JF8eV41tcORdzaI1OocSqE_PUncpi33aLKM0nKsfPleKJJSKi0oa4xArSAo-Ep-NdYAyuZdu-f18v9PNNCP_PcELgRAkEZUCa-mxcROBjRRoCbwUDGukLZryIJ1GZVMiFJjAA7bTkZyUz550flmNCtK7TwQXQFIEpPeg


y4mYGI_P_25aTLUEBpqvCzgmLFQKBK9Hc8o2RXJ0zAtYRGTluOU-vdrAYmjGzrZJagB02lPN6XBFcvyUyRQBJ_X6HkMqZd_Mye676zE2VEsFNFIF_3XgENDklOaqzF16EYmShJOJsFoZaT0MMGqlJGIr7lykKJJiuN6Y5RkAw27FiL_3KZnKcEiUAtDzUpGCHkqY7SkmJcZAwxq0-gq_h4Hlw
 
OP
M

moparfreak

Well-known member
Joined
Jan 24, 2005
Messages
853
Location
Milwaukee, WI
thanks! no trips so far, real happy with it. It seems very solid. I'm going to try that method on the threshold in the bathroom that loosened up after I used PL to originally fasten.
 
To avoid these ads, REGISTER NOW!
Top Bottom