OutlawDrifter
Well-known member
Looks great! With the bottoms inset, you can also put some lights under there if wanted.

Thanks!Definitely like the look of the shelves with the bottom stained, nice touch!
Playing a bit of catchup on other topics also....RE: toolbox, I haven't looked at the Craftsman stuff since Lowes took them over, I know years ago (circa 2009) I was highly disappointed with them, which is why I went with the Kobalt unit for my top box and then bottom box...but I know you'll do your diligence! But, in related news, the US General 1 drawer cart went on sale last weekend at HF, AND a 10% off coupon, so I finally justified my ~$100 tool cart, LOL, excited to get that put together
Thanks Marc!Looks great! With the bottoms inset, you can also put some lights under there if wanted.
Definitely like the look of the shelves with the bottom stained, nice touch!
Playing a bit of catchup on other topics also....RE: toolbox, I haven't looked at the Craftsman stuff since Lowes took them over, I know years ago (circa 2009) I was highly disappointed with them, which is why I went with the Kobalt unit for my top box and then bottom box...but I know you'll do your diligence! But, in related news, the US General 1 drawer cart went on sale last weekend at HF, AND a 10% off coupon, so I finally justified my ~$100 tool cart, LOL, excited to get that put together
Anyway, the Wen handled it fine and I went from a big 4x8 sheet to several (roughly) 15x20 inch doors. Ten, to be precise. I learned about how finicky MDF can be during this process, as I damaged ONE piece beyond repair simply by dropping them from 3 feet. I also had to trim off some tearout a few times. Not a really fun material to cut, and I suspect it would have been easier with a table saw. But I made it work and finished cutting 9 doors.
There's a bunch of different ways to seal it, but I went with good old-fashioned oil-based Kilz. It's easy to work with and I know it will be durable, so I put on three coats of primer to seal the material. I probably didn't need three coats to be honest, but I wanted to be sure there wouldn't be any water issues, so I overdid it.
Thanks Jolly! I'm pretty stoked about it too.I think Craftsman has come a long way on their build quality, at least for the price point they are at. I know when I was shopping for a lower cabinet the 52" 2000 series Craftsman was a better built box than the equivalent husky IMO.
Those cabinets are looking really nice! Excited to see the final product!
Thanks Nick! I'm really excited about the developments, including those I've yet to shareGreat work on the shelving Tom! Matches your bench great and will be nice to have that out-of the-way storage.
You seem like you're using your track saw enough and enjoying it enough that I can confidently reinforce that a Makita upgrade would serve you well.
Breaking down full sheets on a job site saw is next to impossible. You could always rough cut the sheet into smaller pieces with a track saw, and then make the final dimension cuts, trimming just a bit, on the table saw. MDF is fragile on the edges, for sure. But you shouldn't really be getting tear out. I'm not sure what type of blade comes with the WEN saw, but my track saw came with a 50T crosscut blade, which does well in all sorts of sheet goods. The other downside to cutting MDF on a table saw is dust collection. A job site saw anyways, does not have great dust collection, and MDF is terrible to breathe. I don't have experience with the WEN specifically, but with my Makita (and certainly a Festool, Bosch, Mafell, etc), the dust collection is quite good which puts another win in the track saw column when cutting materials like MDF in my book.
Nothing wrong will overkill, haha. But unless you're putting wet things in those cabinets, I wouldn't be worried. I have all sorts of MDF things in my non-climate-controlled garage (jigs, MFT top, router table top) that are completely raw and have held up fine over the years. The biggest thing with your doors would be to protect the edges from bumps. Not sure if you have a router, but a tiny 1/16" chamfer or round over would break the edge. Otherwise just hit them with a sanding block by hand so the edges aren't sharp. They will be much less likely to chip that way if you accidentally bump the edge with something.
P.S. Despite what the pocket hole h8terz might say, they will be plenty strong, even the way you did the "inset" bottoms like that. Screws in general are quite strong and commonly used in cabinet construction, in my opinion you've got nothing to worry about.


 Picture 21 by bjohnson388, on Flickr
 Picture 337 by bjohnson388, on Flickr
And this is the moment you became a woodworker ......that feeling is what starts it.The end result has me doing backflips. Holy cow this looks better than I thought it would! Wow!
 I think you will eventually need more pegboard to the left of the stop sign.....
And this is the moment you became a woodworker ......that feeling is what starts it.

Thanks Marc! I'm really happy with the overall look and how they "go" with everything I've got in there. Can't argue with the extra space either. I'm really pleased.Tom, the cabinets turned out awesome! The hardware and color definitely blend well with the "wood wall". Nice work!
On the table saw front...it looks used...but, can get you by until you decide what you really want I bet.
Thanks Bret, the cabinets really hit the mark I was aiming at for sure.Cabinets look great. Really love the industrial type Blue.
The saw will get you by for a bit but you will be longing for a better one once you start using it and understanding it's limitations. I started off with a Craftsman just like that. I made it 2 years before I upgraded to the TS3650. It will do quite a few things just make sure it is tuned up and the blade is sharp. They are very underpowered. Still you can work with it and the next bigger saw you will really appreciate. I made a ton of projects on that first table saw.
I made everything you see in my first shop with the Craftsman. You can see the few upgrades I made to it to get more use out of it.
Bret
Ha! Yeah, I can certainly see it going that way. Just what I need, another hobby!And this is the moment you became a woodworker ......that feeling is what starts it.
Great job and they do look awesome.

Thanks man! I think they really go great with everything and it's starting to bring my vision together.The cabinets turned out awesome Tom.
Thanks Trapps! I appreciate that coming from you. I don't do an awful lot of this kind of thing so it's cool to see it come together like this.Tom,
Cabinets look great and are integrating so nicely with the rest of the space! Realizing your vision for this is super cool and its motivating me to finish mine.
Ha, you're probably right. A buddy of mine did notice but he's really pedantic. Honestly it's barely noticeable anyway so no big deal.Tom,
The cabinets look great! Only you will ever know the hinge is off....
Thanks Fouckhest!Cabinets look fantastic, great work!
Like so many on GJ, start out with great automotive project ambitions and end up being almost woodworkers, I know I've fallen victim! lol
*edit, thanks for helping me spend more money, I'd never seen that Kreg hardware jig, I'll be buying one today to mount handles on our new vanity!
Thanks Nick! Means a lot coming from you for sure.What @Chrisb62 said!
Tom, they really turned out nice!
Jigs are key to accuracy and repeatability in woodworking. The Kreg hardware jig looks handy. Great idea making the MDF ledger to position the doors — just another idea for next time you could have even screwed a "stop" 2 inches in to the MDF, so it registered in the exact same spot each time with no measuring.
You'll have to let me know how you like the RZ mask. I've actually never tried one, I use a "GVS Elipse P100" I got at Rockler. I've always been interested in the RZ mask because mine gets a little sweaty in the summer. But I wear glasses and it does a great job of not fogging them.
Bonus points for the SKX009!
I agree with Bret on the table saw. Safety-wise you'll need a throat plate, and if the saw accepts a riving knife and you can order a spare part I would do that. My dad only had one table saw his whole life, an old belt-drive Craftsman small contractor saw. It had no riving knife, and the fence would not lock parallel at all (not safe!). He literally measured with a tape measure from the back and front of the blade, pounding the fence on either side with his hand until it was "parallel", aka 'the old tap-a-roo', and hoped it would be accurate enough to his measurement. Can you live with and older, less-featured saw and make good stuff with it? Absolutely. But like Bret said after awhile I'm guessing you'll want to upgrade for many reasons, both safety and accuracy.
No need to mess with the blade guard in my opinion, they just get in the way and make it harder to see and use a push stick.
If I were you I'd spend some time cleaning it up, get a throat plate, and watch some YouTube videos on table saw safety. Get yourself a good push stick for any narrow rips.
Like I mentioned before, I think using an older free saw first will help you figure out what features you want. Anyone on here could go tell you what to buy, but even a short amount of time using this I think will help you figure out what you want next and at what price point. One bonus of this Porter Cable is the table is quite a bit larger than the DeWalt you were looking at.
Again, great work!
Thanks!Looking good!!!! Now it's time to fillem with stuff!!!!


Thanks! Very proud of this guy. Waiting for the head to be cleaned at the taxidermist so I can get a wall mount made. Just doing a Euro mount, so a skull with antlers. Not sure what I'm doing as a backer yet, behind the skull. Thinking about a few pallet planks but I dunno yet. Don't want to overdo that look. Maybe nothing backing it would be better, and just the clean skull on the wall?Congrats!
It's kind of a hodgepodge. The lower is mostly Anderson Mfg, but the grip, stock, magazines, and trigger guard are all Magpul. Trigger itself is Rise Armament. Upper is mostly Bear Creek Armament. 16" standard barrel with a .750 gas block (probably will change this to adjustable at some point) and Bear Creek flash hider. I built it as a side-charging upper.What brand AR15 are you building?
Thanks Brent! It was a lot of fun this year. Great times were had. Really proud of this deer and feeling so thankful for the whole experience. I am trying a few new things with him too. Cut some tomahawk steaks from one backstrap and then was able to do some ribs, which is rare.Congrats on the successful hunting season!
...Not sure what I'm doing as a backer yet, behind the skull. Thinking about a few pallet planks but I dunno yet. Don't want to overdo that look. Maybe nothing backing it would be better, and just the clean skull on the wall?...
Thanks Brad!Nice deer! That is pretty similar in size to the one I have on the wall (also went with a euro mount).
My vote is to just use one of those sheet metal euro mount hooks mounted directly to the wall. I personally don't care for backer boards as they always end up looking dated and end up distracting from the mount itself. But, people have different tastes so if it ends up being too plain for your liking, you can always just mount the hook onto a backer board later.
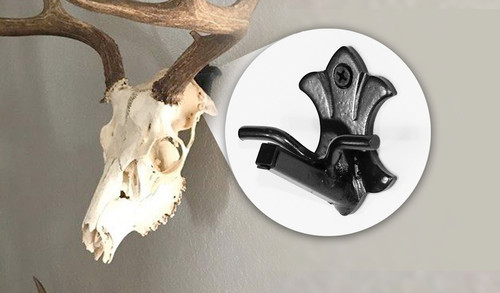
 www.skullbracket.com


Thanks Chris! Happy to have you onboard!Tom, Just caught up on your posts. Great looking shop!
That compressor has been incredibly trouble-fee, but my God... the headaches I've gotten from the noise. It's unreal how loud it is. I've got hearing protection on all the time. I mostly use cordless tools just to avoid using the damn compressor.Man I will tell you it was so nice to get rid of my noisy craftsman. I gifted it to someone...don't remember now.
Bret
...Someday I will switch to a quiet compressor for no other reason than the noise...

If you are long term shopping for compressors, give Quincy a good look, I have one and its fantastic, they are a bit pricey, but Made in America, so that always helps.
I have an older version of this unit, appears it must have gone up in price a little, but I'd stand behind the brand for sure
Yep, not a priority so I can take my time and get a good deal. I'm honestly looking at the Kobalt or HF 26-gal quiet compressors. They have enough chooch to keep most of my **** running even at higher air loads, and only running 80-90 db is a big plus for me. I've rarely needed more air than my 20 gallon can provide, so I'm sure one of those is just fine.The good thing is you don't need a compressor right now, so you can take the time to find a good deal on one. You won't regret upgrading when you do. It makes such a difference.
I don't use a lot of air in my shop - running the brad nailer, blowing off stuff, and pumping up tires accounts for 99% of my use. My old compressor worked great, but was obnoxiously loud. Like you, I would go out of my way to avoid turning it on because of the noise. Then one day I saw a deal at Menards for a California Air Tools 8010 that I couldn't pass up. As soon as I fired it up, any guilt I had about replacing a perfectly good compressor with a quieter one went right out the window.
If you are long term shopping for compressors, give Quincy a good look, I have one and its fantastic, they are a bit pricey, but Made in America, so that always helps.
I have an older version of this unit, appears it must have gone up in price a little, but I'd stand behind the brand for sure
I've never heard anything but positive about Quincy, they're definitely good stuff.I second this recommendation. I have an older Quincy QT-5 that I bought new in early 90's when I built my last shop. It was a stretch on the old budget but it served me exceptionally well for the 25+ years at that shop and is still serving me well after 30 years. Just normal maintenance for the most part although I had a check valve fail about 2 years ago but a new one was quickly acquired and back up and running. It's a nice solid piece of shop equipment and mine gets a lot of daily use as I don't use many battery powered tools, mostly pneumatic.
I could probably do that, but I don't really want to if I'm honest. The PITA factor outweighs the benefit I'd get from it. I honestly am not using a compressor enough to justify the cost of a big one or the work in building an enclosure. Better off just getting a quiet one and using that.Quincy is the name brand for air, but I feel like I've read that their quality has gone the way of household appliances more recently. I think an older unit like what @fouckhest or @zmotorsports have will probably last longer, but pry wont be quiet.
Could you possibly build an enclosure outside and plumb it through the wall?
On the quiet and infrequently used side, the Porter Cable quiet 20 gallon belt drive unit I have has been pretty solid for my uses. Most of my stuff is battery powered or electric, with the exception of my nailers and filling tires. I have yet to try out the plasma cutter I bought last month. The price has went up about 50% compared to what I paid for it a year or two ago, though.

 www.harborfreight.com