To avoid these ads, REGISTER NOW!

Tool Box Refurbishment Projects

larryq

Well-known member
Joined
Jul 12, 2011
Messages
2,421
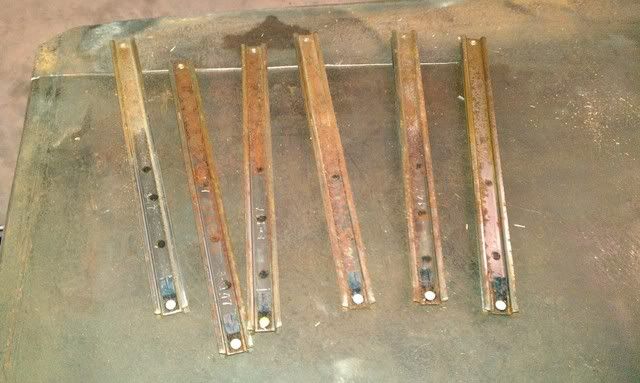
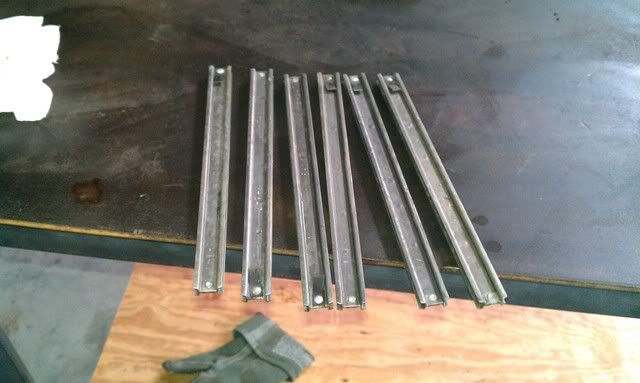
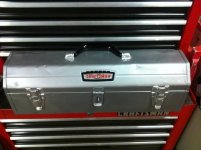
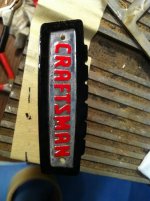
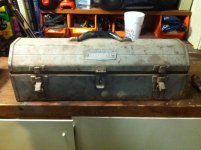
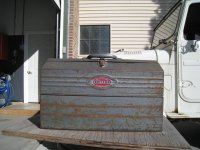
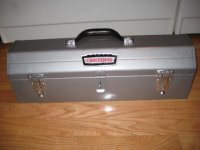
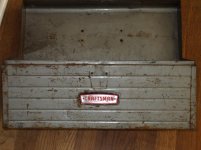
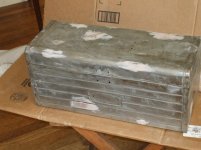
I'm tying my luck with a small craftsman. 1st time I've ever done this. Some before pics, along with a few after it's been sanded to metal and some body filler put on. This box has seen better days but it isn't rusted through anywhere.

I've just today rattlecanned some rustoleum primer, noticed the body filler wasn't well feathered, so I've sanded down to metal in a few spots to try the glaze putty again. The surface area I'm working with here is pretty small and I'm not very good at feathering. Any tips?

Also, any advice welcome on how best to drill out the latch rivets (took me a long time) and how best to paint them after they've been cleaned up with the wire brush. Finally, what do you recommend I do for putting new rivets back in? Never done that either.
 

Attachments

  • DSCF0876.jpg
    DSCF0876.jpg
    140.8 KB · Views: 76
  • DSCF0878.jpg
    DSCF0878.jpg
    140.7 KB · Views: 71
  • DSCF0880.jpg
    DSCF0880.jpg
    138.9 KB · Views: 66
  • DSCF0903.jpg
    DSCF0903.jpg
    136.8 KB · Views: 69
  • DSCF0904.jpg
    DSCF0904.jpg
    134 KB · Views: 76
To avoid these ads, REGISTER NOW!

geologist

Well-known member
Joined
Dec 14, 2011
Messages
5,326
I've just today rattlecanned some rustoleum primer, noticed the body filler wasn't well feathered, so I've sanded down to metal in a few spots to try the glaze putty again. The surface area I'm working with here is pretty small and I'm not very good at feathering. Any tips?

Make yourself a nice long sanding block. I prefer a 1 x 2.
 

FJ 432

Well-known member
Joined
Aug 2, 2010
Messages
3,723
Location
Littleton Colorado
Fj432, man those are sharp and that mac powder coated one above is too. I'm curious how much it runs (where abouts) to powder coat something like these?

Powdercoating can be relatively inexpensive if you put in the time of stripping the tool box itself. At least that's what I have found.

To specifically answer your question the yellow was about $70.00 dollars. The tray, latches and handles were powdercoated with a Herbrand chest that I did in flat black. Those little pieces probably added about $10.

So I have about $100.00 in the yellow chest plus plenty of labor.:shocking:

My experience is that you restore a tool box because it interests you and you have time on your hands. I feel it gives me an opportunity to work/straighten metal so that maybe one day I can take some dents out of my Land Cruiser.
 
OP
W

W650Mike

Well-known member
Joined
Dec 17, 2010
Messages
1,093
Location
North Central Texas
Several Progress Pics:

Filler in a couple of places and a final coat of primer went on this weekend.

GJFridge008.jpg


GJFridge016.jpghttp:


GJFridge001.jpg


GJFridge027.jpg


Miss ***** the Shop Kitty (on her Grateful Dead towel) is keeping the roll cab company as it awaits its top chests:

GJFridge005.jpg


Testing some paint/color on the bottoms of drawers:

GJFridge024.jpg


GJFridge029.jpg


In an effort to save a few bucks, I've decided to use two different paints. The backs, bottoms, and insides of the drawers and the insides of the boxes will get an Alkyd Enamal with hardener at about $16/qt and the drawer faces and exterior box panels will get Wanda Single Stage Polyurethane ($137/qt).
 
OP
W

W650Mike

Well-known member
Joined
Dec 17, 2010
Messages
1,093
Location
North Central Texas
Some nice stuff getting shown here! This round is on me. :beer:

Remember to add details of products and techniques if you can – it helps those of us who have time and desire but lack technique and talent. I get by using a combination of Ham Fisted – Bull in a China Cabinet – Don’t know what I’m doing but I’m gonna do it anyway – all fueled by determination (and Lonestar Beer). And I try to copy and learn from the success of others.

I certainly hope that Stripped can find some parts for that stack. It would be a nice set completed.

Larry, that C-man box has great potential – take your time on blocking that filler. (Even though block sanding on somewhat flexible panels is proving to be interesting.)

Foxx, Well buddy…I hope you really like sanding drawers; cause you gotta lot of ‘em. Those Mac boxes are some of my favorites! A guy at work has a stack of reds like yours. I offer to buy it every time I see him.

A rollcab microwave cart. I swear – some guys have it made.:)
 

BobsurUncle

Well-known member
Joined
Dec 4, 2010
Messages
130
Location
Tracy, Ca.
Bobsuruncle, that would be great if you could show us guys some picture how you install aircraft style aluminum rivets and the tools you use.

I promise I will!! I've been ******* remodeling my sisters stairs in her house. I'll do a small write up on riveting and post it this weekend with pics.


I just learned something amazing. Thank you. I've been wondering how to get less hammering. Any particular ratio?

Thinned it out till it sprayed?:lol_hitti . It didn't take a lot. I have thinned it out using either Acetone, tuolene, or MEK. All 3 seem to work fine. The MEK I used this this time worked well. It was cold outside, so the high flash time helped.


ETA: here is a crappy close up pic of the first box I did. My bar wasn't quite deep enough and it slightly dimpled the rivet head, but it will give you an idea of what it looks like. This is on a early 50's Craftsman rollcab.

d41c313e.jpg
 
Last edited:

Outlawmws

Well-known member
Joined
Aug 9, 2011
Messages
39,092
Location
The Badlands
I picked this stuff up a couple of months ago. The intermediate box is MAC but the top and bottom are of an unknown pedigree as I can find no markings. Most of the drawers need slides but the major makers won't help without model numbers and I am currently trying to find sources. At one time they were sand blasted and primered but will need a good redo. So when the weather starts warming up a bit and I can paint I can get to work.

Get some closeups of the drawer pulls, (top and bottom since they look to be different), Someone may be able to ID them. Are they straight lines only, or is there an emblem/trademark on them?
 

larryq

Well-known member
Joined
Jul 12, 2011
Messages
2,421
Powdercoating can be relatively inexpensive if you put in the time of stripping the tool box itself. At least that's what I have found.

To specifically answer your question the yellow was about $70.00 dollars. The tray, latches and handles were powdercoated with a Herbrand chest that I did in flat black. Those little pieces probably added about $10.

So I have about $100.00 in the yellow chest plus plenty of labor.:shocking:

Sorry for the question...it was $100 for someone else to powdercoat it, or just for the materials for you to do it?
 

ZRX61

Well-known member
Joined
Aug 15, 2006
Messages
28,716
Location
Solar Blight Valley, SoCal
A rollcab microwave cart. I swear – some guys have it made.:)
I don't have room for more toolboxes in my garage, as it is now I have to move 2 or 3 just to get to my big rollaway once the truck is out of the garage.... & the garage is 20x50ft.. it's FULL:mad:.. which is why that Mac box is now in the kitchen..
 
OP
W

W650Mike

Well-known member
Joined
Dec 17, 2010
Messages
1,093
Location
North Central Texas
Sanding, sanding, and more sanding...I'm finally done sanding - I think. We need the rain but it ***** for painting! I re-routed the compressor drain to make it easier and faster (so maybe I’ll be more apt to do it more often). Waiting now for a nice day. Maybe this weekend!

Bob, those rivets look great. Thanks

How are you guys coming on your tool box projects?
 

HarrisonTX

Well-known member
Joined
Oct 9, 2011
Messages
77
Location
Burleson, TX
Good thread Mike.

Here's to another CenTex guy! :drink:
I guess the only good tip I can offer up is: "Evapo-Rust"
It's a tad pricey, but it sure does work. Make sure to dispose of the product after use. I used a cookie sheet to lay my slides in. I removed them, and left the Evapo-Rust in the sheet, and over a few days it turned extremely thick. So thick that I had to chunk the pan. I was only saving it to de-rust a few more items over the next week, but it doesn't keep.

Before:
IMAG0552.jpg


After

IMAG0554.jpg


I refurbed (should have got the metal straighter) this box.
The black box is on ebay (ending feb-12) because it appears it doesn't go with my roller that I just picked up. I would love to keep it, but I just cannot afford to buy another top box, and keep this one.
IMAG0583.jpg


The thread is here

http://www.garagejournal.com/forum/showthread.php?t=124547

And I'm about to start on this. (shame the guy had already sold the matching top box on the ground to the right of this picture)

DW36500.jpg
 

USMCdodge

Well-known member
Joined
Oct 12, 2011
Messages
453
Location
MCBH
http://garagejournal.com/forum/show...estoring+1947+vintage+snap+tool+box&showall=1

USMC, What did you do to prep the chrome for paint? Rough up with sanding/blasting I assume. Special primer? Special Paint? The cart is awesome. (and I really dig the Lunati sticker)

I took a wire wheel on a die grinder to it at work. You really under estimate how long it takes to hit up something like that. the inside Welds were cracked so i touched those up, and used gloss black.
 

cfiles

Member
Joined
Oct 19, 2011
Messages
14
OK, after looking at all the resto's on here, I thought I would try my hand at it. I wanted to redo one of my Dads old boxes. My intent was to make it look like the day he first bought it. But after stripping the paint and finding "pipe fittings" written by him on the lid, under several coats of paint. I decided I didn't want to fix any of the dent or dings he put in. So here it is with his dents still in it. Its amazing how many good memories come back, doing something like this.
 

Attachments

  • box.jpg
    box.jpg
    31.3 KB · Views: 169
  • box lable.jpg
    box lable.jpg
    39.2 KB · Views: 135
  • pre box2.jpg
    pre box2.jpg
    32 KB · Views: 122
  • pre box.jpg
    pre box.jpg
    35.2 KB · Views: 122

shannonw

Well-known member
Joined
Jun 18, 2010
Messages
660
Location
Florida
Cfiles, nice that came out real sharp!

I agree 100% with keeping the dings when there's personal (or sometimes not personal) history there. My 2 yr old son is a cars movie fan (who's isn't), reminds me of the towmator scene in cars2 about keeping his dings.

There's been some nice resto's on this thread!
 

TJT

Active member
Joined
Dec 26, 2011
Messages
31
Our current project. Still trying to figure out Model/Brand (THREAD HERE)

Initial Inspection & Tear down
web.jpg

web.jpg


After Media Blast (our current stage)
IMG_1212.jpg

web.jpg


  • Next step is some body work through this weekend.
  • Then: powdercoat or Paint (Color: TBA)
  • Then: bedlining the inside of the drawers and top

I'll keep this post updated as we go.
 

jvitez

Well-known member
Joined
Nov 30, 2009
Messages
2,429
Location
Big Sky Country, Canada
HHere’s a shot of the ugliest box on the planet. It’s one I built in 8th or 9th grade shop class
camera001Medium.jpg


Man, you brought a tear to my eye. I built a toolbox in 8th grade metals class. Much simpler than yours (great job BTW). Spent lots of time, really wanted to make it perfect as it was a keeper. I used it until my university years. Repairing my old 1978 Ford Fiesta that was more Canadian Tire than Ford by the time I sold it, forgot to pick up when finished, and...and.....backed over it with the front wheel. :( It was a 49-ers flapjack, completely unsalvageable.
 
OP
W

W650Mike

Well-known member
Joined
Dec 17, 2010
Messages
1,093
Location
North Central Texas
Cfiles – that thing is better than new!!!

Perfection is not always about straight lines and perfectly matching curves. Like beauty, it can mean different things to each of us. Flaws add character, especially when they relate to memories. But enough coffee house, esoteric BS – is that a smooth silver or a hammertone? Brand? Number of coats? The crown emblems are cool. I hope you have someone to pass that on to someday.

TJT – It looks like you got a helper who will cherish that box and never forget the project and time spent with Dad. Remember to help him develop good safety habits – eye and ear protection, respirator and such.

I’ve only done a little sheet metal dent pounding but one thing I have learned is that the older boxes with heavier gauge steel are more forgiving of us amateurs. Take it slow. The holes where the hasp was mounted will MIG in easily.

Thanks, jvitez – that box almost got tossed a couple of times. We appreciate those items and memories more as we get older.

My little project got put on hold the past couple of weekends while I worked on trap machines. I hope to get back to it this weekend.

Great job guys!!
 
Last edited:

cfiles

Member
Joined
Oct 19, 2011
Messages
14
Thanks shannonw. It was a fun project. Ive got one like Larryq that needs some help. It may be the next box I try.

Thanks W650Mike. Yea the paint is Rustolum Hammertone silver. Two coats, inside and out. Yea, I like the detail on those crown enblems.
 
To avoid these ads, REGISTER NOW!

JASTECH

Well-known member
Joined
Oct 21, 2009
Messages
2,671
Location
Gering, NE
I like all tge recondition work that has been doone. Makes me want/need to get my shop emptied and the floor steam cleaned or maybe try Simple Green? Then roll on 2 coats of Battleship Grey. I have the walls insulated and flake board over then painted white. New 150w fluoresent lights above.
 

countryroad82

Well-known member
Joined
Mar 18, 2011
Messages
3,447
Location
Kentucky
I like all tge recondition work that has been doone. Makes me want/need to get my shop emptied and the floor steam cleaned or maybe try Simple Green? Then roll on 2 coats of Battleship Grey. I have the walls insulated and flake board over then painted white. New 150w fluoresent lights above.

I buy a Purple Power knockoff in 5 gallon buckets that I use to scrub my floors down with then hose it out the door if that helps. I coated my floor with some of the Rustoleum epoxy kit. It has held up decent for my shop, it could use a fresh coat maybe this summer. The overspray in my shop is hard on coatings.
 

BobsurUncle

Well-known member
Joined
Dec 4, 2010
Messages
130
Location
Tracy, Ca.
I promise I will!! I've been ******* remodeling my sisters stairs in her house. I'll do a small write up on riveting and post it this weekend with pics.

Still waiting!!! :)

Dammit!!!!

I just did a few on a block grinder last night. Would have been perfect for this.
:eyecrazy:

The upper right one needs to be redone. I'll write it up on that one.

0519b2d9.jpg
 

MeridianCreek

Member
Joined
Mar 11, 2012
Messages
7
OK, after looking at all the resto's on here, I thought I would try my hand at it. I wanted to redo one of my Dads old boxes. My intent was to make it look like the day he first bought it. But after stripping the paint and finding "pipe fittings" written by him on the lid, under several coats of paint. I decided I didn't want to fix any of the dent or dings he put in. So here it is with his dents still in it. Its amazing how many good memories come back, doing something like this.

cfiles- I have the same box I want to refurbish; yours looks great! Can you describe your technique? I don't have a sander that will fit down in some of the corners. What did you use? Thanks!
 

sleepjeep

Active member
Joined
Feb 24, 2012
Messages
28
After going this forum and reading and looking at all of the great restorations of tool boxes I decided to restore mine. I have a SK tool box with a date stamped on it of 9/80. It was made by waterloo. The original color was red and it had quite a bit of rust on the lower cabinet. As you can see in the original picture the lower part of the cabinet and the wheels had surface rust. I removed all of the drawers and hardware. I sanded the cabinet going down to bare metal anywhere there was rust. I then sprayed everything with gray primer and then put 5 coats of hammered green rustoleum. This is my first try and I learned a lot of lessons that will make the top come out better.
 

Attachments

  • DSCN1316.JPG
    DSCN1316.JPG
    90.6 KB · Views: 172
  • DSCN1280.jpg
    DSCN1280.jpg
    86 KB · Views: 109

sleepjeep

Active member
Joined
Feb 24, 2012
Messages
28
I should add that the prepping took me about 8 or 9 hours. The painting was spread out over 6 days. I will be starting the matching top box this week. There is no rust on the top box so the prep time should be less. There are more drawers and smaller drawers though so that means more hand sanding. I will past pictures when I have that completed.
 

sleepjeep

Active member
Joined
Feb 24, 2012
Messages
28
Good job sleepjeep! I like how the green comes out the best out of all the hammered colors available!

Funny thing is that I am color blind and I had to ask the people in the paint aisle at the ACE hardware store which can was the green. I know that SK color is green so that is why I chose it, OK why I had them help me choose it. Left to my own devices I could have come out of the store with grey.
 

Outlawmws

Well-known member
Joined
Aug 9, 2011
Messages
39,092
Location
The Badlands
So...what is the best way to do chrome-colored parts...such as hasps?

as in refinish? Is this rust we are talking about? How bad is it? Sometimes you can simply replace, but rust removal can be done by fins Steel wool as mentioned (I use oil with the Steel wool - prevents scratching) or wet SOS pads (not Brillo) also works well.

Another one is Nevr-Dull; amazing stuff for rusty chrome.
 

Zaylor

Well-known member
Joined
Jan 17, 2012
Messages
248
Location
Alaska
It is surface rust, but if I get rid of it with an abrasive like steel wool the rust just comes back. Meaning the chroming is no good anymore, unleess I'm mistaken.
 

Outlawmws

Well-known member
Joined
Aug 9, 2011
Messages
39,092
Location
The Badlands
It is surface rust, but if I get rid of it with an abrasive like steel wool the rust just comes back. Meaning the chroming is no good anymore, unleess I'm mistaken.

I find chrome gets 3 kinds of rust. It starts with pinholes and progresses into cancer (bad), but there is also a stain-like rust that is basically leakage from the other two (or reacting to something rusty laying or dripping against it). That stained rust comes off fairly easily with just fine steel wool and oil; the oil does two things: lubricates so you don't scratch the chrome withe the mildly abrasive steel wool, and helps get into the pores to resist further rusting.

SOS pads do remove the rust stains, but nothing to keep the pores for further rust. so if you use SOS, heat the item a bit to get ti really dry, then oil it of use a chrome preservative.

Nevr-Dull is like fine steel wool without the abrasive properties.
 

cfiles

Member
Joined
Oct 19, 2011
Messages
14
cfiles- I have the same box I want to refurbish; yours looks great! Can you describe your technique? I don't have a sander that will fit down in some of the corners. What did you use? Thanks!
MeridianCreek, Thanks. It turned out to be alot of fun. I used electrolysis to remove the paint and rust, then just wire brushed, primed & painted. Be sure to remove the aluminium label first.
 

FJ 432

Well-known member
Joined
Aug 2, 2010
Messages
3,723
Location
Littleton Colorado
I found this box and I thought it would be a good candidate for my office tool box. The box measures 17" wide by 8" deep and 10" inches tall and there was not much paint left on it. There was also a large dent on the top that I did my best to remove (I still have a lot to learn on metal shaping). I took it to bare metal and had it powder coated at a cost of $150. I used pop rivets on the hinges with rivet washers so that the arms articulate. The colors chosen was a dove gray with safety orange which is a common theme of mine. Overall I'm pleased but I'm second guessing the dove gray which is flat.

Some would say that this was a costly endeavor but I enjoy doing these from time to time.
 

Attachments

  • Web cantilever craftsman.jpg
    Web cantilever craftsman.jpg
    55.5 KB · Views: 104
  • web cantilever craftsman 1.jpg
    web cantilever craftsman 1.jpg
    48.8 KB · Views: 85
  • web cantilever craftsman 2.jpg
    web cantilever craftsman 2.jpg
    35.5 KB · Views: 108
  • web cantilever craftsman 3.jpg
    web cantilever craftsman 3.jpg
    46.1 KB · Views: 114

gipp

Active member
Joined
Oct 3, 2011
Messages
39
Location
Sterling Heights, Mich
Just wrapped up this project with riveting the tag back on. Picked this up at an estate sale for 10bucks with some cman tools to boot.
Paint stripper, sand blast and rustoleum hammer tone and chrome paint for the hardware.
 

Attachments

  • lamb, shade, craftsman box.jpg
    lamb, shade, craftsman box.jpg
    146.4 KB · Views: 77
  • after closed.JPG
    after closed.JPG
    40 KB · Views: 86
  • after open.JPG
    after open.JPG
    43.9 KB · Views: 76
To avoid these ads, REGISTER NOW!
Top Bottom