To avoid these ads, REGISTER NOW!

Tooling organization

IONH

Well-known member
Joined
Feb 12, 2010
Messages
2,043
Location
Central Massachusetts
For one, get a profile gauge. This way, no matter what tool you have, you can easily get the profile of it, then transfer that profile to a white poster board. Cut the poster board to the size that fits in whichever drawer of your toolbox. Then you can either send that poster board to someone that has a CNC Router and get the cutout cut into what ever material you want, or you can lay the posterboard over a piece of foam and will have something to cut to for shadowing your box.

http://fine-tools.com/k309631.jpg

That's really cool! I've never seen one of those before. A 6" one on Amazon for only $9.59 too.
 
To avoid these ads, REGISTER NOW!
OP
L

lilscorpion

Well-known member
Joined
Mar 15, 2010
Messages
3,599
Location
Colorado
For one, get a profile gauge. This way, no matter what tool you have, you can easily get the profile of it, then transfer that profile to a white poster board. Cut the poster board to the size that fits in whichever drawer of your toolbox. Then you can either send that poster board to someone that has a CNC Router and get the cutout cut into what ever material you want, or you can lay the posterboard over a piece of foam and will have something to cut to for shadowing your box.

k309631.jpg

****... I have one and it didn't even cross my mind. Brilliant!!
 

sakurama

Well-known member
Joined
Oct 10, 2010
Messages
1,458
Location
Portland - the cool one.
What would any of you guys suggest for making silhoutte cut-outs for tools in a tool chest for those of us without machining tools? Is there a cheap foam or foam padding alternative that could be re-purposed to make the tool cutouts that is easy to cut and light? I wonder if maybe i could wrpa tools in cellophane or ziplock bags, and use some type of expandable foam that i could then cut down and remove the tools to reveal the pockets for the tools.

Or I was also thinking of cardboard. Unless anyone has any other ideas?

Here you go: http://www.woodmagazine.com/woodwor...p/custom-tool-organization-with-foam-inserts/
 

Blacklisted

Well-known member
Joined
May 8, 2012
Messages
64
Location
San Diego
What would any of you guys suggest for making silhoutte cut-outs for tools in a tool chest for those of us without machining tools? Is there a cheap foam or foam padding alternative that could be re-purposed to make the tool cutouts that is easy to cut and light? I wonder if maybe i could wrpa tools in cellophane or ziplock bags, and use some type of expandable foam that i could then cut down and remove the tools to reveal the pockets for the tools.

Or I was also thinking of cardboard. Unless anyone has any other ideas?

At work I used the 4 Piece Anti-Fatigue Foam Mat Set from harbor freight. It works good and easy to cut with a exacto knife. One side is smooth and the other is like a knurled texture. And it's a lot cheaper than the specialty foam made for tool boxes.:beer:
 

sakurama

Well-known member
Joined
Oct 10, 2010
Messages
1,458
Location
Portland - the cool one.
I think I've read this thread about three times. I get something new each time and now that my garage is finally in progess I'm finally getting the chance to start putting some of the ideas to use.

Gregor
 

PECVD2

Well-known member
Joined
Oct 30, 2009
Messages
1,380
Location
Albuquerque, NM
CHRIS98006, very nice, organized use of your space. I have always liked the use of jelly jars for hardware storage as it reminds me of a small work shop I spent a good part of my childhood hanging out in.
What tools are hiding out under the covers?

Great job!
 

twertsy

Well-known member
Joined
Jan 5, 2014
Messages
6,725
Location
Reedville, VA
lilscorpion, Thank you for this thread (I think). Just ordered a CNC Router Table with 4th axis. Hope you don't mind but I'll be stealing most of your ideas for tool organization as my "learning" experience with the new machine. Awesome work!!
 

Chris98006

Well-known member
Joined
Mar 14, 2013
Messages
60
Location
Bellevue WA
I like the jars too. Sometimes they are hard to get them open, but they still make me smile, my grandfather used them. Under the covers I have a 1/3 HP benchtop drill press (harbor frieght), and a 10" craftsman benchtop bandsaw. I've been doing some sanding and sewed covers to keep everything from being covered in dust. I also did covers for a benchtop sandblast cabinet and a 9" disc and 6" belt sander combo. They sit on rolling cabinets I made.


CHRIS98006, very nice, organized use of your space. I have always liked the use of jelly jars for hardware storage as it reminds me of a small work shop I spent a good part of my childhood hanging out in.
What tools are hiding out under the covers?

Great job!
 

PECVD2

Well-known member
Joined
Oct 30, 2009
Messages
1,380
Location
Albuquerque, NM
I like the jars too. Sometimes they are hard to get them open, but they still make me smile, my grandfather used them. Under the covers I have a 1/3 HP benchtop drill press (harbor frieght), and a 10" craftsman benchtop bandsaw. I've been doing some sanding and sewed covers to keep everything from being covered in dust. I also did covers for a benchtop sandblast cabinet and a 9" disc and 6" belt sander combo. They sit on rolling cabinets I made.

I noticed that you had covers for just about everything.
What material do you use for the covers?
Are you in the profession as they look pro-made?
 

OJ Bartley

Well-known member
Joined
May 18, 2009
Messages
605
Location
Toronto, ON

Scorpion, thanks for this thread. The cabinet/drawer methodology was a great tutorial, and your custom milled organizers are pretty stunning. It seems like a lot of fun to make them, in addition to making the shop look awesome.

But what I wanted to ask you about most was your tablesaw. What is that extension over the cabinet made from? It looks glossy, almost like... marble or something! Any info on this would be much appreciated.
 

BarquestDan

Well-known member
Joined
Feb 11, 2013
Messages
58
Re: Tool Organization

aqu2eta3.jpg


GREAT thread!!! Your cabinets and organizational skills are awesome!

Here's my contribution:

A simple way to organize spray paint, bug spray, and other beer bottle sized chemicals in your chemical cabinets.

*Obviously you'll want to match certain types of chemicals to certain types of beer...


Sent from my iPad using Tapatalk
 

LS6 Tommy

Well-known member
Joined
Dec 27, 2013
Messages
26,162
Location
Northern NJ
That's some beautiful stuff. I wish I knew more about how to do what you machinists do. Some of you guys are geniuses in my book...

Tommy
 

twertsy

Well-known member
Joined
Jan 5, 2014
Messages
6,725
Location
Reedville, VA
That's great, consider it 'borrowed':thumbup:

What angle did you use for the shelves?

I got tired of buying the Pit Pal stuff and I got sick of the stupid paint cans all over the shop.
Frankly, I don't remember the angle! I believe it was 30. I then cut the openings with a hole saw bit at as much of an angle (toward back) as I could get given the depth of the bit. The cans sit just behind the cans on the shelf below.
 
Last edited:
To avoid these ads, REGISTER NOW!
OP
L

lilscorpion

Well-known member
Joined
Mar 15, 2010
Messages
3,599
Location
Colorado
Scorpion, thanks for this thread. The cabinet/drawer methodology was a great tutorial, and your custom milled organizers are pretty stunning. It seems like a lot of fun to make them, in addition to making the shop look awesome.

But what I wanted to ask you about most was your tablesaw. What is that extension over the cabinet made from? It looks glossy, almost like... marble or something! Any info on this would be much appreciated.

Thanks for the props...

I wish I could take credit but the extension is what comes standard with the SawStop saws. It's some kind of phenolic faced plywood though it's deep enough it almost looks like a sprayed on finish (but it's not). I wish I could find the stuff because it would be cool to use in projects. It certainly looks expensive.
 

FunkyfullWidth

Well-known member
Joined
Oct 3, 2011
Messages
1,238
Location
Three Rivers, ma
You have an awesome set up and a great eye for organization!

Have you completely ruled out fasteners? maybe you could drill a big hole with a little hole in the middle on the top peice, drop a nut in, then screw them from the bottom with countersinks. cut a couple of slugs to fill the holes. Kinda like the slugs for decking to cover the screw holes.
 

CoopVA

Well-known member
Joined
Jan 20, 2014
Messages
2,144
Location
Virginia
Re: Tool Organization

Great thread! Thanks for sharing.


Sent from my iPad using Tapatalk
 

Scottwi

Well-known member
Joined
Jul 25, 2012
Messages
154
Location
Cedarburg, Wisconsin
You have inspired me. I purchased foam from "Foam fit Tools" and used my CNC sign router to make inserts for my tool box. I didn't like all the wasted space of the pre made ones on the market.
 

Attachments

  • IMG_2237.jpg
    IMG_2237.jpg
    142.9 KB · Views: 728
  • IMG_2236.jpg
    IMG_2236.jpg
    144.4 KB · Views: 582
  • IMG_2235.jpg
    IMG_2235.jpg
    145.1 KB · Views: 515

wfochris

Well-known member
Joined
Aug 1, 2010
Messages
131
You have inspired me. I purchased foam from "Foam fit Tools" and used my CNC sign router to make inserts for my tool box. I didn't like all the wasted space of the pre made ones on the market.

You have to show this setup filled in the box!
 

SBOhio

Active member
Joined
Jan 3, 2014
Messages
41
Location
Perry, Ohio
And fill it up with tools and I'm done.
9udujuqa.jpg
[/QUOTE]

lilscorpion Great job organization.:thumbup: I've seen these french cleats in woodworking shops **** you've done slick job with crossing over to your machine tools. Now that they're up are you glad you went with it? Have you found a need to relocate or or sort the different tools? Can you help with a source on your heavy slides? I believe you mentioned some were 100 lb.. How are they holding up?
 

mebuildit

Well-known member
Joined
Dec 25, 2012
Messages
75
Location
Scottsdale, Az.
You have inspired me. I purchased foam from "Foam fit Tools" and used my CNC sign router to make inserts for my tool box. I didn't like all the wasted space of the pre made ones on the market.

We do that same thing at work only we use plastic to keep the debris down after much use.

I like the idea
 

Dick in Wisconsin

Well-known member
Joined
Mar 3, 2012
Messages
3,048
Location
Shawano, Wisconsin
This thread is overwhelming. Mr. Lilscorpion has outstanding imagination and creativity, is a skilled machinist, and a great communicator.

I've thought about trying to do something similar with a CNC laser, but this is much better.

Question ... how heavy is the HDPE material?

If Mr. Lilscorpin ever decided to sell "his garage" ... Barrett-Jackson will turn the sale into a primetime TV event!

Keep up the good work!
 

Wingnut65

Well-known member
Joined
Apr 21, 2010
Messages
3,170
Location
Tampa Bay, FL
... Can you help with a source on your heavy slides? I believe you mentioned some were 100 lb.. How are they holding up?

SBO, I found some 100 lb. drawer slides at Lowes and HD. I think I purchased them at Lowes because they had the 24" full extension slides in stock when I needed them. No complaints!
 

paranoid56

Well-known member
Joined
Dec 18, 2008
Messages
1,596
Location
San Diego, Ca
You have inspired me. I purchased foam from "Foam fit Tools" and used my CNC sign router to make inserts for my tool box. I didn't like all the wasted space of the pre made ones on the market.

talk to me about your setup. what are all the things? i see a spindle, but not sure what the other items are.
 

Hpozzuoli

Well-known member
Joined
Dec 11, 2013
Messages
3,428
Location
Rhode Island
Wow lilscorpion. You make some great trays. There is a market for that stuff. Just look at how many people are looking for the snap on trays. I prefer to store what I can in the original trays. It just makes everything look neat.
 

Scottwi

Well-known member
Joined
Jul 25, 2012
Messages
154
Location
Cedarburg, Wisconsin
talk to me about your setup. what are all the things? i see a spindle, but not sure what the other items are.

The machine is a Zund cutting table. It's primary use is for cutting printed graphics but can be used as a X/Y plotter. It has many different tool inserts that range from kiss cutting knives to a 1kw spindle. the box with the logo on it is a camera used to read register marked on printed materials so it cuts in the correct position every time.

It is my favorite tool in the basement.
 
OP
L

lilscorpion

Well-known member
Joined
Mar 15, 2010
Messages
3,599
Location
Colorado
And fill it up with tools and I'm done.
9udujuqa.jpg

lilscorpion Great job organization.:thumbup: I've seen these french cleats in woodworking shops **** you've done slick job with crossing over to your machine tools. Now that they're up are you glad you went with it? Have you found a need to relocate or or sort the different tools? Can you help with a source on your heavy slides? I believe you mentioned some were 100 lb.. How are they holding up?[/QUOTE]

Thanks. I've kinda felt like wood working and metal working complement each other nicely when it comes to the shop and, in many cases, some tasks are better suited to one more than the other so I always keep an open mind when trying to figure out the best way to do something. Many of my friends are either one or the other and can see how they get stuck trying to build something only having the one skill/tool set.

I purchased the heavy slides at a local wood supply who had them on clearance for about $7 a pair. I've also sourced a few pairs from Home Depot when I ran short. They work just as well but cost a little more.

The slides have held up really well and I haven't noticed any sagging or roughness in them yet. I also don't make a point of leaving it open any longer than I need to to put a tool away or get one out. That may have something to do with it.

I've not really needed to mess with re-organizing. The slide out has been nearly perfect since it's right next to the mill. Probably the only thing I'd change is that the larger drill chucks and a slitting saw don't fit ideally and I should have made a few lager spaced holders for items like them.
 
OP
L

lilscorpion

Well-known member
Joined
Mar 15, 2010
Messages
3,599
Location
Colorado
This thread is overwhelming. Mr. Lilscorpion has outstanding imagination and creativity, is a skilled machinist, and a great communicator.

Thank you very much. I've enjoyed sharing much more than I thought I would and I'm glad that others have gotten some entertainment out of it (like I have from other's threads).

Question ... how heavy is the HDPE material?

It's not light but after a piece get's machined it's really not that heavy. Most of the drawer inserts I have don't add that much weight when compared to what was already in the drawer.

If Mr. Lilscorpin ever decided to sell "his garage" ... Barrett-Jackson will turn the sale into a primetime TV event!

Don't give my wife any ideas. ;)
 
OP
L

lilscorpion

Well-known member
Joined
Mar 15, 2010
Messages
3,599
Location
Colorado
So it's been a while and I've been off thinking more than playing. About a month ago I got a break in the cold (yes, I still haven't hung my heater) so I wondered out and started working on my workspace plan. A little background - I only have a 3 car garage and I need more surface space when working on a variety of projects. One thing I miss not having (in regards to the business years ago) is assembly and fabrication tables. I had more than a few and many of them were fairly big (4x4 w/ 3/4-inch thick tops and a few a little longer). I needed something a little lighter and more mobile. Something that could be moved to where i need it when I need it and then put away when I'm done.

The months I spend in the garage usually result in restless moments filled with research and thinking. At some point I ran across this guy Ron Paulk who came up with this really cool twist on a torsion box assembly table that's specifically designed to be a mobile work bench. Ron calls it "The Ultimate Workbench" and justifiably so.

paulkworkbench.jpg


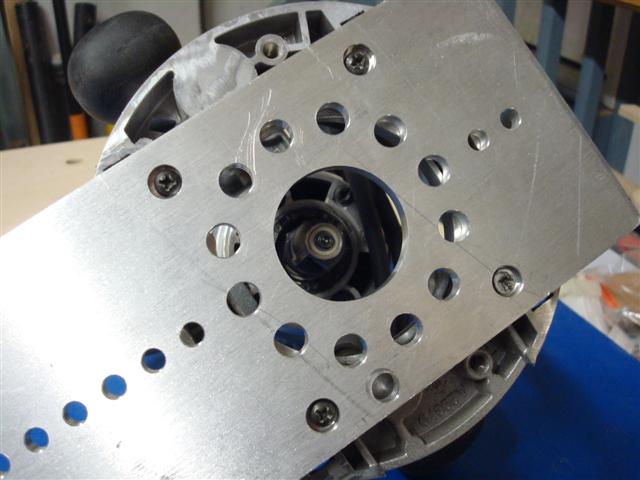
The surface uses a grip of thru-holes that are used for a variety of purposes (like clamping, filtering, etc) which I found to be an incredibly interesting idea. Woodworkers have used these in thick assembly tables for years to accept bench dogs which were also used for fixturing and work holding but recently a company named Festool came out with a system they call the MFT (Multi-Function Table) which incorporates many perfectly (CNC) spaced holes similar to Ron's design (which is the chicken/egg I have no idea).

festoolmft-3-multifunction-table-basic72-450.jpg


If I had a shop big enough to support it, I'd certainly build one like Ron's plans make (4' x 8') but I just don't have that much usable floor especially when I have a car in the garage so I decided I want to build 2 (or maybe 3) of these in a variety of sizes so I can use them when I need them where I need them. As with any of my projects, the project I set forth to do isn't the only resulting project so I decided to document what I've done thus far.

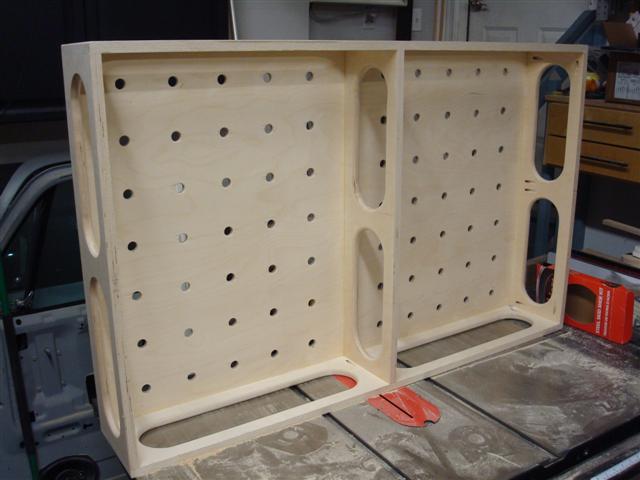
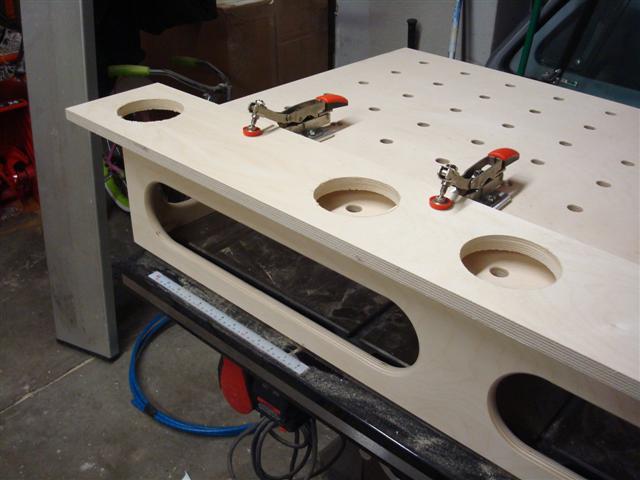
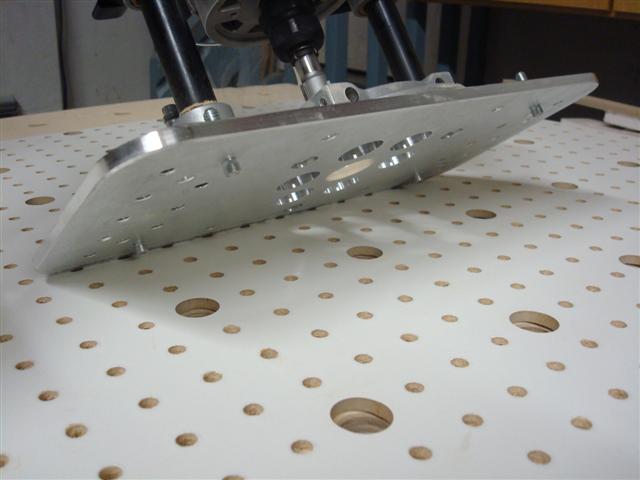
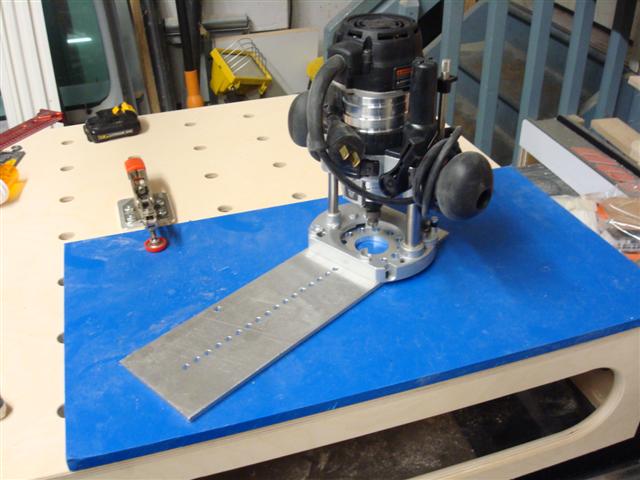
The first table is a 4 foot long by 30-inch wide table. I wanted a smaller one that I could take inside or use in conjunction with a larger table for smaller fabrication jobs.

MFT99.JPG


The top is constructed using 1/2-inch ply for the surface (and the bottom once I attach it) and 3/4-inch sides and bracing to add a little more strength.

MFT1.JPG


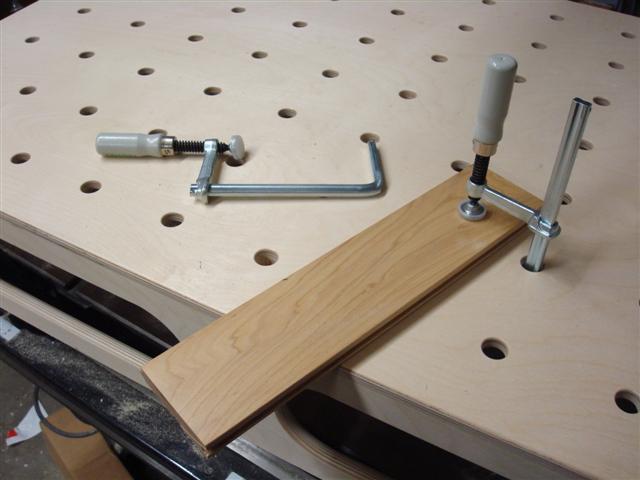
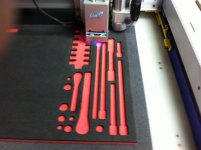
It's much lighter than I thought it was going to be and it will be easy (even once the bottom is installed, to move it around. the surface as a mess of 3/4-inch holes drilled 4-inches on center for fixturing. Festool actually makes clamps that are specifically designed for clamping through the holes.

FestoolClamps.JPG


I've always used the edge of a table or counter top to clamp to and I've never found a better solution until I was able to use this setup for the first time. It makes assembly of just about anything extremely easy and is only limited by the size of the clamps you have. As you can imagine I'm not all that happy that not a single clamp I already have fits through a 3/4-inch hole.
 
Last edited:
OP
L

lilscorpion

Well-known member
Joined
Mar 15, 2010
Messages
3,599
Location
Colorado
Somewhere between building the table and using it for the first time (with my overly expensive pair of clamps) I did some more research and found some other accessories that MFT users were buying for their tables. Bessey makes some really cool auto-clamps similar to some of the clamps I've used for metal fabrication and fixtures for years and they're more reasonable than these simple little clamps. I needed a base to attach the clamp to that would allow it to be attached to the MFT through the holes. I made some plates out of 1/4-inch 6061. Instead of using a counter sunk bolt, I decided to machine a recess that allowed me to use bolts I already had.

AutoClamp1.JPG


I then turned a 1/2-inch long piece of aluminum to 3/4-inch (the diameter of the holes in the MFT) and threaded the ID for a 5/16-inch bolt. The length worked out just about right and left enough thread showing to get the right engagement on the threads inside the plastic knob I sourced for the project.

AutoClamp2.JPG


Setups on the MFT are now painfully quick and simple ops with a saw, router, or any other tool can be done safely without the need of trying to hold the material with a free hand.

AutoClamp3.JPG


Once the workpiece is in place, up to 500 lbs of force keeps it where I left it. That's more than enough to serve as another hand and I was able to utilize scrap material from around the shop instead of having to source it. Even better.

MFT3.JPG
 
OP
L

lilscorpion

Well-known member
Joined
Mar 15, 2010
Messages
3,599
Location
Colorado
No I breezed over the assembly of the top but I figured you guys would want to see how I drilled the holes. There's a mess of woodworking forums out there that give ideas how to recreate the even spacing for an MFT top but I instead decided to bite the bullet and use an idea a friend of mine gave me about 8 years ago that I'd never had time to try. For the record i admit that this isn't a novel idea and that I've found others that recommend it for hole jigging.

The concept is to use a piece of peg board as the jig to get the spacing right and then use dowels in a fixture to keep the cutter located. I machined a base for my router that had a configurable set of threaded holes where indexing pins could be set. The overall design was similar to the factory plate other than that. The overall size of the plate was loosely decided on by the material I had on hand and the constraints of the space needed for a couple of rows of pins.

RouterPlate1.JPG


Since the plate was machined out of 6061, it's fairly light but much heavier than the plastic it replaced. It glides nicely over the wood without pins and makes for an extremely wide and stable base for regular routing.

RouterPlate2.JPG


At first I thought that coming up with pins would be a little more difficult than it turned out to be. The holes in the pegboard were 1/4-inch. After wondering around the shop I realized that a bolt would work fairly well. After looking in my bolt bin, I realized that if I no more than machined the head off of a bolt, I'd have a threaded pin.

RouterPlate3.JPG


I machined the bolts down so that only about 1/4-inch of the shoulder is exposed when inserted. This gave them full engagement into the pegboard.

RouterPlate4.JPG


Screw in all four pins. The location of the pins really doesn't matter since the threaded holes were done 1-inch on center just like the pegboard. The further they are apart, the tighter (as in less slop) the router will feel in the pegboard. I tried it with only two and it did move a bit. Locating the router is easy once you know which hole the cutter needs to go through.

RouterPlate7.JPG


After setting up the plate and locating the pegboard, this surface was completed in less than 15 minutes for all of the holes.

RouterPlate8.JPG
 
OP
L

lilscorpion

Well-known member
Joined
Mar 15, 2010
Messages
3,599
Location
Colorado
If you've followed along, you'll notice that I tend to get a bit distracted even in the middle of a project and I may wonder off and start another project before the previous one is finished. Once completed with the fixture and holes drilled in the MFT surface, I got to thinking about the router plate I'd just made and that it would be really nice to have a circle cutting fixture for the router (I really want to build a Thien dust collector at some point) so I can cut holes larger than my largest hole saws so I kept making chips.

RouterCircleCutting2.JPG


The plate is machined from 6061 and designed to allow for holes from 4 to 2.5-feet. It attaches to the bottom of my Dewalt/Porter cable mini-routers using the factory hardware and is easily removable.

RouterCircleCutting3.JPG


Once attached, I simply run a screw through the correct hole (for the diameter I desire) and spin it in circles until I'm done. Works good too. I do suppose I could have come up with an easy way to make it infinitely adjustable between max and min holes but I'll address that if I ever have a need other than what it can do.

RouterCircleCutting1.JPG


Also note the piece of HDPE under the router I found laying around the shop. By simply clamping it to the table I can now use the bench for more destructive purposes without worrying about destroying the wood.
 
To avoid these ads, REGISTER NOW!
Top Bottom