To avoid these ads, REGISTER NOW!

Tooling (Re)Organization

OP
L

lilscorpion

Well-known member
Joined
Mar 15, 2010
Messages
3,599
Location
Colorado
Re: Squirrel!

I’ve ordered three different sets of these from Amazon and found all three were not 90 degrees. They were all a few degrees more, which made no sense to me. Once installed I couldn’t see how the tops would align...


Sent from my iPhone using Tapatalk


My set has a 1* rise to them as well (installed) meaning that the opposite end from the hinge is higher than the hinge. I’ve wondered if this was intentional/by design. Now that you’ve said that all of yours were as well, it makes me even more curious. The design of the bracket wouldn’t allow it to go to 90* if it were loaded, it would fail first.

Interesting though.


Sent from my iPad using Tapatalk Pro
 
To avoid these ads, REGISTER NOW!
OP
L

lilscorpion

Well-known member
Joined
Mar 15, 2010
Messages
3,599
Location
Colorado
Bob Heine said:
Lilscorpion, I hate it when a simple solution is outrageously priced. I was looking for the same kind of shelf bracket but only wanted a 12-inch fold-down shelf for a grinder. I don't actually believe their claim of 550-pound capacity but if it holds up the grinder I'll be happy. It also feeds my obsession for stainless steel.
attachment.php


It's beefier than I expected, especially at $11.98 each.

https://www.amazon.com/gp/product/B00LGBZC4G/?tag=atomicindus08-20


I️ looked at those (but the longer version) for weeks before deciding not to buy. Feedback on them indicated that they couldn’t handle the stated load and some stated that they failed with hardly any load. I️ didn’t want to mess with going there so I️ picked the ones I️ did because of how they’re made...but it was still a guess. Given the intended use, I️ probably could have just bought a set. I️ don’t really need them to handle more than about 50lbs (more than the weight of the top).


Sent from my iPad using Tapatalk Pro
 

BoilermakerFan

Well-known member
Joined
Apr 17, 2006
Messages
2,188
Location
Indianapolis, Indiana
Re: Squirrel!

Here’s a neat fact. I purchased them from Kitchensource.com which has them listed as a pair for load and then per/single for ordering @ $130. I bought 2 pairs so that I could make folding benches in two places but, since I didn’t really read the site right, I actually only ordered 2.

<snip>

Now I just need to order another pair for the other fold-up top. Kinda pissed that each will now cost about $260. Had I known that I would have built them myself. I still have a few more work surfaces to add in the shop, maybe I’ll save off building a set myself for one those later.

:scared:

Holy ****! I'd be pissed too, so pissed I probably would have sent them back and gotten a refund. $130 for two drop arms? That's nuts.

I've been kicking around a design idea in my head for the past two days on how to use a pair of side mount linear actuators that are rated for 700N (157lbs) lifting force each. I'd love to be able to use them to lift and support drop leafs, but they can't take much side load. I'm thinking about attaching them to a small frame on casters that will have guide rods with thrust bearings to take the side load since they would be extending horizontally to the floor. Then the main side mount frame would be mounted to the underside of a workbench.

I could just use them to lift a 65" flat screen out of a base cabinet, but that's boring... :D And I don't have a cool domino cutter to make a fancy cabinet.
 

Tyberius

Well-known member
Joined
Nov 26, 2013
Messages
312
Location
Wilmette, IL
I️ looked at those (but the longer version) for weeks before deciding not to buy. Feedback on them indicated that they couldn’t handle the stated load and some stated that they failed with hardly any load. I️ didn’t want to mess with going there so I️ picked the ones I️ did because of how they’re made...but it was still a guess. Given the intended use, I️ probably could have just bought a set. I️ don’t really need them to handle more than about 50lbs (more than the weight of the top).

Maybe I'm not thinking enough, but couldn't you just use the lightweight bracket and keep a couple of 4x4s on hand when you want to hold up an engine block?
 
OP
L

lilscorpion

Well-known member
Joined
Mar 15, 2010
Messages
3,599
Location
Colorado
Tyberius said:
Maybe I'm not thinking enough, but couldn't you just use the lightweight bracket and keep a couple of 4x4s on hand when you want to hold up an engine block?

Maybe, depends on the error factor applied certain aspects of the design. There’s multiple aspects of the brackets that “hold” weight. The hinge pin and the material retaining it, the support rod/latch that holds it locked open, the attachment to the wall/cabinet, and the weight bearing capacity of the arm as perpendicular and side loads are applied, etc.

A 2x4 under the wing reduces the load on some of the above but not all.
 

zr52002

Well-known member
Joined
Jan 5, 2007
Messages
82
Oh, I'll be looking into a heater setup for an enclosed FT-5. They're easy to enclose, but to get the best out of ABS and Nylon, they need to be heated. I have a few single loop temp controllers so I'm going to see what it takes. I'd really like to add a small heat exchanger setup so I can also pull off the odors and vent them outside without losing the heat. I'll probably tackle that little DIY project this summer.

I've been on the road and out of this thread a while. One thing about printing nylon or other exotics ... get your legs under you with PLA or PETG first. Nylon is nightmarish to print compared to them, and unless you really, really need the strength, PETG will give you really solid parts.

Not to mention, as you get into more exotic filaments, your print speed is going to slow down a lot.

I have Nylon, I have successfully made one part with Nylon, and I have never felt the need to deal with that again.

As to the i3 MK3 vs other printers - one thing to keep in mind is that, by far the i3MK3 has the best electronics available in a consumer-level machine right now. The missed step detection and quiet steppers are a much bigger deal than an enclosure.

I did design a modular system for drawer organizers and have been printing a bunch in PLA for my desk drawer. I'll probably start a new thread for that at some point.
 
OP
L

lilscorpion

Well-known member
Joined
Mar 15, 2010
Messages
3,599
Location
Colorado
I've been on the road and out of this thread a while. One thing about printing nylon or other exotics ... get your legs under you with PLA or PETG first. Nylon is nightmarish to print compared to them, and unless you really, really need the strength, PETG will give you really solid parts.

Not to mention, as you get into more exotic filaments, your print speed is going to slow down a lot.

I have Nylon, I have successfully made one part with Nylon, and I have never felt the need to deal with that again.

As to the i3 MK3 vs other printers - one thing to keep in mind is that, by far the i3MK3 has the best electronics available in a consumer-level machine right now. The missed step detection and quiet steppers are a much bigger deal than an enclosure.

I did design a modular system for drawer organizers and have been printing a bunch in PLA for my desk drawer. I'll probably start a new thread for that at some point.

I'm going to start simple and just play. Once I get the hang of it I'll dabble in drawer organizers. Thanks for the tip on Nylon. I kinda expected it would be more difficult because I see a disproportionate amount of PLA videos and there has to be a reason.

Would like to see what you've built so get that thread up (or paste some teasers here ;)).
 
OP
L

lilscorpion

Well-known member
Joined
Mar 15, 2010
Messages
3,599
Location
Colorado
Preparing for the new Tooling Workbench

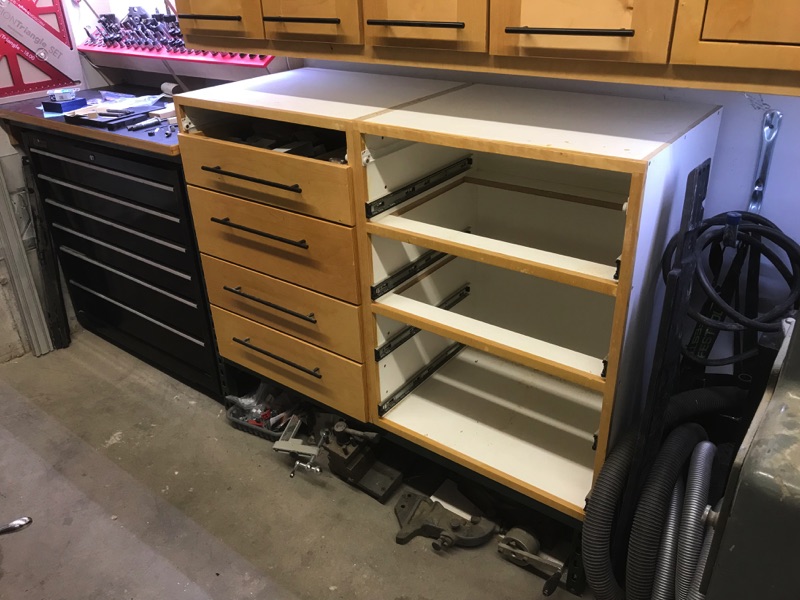
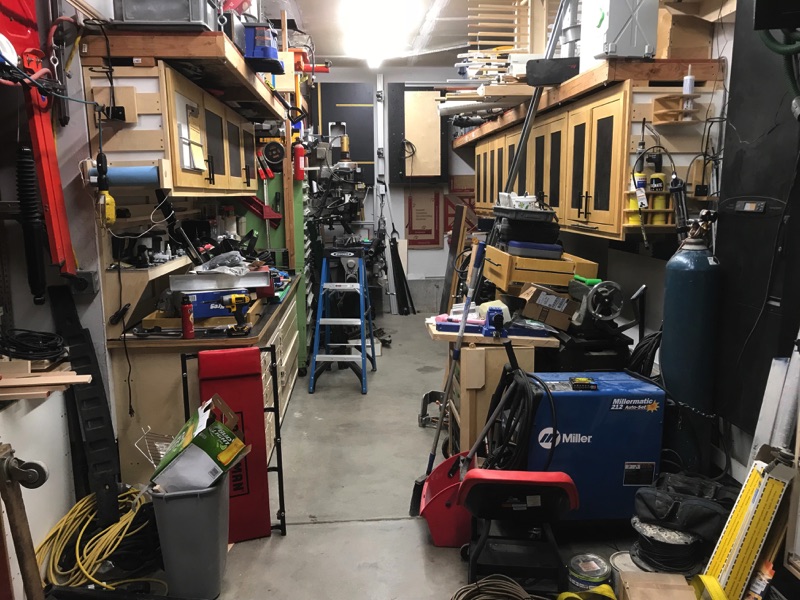
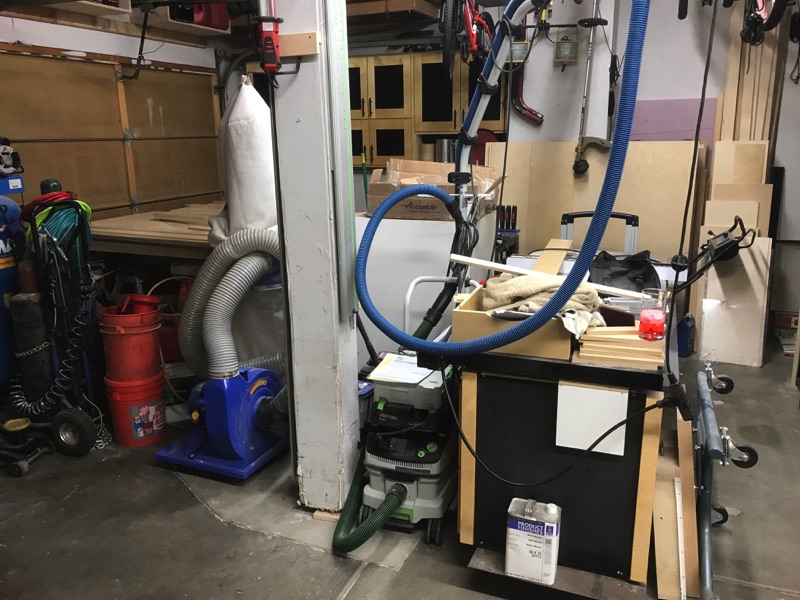
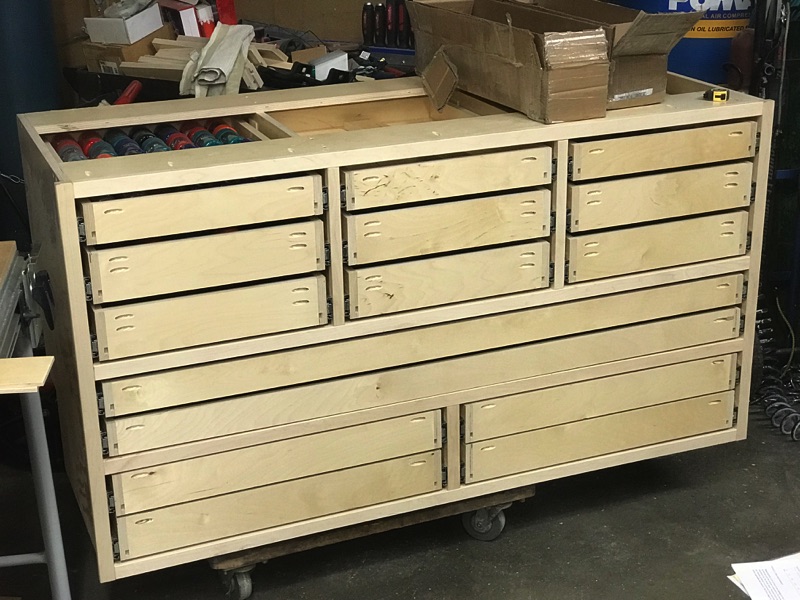
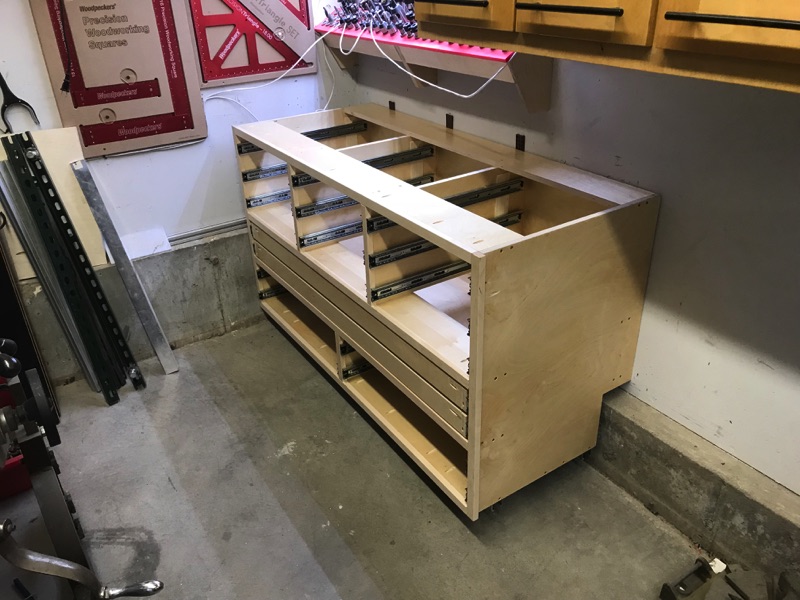
Though not finished, the primary workbench construction is done and it’s usable again. It’s tempting to move all the tools in however I know that unless I have most of my storage built and in place, moving it will just cause me to do it again…and I’m in fab mode, I might as well finish. This weekend I shifted my focus to the other side. The existing bench and cabinets are currently setup like this. I’ve really liked this space but learned that the bench is too small to really use it for more than tooling setup and I rarely actually do tooling setups.

IMG_2070.JPG


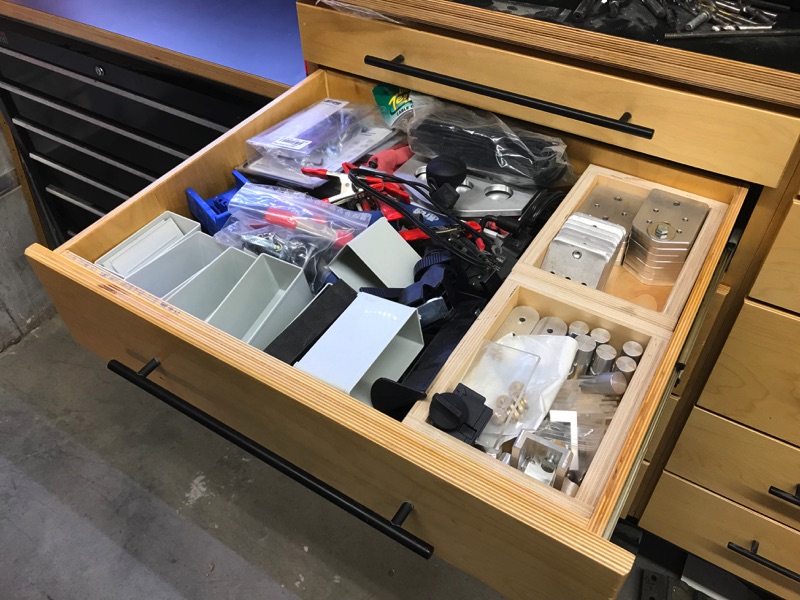
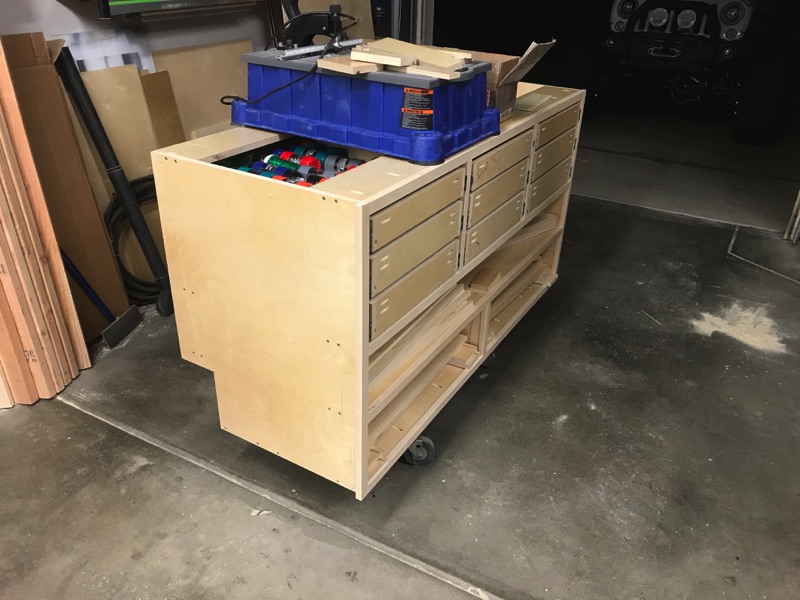
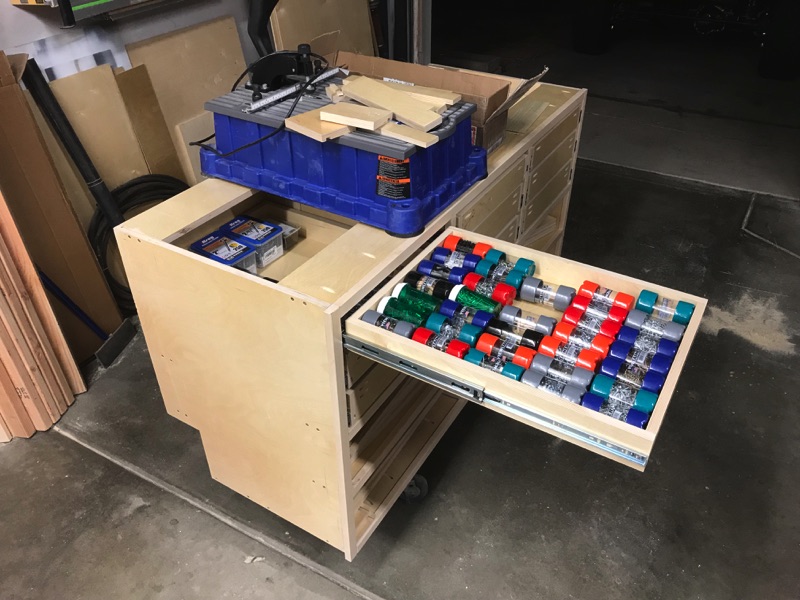
Originally these drawers were used to store tools but, as I’ve shifted to festool tools and added a SysPort setup out in the primary garage, these drawers have shifted to more of catch-alls than anything else. It was actually these drawers that got me thinking about my overall organization strategy. I don’t need to pile stuff in deeper drawers but I do.

IMG_2078.JPG


Sometimes it’s useful however. Drawers like this make material drops easier to find quickly however I really only want a single drawer like this, not multiples.

IMG_2079.JPG


The reality is this - I can find much more efficient ways to store sandpaper (I have 3 drawers full).

IMG_2086.JPG


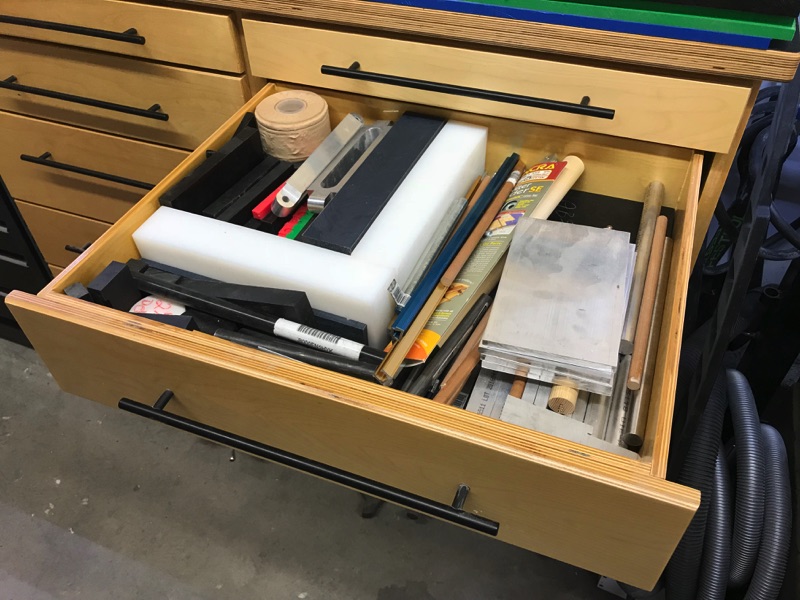
With so many of these drawers seeming unnecessary, I’ve had thoughts of how to use this space more effectively. Size wise, this space is nearly perfect for storing my Kapex miter saw and one of the MFTC’s and still leave me some room to elongate the tooling bench so it’s more multi-purpose. While elongating I’ll also gain more drawer storage so I can store the things I really need to store for easy access. A longer bench will also enable me to have a really long drawer for the stuff that was too big to fit in drawers before.

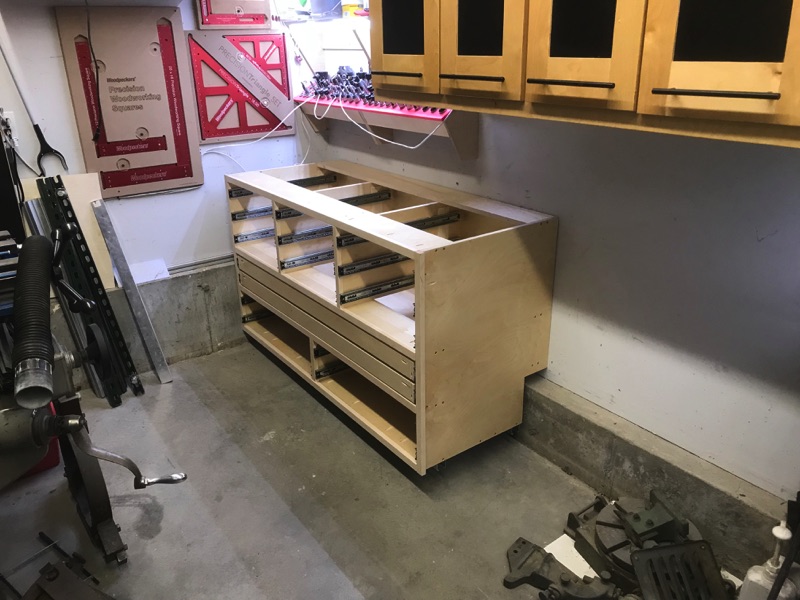
So, I’ll clear the space in preparation for the new setup and start with the drawer-bases. As I begin to remove drawers I noticed that this cabinet assembly has more structure to it than the previous main bench bases did.

IMG_2540.JPG


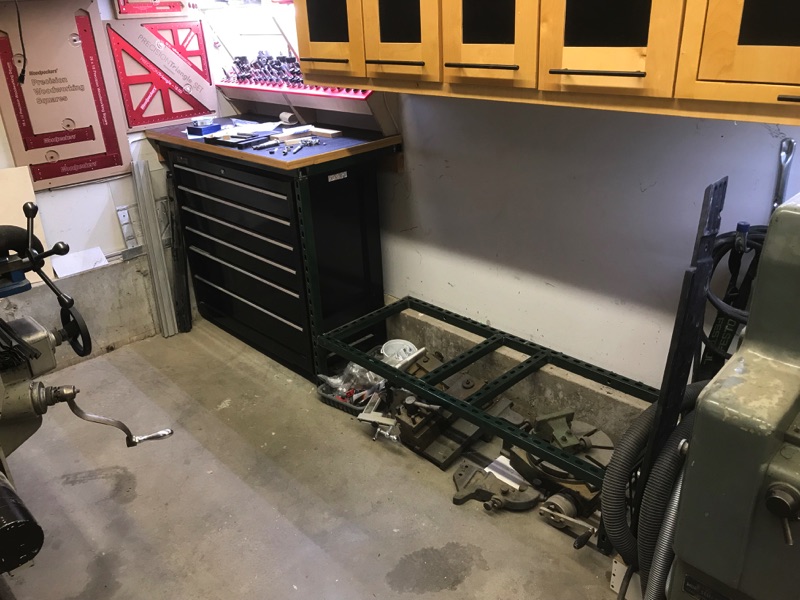
After I get the drawer bases moved, I realize how much I used the space under them for “additional storage”


IMG_2542.JPG


You can also see how I utilized the uni-strut to build out a support structure over the box and the drawer bases. I even cheated and used the foundation to support the backside of the drawer bases. I’ll have to take that into account when building the new cabinets.


IMG_2541.JPG


Had to remove everything from the craftsman 41-inch cabinet too. Those drawers were so heavy that I had no choice but remove everything from them one at a time before removing the drawers. With the base out of the way, you can now see the overall uni-strut structure. I think I made all of this out of less than two 8’ lengths. If you have a welder this can be an incredibly effective way to build out cabinet and bench structures (everyone on GJ knows about Stevo’s Harbor Freight benchs…you could use uni-strut if square tubing isn’t readily available).


IMG_2545.JPG


With the new cabinet being much longer than the old one, a new base is necessary. Wood tools move to the side and hook up the welder. The local big-box store was out of the green painted uni-strut so I had to get the galvanized stuff. I hate galvanized. Even though I clean it, it still burns and ain’t healthy to breathe. As for the design of the base, I’m building less complicated than what I pulled out. Cut two pieces to length and some spreaders, drop the hood, and weld away. Having a StrongHand fixture makes tubing squaring and alignment extremely easy. It ends up square, it just does.


IMG_2517.JPG


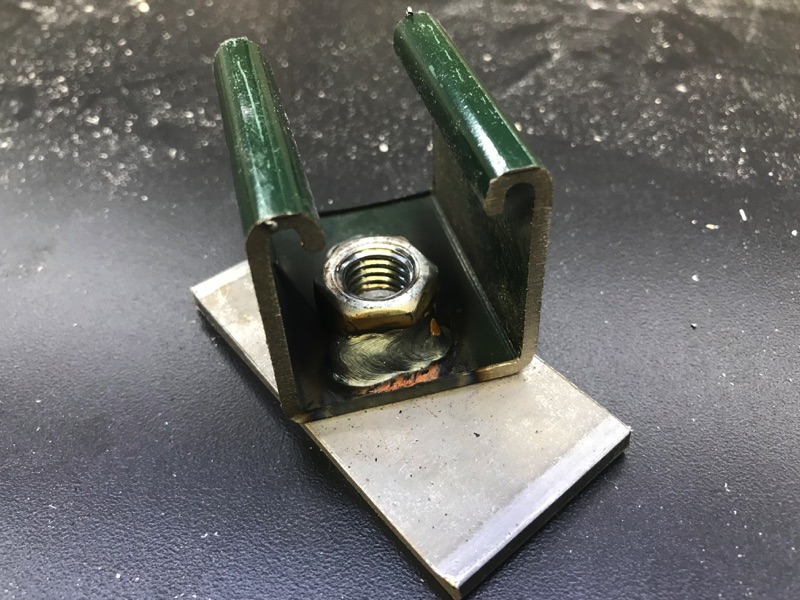
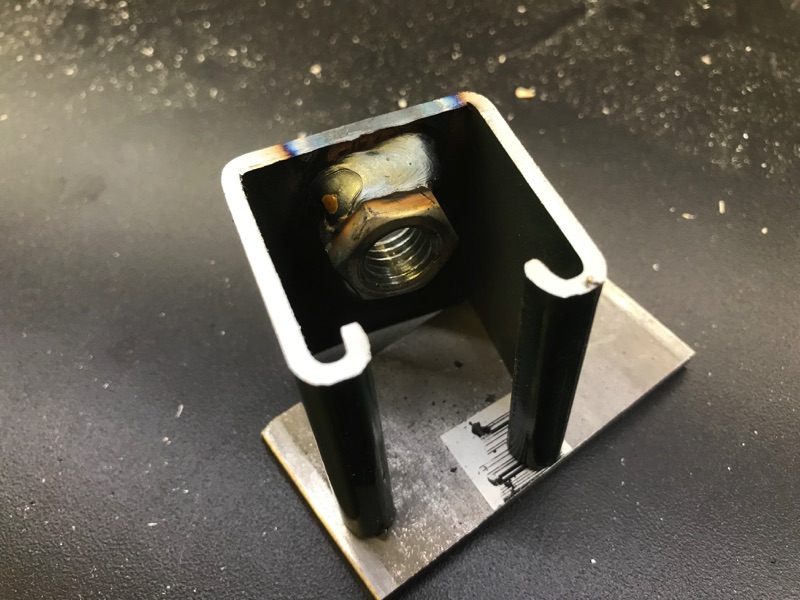
Here’s how I make the feet. I cut a bunch of uni-strut pieces about 3-inches long (I cut perfectly in between the slots so whatever length that ends up being). Then I run a 1/2-inch bolt and nut in the hole and weld the nut into the edge.


IMG_2521.JPG


I keep the nut off-set so there’s material to weld it to.

IMG_2523.JPG


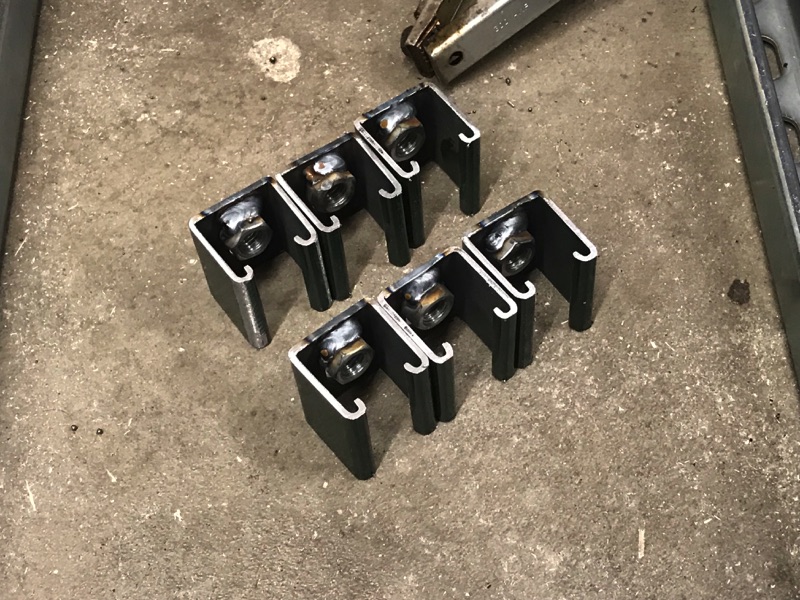
Fairly quickly I have a set of 6 (with no additional trips to the hardware store ;)

IMG_2525.JPG


After welding them on, I stand the assembly on end so the heat can risk up through the material. If I were to lay it down on the floor, the heat would rise perpendicular to the material causing parts of the assembly to cool at different time than others and I’d end up with a warped piece of ****. I learned this trick from a guy who first showed me how to narrow 9-inch ford rear ends.

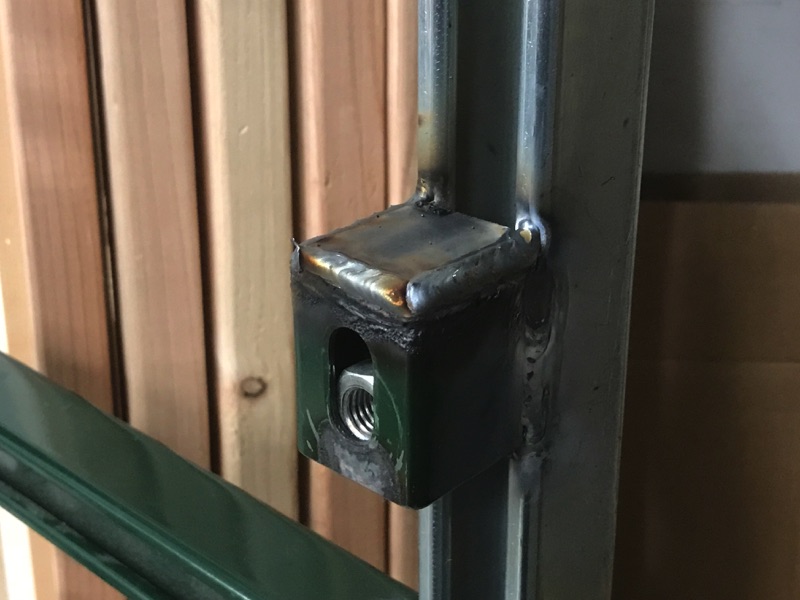
Back to the cabinet base -The only concern about using uni-strut for feet is that too much weight could cause them to collapse so I add some plate/gussets to the outside of all of the feet.


IMG_2533.JPG


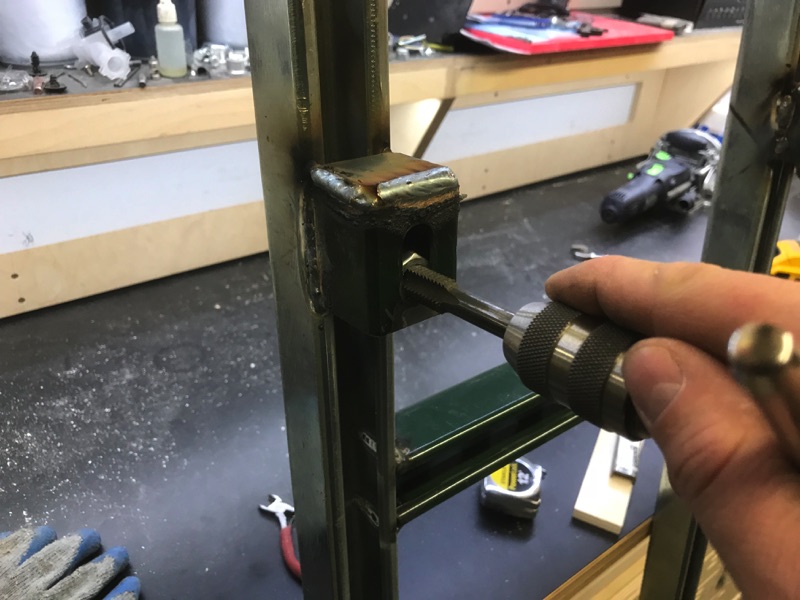
When pushing the nut/bolt assembly to one edge of the uni-strut slot, it sometimes gets so close that the bolt has a hard time threading into the nut so I re-tap all 6. Only takes a second and makes leveling later much easier.


IMG_2535.JPG


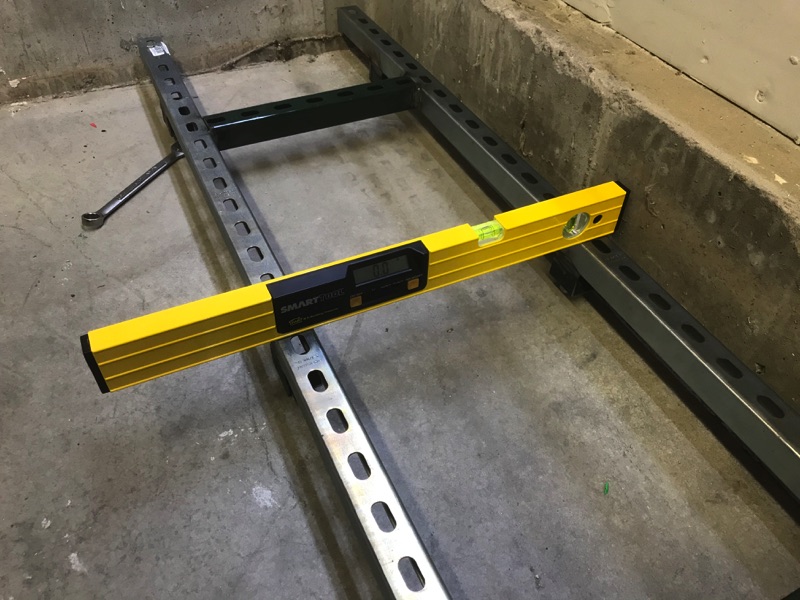
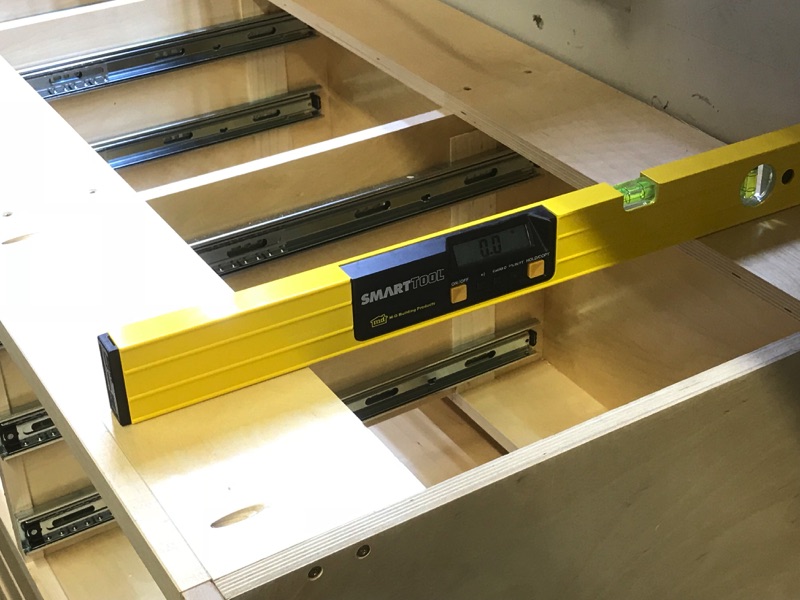
With the assembly complete and is cool to the touch, I level the assembly using the outer 4 feet. Once I have it level, I spin down the middle two until they touch and then a smidgen more. Final check for level and tweak as necessary.


IMG_2550.JPG


Since the base isn’t physically attached to the floor, I mark the front two feet with a sharpie on the concrete so I know where it’s supposed to be on the chance I bump it while setting the cabinet on top. If I don’t, I will be nearly impossible to drop the box on without re-leveling (unless I get lucky)

I thought I'd get into the tooling bench this weekend however I spent way too much time moving things from one location to another and then to another again when it was in the way. The back of the shop is already starting to look more open but now everything feels messy.


IMG_2563.JPG


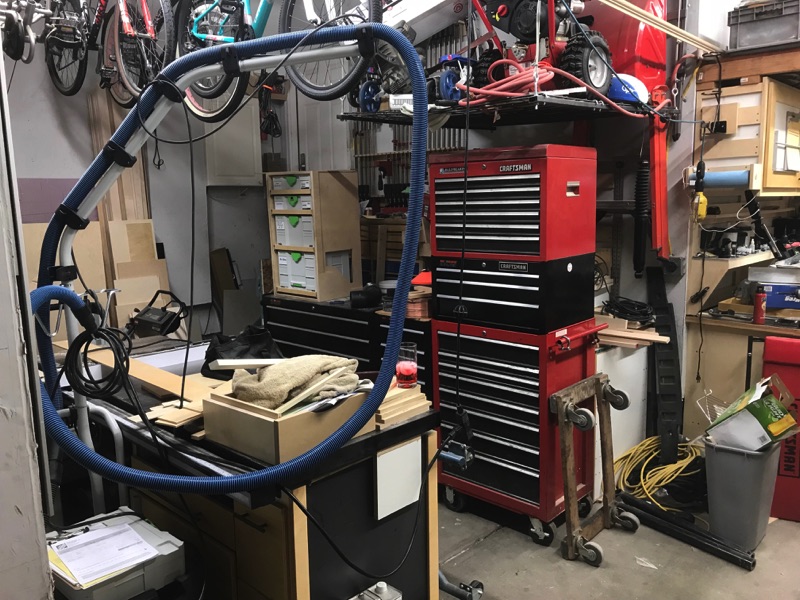
The 41-inch Craftsman tool chest is back on wheels and now lives between the table saw and the cabinets in the front of the non-tandem side.


IMG_2564.JPG


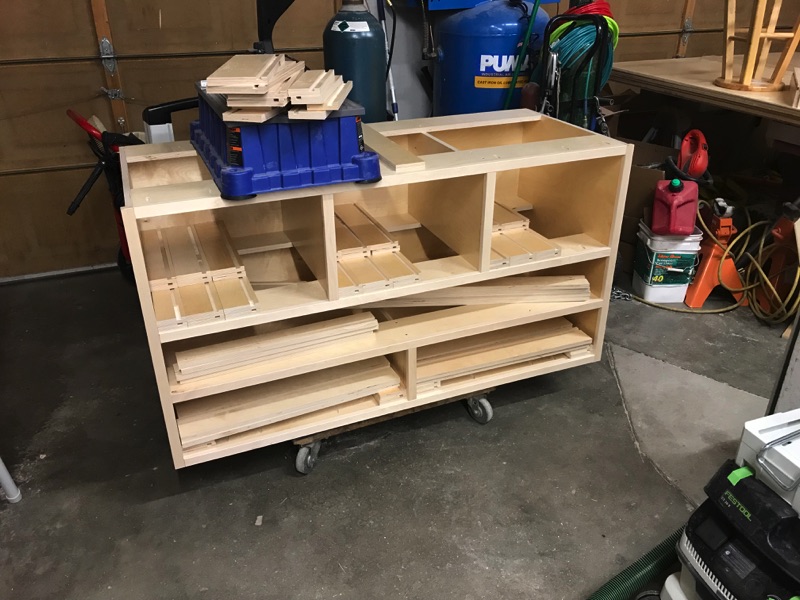
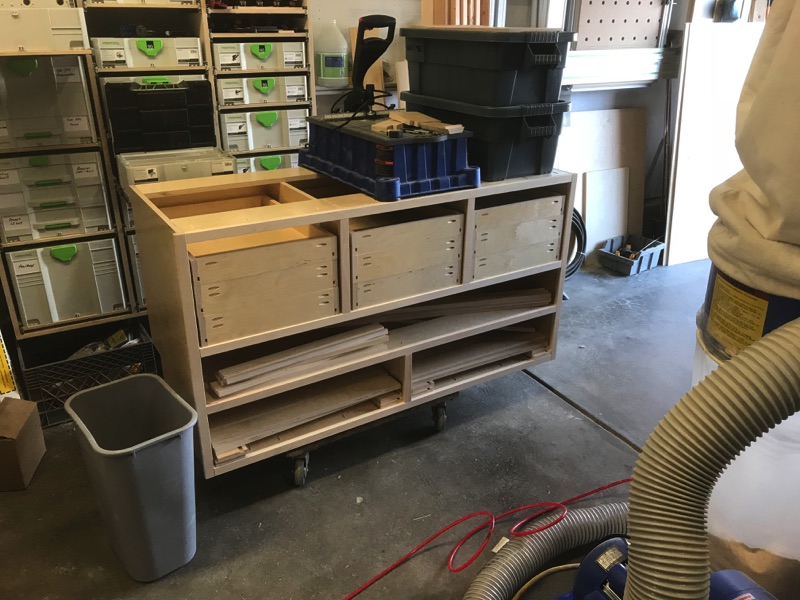
The front of the non-tandem side gets to be temp-storage-ville. All of the 5x5 sheets of plywood are resting on my two MFT Horses which easily slide directly into the saw when I'm ready to cut. I have what's left of the previous cabinets resting on two different dollies so I can roll them around as needed and then tuck them back in the walk ways during the week so I can still get the Jeep in the garage.

IMG_2565.JPG


Next week I plan on getting the tooling cabinet put together and build some more drawers. Can't wait to start moving things in. Maybe I'll lead with that next week.
 
Last edited:
OP
L

lilscorpion

Well-known member
Joined
Mar 15, 2010
Messages
3,599
Location
Colorado
Did you remember that steady rest was stashed behind the toolbox? :lol:


I’m not gonna lie...I did not even remember I had that huge *** thing. Clearly I don’t use it much. It had to be back there for about 7 years. I’m going to have to have a better plan for storing that going forward. I’m not sure what I was thinking.


Sent from my iPhone using Tapatalk Pro
 

BoilermakerFan

Well-known member
Joined
Apr 17, 2006
Messages
2,188
Location
Indianapolis, Indiana
I've been on the road and out of this thread a while. One thing about printing nylon or other exotics ... get your legs under you with PLA or PETG first. Nylon is nightmarish to print compared to them, and unless you really, really need the strength, PETG will give you really solid parts.

Not to mention, as you get into more exotic filaments, your print speed is going to slow down a lot.

I have Nylon, I have successfully made one part with Nylon, and I have never felt the need to deal with that again.

As to the i3 MK3 vs other printers - one thing to keep in mind is that, by far the i3MK3 has the best electronics available in a consumer-level machine right now. The missed step detection and quiet steppers are a much bigger deal than an enclosure.

I did design a modular system for drawer organizers and have been printing a bunch in PLA for my desk drawer. I'll probably start a new thread for that at some point.

I've pretty much been watching YouTube vids for the past 2 weeks at night on materials and mods. I picked up a GeeeTech Prusa i3 clone from a friend on Wednesday. I shared my first results in my Killing Time thread... I picked up a roll of eSun PLA+ on Saturday but haven't had a chance to get back to the printer. One of the vids I came across was annealing or tempering PLA prints and it makes a huge difference. They become very strong and durable, more so than even PET-G. I did see that most guys print their new parts in PET-G though, so I will be ordering some of that material.

I discovered that the hot end needs to be replaced and the extruder needs to be calibrated. I also discovered that I can upload a different firmware to it, it doesn't have to be GeeeTech... so I will be doing that to get better PID tuning. I will probably pick up the genuine Prusa MK45 heated bed too.

Since the Prusa i3 Mk3 is still open source, you can implement the missed stepper, broken filament detector, and swap in the TMC2130 drivers into most of the current i3 clone boards. I'm looking at the Smoothieboard and Duet WiFi boards too.

I'm waffling on just building a bigger H-Bot/CoreXY printer from the start and skipping the FT-5. But I can only do that if I can get the GT i3 printing good parts. I may still get the FT-5, still undecided.
 

wkearney99

Well-known member
Joined
Oct 10, 2012
Messages
323
Location
Bethesda, MD USA
I'm going to start simple and just play. Once I get the hang of it I'll dabble in drawer organizers. Thanks for the tip on Nylon. I kinda expected it would be more difficult because I see a disproportionate amount of PLA videos and there has to be a reason..

One alternative is to prove the design with your own printer using PLA and then sending it out for printing. Shapeways, 3Dhubs and other services are great for this and not really all that expensive.

The upside is you're getting prints done with materials you might not use regularly from someone that does. All the tweaks, calibrations and filament condition are all handled. Note the last point, filament can be sensitive to humidity and temp. So unless you're cranking a lot of a given filament it can be a real time-waster trying to dial-in all the variables.

Were I buying new I'd spend for the prusa. For just dabbling/learning the Monoprice Mini is a fantastic bargain. The Folgertech units have a LOT of variables which will lead to a LOT of fiddling. Not ideal as a learning experience...
 
OP
L

lilscorpion

Well-known member
Joined
Mar 15, 2010
Messages
3,599
Location
Colorado
Were I buying new I'd spend for the prusa. For just dabbling/learning the Monoprice Mini is a fantastic bargain. The Folgertech units have a LOT of variables which will lead to a LOT of fiddling. Not ideal as a learning experience...


I think the moment to change my mind is solidly behind me. I think I have a UPS notification for delivery today and it’s probably the FT-5 I ordered nearly 3 weeks ago now.

As I’ve mentioned in the past, CNC kit adventures are not new to me. More than 10 years ago I dove into CNC plasma and learned a lot on the first kit. Those lessons learned were then applied to the next one which ended up extremely successful. Thing is, you can’t really know how to pick one until you speak the language. That being said, I expect to learn, struggle, and will have to work through things but I’m cool with it because I know it’s part of the process.

Now when I select a CNC router/plasma again, I won’t be as willing to learn...lessons have been learned.


Sent from my iPhone using Tapatalk Pro
 

wkearney99

Well-known member
Joined
Oct 10, 2012
Messages
323
Location
Bethesda, MD USA
No worries, they're all a bit of Frankenstein's monster anyway. Some are just "less worse" than others.

There's a lot of modeling knowledge that transfers from CNC to printing, but the change from reductive to additive is a challenge. There's a ton of feeds & speeds, materials and bit knowledge from CNC that doesn't correlate. But then there's a ton of new stuff like layer heights, filament diameters, retraction, print motion speed and then the temperature settings (head, bed and ambient).

For me the key to reducing headaches during the learning process is not tossing too many variables into the mix. Stick with one model and one filament spool FOR A WHILE until you're reasonably sure you've got the printer dialed-in. This I learned after NOT doing that, trying all kinds of models, filaments and speeds. Ugh, I've got a pile of failed prints from all that. The hardest part was discovering how crappy some filament can be. Some stuff just does not print without issues and you kinda can't "prove this" until you really know that your printer isn't the problem. Well, for me anyway.
 

BoilermakerFan

Well-known member
Joined
Apr 17, 2006
Messages
2,188
Location
Indianapolis, Indiana
I think the moment to change my mind is solidly behind me. I think I have a UPS notification for delivery today and it’s probably the FT-5 I ordered nearly 3 weeks ago now.

As I’ve mentioned in the past, CNC kit adventures are not new to me. More than 10 years ago I dove into CNC plasma and learned a lot on the first kit. Those lessons learned were then applied to the next one which ended up extremely successful. Thing is, you can’t really know how to pick one until you speak the language. That being said, I expect to learn, struggle, and will have to work through things but I’m cool with it because I know it’s part of the process.

Now when I select a CNC router/plasma again, I won’t be as willing to learn...lessons have been learned.


Sent from my iPhone using Tapatalk Pro

No worries, they're all a bit of Frankenstein's monster anyway. Some are just "less worse" than others.

There's a lot of modeling knowledge that transfers from CNC to printing, but the change from reductive to additive is a challenge. There's a ton of feeds & speeds, materials and bit knowledge from CNC that doesn't correlate. But then there's a ton of new stuff like layer heights, filament diameters, retraction, print motion speed and then the temperature settings (head, bed and ambient).

For me the key to reducing headaches during the learning process is not tossing too many variables into the mix. Stick with one model and one filament spool FOR A WHILE until you're reasonably sure you've got the printer dialed-in. This I learned after NOT doing that, trying all kinds of models, filaments and speeds. Ugh, I've got a pile of failed prints from all that. The hardest part was discovering how crappy some filament can be. Some stuff just does not print without issues and you kinda can't "prove this" until you really know that your printer isn't the problem. Well, for me anyway.

lilscorpion won't have many issues. Most folks have no trouble with their FT-5 initially. And fortunately, they have a great support forum and a ton of guys have them on YouTube. I had found pretty much everything needed for the FT-5 online or on YT before I got my GeeeTech i3. I wish this GT i3 had the same level of support! It's taken me almost a week to GoogleFu solutions and things to check on mine. The only nice thing is that since it's an i3 clone, I can buy a few upgrades direct from Prusa and they will work.

But I do fully agree to get really good at printing PLA/PLA+ before moving on. That's where I'm at right now, just trying to get PLA/PLA+ to print.

Simplify3D runs like a dream on my Mac. So I'm glad I made that upgrade and the settings for a FT-5 are out there too. I found plans to convert an i3 into a CoreXY machine and I'm probably going to go that route. Most of the parts from the i3 are used and it changes to a single z-axis stepper so no more wobble.

For a nice lower cost filament, look up eSun PLA+ on Amazon. I lucked into a roll locally. I have yet to see a bad review on this stuff. The PLA I got with the printer is ****, not a PLA+ but requires 200-230degC hot end temp and it barely extruded at 220degC. My plan is to get the eSun PLA+ running correctly, then I'll print a few parts for the new machine and heat treat or temper them and check dimensions. There can be some change in dimensions that have to be factored into the prints, but once dialed in you can get prints stronger than PETG which is pretty wild.

The issue I have in my current setup is that I run Win7 Pro in VMware Fusion on a 2011 MacBook Pro. The Audrino app doesn't communicate with the GT2560 board on the Mac side so I can't upload new firmware or even get into the current firmware to check PID loops. And in the Win7 side it doesn't connect at all. I'm hoping that I can resolve all these issues this weekend after my new beast of a laptop arrives, I swap in a new hot end, and calibrate the extruder. If it still doesn't print correctly, I'm going to install a 3rd party firmware on the GT2560 board because the issue I'm having is thermal runaway on the extruder on any temp over 215degC. The eSun PLA+ should print well at 210-215degC so I'm hoping to avoid the temp loop control issue long enough to get some parts printed.

It's definitely been a learning experience and I see why my buddy gave up on this GeeeTech. I would never buy one myself, but I'm also determined to get it running.
 
Last edited:

Cruzan80

Well-known member
Joined
Jul 22, 2015
Messages
4,158
Location
Denver, CO
I have been running the Microcenter "Intech" filament with very few problems. Nothing regarding flow, mostly breaking due to humidity. Maybe twice in 18 months have the nozzles jammed (once before/once after all metal hot-end upgrade). Their blue is really shiny and cool looking. Gold is a bit see-thru.
 
OP
L

lilscorpion

Well-known member
Joined
Mar 15, 2010
Messages
3,599
Location
Colorado
Cruzan80 said:
I have been running the Microcenter "Intech" filament with very few problems. Nothing regarding flow, mostly breaking due to humidity. Maybe twice in 18 months have the nozzles jammed (once before/once after all metal hot-end upgrade). Their blue is really shiny and cool looking. Gold is a bit see-thru.


“INTECH” or “INLAND”? I have a Microcenter not far from me but I don’t see Intech on their website.


Sent from my iPhone using Tapatalk Pro
 
OP
L

lilscorpion

Well-known member
Joined
Mar 15, 2010
Messages
3,599
Location
Colorado
lilscorpion said:
I think the moment to change my mind is solidly behind me. I think I have a UPS notification for delivery today and it’s probably the FT-5 I ordered nearly 3 weeks ago now.


No more I think, now I know for sure changing my mind is solidly behind me...

80b77d3f6805f30471e8c89b3c636054.jpg


Sent from my iPhone using Tapatalk Pro
 

Attachments

  • 80b77d3f6805f30471e8c89b3c636054.jpg
    80b77d3f6805f30471e8c89b3c636054.jpg
    339.2 KB · Views: 0
To avoid these ads, REGISTER NOW!

Cruzan80

Well-known member
Joined
Jul 22, 2015
Messages
4,158
Location
Denver, CO
“INTECH” or “INLAND”? I have a Microcenter not far from me but I don’t see Intech on their website.


Sent from my iPhone using Tapatalk Pro

Sorry, Inland. At home (printer is at the school I teach at) and was trying to go from memory. I have used their PLA only, so can't comment on other parts.
 
OP
L

lilscorpion

Well-known member
Joined
Mar 15, 2010
Messages
3,599
Location
Colorado
Cruzan80 said:
Sorry, Inland. At home (printer is at the school I teach at) and was trying to go from memory. I have used their PLA only, so can't comment on other parts.


Cool, I’ll get a roll to play with. My son was kinda irritated I didn’t order any material to test print on so you’re savin’ me. Lol


Sent from my iPhone using Tapatalk Pro
 

zr52002

Well-known member
Joined
Jan 5, 2007
Messages
82
Cool, I’ll get a roll to play with. My son was kinda irritated I didn’t order any material to test print on so you’re savin’ me. Lol
Sent from my iPhone using Tapatalk Pro

Smart to only get one roll. I have had issues with certain colors from some brands in the past, but great results from same color of same brand. Don't stock up on anything until you get the first roll going, I've learned that the hard way. All of it bought long enough ago I don't want to pick on any brands by name today.

From my experience, black tends to be the most consistent to deal with - probably because it has less going on with the pigments?
 
OP
L

lilscorpion

Well-known member
Joined
Mar 15, 2010
Messages
3,599
Location
Colorado
Smart to only get one roll. I have had issues with certain colors from some brands in the past, but great results from same color of same brand. Don't stock up on anything until you get the first roll going, I've learned that the hard way. All of it bought long enough ago I don't want to pick on any brands by name today.


From my experience, black tends to be the most consistent to deal with - probably because it has less going on with the pigments?


Interesting. I’ll then start with black. Couldn’t care less about the color for now anyway.

After playing with it I’ll probably find a YouTuber and see if I can get the same materials and use the same settings with similar outcomes. Known Good can be an much better place to try to dial things in for the first timw (in my experience anyway).
 

BoilermakerFan

Well-known member
Joined
Apr 17, 2006
Messages
2,188
Location
Indianapolis, Indiana
Do you guys think we should start a 3D Printing thread or do you want to keep the info here in your thread lilscorpion?

I did a little research on the MKS 1.4 board that comes with the FT-5:

Arduino MEGA compatible Atmega2560 and FT232 processors are compatible with all RAMPS class firmware
Firmware can use the same configuration as ramps1.4
Easy DISPLAY + SD-CARD connector,RepRapDiscount SmartController compatible pin header on board
All extra pins broken out the same as ramps1.4(AUX-1,AUX-2,AUX-3,Servos1)
3x temperature ADC connectors for thermistors
up to 5 motor driver with easy micro stepping setup (micro switches)
4x PWM capable power mosfet outputs with voltage selector for MainPower.(Bed,Extruder0,Extruder1, Fans)
4 layers PCB, optimize heat dissipation.
6x end stop connectors with power supply Xmin/Xmax/Ymin/Ymax/Zmin/Zmax
3* 5V output, 3* 12V-24V output interface.
Recoverable fuse for short-circuit protection.

So it can also use 3rd party RAMPS firmware like the GT2650 can and it can support the MKS TFT 2.8" Touch Screen if you want to upgrade from the LCD2004 that is included.
 
OP
L

lilscorpion

Well-known member
Joined
Mar 15, 2010
Messages
3,599
Location
Colorado
BoilermakerFan said:
Do you guys think we should start a 3D Printing thread or do you want to keep the info here in your thread lilscorpion?


Originally I thought it was a good idea to have it here because (in my mind) the purpose was for researching technologies that would enable organizing tools. It totally accomplished the goal however, since the machine has arrived, I have assembly and learning to do which doesn’t necessarily have anything to do with organization itself so a new thread would probably make sense.

I’m wondering what kind of feedback the next research request will dig up - CNC Routers. If this (3D Printer outcome) pattern occurs again with it as a topic it could also be easily spun off at the time I order...all of it good stuff.

Oh, speaking of research, I found 2 or 3 options for Laser upgrades for CNC Router/3D printer-like setups. All appear viable and some are only about $500. New goal for 2018 is to become CNC Router and Laser capable. [emoji41]


Sent from my iPhone using Tapatalk Pro
 

BoilermakerFan

Well-known member
Joined
Apr 17, 2006
Messages
2,188
Location
Indianapolis, Indiana
Originally I thought it was a good idea to have it here because (in my mind) the purpose was for researching technologies that would enable organizing tools. It totally accomplished the goal however, since the machine has arrived, I have assembly and learning to do which doesn’t necessarily have anything to do with organization itself so a new thread would probably make sense.

I’m wondering what kind of feedback the next research request will dig up - CNC Routers. If this (3D Printer outcome) pattern occurs again with it as a topic it could also be easily spun off at the time I order...all of it good stuff.

Oh, speaking of research, I found 2 or 3 options for Laser upgrades for CNC Router/3D printer-like setups. All appear viable and some are only about $500. New goal for 2018 is to become CNC Router and Laser capable. [emoji41]


Sent from my iPhone using Tapatalk Pro

I sent you a DM on the lasers... and that OpenBuilds site has a whole section on OpenSource CNC routers. ;)

OK, I'll start a 3D Printer thread in the Free Parking area later tonight or this weekend.
 
OP
L

lilscorpion

Well-known member
Joined
Mar 15, 2010
Messages
3,599
Location
Colorado
I sent you a DM on the lasers... and that OpenBuilds site has a whole section on OpenSource CNC routers. ;)

OK, I'll start a 3D Printer thread in the Free Parking area later tonight or this weekend.

Free Parking or Fabrication & Techniques? Feels more like the latter. :beer:
 

BoilermakerFan

Well-known member
Joined
Apr 17, 2006
Messages
2,188
Location
Indianapolis, Indiana
Free Parking or Fabrication & Techniques? Feels more like the latter. :beer:

Good point. I'll put it in F&T... I have some "real job" work I have to do tonight so it probably won't be until Friday or the weekend.

But I'll leave this here as a little teaser...
 

Attachments

  • Screenshot_20180228-171611.jpg
    Screenshot_20180228-171611.jpg
    117.2 KB · Views: 146
OP
L

lilscorpion

Well-known member
Joined
Mar 15, 2010
Messages
3,599
Location
Colorado
BoilermakerFan said:
Good point. I'll put it in F&T... I have some "real job" work I have to do tonight so it probably won't be until Friday or the weekend.


But I'll leave this here as a little teaser...


Cool! Ya know, I can create it too. Tonight is a couch night.


Sent from my iPhone using Tapatalk Pro
 
OP
L

lilscorpion

Well-known member
Joined
Mar 15, 2010
Messages
3,599
Location
Colorado
Here’s the finished tool bench assembly. Before everyone goes all armchair gangster on me, no, I did not build this in just one weekend, I did it in less than a day...seriously. All components were pre-cut at the same time I machined the main bench so it only needed to be assembled and it helps to have a drawing and all the parts labeled waiting for you.


IMG_2297.JPG


With the box complete I was back to building drawers again. This time I had all of the measurements documented so the day went a little more bang bang bang than before. Set up the miter saw stops and it becomes a little easier to fly through the assembly. Since there were really only 3 different sizes, it was easy to knock out the top 9 as soon as I got the dimensions right on the first one. These top 9 drawers will likely hold mostly hardware and some basic setup and machining tools (like calipers, chuck keys, parallels, etc). All 9 were designed to match the depth of the various organizers I use. More to come down below.


IMG_2328.JPG


I failed to mention how I decided to accommodate the protruding concrete footer. After measuring I found that it sticks up about 12-inches and out about 5. Problem was I didn't account for that when I pre-cut all of the plywood so I had to go back and "notch" the back after the whole thing was put together. 5-inches must have been lucky when it came to modifying the cabinet because with the 5 removed I can now fit full 18-inch deep drawers on the bottom 4 drawers. All of the full-length drawers were still going to be 24-inches deep which is awesome. Probably as close to wasting no space as I could get.


IMG_2378.JPG


In contrast to the Craftsman box, it only had 18-inch deep drawers so the added 6-inches will make a huge difference. This shot shows just how much hardware I can fit in a single drawer. I went ahead and loaded a drawer so I could realize the fruits of my labor (aka get some motivation to keep plugging away). As it turns out, they have never left the drawer since I put them in there and now it’s almost too easy to get the hardware I need when I need it and put it back as soon as I don’t. These view-tainers have just about every kind of hardware that I use in the shop. #6 screws in 1/2, 5/8, and 3/4-inch lengths. #7 in 5/8 and 3/4-inch, #8 in 3/4, 1, and 1 1/4-inch, 1 1/2-inch…and so on. I’ve learned that it’s so much cheaper to buy in bulk and have what I need on hand than it is to go to local box store and buy 25 at a time. As for the view-tainers…I keep a small one full of most hardware so I can easily grab what I need and throw them in the toolbox or take them over to the bench for a single use (even assembling a bunch of drawers). I keep the bulk boxes up in longer-term storage.


IMG_2381.JPG


The weekend wrapped up with a completed assembly. Ran into some challenges with the bottom drawer sets (4). According to the drawing they were supposed to be as deep as the upper drawers with equal reveals (1/2-inch).


IMG_2485.JPG


I was running out of time Sunday night but I just had to see the bench stuffed back in the corner. To my disappointment, I couldn't manage to lift it off of the dolly onto the base without removing all of the drawers (it was too heavy).


IMG_2552.JPG


Check to make sure it’s level. Of course it is, the base was level and the cabinet is perfectly square. I really like the leveling feet system. It’s worked so well for me over the years and enables me to re-level the bench should the floor shift (which it has).


IMG_2557.JPG


Got ‘er shimmed and permanently attached to the wall.


IMG_2561.JPG


Yeah...so outta time I had no choice but leave it exactly like this...couldn't even drop the drawers in. Good news is that next weekend I'm moving in. :3gears:
 
Last edited:

bj383ss

Well-known member
Joined
Sep 29, 2011
Messages
3,166
Location
TX
The new cabinet looks great. I like your ingenuity for dealing with the footer. If you had a whole wall of cabinets know one would ever know its there. Do you happen to have a link for the viewtainers?

And you are right about the hardware not only being cheaper but better quality than most of the China soft screws at Lowes or HD. Except for the maybe their higher end pro brand with the torx drive or star drive.

Bret
 
OP
L

lilscorpion

Well-known member
Joined
Mar 15, 2010
Messages
3,599
Location
Colorado
I know, I wish he would travel the country and build some nice benches & drawers for my garage! :lol:


You bustin my balls here?! You could build cabinets just like these, skip a bunch of the lipstick steps, roll paint on them, and have a bangin’ space yourself. Cabinets and drawers are so easy.

Huh...have I not documented the steps!? I was rushing through and skipping stuff because I thought it was old hat and it would be boring content. Was I wrong?


Sent from my iPhone using Tapatalk Pro
 
OP
L

lilscorpion

Well-known member
Joined
Mar 15, 2010
Messages
3,599
Location
Colorado
The new cabinet looks great. I like your ingenuity for dealing with the footer. If you had a whole wall of cabinets know one would ever know its there. Do you happen to have a link for the viewtainers?

And you are right about the hardware not only being cheaper but better quality than most of the China soft screws at Lowes or HD. Except for the maybe their higher end pro brand with the torx drive or star drive.

Bret


Viewtainers are the cheapest (so far) at HD. They keep them in the hardware isle at my store.

Here’s a link to the companies website - http://www.viewtainer.com

HD only shows their own version in their Everbuilt line. I suspect they’re Viewtainers private labeled for HD - https://www.homedepot.com/p/Everbilt-2-in-x-4-in-Clear-Can-Storage-Container-00382/100338091

You’re completely right on HD’s Pro hardware line. I do have some of it and it’s fantastic. Torx drive, self cutting tips, and they don’t ywisy the tops off when you hit them hard with the impact driver.


Sent from my iPhone using Tapatalk Pro
 

EOC_Jason

Well-known member
Joined
Jun 25, 2012
Messages
11,388
Location
Bentonville, AR
I'm serious, those that you have built are awesome and you make it look so easy!

I think you've pretty much documented everything well, I just need to motivate myself to dive in and get it done. Right now my work area is dominated by a bunch of shelf pieces I'm painting to go in my pantry, but after that I'm going to work on my multi-cart that will have a drawer or two and some shelves.

You bustin my balls here?! You could build cabinets just like these, skip a bunch of the lipstick steps, roll paint on them, and have a bangin’ space yourself. Cabinets and drawers are so easy.

Huh...have I not documented the steps!? I was rushing through and skipping stuff because I thought it was old hat and it would be boring content. Was I wrong?
 
To avoid these ads, REGISTER NOW!
Top Bottom