To avoid these ads, REGISTER NOW!

Tooling (Re)Organization

OP
L

lilscorpion

Well-known member
Joined
Mar 15, 2010
Messages
3,599
Location
Colorado
Strouty said:
I really need to make some holders for my lathe's aloris holders, they are a mess right now.


I’m sure you’ve already seen them but these ended up being nearly one of the most useful organizers I’ve made for the shop to date. The back row is nearly useless when boring bars are in the front so that one spot ends up “long term storage”. Holders don’t need to be machined out of aluminum, I think they could be wood screwed from the bottom.

4ac3e32d17bb2d4d6a163657ef42b3d4.jpg
 

Attachments

  • 4ac3e32d17bb2d4d6a163657ef42b3d4.jpg
    4ac3e32d17bb2d4d6a163657ef42b3d4.jpg
    63.7 KB · Views: 3
To avoid these ads, REGISTER NOW!

Strouty

Well-known member
Joined
Mar 21, 2010
Messages
38,209
Location
Southern Maine
Yes I remember those, I want to make them out of aluminum for sure. I was hoping to find someone selling an extrusion that worked, but it won't be a bad thing to have the correct tooling to make them, that way when I expand my collection, I can add more holders.
 

Cruzan80

Well-known member
Joined
Jul 22, 2015
Messages
4,170
Location
Denver, CO
I think the biggest issue with that particular drawer is item placement. Getting the tool in the top left down in the bottom, and turning one air hammer/drill 180 so it forms a square with the other leaves a space easily 1/4 of the drawer empty. Are the two right angles always going to have those bits in them? If so, possibly 180 one for another box shape to ft the horizontal room needed for the item in top left.

Sent from my Moto G (5) Plus using The Garage Journal mobile app
 

Duker

Well-known member
Joined
Sep 25, 2010
Messages
10,861
Location
Livingston, TX
The concept of the mag rail is great, i spent something ridiculous, like $1200 on socket rails, I want to make something that utilizes their pins without magnets. I rarely drag full rails out of my box anyways and I could easily make up a short rail that was magnetic if needed. If I think back to what I have spent on organizing the shop, I definitely have more money in the organization than what I spent on tools, seems a bit like a WTF when I think about it, so I try not to.


Mag Rails.......I don’t quite have that much in the rails (yet!) but I can blame Strouty for showing these in his thread awhile back. I have been slowly acquiring them and they are great. I have been experimenting with some different pop out trays I.e. the carriers I made that I inset the rails into just to see what worked better and to see if i really needed to have portability. So far the verdict is to build a better angled display for sockets within the drawer using the rails.

Now you guys have me buying new hardware for drawer fronts, and now I am looking at new liner for my boxes.... this is getting Brutal!


Sent from my iPad using Tapatalk Pro
 

Strouty

Well-known member
Joined
Mar 21, 2010
Messages
38,209
Location
Southern Maine
That liner is a steal compared to everything else, you should thank us for that! You also gave me an idea that I am going to try out with my magrails, will report back to see if it works.
 

Mecha

Well-known member
Joined
Dec 28, 2016
Messages
194
Location
Volunteer State
Hey guys, long time stalker of this thread. There are so many great ideas between this one and Strouty’s, and a few others. I’m going through a major revamp of my garage/shop area and you guys are a huge help for motivation and ideas. Thanks.

Have you guys checked out the Ernst socket organizers? Been using them for a few years and love them. Able to configure in a ton of ways, lengths of rails, and pull a rail from the drawer with a quick release.

https://www.ernstmfg.com/Socket-Organizers.aspx

Might not be what you guys are looking for but thought if you haven’t seen them before might be worth a look. Summit Racing has the best prices on them I could find. I’m reconfiguring my socket drawer and want to get my impacts on the rails this winter but currently this is it. I like being able to take a single rail where I need it.

3c57f289948c91ddec8b2907c4b7d6c1.jpg


Sent from my iPhone using Garage Journal

I will second this (also stalk this thread a lot), the Twist Lock stuff from Ernst is great. I just bought a set to handle the long armed hex sockets I have because they fell off every other rail system. It works perfect, now I want to put all my sockets on those rails.
 

Attachments

  • 3c57f289948c91ddec8b2907c4b7d6c1.jpg
    3c57f289948c91ddec8b2907c4b7d6c1.jpg
    309.4 KB · Views: 6
OP
L

lilscorpion

Well-known member
Joined
Mar 15, 2010
Messages
3,599
Location
Colorado
I will second this (also stalk this thread a lot), the Twist Lock stuff from Ernst is great. I just bought a set to handle the long armed hex sockets I have because they fell off every other rail system. It works perfect, now I want to put all my sockets on those rails.


I never remove the rails from my drawers, I grab what I need and mine them to the tool cart where I have mixed stud rails there. Don’t you find the twist lock irritating? I leave the MTS locks off (usually) and when I find one is locked - Grrr.
 

Mecha

Well-known member
Joined
Dec 28, 2016
Messages
194
Location
Volunteer State
I never remove the rails from my drawers, I grab what I need and mine them to the tool cart where I have mixed stud rails there. Don’t you find the twist lock irritating? I leave the MTS locks off (usually) and when I find one is locked - Grrr.

Not really, because now it stays on when I want it comes off more easily when I want it. Everything else besides the Hanson style sort of sticks as you pull.

I sort of take a whole strip when I work something though, then I don't walk as far back and forth. Nothing pops off in transport, or as I use them. I like that they have pre-made trays, and come in red, blue, hivis yellow, and black allowing me color wise to decide SAE, Metric, Torx, or whatever visually. Typically I am someone who will design my own solution, but in this case I think that they have done well. Also they send along a sticker set of called out sizes in Metric or SAE to help label everything. Just well thought out and made in the USA.

I have seen the Mag ones too at Harry Epstein and they are certainly nice as well but sockets are some of my most used tools and I want them to go with me to whatever I work on. The mag trays just don't seem conductive to that portability. Whatever works for each person though just works.
 
OP
L

lilscorpion

Well-known member
Joined
Mar 15, 2010
Messages
3,599
Location
Colorado
Typically I am someone who will design my own solution, but in this case I think that they have done well. Also they send along a sticker set of called out sizes in Metric or SAE to help label everything. Just well thought out and made in the USA.


I probably design my own solution to a fault but I do so to enjoy the journey and, to some extent, to ensure my strategies are as future proof as they can be. At some point all manufacturers either go away or change their designs to stay relevant. That **** irritates me...if I’m gonna commit to using something, I’d prefer I can continue to get said exact same thing for the REST of my life. Partly kidding.

Too bad I’m not into the YouTube thing, now would be the perfect time for a socket rail manufacturer to sponsor me in exchange for a 2 minute call-out. #merica
 
OP
L

lilscorpion

Well-known member
Joined
Mar 15, 2010
Messages
3,599
Location
Colorado
This is where Kaizen foam shines. Same spacing as the air tools drawer but, in this case, I’m willing to lose space in exchange for protecting the tools.

e98992cd112d1a30afa155b007050dc9.jpg
 

Attachments

  • e98992cd112d1a30afa155b007050dc9.jpg
    e98992cd112d1a30afa155b007050dc9.jpg
    69.4 KB · Views: 7

bimmer1980

Well-known member
Joined
Feb 5, 2009
Messages
2,103
Location
York, PA
Another Kaizen foam drawer Organization attempt. Thinking this is one of those drawers that maybe it won’t be ideal for. Air tools before

0a7d09c599dd501f1faf9823b7a0b270.jpg

After some whittling

bc4a5a2b574ff2bd523d2bb346825a1f.jpg

I’m thinking I could add a little box in the top right corner for the pieces and parts...still have to cut in the body saw. I have that feeling in my stomach though that I don’t like it. Yes, everything has a place but now I’ll need more places. Think this drawer gets a mat and that’ll be good enough.

I'd be happy if my air tool drawer was as tidy as the first picture!!!

I usually stop into this thread to see what is possible if I were to allocate the time in my shop to do this....

Some days, I'm just pleased with myself if the tool finds its way back into the appropriate drawer instead of just hanging out on a random work bench.... but I'm getting better at that..... :lol_hitti

Nice work as usual! :beer:
 

Attachments

  • bc4a5a2b574ff2bd523d2bb346825a1f.jpg
    bc4a5a2b574ff2bd523d2bb346825a1f.jpg
    65.5 KB · Views: 4
  • 0a7d09c599dd501f1faf9823b7a0b270.jpg
    0a7d09c599dd501f1faf9823b7a0b270.jpg
    69.2 KB · Views: 3

Strouty

Well-known member
Joined
Mar 21, 2010
Messages
38,209
Location
Southern Maine
That is exactly what a foam drawer should be used for. I like it. For machine specific tools, you could do a box mounted at an angle to the wall and not even have a drawer to open.
 

moparfreak

Well-known member
Joined
Jan 24, 2005
Messages
853
Location
Milwaukee, WI
This is where Kaizen foam shines. Same spacing as the air tools drawer but, in this case, I’m willing to lose space in exchange for protecting the tools.

e98992cd112d1a30afa155b007050dc9.jpg

Lilscorpion this drawer looks amazing. Drooling over the Woodpecker layout tools, I'd love to try some of those out.

Lately I've been messing around with using 2" foam sheet for organizing tools. I've started with sockets, since I've never been really happy w/ a number of my attempts using the Hanson rails, Ernst, metal clip, etc. I've been really pleased w/ how it's turning out, and at minimal costs. The Kaizen also looks amazing but to implement it across numerous drawers and cabinets would be exorbitantly $$$. The 4'x8' sheet is of course only $25 and covers a lot of ground.

y4mHWjDkAaG7XE5J6PPS7KF0RF8_GOZDn4eFp9dOCWuukTN24kZJLUtcmThG9U1gvhAkHswuF8OWRanqiSJ05abiO34MaAgE1sj6aORA3fhKa84tCAO7v-qMA3tqmih6nXnKnziIBAMyEmiDZHBQTlPhVS-V0UPFW0CBDTOaCLnQzmlQCr2-HPq4mVkfGd3DSQ5IEOwiFu-LoW5YYMdI3UaxQ


y4mKNxhW5rm6obVlZRN4emfiW9RidaG9RaWf9CUfnI2yp-9Hx0HMUOfwTML0jwGqZ23eSPAjQBjv2WID8pfg4xEWPB_tokPskZQ6agpTMpCAq_lpzDlO28faDqemYz40wAcD7GnoVTYCTgLIk6XZj790mxnlkx0xo4cpYYgrSNCb0Sxid0KWtqODICyT-DZfFa172kVbftAQ1HDOgiB9mVCkg


Getting ready to do my 1/2" socket drawer and then another drawer for the ratchets, breaker bars & extensions.
 

Attachments

  • e98992cd112d1a30afa155b007050dc9.jpg
    e98992cd112d1a30afa155b007050dc9.jpg
    69.4 KB · Views: 2

Nebulus

Member
Joined
Dec 2, 2013
Messages
5
I wasn't able to spend much time online in 2018 (and i'm a permalurker here anyway, until i'm a homeowner myself), but when i opened this thread and saw the cabinets/pull handles, i instantly recognized the handiwork and remembered watching the first thread progress for quite some time! So glad to see another one up and running, and man i could have had a lot of responses, but i will just say this; i'm glad to see you didn't get in too deep with the wife and she allowed you to keep your life after pushing back getting her car in the garage for so long. :lol_hitti

Absolutely wonderful work man, thank you so much for putting this much effort into documenting everything and posting. It is incredibly inspirational and gets me itching to get my hands on a space to start creating the way you have. Although, my wallet may have a bone to pick with you when the time comes! :fawk: Good news is, i now know what 3d printer to buy, what socket rails, what drawer slides... pretty peeved i missed the cutoff for the Woodpeckers 12"/18" triangles years back when i was watching the first thread, damn do they make some nice pieces!
 

moparfreak

Well-known member
Joined
Jan 24, 2005
Messages
853
Location
Milwaukee, WI
You are losing me with the pink foam....................


;)

Lol, yes the thought crossed my mind. There's always trade-offs....was hoping they'd have it in at least the light blue but that's what Lowe's had....

Also tried spray painting it and honestly polystyrene like that just doesn't take paint super well so it looked pretty poor and I decided not worth the time to make it look decent. I've seen on a youtube video I believe a guy did a similar thing then applied Plastidip to it which I suppose would be fine but still IMO not worth it just for looks.
 

RonRock

Well-known member
Joined
Oct 6, 2007
Messages
1,171
Location
Iowa, USA
Anybody have any input on my question of the sticker labels? Post #749. I'm wondering about the printed ones.

Thanks, don't mean to be a PITA.
 
To avoid these ads, REGISTER NOW!

beelsr

Well-known member
Joined
May 6, 2007
Messages
1,324
Location
NE PA, USA
Anybody have any input on my question of the sticker labels? Post #749. I'm wondering about the printed ones.

Thanks, don't mean to be a PITA.

I get labels from

1. for "serious" labels I like fastcap's lean labels. PVC, super adhesive, "erasable" with lacquer thinner, expensive...

2. for plain 'ole one-time-use labels, UPS has rolls an/or sheets of free shipping supplies labels in various sizes.

3. for inside the individual bin labels, I tend to use P-Touch labels.
 

RonRock

Well-known member
Joined
Oct 6, 2007
Messages
1,171
Location
Iowa, USA
Cool thanks, I'll check them out. I also have a P-Touch and use it. But they don't stick together forever. I've found that eventually the top layer with the printing will peel off of the bottom layer.

I also like the bin labels with the "picture" of the screw or bolt, nut. Just looks better IMO.
 

pennsylvaniaboy

Well-known member
Joined
May 28, 2014
Messages
417
what are you using to cut/drill the pink foam? I seems to tear out in chunk with eh experience i have had working with it.
 

moparfreak

Well-known member
Joined
Jan 24, 2005
Messages
853
Location
Milwaukee, WI
what are you using to cut/drill the pink foam? I seems to tear out in chunk with eh experience i have had working with it.

Dremel with a base and a sharp mini spiral bit. Works fantastic, excellent control and perfect tearout-free cuts.

There are a few of the holes that I drilled out w/ forstners, where all the sockets of a set were the same size (such as bit sets, etc) and those don't get the most perfect flat bottom but it is a bit quicker to complete the operation.

y4mzvIvCabsXX6wHi-ru_xnFCa203TwC5PU_Ge2Unxhj0npV0haU8a11pffD9hcfO_Je4LYstv8vGaII966q2l8wId0QJ82ayXKn36RHzS5ophpW2Lu4Q8ShXRR5rzsPFCJMSPmfhd4XZm6y2IGXD5E6NtU54bEDhHTxYn9-2sKIBdB2jTxGW4jQWPgNSvtcV9_FJjbQIcxfwJLA-NAZIanNA


y4muH18bxkeJMPa3RIzlUdr3BLQgeJD9ezjctPAhofKWIzCZqElGzkLfCVOeB1REGDq5jZiDtpoTx4g4DcdI8cQJf6a1B5crZNijbkIk1JmllY0dgljSJND_NrDoKs7-lmWzFMt_JtUCoLk1OTRgWRoUJyrCuMIWrdmRu8-yNepadUHVf_jRgGZUsHCqGMod-SZoHVBA23EfGgBtXYB8irihw


y4mi1pzaU7DTuFFULOR3IVx1x-RQiHvAWIpeItw5RAGI-2zT0TMo6LUdiqWMeHNWkFTnUypDLTd0fzuxbNFHgRmPcOxPFVIo2ifA7V_-ognuXUDXe3H3Y0vw4tvjYVTIdenDjQ4kuJL9DcuDJMaPDaTB4s7M8Pb8KY_8IAywKhMkTEPsthRhrpmy2oaH5n7S3UN6B-0aZO6RjVIVA-G_gGmOA


Here you can tell the difference between the two rows in the middle drilled w/ forstner (more jagged bottom) vs. the rest that were milled out w/ the dremel & spiral bit (flat smooth bottom). Both approaches have their purpose.

y4msFHtr-XYkrvvqFrUZGtOGFuPtNWTsBVNdbrQ6V6wBgUyOOMVk4jXexEk_w8cRte6PEsWcu-jCGbpoqepMJ42tk8eWA02vbyzL5N6G_ZMVBWMJxitfldeQtuCpFHPpw5MpDXLLO-iN1Hca0iyGc3HUiOvl_LFI0a9Jkv-2ETCZXnd7rOUOV4eXZ6X6LLhy5irenk5O4VDG8dJ9w7Grs0taA
 
OP
L

lilscorpion

Well-known member
Joined
Mar 15, 2010
Messages
3,599
Location
Colorado
Anybody have any input on my question of the sticker labels? Post #749. I'm wondering about the printed ones.

Thanks, don't mean to be a PITA.


Sorry, missed the question. I used Avery 1 x 1.5 removable labels.

879af12c227d644986852ef7f461ed1c.jpg

It’s been a while but I think Avery has a label template thing online which you can use to build your own custom labels. I googled the kind of screws I was printing and found pics to use on the templates. Removable is nice but you have to get them positioned correctly the first time or they won’t stay stuck as you can see in the pic below.

b374fce259ed8b023ee88168bea1acc8.jpg

Though they look super clean printed, I’ve started just hand writing them instead. I can label and fill a full Systainer in about 15 minutes by hand or an hour printed. When I did this one I thought I’d come back and print them when I had time but I’ve yet to find it.

ab891418349dc812b35b41501521c4f4.jpg
 

Attachments

  • b374fce259ed8b023ee88168bea1acc8.jpg
    b374fce259ed8b023ee88168bea1acc8.jpg
    82.1 KB · Views: 1
  • ab891418349dc812b35b41501521c4f4.jpg
    ab891418349dc812b35b41501521c4f4.jpg
    61.3 KB · Views: 0
  • 879af12c227d644986852ef7f461ed1c.jpg
    879af12c227d644986852ef7f461ed1c.jpg
    38.2 KB · Views: 0
Last edited:
OP
L

lilscorpion

Well-known member
Joined
Mar 15, 2010
Messages
3,599
Location
Colorado
I wasn't able to spend much time online in 2018...I will just say this; i'm glad to see you didn't get in too deep with the wife and she allowed you to keep your life after pushing back getting her car in the garage for so long. :lol_hitti


Welcome back! Appreciate the compliments, I’ve enjoyed this reorg effort bit it’s dragging on a bit longer than I had hoped or planned.

I’m glad you brought up the wife agreement, it’s a perfect Segway to the big reveal...

677c19bfcebd53db9b414cd474371831.jpg

Kinda funny story too. So mid year I was close to having the space carved out for her to park in there but when we went to the stealership, we found the car she was looking at didn’t come with second row captains chairs and they wouldn’t be available until 2019. Her wanting to wait gave me the additional time I needed to finish what I’d started without the hurry. When the 2019’s finally came out and we actually got to sit in the second row captains, we realized we’d lose the ability to seat 3 as a result...so we got the car that was actually available half a year ago.

When we got it home we realized it’s too long for the left side of the garage so she gets the front of the tandem side where there’s ample room.

e494629d397df7d814774499acd6e8d1.jpg

The jeep is a few inches shorter and I can more easily creatively park consistently so I’ll park on the left from now on. As soon as the front bumper gets to the pole in the middle, I crank it hard to the right and park caddywhompus. Ignore the lights on the Jeep, my son was playing around while I was figuring things out.

66eec5cbc9a8bbb50ab50153e6a03b00.jpg

This weekend I need to address the wall in front of the Jeep. Right now the table saw is there and it’s just a bit too wide so we can’t quite walk in front of the Jeep. I have some ideas and will post up after I get it figured out. For now on though, they’re both in the garage.

16ffcd346500e694f11597ae958ec068.jpg
 

Attachments

  • 677c19bfcebd53db9b414cd474371831.jpg
    677c19bfcebd53db9b414cd474371831.jpg
    64.6 KB · Views: 0
  • e494629d397df7d814774499acd6e8d1.jpg
    e494629d397df7d814774499acd6e8d1.jpg
    74.9 KB · Views: 0
  • 16ffcd346500e694f11597ae958ec068.jpg
    16ffcd346500e694f11597ae958ec068.jpg
    72.3 KB · Views: 0
  • 66eec5cbc9a8bbb50ab50153e6a03b00.jpg
    66eec5cbc9a8bbb50ab50153e6a03b00.jpg
    62.3 KB · Views: 0
Last edited:
OP
L

lilscorpion

Well-known member
Joined
Mar 15, 2010
Messages
3,599
Location
Colorado
Dremel with a base and a sharp mini spiral bit. Works fantastic, excellent control and perfect tearout-free cuts.


There are a few of the holes that I drilled out w/ forstners, where all the sockets of a set were the same size (such as bit sets, etc) and those don't get the most perfect flat bottom but it is a bit quicker to complete the operation.


y4msFHtr-XYkrvvqFrUZGtOGFuPtNWTsBVNdbrQ6V6wBgUyOOMVk4jXexEk_w8cRte6PEsWcu-jCGbpoqepMJ42tk8eWA02vbyzL5N6G_ZMVBWMJxitfldeQtuCpFHPpw5MpDXLLO-iN1Hca0iyGc3HUiOvl_LFI0a9Jkv-2ETCZXnd7rOUOV4eXZ6X6LLhy5irenk5O4VDG8dJ9w7Grs0taA


Like the results. More or less the same things as my HDPE ones but out of insulation. The forstners work well on plastic too but I’m not sure about free handing plastic with a Dremal. I considered foam at one point a few years ago when I played around with a variety of densities (in the original tool org thread) bit I’d never considered insulation. I know some stores have it in a teal-like and baby blue colors too.

Bet that foam is hard to clean up after a few hours of dremal work.


Sent from my iPhone using Tapatalk Pro
 
OP
L

lilscorpion

Well-known member
Joined
Mar 15, 2010
Messages
3,599
Location
Colorado
Dremel with a base and a sharp mini spiral bit. Works fantastic, excellent control and perfect tearout-free cuts.


MoparFreak - What are you using all of those micro end-mill and drills for? I’ve seen them on eBay often but haven’t “gone there yet” given my knee mill only spins max 3500 RPM. May someday if I can find an engraving head for it.

c6d545cf2c49ae9933a01204e629f235.jpg
 

Attachments

  • c6d545cf2c49ae9933a01204e629f235.jpg
    c6d545cf2c49ae9933a01204e629f235.jpg
    55.6 KB · Views: 0

RonRock

Well-known member
Joined
Oct 6, 2007
Messages
1,171
Location
Iowa, USA
Thank you, the bin labels look great. Look like a lot of effort! When I first saw them I figured that they were from a supplier, Fastenal or such.

Don't know if I have the time or patience to do as nice as yours. As usual good job.

Nice looking cars too. Happy wife always a good thing.
 

gemniii

Well-known member
Joined
Jul 20, 2015
Messages
112
Location
Fulton, Ms
Where did you get the labels? Identifying the item is the biggest problem I have with small containers. I usually keep screws and stuff in the box just so that it is easy to identify for the next time I need it. Problem is I have many different size boxes from many different companies. They don't store well to say the least.

I'm a newbie to this mass organization thing and EXTREMELY impressed by this thread but recently gave into to decide to machine label as much as I can.

Aging handwriting and dull sharpies have made some of my labels illegible with my aging eyes. (Who would know the eyes AND hands would age?) Add to that expanding my shop area from about 150 sq ft to about 5,000 sq ft and I'm spending a lot of time "finding" things.

I bought a P-touch PTD600 because it was about the widest labeler (24MM~ 1 inch) I could justify. And I can do labels in multiple strips IF need be, so I AND OTHERS can read them across a large room.

My method is evolving but presently I've "painters tape" (tape that peels off relatively easily) scattered throughout my shops and I try to keep a sharpie on hand/in pocket at all times. If the labeler is not "handy" I'll scribble the label on the painters tape and stick it on the container. Then I try to go around on rainy days and replace the quicky labels with more permanent labels.

I'm very pleased with the looks of the neatly printed labels and will probably buy another labeler soon that I can use on narrower tapes. I've found that so far for about 75% of my usage a 0.5 inch label would do, and the P-touch that size often goes on sale for $10.

But now they are introducing "bluetooth" labelers at low prices so I might go that route.
 

Strouty

Well-known member
Joined
Mar 21, 2010
Messages
38,209
Location
Southern Maine
I use painters tape and a sharpie too, I have yet to spend rainy days changing the them to labels though. :(

I was looking at some serious label makers, they can easily be $1000, I have no need for one, but it sure would be a neat thing to own. Maybe in a few years I can find a deal on eBay. ;)
 
OP
L

lilscorpion

Well-known member
Joined
Mar 15, 2010
Messages
3,599
Location
Colorado
I'm a newbie to this mass organization thing and EXTREMELY impressed by this thread but recently gave into to decide to machine label as much as I can.

Aging handwriting and dull sharpies have made some of my labels illegible with my aging eyes. (Who would know the eyes AND hands would age?) Add to that expanding my shop area from about 150 sq ft to about 5,000 sq ft and I'm spending a lot of time "finding" things.

I bought a P-touch PTD600 because it was about the widest labeler (24MM~ 1 inch) I could justify. And I can do labels in multiple strips IF need be, so I AND OTHERS can read them across a large room.

Hm, somewhere around here I have a labeled too. Kinda forgot all about it. I may have to dig it out and try it once to see if they’re easier than the Avery way. I know in the past I didn’t always like that a printed label wasn’t fixed width and words centered.
 

moparfreak

Well-known member
Joined
Jan 24, 2005
Messages
853
Location
Milwaukee, WI
MoparFreak - What are you using all of those micro end-mill and drills for? I’ve seen them on eBay often but haven’t “gone there yet” given my knee mill only spins max 3500 RPM. May someday if I can find an engraving head for it.

c6d545cf2c49ae9933a01204e629f235.jpg

I pretty much use them only for soft materials with a dremel, which spins rather fast. I've used the larger ones a bit in wood. They weren't expensive & come in handy once in a while. Really shine on this foam project as it's quite easy to cut up to the line by hand with this setup. Looking forward to using them on the ratchet drawer where I'll have lots of odd shapes to cut, rather than just circles.
 

Attachments

  • c6d545cf2c49ae9933a01204e629f235.jpg
    c6d545cf2c49ae9933a01204e629f235.jpg
    55.6 KB · Views: 2
OP
L

lilscorpion

Well-known member
Joined
Mar 15, 2010
Messages
3,599
Location
Colorado
I’ve been putting off a deep cleaning for a while. I don’t think I’ve cleaned up the metal, plastic, and wood chips on and around the mill for more than a year. Cleaned out all of the slots. Nooks and crannies.

b29dd27fe25e18dd6488b7e177e220e9.jpg

I’ve been storing stuff on the floor in front of the mill since I moved the mill a few years ago. Today I found a spot for all of it. So much more space now.

39f6821ae2072d4784b2d46d939787e5.jpg

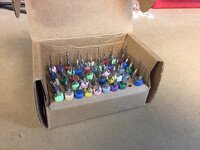
I then spent time going through drawers and putting things away. There’s two things in the shop that I really struggle with putting away and thus, I end up with piles. The most common is hardware. I don’t know exactly how I do it but in a mont I’ll end up with a news of piles of hardware (screws, nuts, bolts, etc). In many cases the hardware is all new and in mixed piles which forces me to take time and go through it in order to put it away.

7583830cdfee0fa98164836e281440c2.jpg

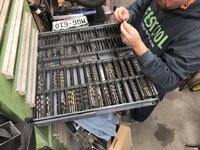
Second typical pile kind is drill-bits. I’ll get a couple out, use them, and then leave them on the bench. At some point they’ll be in the way so I’ll move them aside or move them to the upper shelf. At some point I can end up with 2 - 3 dozen drill bits scattered all over the place. Since the etching is fairly small and hard to read, I wind up spending half an hour sorting the pile.

063724becdd5f33718abd68255febea9.jpg

I also organized my drawer slides that I’ve been ticking here and there as I disassembled the cabinets over the past 6 months. I grouped them in bundles grouped by length and type and then shrink wrap them together so they store more easily.

c00aa729f2d50c87003e0383800399e0.jpg

When all were tucked nicely on the shelf, I was maybe a little shocked at how many “extra” slides I now have just waiting for the next project(s). LOL

d79110686114c2c9a9cb5be2fcf98e05.jpg

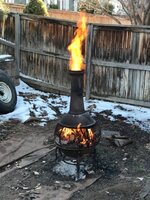
As I do most weekends, I also stoked the fire with wood I’ve needed to dispose of. I can keep it roaring the entire weekend and not make a dent in the pile. To keep it roaring I have to (re)pack it full about every 45 minutes.

d3f9cc7f1eae1e24fe6cfa2e53513950.jpg

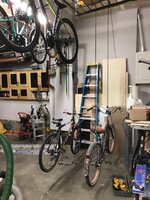
When I put up the bike racks years ago I didn’t do a good job getting them spaces correctly so that the handle bars and peddles mis each other as I raise them to the ceiling. I pulled all the bikes down and moved the racks around so everything nests nicely and I had adequate distance between the bikes and the wall so it’s usable.

8bb2df4103e46d774aacee9043fd9088.jpg

I moved the Rubbermaid organization rails around so I could get all of the things I needed to mounted on them. This is where I typically hang the things that don’t store nicely.

05d615830e0b0eac41f3f5a08065c054.jpg

Next I’l reorganize the overhead storage.
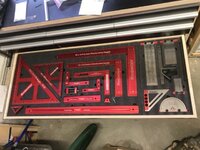
 

Attachments

  • 05d615830e0b0eac41f3f5a08065c054.jpg
    05d615830e0b0eac41f3f5a08065c054.jpg
    46.2 KB · Views: 1
  • b29dd27fe25e18dd6488b7e177e220e9.jpg
    b29dd27fe25e18dd6488b7e177e220e9.jpg
    77.3 KB · Views: 1
  • 39f6821ae2072d4784b2d46d939787e5.jpg
    39f6821ae2072d4784b2d46d939787e5.jpg
    67.7 KB · Views: 1
  • 7583830cdfee0fa98164836e281440c2.jpg
    7583830cdfee0fa98164836e281440c2.jpg
    72.7 KB · Views: 1
  • 063724becdd5f33718abd68255febea9.jpg
    063724becdd5f33718abd68255febea9.jpg
    82.5 KB · Views: 1
  • c00aa729f2d50c87003e0383800399e0.jpg
    c00aa729f2d50c87003e0383800399e0.jpg
    67.9 KB · Views: 1
  • d79110686114c2c9a9cb5be2fcf98e05.jpg
    d79110686114c2c9a9cb5be2fcf98e05.jpg
    76.1 KB · Views: 1
  • d3f9cc7f1eae1e24fe6cfa2e53513950.jpg
    d3f9cc7f1eae1e24fe6cfa2e53513950.jpg
    98.1 KB · Views: 1
  • 8bb2df4103e46d774aacee9043fd9088.jpg
    8bb2df4103e46d774aacee9043fd9088.jpg
    78.2 KB · Views: 1
Last edited:

jade97

Well-known member
Joined
Nov 7, 2008
Messages
1,618
Dremel with a base and a sharp mini spiral bit. Works fantastic, excellent control and perfect tearout-free cuts.

There are a few of the holes that I drilled out w/ forstners, where all the sockets of a set were the same size (such as bit sets, etc) and those don't get the most perfect flat bottom but it is a bit quicker to complete the operation.

y4mzvIvCabsXX6wHi-ru_xnFCa203TwC5PU_Ge2Unxhj0npV0haU8a11pffD9hcfO_Je4LYstv8vGaII966q2l8wId0QJ82ayXKn36RHzS5ophpW2Lu4Q8ShXRR5rzsPFCJMSPmfhd4XZm6y2IGXD5E6NtU54bEDhHTxYn9-2sKIBdB2jTxGW4jQWPgNSvtcV9_FJjbQIcxfwJLA-NAZIanNA


y4muH18bxkeJMPa3RIzlUdr3BLQgeJD9ezjctPAhofKWIzCZqElGzkLfCVOeB1REGDq5jZiDtpoTx4g4DcdI8cQJf6a1B5crZNijbkIk1JmllY0dgljSJND_NrDoKs7-lmWzFMt_JtUCoLk1OTRgWRoUJyrCuMIWrdmRu8-yNepadUHVf_jRgGZUsHCqGMod-SZoHVBA23EfGgBtXYB8irihw


y4mi1pzaU7DTuFFULOR3IVx1x-RQiHvAWIpeItw5RAGI-2zT0TMo6LUdiqWMeHNWkFTnUypDLTd0fzuxbNFHgRmPcOxPFVIo2ifA7V_-ognuXUDXe3H3Y0vw4tvjYVTIdenDjQ4kuJL9DcuDJMaPDaTB4s7M8Pb8KY_8IAywKhMkTEPsthRhrpmy2oaH5n7S3UN6B-0aZO6RjVIVA-G_gGmOA


Here you can tell the difference between the two rows in the middle drilled w/ forstner (more jagged bottom) vs. the rest that were milled out w/ the dremel & spiral bit (flat smooth bottom). Both approaches have their purpose.

y4msFHtr-XYkrvvqFrUZGtOGFuPtNWTsBVNdbrQ6V6wBgUyOOMVk4jXexEk_w8cRte6PEsWcu-jCGbpoqepMJ42tk8eWA02vbyzL5N6G_ZMVBWMJxitfldeQtuCpFHPpw5MpDXLLO-iN1Hca0iyGc3HUiOvl_LFI0a9Jkv-2ETCZXnd7rOUOV4eXZ6X6LLhy5irenk5O4VDG8dJ9w7Grs0taA

I'm sure it's not cost effective, but has anyone tried using that flexseal stuff to create socket organizers? If the sockets are lubed up, you should be able to pour the stuff in the drawer around the sockets.

.....to many commercials...
 

zmotorsports

ALLIANCE MEMBER
Joined
Oct 20, 2009
Messages
21,312
Location
Northern Utah
Hey Matt, I just noticed in the pictures above of your Jeep that you are running the Nitto Ridge Grappler, I'm assuming in a 35" flavor?

How do you like them? How do they ride on pavement and how do they handle off-road?

I'm asking because I just ordered a set of five on a Black Friday sale in 37" and I am anxious to get them on the Jeep.

Thanks.
 
To avoid these ads, REGISTER NOW!
Top Bottom