

You are using an out of date browser. It may not display this or other websites correctly.
You should upgrade or use an alternative browser.
You should upgrade or use an alternative browser.
Tooling (Re)Organization
- Thread starter lilscorpion
- Start date
joeysh03
Well-known member
That has to be the most expensive way to store those torches lol
jeffmoss26
Well-known member
love it
aventino68
Well-known member
Great thread. For someone like me who’s always just added to storage in the garage and now is starting from scratch again I forget how much stuff you accumulate.
Pressingonward
Well-known member
www.raptorgrab.com
It is pretty much just an info page, I have tried the email address, but no luck yet. Regardless, the eBay link works and it is really a great price for the 4 rolls. Snap on sells it, but it is much more expensive, they cut it to fit your drawers though.
Just ordered some drawer liners off Ebay - excited to finally replace the cheap crappy ones in my box. Thanks for the recommendation Strouty!
Also ordered two 30" pliers racks from JBTool. I probably only need one right now, but at $13 each I'd rather have the extra capacity to grow into. Looking forward to a more functional, organized shop for 2020!
OP
lilscorpion
Well-known member
I have a box full of that stuff that I have to get around to putting in the drawers. Really nice high-end feeling stuff.
slodat
ALLIANCE MEMBER
What do you use for mill tool holder storage?
OP
lilscorpion
Well-known member
What do you use for mill tool holder storage?
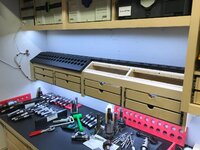
I have 2 benches in the back of my shop. One is across from the mill and there I keep all my milling stuff (except for my assortment of drill bits and end mills which I keep in my Lista cabinet). On the backside of the timing bench I built an upper cabinet that has built in holders for all of my R8
Tooling. These “holders” are sheets of 1” HDPE that I machined to fit the R8 taper (I purchased an end mill with the correct taper built in).

The sheets were cut and beveled so that the front piece was on a slope allowing easier access to the various tools. I then used a Festool Domino to create a seamless joint.

They’re then attached to the upper floating cabinets with screws

Tightly fit together such that they look like one piece.

Here they are loaded.

They work very well. If I had to build them again I’d figure out how to make better use of the space. With a more efficient cabinet frame design I could probably double the number of tools the same setup could hold.
Attachments


Last edited:
slodat
ALLIANCE MEMBER
That was the inspiration I needed! Thanks, Matt!
OP
lilscorpion
Well-known member
slodat
ALLIANCE MEMBER


OP
lilscorpion
Well-known member
Current idea..
3d printing tapered inserts that drop into the pockets. Top is at a 5 degree angle. If I love it, I’ll make it out of nicer material.

I like it! I used a similar idea (inserts) for an hplv gun drawer organizer I made some years ago. Never occurred to me to use inserts for the tooling rack, slick. I fixated on HDPE sheet originally because it’s easily cleanable and super resistant to oils and fluids but wood can be coated to accomplish the same thing. Damn, I need to get my 3D printer up and running...and a CNC router...and a laser. (Jealous of your capabilities again).
Looking forward to seeing it come together. Are you making racks or building it into a bench or shelf?
Attachments

theundermount
Well-known member
damn dude that is fantastic !!I have 2 benches in the back of my shop. One is across from the mill and there I keep all my milling stuff (except for my assortment of drill bits and end mills which I keep in my Lista cabinet). On the backside of the timing bench I built an upper cabinet that has built in holders for all of my R8
Tooling. These “holders” are sheets of 1” HDPE that I machined to fit the R8 taper (I purchased an end mill with the correct taper built in).
The sheets were cut and beveled so that the front piece was on a slope allowing easier access to the various tools. I then used a Festool Domino to create a seamless joint.
They’re then attached to the upper floating cabinets with screws
Tightly fit together such that they look like one piece.
Here they are loaded.
They work very well. If I had to build them again I’d figure out how to make better use of the space. With a more efficient cabinet frame design I could probably double the number of tools the same setup could hold.


Attachments


aventino68
Well-known member
For those of you who have a drill press, lathe, press or CNC machine or other large engineering tools in an area of your shed is there a sensible or better way of organising what goes where? I can find lots online about setting up a woodworking shed but not much on engineering. I can see that you need storage areas nearby for accessories and tool bits etc but apart from that any other thoughts?
fartymarty
Well-known member
For those of you who have a drill press, lathe, press or CNC machine or other large engineering tools in an area of your shed is there a sensible or better way of organising what goes where? I can find lots online about setting up a woodworking shed but not much on engineering. I can see that you need storage areas nearby for accessories and tool bits etc but apart from that any other thoughts?
Maybe you should search for "fabrication shop" or "machine shop" set up instead of "engineering". In the old days an engineering shop was made of a brain, a slide rule, a few reference books, and a drafting table. Today I think it's just a brain and a computer.
I have a very small lathe and mill, and the only thing I can add is to keep abrasives (grinders etc), welders, and any woodworking sawdust generating tools on the other side of the shop. My drill press is on the opposite side as well since I sometimes use it with small drum sanders. If you can't do that then loosely cover the machine tools when not in use.
Last edited:
OP
lilscorpion
Well-known member
For those of you who have a drill press, lathe, press or CNC machine or other large engineering tools in an area of your shed is there a sensible or better way of organising what goes where? I can find lots online about setting up a woodworking shed but not much on engineering. I can see that you need storage areas nearby for accessories and tool bits etc but apart from that any other thoughts?
My layout is really determined by access. My milling machine needs ~3’ to the front, 1’ to the rear (to access the computer), and however much space to the left and the right based on the longest part I’d ever machine. My lathe needs 3’ on the front for the operator, no additional access on the tail stock end , and access to the head again for whatever the longest part is ever machine. Benches need about 3’ on all sides an operator will use.
Where it gets hard is trying to figure out how and where to make compromises. To do so requires you know enough about how you use your shop and what you’ll be working on to do so...or you’re willing to pick a setup and change it as your awareness evolves.
Last edited:
slodat
ALLIANCE MEMBER
For me, this is a necessity is the mother of invention conversation. My layouts have usually been dictated by what I had and the space I had to use it in. When I finally had more space than equipment, the existing building was a major influence in layout. I say, get it, do it, adjust as you see fit. Organizing my shop is one of the highest forms of therapy I have. It is so nice doing the organizing and building the things that make it organized. Using it all is a daily treat going forward. Most of the time a major motivator for me isn't how hard or how much work it will be. The motivator for me is how much I'll enjoy using it, how happy will I be that it's done.
QwikKotaTx
Well-known member
Really awesome shop and super impressive cabinetry skills.
I am up to page 39 but did not see any details on your band saw setup. Is that an available mounting plate that attaches to the band saw and has router plate outer dimensions? I see some available online but most are bench mounts.
I am up to page 39 but did not see any details on your band saw setup. Is that an available mounting plate that attaches to the band saw and has router plate outer dimensions? I see some available online but most are bench mounts.
OP
lilscorpion
Well-known member
Really awesome shop and super impressive cabinetry skills.
I am up to page 39 but did not see any details on your band saw setup. Is that an available mounting plate that attaches to the band saw and has router plate outer dimensions? I see some available online but most are bench mounts.
Thank you, very kind. All of the router-like insert plates I machined myself including the bandsaw one. I designed then all to fit the Rockler plate size mostly because I bought a router lift and table and wanted all of my tools to fit. I imagine one could be made with other tools like a metal bandsaw or a router if you used phenolic material instead of aluminum. Many companies make router plates out of phenolic so it’s not crazy.
QwikKotaTx
Well-known member
Thank you, very kind. All of the router-like insert plates I machined myself including the bandsaw one. I designed then all to fit the Rockler plate size mostly because I bought a router lift and table and wanted all of my tools to fit. I imagine one could be made with other tools like a metal bandsaw or a router if you used phenolic material instead of aluminum. Many companies make router plates out of phenolic so it’s not crazy.
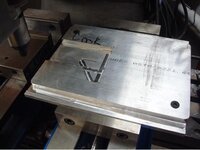
Ah, I should have figured. That mill you have is nice. I have never seen 2 vices setup like that, very clever. Whenever you get a chance if you could post some detailed pictures of how you mounted the band saw to the plate I would appreciate it.
OP
lilscorpion
Well-known member
Ah, I should have figured. That mill you have is nice. I have never seen 2 vices setup like that, very clever. Whenever you get a chance if you could post some detailed pictures of how you mounted the band saw to the plate I would appreciate it.
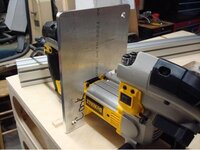
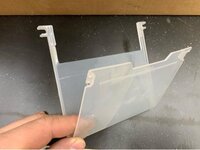
The reputed plate was 3/8” 6061 aluminum. I used the same concept that SwagOffroad used for mounting a bandsaw to their table.

Essentially hanging the portable saw from the removable material guard which is retained by only 2 screws (black piece)

The greatest challenge In cutting a relief in the plate for the saw is making it fit around the blade guard.

This is the profile I ended up with. Not really overly complex.

Here’s the plate mounts to the saw showing the profile.


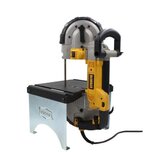
Next I added a little bling. A replaceable zero clearance insert. Think this step could be simplified or done a little easier.

The zero clearance insert is retained using simple fender washers.

Fully assembled.

And that’s about it. Not too complicated.


Attachments
-
 cbdc061a557344960d2122027a965d84.jpg38.7 KB · Views: 4
 -
 7e8dcbf06e00554d901ee2e39e99a04d.jpg51.5 KB · Views: 2
 -
 fa7f0c9e79799ea8c3fa2542bc52b3dd.jpg35.2 KB · Views: 2
 -
 30824aa7d0cd61f780fb1b98e1d3ee14.jpg21 KB · Views: 1
 -
 0bed8a4b04dad3dc3efc611cd6cc07f5.jpg26.3 KB · Views: 1
 -
 794a710fd66cf89f1861a0ba598e1db8.jpg27.4 KB · Views: 1
 -
 39eae5cbd1725f415fecf5c37faf66c7.jpg30.3 KB · Views: 1
 -
 475b186aa2135fcd25a5fa6634e94c53.jpg26.8 KB · Views: 1
 -
 2c98469bc172c23ecdf810d342b086f8.jpg32.6 KB · Views: 1
 -
 61e0283e6be3e9cdb701a8f4db02b1e5.jpg29.6 KB · Views: 1
 -
 bb336503c5a700d6b6bb80dfcef8bfa5.jpg15.9 KB · Views: 1
QwikKotaTx
Well-known member
Thank you very much! That is very unique. I saw the off-road swag setup but yours is much cleaner. For some reason I thought that center section on the saw was some type of AL extrusion you added. Makes more sense now.
Sent from my VS987 using Tapatalk
Sent from my VS987 using Tapatalk
OP
lilscorpion
Well-known member
Coming off of a 8 month hiatus from working on the shop where instead, my son and I built him a 2006 Jeep Unlimited. Ow that we’re beyond it, the shop needs a little love.

Using a 3-car for projects of this size can tend to test your organization skills especially when you have as much stuff as I’ve collected over the years. We tried hard to keep the shop as organized as possible but the constant mess wasn’t easily contained. What’s worse is that I have very poor short and long term organization. In most cases, things get stored in boxes, and boxes in boxes…and then sometimes I consolidate boxes into large tote-style containers. Since boxes end up being random sizes, they don’t fit shelves or cabinets well so they get stacked on top of each other, or hide behind each other, and tend to get moved around when I’m rooting for a part making them even more difficult to find. Shortly after moving into this house I hung some floating shelves on just about all walls which allowed me to more or less hide the mess above my sight-line. Then, when they got full, I added shelves on top of the floating shelves.

During the 8 months of building Andrew’s jeep, I lost more hours than I could have imagined looking for parts I knew I had (somewhere). About half way through the project I decided that in 2020, I was going to come up with a better way. Last summer I converted the shop shelves to be of consistent width designed specifically to fit the sustainers I’ve been using to organize my tools.

Though I really like the solution, using sustainers for everything is just too expensive. What I need is a more affordable way to store things that don’t need to be as easily accessible which would work dimensionally with the shelving. I spent a few months shopping around and tripped across these containers manufactured by Akro-Mills which happen to be the new version of a container I used to use as a way to move parts between operations, machines, and then to the shelf. They worked very well for me back then kept things well organized. Dimensionally, the new versions are about 16 1/2” long x 11” wide and various depths from 2 1/2” to 8”.

They fit the shelf perfectly.

Akro-Mills has upped their game since then. These new ones have lids and slots cut into the lip which allow for attaching these card holders so you can label your bins. Would have been handy back when I had my shop. Back then I ended up labeling the shelves themselves.

With a plan in mind, I ordered a box of each size. It seemed like dipping my toe in the pool so to speak until I unboxed all of them and got them stacked in the garage. All in I guess.

Over the last few months of the build, I slowly started to organize the shelves maybe half a dozen or so here and there. It was easy really, each time I had to pull down a box and look for a part, I just emptied it and moved the contents to smaller containers that were organized more specifically. Once boxes were created, iI’d add to it as I tripped across things as I moved through the garage.

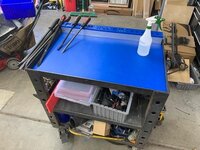
We found that the containers made it much easier to keep parts we removed from the jeep organized. We stashed a few of them under the cart and put everything we removed from the jeep in them. We used to use little sandwich baggies but found that we could find almost anything we were looking for so we stopped using the baggies. We ended up with about 3 containers worth of parts at the end of the build.

With the jeep project done, I now have more time to dedicate to finalizing the new storage solution. Probably the biggest hill to climb is the over-head storage. Since I had to go through all of the boxes and containers anyway, I pulled it all down from the floating shelves and removed the add-a-shelves on top of them as well.

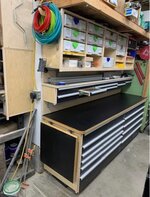
Built some cabinets to store these containers. I ran and picked up 9 sheets of 3/4-inch pre-finished baltic birch. This is about as heavy as I can manage with Andrew’s help.

They should be able to handle some serious weight. The “nailer” strips in the back are 3/4-inch as well and in-set into the casing.

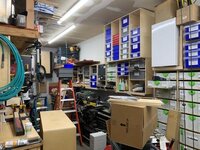
One at a time I pulled down the floating shelf segments down and replaced them with the new cabinets and stuffed them with containers as I went.

As I uncovered the far end, I found that the cabinet over the bench was actually hung 3/4” higher than the others so it needed to be re-hung to match. My new shelving design allows for instant reconfiguration so making a simple adjustment like this is fairly easy. Kinda like Legos.

The face-frames are just pressed onto the domino’s (wide dowels) so they can be removed with just a slight tug.

To get to level, I just clamp a board to the top of the shelf so that it self-levels against the other cabinet. This way I only have to hold up one end of the cabinet while I zero it on the level.

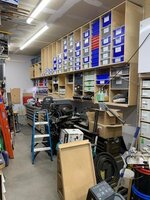
I continued to install the shelves as they were assembled working towards the wall.

I did the best I could to organize the containers into groups. This will help later when I install the individual shelves. For now it’s just a rough stab, I won’t have to commit to location until then.

Thanks for looking.
Using a 3-car for projects of this size can tend to test your organization skills especially when you have as much stuff as I’ve collected over the years. We tried hard to keep the shop as organized as possible but the constant mess wasn’t easily contained. What’s worse is that I have very poor short and long term organization. In most cases, things get stored in boxes, and boxes in boxes…and then sometimes I consolidate boxes into large tote-style containers. Since boxes end up being random sizes, they don’t fit shelves or cabinets well so they get stacked on top of each other, or hide behind each other, and tend to get moved around when I’m rooting for a part making them even more difficult to find. Shortly after moving into this house I hung some floating shelves on just about all walls which allowed me to more or less hide the mess above my sight-line. Then, when they got full, I added shelves on top of the floating shelves.
During the 8 months of building Andrew’s jeep, I lost more hours than I could have imagined looking for parts I knew I had (somewhere). About half way through the project I decided that in 2020, I was going to come up with a better way. Last summer I converted the shop shelves to be of consistent width designed specifically to fit the sustainers I’ve been using to organize my tools.
Though I really like the solution, using sustainers for everything is just too expensive. What I need is a more affordable way to store things that don’t need to be as easily accessible which would work dimensionally with the shelving. I spent a few months shopping around and tripped across these containers manufactured by Akro-Mills which happen to be the new version of a container I used to use as a way to move parts between operations, machines, and then to the shelf. They worked very well for me back then kept things well organized. Dimensionally, the new versions are about 16 1/2” long x 11” wide and various depths from 2 1/2” to 8”.
They fit the shelf perfectly.
Akro-Mills has upped their game since then. These new ones have lids and slots cut into the lip which allow for attaching these card holders so you can label your bins. Would have been handy back when I had my shop. Back then I ended up labeling the shelves themselves.
With a plan in mind, I ordered a box of each size. It seemed like dipping my toe in the pool so to speak until I unboxed all of them and got them stacked in the garage. All in I guess.
Over the last few months of the build, I slowly started to organize the shelves maybe half a dozen or so here and there. It was easy really, each time I had to pull down a box and look for a part, I just emptied it and moved the contents to smaller containers that were organized more specifically. Once boxes were created, iI’d add to it as I tripped across things as I moved through the garage.
We found that the containers made it much easier to keep parts we removed from the jeep organized. We stashed a few of them under the cart and put everything we removed from the jeep in them. We used to use little sandwich baggies but found that we could find almost anything we were looking for so we stopped using the baggies. We ended up with about 3 containers worth of parts at the end of the build.
With the jeep project done, I now have more time to dedicate to finalizing the new storage solution. Probably the biggest hill to climb is the over-head storage. Since I had to go through all of the boxes and containers anyway, I pulled it all down from the floating shelves and removed the add-a-shelves on top of them as well.
Built some cabinets to store these containers. I ran and picked up 9 sheets of 3/4-inch pre-finished baltic birch. This is about as heavy as I can manage with Andrew’s help.
They should be able to handle some serious weight. The “nailer” strips in the back are 3/4-inch as well and in-set into the casing.
One at a time I pulled down the floating shelf segments down and replaced them with the new cabinets and stuffed them with containers as I went.
As I uncovered the far end, I found that the cabinet over the bench was actually hung 3/4” higher than the others so it needed to be re-hung to match. My new shelving design allows for instant reconfiguration so making a simple adjustment like this is fairly easy. Kinda like Legos.
The face-frames are just pressed onto the domino’s (wide dowels) so they can be removed with just a slight tug.
To get to level, I just clamp a board to the top of the shelf so that it self-levels against the other cabinet. This way I only have to hold up one end of the cabinet while I zero it on the level.
I continued to install the shelves as they were assembled working towards the wall.
I did the best I could to organize the containers into groups. This will help later when I install the individual shelves. For now it’s just a rough stab, I won’t have to commit to location until then.
Thanks for looking.
Attachments
-
 9ff6d6257972830354775dadd92fc0df.jpg38.3 KB · Views: 2
 -
 8464249d6d3272f93704d77bbdbf99b0.jpg38.5 KB · Views: 2
 -
 266278c865c944bf5478db0f088fd2c3.jpg35 KB · Views: 2
 -
 7f80cd83d94e90e98300115fd6e558f6.jpg33.9 KB · Views: 2
 -
 02d6552a896a73a247b8b9076a9d1281.jpg20.6 KB · Views: 2
 -
 8e8e0ef457a56ed14944eb042ca432e1.jpg42.3 KB · Views: 2
 -
 ae6631170dfea4d1d3c2a54055f5e255.jpg42.3 KB · Views: 2
 -
 74841818c2871a0a5d3d226d022943b1.jpg35.4 KB · Views: 2
 -
 0fbca01e5130675918792e5d4a1c0037.jpg34.1 KB · Views: 2
 -
 d596f94312e9d09c111734468b25f75c.jpg36.2 KB · Views: 1
 -
 bf890d61a18d4bbff9e2f342f5c09938.jpg35.5 KB · Views: 2
 -
 cc1888c54d10f03fedc1c2ed45fb4ab3.jpg35.6 KB · Views: 3
 -
 33df73c4c83053849d337f3c20ec3ed6.jpg39.8 KB · Views: 3
 -
 80ddccae1837c29bbb67d5168f79a1ba.jpg43.6 KB · Views: 3
 -
 800f07a2e426fd6c386ff244693ba948.jpg19.7 KB · Views: 2
 -
 84218647eee4e57f2aa2ed33491b7c8b.jpg26.5 KB · Views: 1
 -
 5fb48a037d23ef795ac8f938ff08e0c0.jpg33.7 KB · Views: 1
 -
 4c2f94ce7d2bd866f647f521bc3ef843.jpg40.5 KB · Views: 1
niget2002
Well-known member
That looks great. Just make sure the boxes you use the least are on the bottom. I won't tell you how frustrating it is to always have to stack/unstack a bunch of boxes because what you need always seems to be in the bottom one.
Personally, I would have added shelves to slide the boxes in on.
Personally, I would have added shelves to slide the boxes in on.
fartymarty
Well-known member
That looks great. Just make sure the boxes you use the least are on the bottom. I won't tell you how frustrating it is to always have to stack/unstack a bunch of boxes because what you need always seems to be in the bottom one.
Personally, I would have added shelves to slide the boxes in on.
I did the best I could to organize the containers into groups. This will help later when I install the individual shelves. For now it’s just a rough stab, I won’t have to commit to location until then.
Someone was looking at all the beautiful pictures and not doing the required reading?

Great work lil' scorp' !
Last edited:
nicholam77
Well-known member
Always makes my day when this thread gets updated. Looks great!
Always enjoy seeing shop updates. I currently use the black and yellow tuff boxes but have been wanting to move away from them. I really like my Festool Systainers but you are correct - they can be cost prohibitive.
Sent from my iPhone using Garage Journal
Sent from my iPhone using Garage Journal
Pressingonward
Well-known member
Nice looking storage solution with those Acrobins.
niget2002
Well-known member
Someone was looking at all the beautiful pictures and not doing the required reading?
Great work lil' scorp' !
You know what's worse... I remember reading that now

Feel free to safely ignore me
TLCObsession
Well-known member
Nice! Not afraid to spend the $$ for the good materials.around here a 5x5 sheet of 3/4" pre-finished Baltic birch is pretty spendy. I resort to using the radiata pine ply from HD
QwikKotaTx
Well-known member
Those bins look stout and Acro is typically made in the USA. [emoji106]
Milwaukee has some nice tool bins/cases that are stackable and pretty tough but only half the price of Systainers.
Sent from my VS987 using Tapatalk
Milwaukee has some nice tool bins/cases that are stackable and pretty tough but only half the price of Systainers.
Sent from my VS987 using Tapatalk
Crooked Beat
Active member
- Joined
- Mar 14, 2010
- Messages
- 29
Are those Acrobins the same size as Euro-containers?
https://www.ssi-schaefer.com/de-de/...ungstraeger/lagerbehaelter/klt-behaelter-9464
https://www.ssi-schaefer.com/de-de/...ungstraeger/lagerbehaelter/klt-behaelter-9464
There are a lot of Sprinter Vans that use those Euro-containers as boxes to DIY an RV. I am having a hard time finding a source in North America.
https://www.ssi-schaefer.com/de-de/...ungstraeger/lagerbehaelter/klt-behaelter-9464
https://www.ssi-schaefer.com/de-de/...ungstraeger/lagerbehaelter/klt-behaelter-9464
There are a lot of Sprinter Vans that use those Euro-containers as boxes to DIY an RV. I am having a hard time finding a source in North America.
dittle fart around
Well-known member
Those bins look stout and Acro is typically made in the USA. [emoji106]
Milwaukee has some nice tool bins/cases that are stackable and pretty tough but only half the price of Systainers.
Sent from my VS987 using Tapatalk
Akro-Mils is a company from Akron, Ohio. Manufacturing since 1933 they are the top of the line in storage bins and material handling.

jeffmoss26
Well-known member
droool
OP
lilscorpion
Well-known member
Are those Acrobins the same size as Euro-containers?
https://www.ssi-schaefer.com/de-de/...ungstraeger/lagerbehaelter/klt-behaelter-9464
https://www.ssi-schaefer.com/de-de/...ungstraeger/lagerbehaelter/klt-behaelter-9464
There are a lot of Sprinter Vans that use those Euro-containers as boxes to DIY an RV. I am having a hard time finding a source in North America.
Nah, those euro containers look to be 24 x 48” in size, much bigger than the ones I used.
OP
lilscorpion
Well-known member
Akro-Mils is a company from Akron, Ohio. Manufacturing since 1933 they are the top of the line in storage bins and material handling.
That’s some hardware right there!!
OP
lilscorpion
Well-known member
Nice! Not afraid to spend the $$ for the good materials.around here a 5x5 sheet of 3/4" pre-finished Baltic birch is pretty spendy. I resort to using the radiata pine ply from HD
No, it isn’t cheap,you’re right. Think the 3/4 x 5x 5 is about $75 per sheet which is about $8 - $10 more per sheet than unfinished. I like finished cabinets inside and out so it’s much easier to justify the additional spend to have no finish work.
I have purchased pre-finished ply at Home Depot for about half as much but it was half the ply’s and 1/4 the density. For cabinets that need to hold significant weight and last a lifetime, there’s no comparison to Baltic birch and to me, worth the additional cost.
Every one of these cabinets go with me if I move. They’re mine and not a feature of the house so I view the material as a possession I’ll have forever and not a disposable upgrade.
Heifer Boy
Member
You want to try buy that stuff here in Australia. An 8x4 sheet of 3/4" is $185!Nice! Not afraid to spend the $$ for the good materials.around here a 5x5 sheet of 3/4" pre-finished Baltic birch is pretty spendy. I resort to using the radiata pine ply from HD
I look at you guys with envy...
Sent from my XT1635-02 using Tapatalk