To avoid these ads, REGISTER NOW!

Tooling (Re)Organization

senlow

Well-known member
Joined
Apr 26, 2008
Messages
2,228
Location
Wheat Ridge, Colorado
What is your process for prepping aluminum parts for powder? A chromate conversion coating right after media blasting will dramatically increase adhesion of the powder.
 
To avoid these ads, REGISTER NOW!
OP
L

lilscorpion

Well-known member
Joined
Mar 15, 2010
Messages
3,599
Location
Colorado
What is your process for prepping aluminum parts for powder? A chromate conversion coating right after media blasting will dramatically increase adhesion of the powder.
Typically I just blast and coat. If there’s going to be a lot of outdoor exposure (like salt) then I may use a primer.

tell be about cremate conversion coatings? I don’t have adhesion issues (or don’t think I do). Admittedly I’m learning and only following recommendations of others who coat. I’m not even sure what an expert looks like. 😁
 

Monza Harry

Well-known member
Joined
Dec 29, 2018
Messages
1,433
Location
Windsor ON
It only seems like it. Reality is, I screw up all the time but figure out how to make it work (and/or deal with it). I’ll bet nothing I’ve built was exactly what I intended.
Now let's be fair, they never are. Are they? Sometimes you fix, sometimes you replace, and sometimes the unplanned expedition results in something better than planned. Don't ask me how I know! ;) Harry
 
OP
L

lilscorpion

Well-known member
Joined
Mar 15, 2010
Messages
3,599
Location
Colorado
Now let's be fair, they never are. Are they? Sometimes you fix, sometimes you replace, and sometimes the unplanned expedition results in something better than planned. Don't ask me how I know! ;) Harry
I mean like I kinda know what I want the finished product to look like. And sometimes I do the math to figure out the angles and such. In the end tho. The mis-cut ends up more perfect than where I should have and the new angle fits better…can’t be luck if it happens nearly every time right? Is it skill?!
 
OP
L

lilscorpion

Well-known member
Joined
Mar 15, 2010
Messages
3,599
Location
Colorado
the “kit” we purchased came with this air-water intercooler which the guy claimed (1) was the only thing available now so we’d have to make it work and (2) he took the time to polish for us. LOL. It’s clear he just sent us the random parts he had on the shelf and called it a kit.

82AE7FB9-ED96-4F86-B0F2-EFE6BE6343CC.jpeg

Anyway, this bullet provides us plenty of challenges. It had no mounting provisions integrated, offers very little cooling, and had fixed orientation *******. Needless to say, it found its way to the garbage and we went back to the drawing board looking for alternatives.

Andrew did some research and thought maybe an air to air intercooler may be easier and better in some ways. This B&M unit was the right size and it was already powder coated black which was a plus.

0B892B29-E64B-45F2-839C-55674C2D54D0.jpeg

the integrated mounting provisions we top and bottom which seemed like it would work fine given that’s how the trans and steering coolers are mounted in there now.

30EFCE35-5A13-4BFA-835C-925372ED26BF.jpeg

As we worked on mocking it up we realized We were in for some challenges. Presently the trans and steering coolers were mounted in front of the radiator so both would have to be relocated which is not ideal. The trans cooler will be really important once we can make more power and this location may be the best for airflow.

eve if we relocate the two coolers, we’d also have to figure out where/how to run the cold intake pipes. There’s almost no room behind the headlight.

C3F09E3F-22F3-455A-AFD8-7D6EFAAF201F.jpeg

With the headlight bracket out, we see there may be room below the headlight assembly but that would cause us to route the charge pipes up through all of the other garbage like AC lines, over flow tank, and other stock components or systems we’ve worked really hard to keep this far.

ED757964-4E0A-4034-8C36-2EF3B9563438.jpeg

Then we spied this unit online in a picture somewhere (forget where actually) and thought that with it’s firm factor, we might just be able to mount it over the engine above the valve cover and keep all of the charge pipes on the driver side of the motor away from the turbo.
733E7B7F-B4F8-474E-9763-9957B6D11681.jpeg
 

senlow

Well-known member
Joined
Apr 26, 2008
Messages
2,228
Location
Wheat Ridge, Colorado
Typically, I just blast and coat. If there’s going to be a lot of outdoor exposure (like salt) then I may use a primer.

tell be about cremate conversion coatings? I don’t have adhesion issues (or don’t think I do). Admittedly I’m learning and only following recommendations of others who coat. I’m not even sure what an expert looks like. 😁
I try not to cremate anything. o_O:ROFLMAO:

Powder coat and paint tend to have adhesion issues when applied to aluminum.

The coating will adhere better with a somewhat rough surface finish. Your media blast takes care of that.

Coatings don't like to adhere to the thin oxide layer on the surface of aluminum. If one coats immediately after blasting, this issue is minimized. Chromate chemically reacts with the aluminum and leaves a film that is corrosion resistant and promotes coating adhesion. Chromate can be applied in dip, brush or spray processes. It has a negligible build thickness - typically .00001-.00002 inch. Yes, that's 10-20 millionths. It is readily available in quart and gallon containers for those that only need a small amount. Henkel Alodine 1201 can even be purchased from Amazon.

I've been out of the powder coating business for a number of years, so I have no data to prove the improvement in adhesion, but here is a little comparison in adhesion:
I used a stripping chemical that would start to blister Imron paint within seconds after contact.
This stripper typically completely removed polyester powder coat within 4 hours.
Aluminum castings with a rough surface and chromate conversion could take up to 72 hours to completely remove the same coating.

One last thing that I should mention is that chromate is available in either hexavalent or trivalent chromium. Hexavalent chromium is very toxic, so I strongly recommend using a conversion that uses trivalent chromium.
 
OP
L

lilscorpion

Well-known member
Joined
Mar 15, 2010
Messages
3,599
Location
Colorado
With the turbo and intercooler, we now had enough to mock up the hard parts. There’s about an inch of clearance between the intercooler and the hood. Thought there was more room

1ED79F3F-D077-405F-9213-16D16F0D746B.jpeg

There’s about an inch of clearance between the intercooler and the hood. Thought there was more room but room enough.

Andrew removed the file rail and replaced the injectors with larger ones.

51CE087C-6272-4B0E-A9AB-F3A0CB3AA7BA.jpeg
 

Attachments

  • 8B873D90-0855-43E0-9B9E-C09397367220.jpeg
    8B873D90-0855-43E0-9B9E-C09397367220.jpeg
    301.2 KB · Views: 27
  • C598FF74-8D81-4F09-B590-5BBA4A687B69.jpeg
    C598FF74-8D81-4F09-B590-5BBA4A687B69.jpeg
    297.8 KB · Views: 11
  • B8FEB214-2537-467C-90D5-E09D41E906F7.jpeg
    B8FEB214-2537-467C-90D5-E09D41E906F7.jpeg
    340.8 KB · Views: 11
  • 4706EFE2-CE18-4F88-BBC3-7C883D9EC0BF.jpeg
    4706EFE2-CE18-4F88-BBC3-7C883D9EC0BF.jpeg
    298.1 KB · Views: 24
OP
L

lilscorpion

Well-known member
Joined
Mar 15, 2010
Messages
3,599
Location
Colorado
While Andrew worked on getting the Jeep back together again, I installed the blow off valve and air temp sensor. First drilled a hole with a hole saw in the intake.

8691CD68-F3F7-4851-8D3B-E9A827E9CE51.jpeg

Centered it on the hole

26EADBDC-2C65-4C21-B866-7D8B8BB324EB.jpeg

And welded it home. It’s been quite a while since I TIG’d aluminum so I think I was holding my breathe during the whole weld too worried I’d blow through the thin tube. Somehow, I didn’t. Weld didn’t look horrible either.

EFA702B4-30E6-4E62-92C9-D508E15ABAEF.jpeg

First start wasn’t horrible and we did find a few things we needed to fix.

9677A99E-C2F6-49D7-912D-E4DEC602BA3F.jpeg

Spent about 20 minutes trying to figure out what the source of smoke was. Turned out to be the header wrap. 🤣
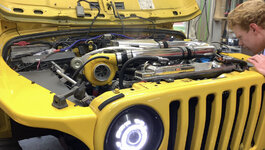
. Had a slight exhaust leak. Found the Y-pipe/exhaust needed to be tightened a little. Apparently you’re not supposed to buy map sensors at the hardware store, 4 out of 5 are junk. Had to get one from the dealership. Andrew noticed the air temp sensor was reading higher than he’s expected. After some research we learned we installed it and the blow off valve in the wrong part of the intake. They’re supposed to go between the intercooler and the throttle body…of course, that makes sense. So redo…supposed to be like this -

72DB4C0C-C78D-4165-9173-D2F071F8E7D5.jpeg

Much less to work with

5FCC8D62-8979-4DD3-BBBF-3819728D58F1.jpeg

with BOV and air temp sensor installed and ready to go back on

3F2CBD40-D9CB-42A1-9DD9-E3E1663861B6.jpeg

ok, this right. Temps are more reasonable too.

975F2461-A5B3-4953-8636-B994831E638D.jpeg

While I’m at it, I decided to fix the angle of the pipe coming off of the turbo itself. It was too close to the radiator hose so I decided to kick it up a bit.

1C2B122E-C984-4BEA-B5D0-C2AF353CC808.jpeg

now it’s parallel to the radiator and splits the AC hoses perfectly.

298C98E9-73B2-4054-8624-60DC63A672F4.jpeg
 
OP
L

lilscorpion

Well-known member
Joined
Mar 15, 2010
Messages
3,599
Location
Colorado
Out if dumb luck, the only dyno time we could get was the week of Christmas so for a few day dyno session, they had it a week and a half. Want exactly easy for Andrew to have to wait that long but the day finally came. We scooted down to pick it up and the entire way he was like a kid Christmas morning and smiling ear to ear when he heard it for the first time


41246D40-4F45-4391-ABDF-2CC40B1292B2.jpeg

First Drive


On the way home up I-25 we got to go up Monument which historically has been hard for the LJ. Typically it would downshift out if overdrive into 3rd and stay about 3k-ish RPM all
the way up. Andrew would struggle to go 65. On the way home I clocked him at 80 and he said it was actually pulling the hill in OD. Guess it now has enough power to hit some tails this spring.

The whole way home he never gave it more than half throttle. Even so, it sounds and runs great.


I need to get a video of the Jeep at WOT. At a full 10lbs of boost, it’s a hoot. 😎
 
Last edited:
OP
L

lilscorpion

Well-known member
Joined
Mar 15, 2010
Messages
3,599
Location
Colorado
That setup looks great. I hope it performs as good as it looks. Not everyone understands the polished aluminum thing but I sure do.
Intake After.jpg
Polished aluminum is awesome. We plan to powder coat all of it the semi-flat black when we get to it. Kinda want it muted out a bit so it’s a little more subtle when the hood is open…but the polished aluminum is growing on us so maybe we’ll just leave it as is.
 
Last edited:

Zippercat

Well-known member
Joined
Jul 13, 2013
Messages
828
Location
TN
Doing a little utube surfing and stumbled across this idea which utilizes plastic fence post material for drawer organizers. It would be super easy with minimal tools and likely inexpensive as well.

Another long time lurker here. Glad you’re back. Thanks for this link! Please share any other links to options you consider useful.
 

zmotorsports

ALLIANCE MEMBER
Joined
Oct 20, 2009
Messages
21,312
Location
Northern Utah
Jeep looks great Matt. Glad to hear you were able to get some more ponies in her and make it fun to drive again.

Looking forward to hearing about the trail performance.
 
OP
L

lilscorpion

Well-known member
Joined
Mar 15, 2010
Messages
3,599
Location
Colorado
Jeep looks great Matt. Glad to hear you were able to get some more ponies in her and make it fun to drive again.

Looking forward to hearing about the trail performance.
Best part is now I can tear into the JK. Just re-read your clock spring write up last night. Clock spring is first, then the super charger, then steering upgrade, then it’s back to fine tuning the suspension. Plenty to do!
 

Ilikeike

ALLIANCE MEMBER
Joined
Jan 8, 2015
Messages
2,452
Location
Northern Ca.
Best part is now I can tear into the JK. Just re-read your clock spring write up last night. Clock spring is first, then the super charger, then steering upgrade, then it’s back to fine tuning the suspension. Plenty to do!
I saw the pictures of the Jeep on the Dyno all strapped down, Did they not give you any #s ? I did see any posted ??
 
To avoid these ads, REGISTER NOW!
OP
L

lilscorpion

Well-known member
Joined
Mar 15, 2010
Messages
3,599
Location
Colorado
Nice job on the Jeep build!
Thank you! 😁
I saw the pictures of the Jeep on the Dyno all strapped down, Did they not give you any #s ? I did see any posted ??
Can’t believe I missed that. Think it was 190HP, 235 lb of torque. We were bummed a bit until he reminded us ours is an auto (~30% loss) at altitude (3% per thousand feet, we’re at 5280), and the motor has to overcome those monster 40” tires. If I do the reverse math the at the crank numbers are more respectable (though a little hard to believe)
 
Last edited:
OP
L

lilscorpion

Well-known member
Joined
Mar 15, 2010
Messages
3,599
Location
Colorado
I’m all about the custom drawer organizer and I’m starting in on my Craftsman USA wrenches ill store in two drawers - one metric, one SAE. Up until now I’ve been using the magnetic EZ-Red wrench racks which have worked well but the drawers never felt as organized as I’dlike.

BC9C77C9-BF39-48E8-969A-E337523E75FC.jpeg

For you Craftsman USA-o-files, here’s some of my collection I’ve assembled over time. As you can see, it’s non-trivial and I kinda went a little overboard. It all started as me wanting a complete made in the USA set. Then I’d find a good deal on a set, then another…

3BF7E920-05B8-4913-A43A-E50387B77B0C.jpeg

Some are sets of rusted wrenches to others they’re just short of junk.

C7800037-A349-4837-A066-8CDCCD2C987F.jpeg

I don’t care about the finish, I’m actually looking for deals like this so I can sand blast and powder coat some of the sets for trail use. Others are pristine complete sets I’ll keep in my box or pass down to my kids when the time is appropriate.

I’ll be machining the racks out of 1/8-inch 6061 uneven angle - one leg is 2” and the other is 1 1/2”. The angle will be permanently screwed to the drawer bottom to keep things from moving around and so I can optimize space.


I’ve settled on laying the wrenches back at a 40* angle and I’m now trying to figure out the ideal spacing for the wrenches. The viewing angle is a little deceptive. Right now there’s about .375” between beams of the wrenches which leaves about .100 for the offset ends. It’s about as close as I can get them and still get the wrenches out easily. This set of 1/4” -

1 5/16” takes up 17” front to back. I might be able to squeeze them closer together but I might only save 1/2”-ish.

05AB54C4-B283-4E07-A85E-6FAABEEDD879.jpeg

Using the conversational programming language I entered the x/y axis moves ti cut the slot profiles. First piece turned out well.

C935803E-65E5-4BC2-928B-4D338DFFFBCD.jpeg

Now to test fit the wrenches to see how the spacing turned out.

E179BF9F-237E-4C89-92B4-80FB155B2614.jpeg

I measured the spacing between the wrenches and only the spacing of the larger wrenches needs to be adjusted. Everything larger than 7/8 needs another .100”. Here’s revision 1, much better.

1391D06C-115B-42A6-A18A-CCB89B2B10D1.jpeg

Now to make the angled right rail. According to my measurements, the right rail must sit 30* in relation to the left to capture all of the wrenches correctly. I used excel to do some triangle math and calculate the spacing adjustment for the wrench spacing.

3F6F9396-683F-4CA1-ACA5-8B84E7A8CF3C.jpeg

It’s almost perfect. Now I gotta figure out which way the foot needs to go. The left/straight one is turned in and the right/angled one is turned out. Think I prefer turned out. Now that I can see it, I think I’look make a few more subtle adjustments on the angled rail, make a fixture, and cut the final. Good progress.

14520304-4124-4D57-ADCE-CF32F12AA47E.jpeg
 

Strouty

Well-known member
Joined
Mar 21, 2010
Messages
38,208
Location
Southern Maine
Nice looking rails, I have some plastic ones, but they don't have the correct angle, so some of my wrenches tip forward and look goofy, using your design that issue could be fixed.
 
OP
L

lilscorpion

Well-known member
Joined
Mar 15, 2010
Messages
3,599
Location
Colorado
Nice looking rails, I have some plastic ones, but they don't have the correct angle, so some of my wrenches tip forward and look goofy, using your design that issue could be fixed.
Yeah, that's what I'm shooting for however I've already noticed that some of the smaller wrenches I have have (like my craftsman ratcheting wrenches 7/16 and smaller) have a thinner and narrower neck and don't sit in there like the rest. Can't yet decide if it's worth the time to fix or if I'll just deal with a few of them not laying in there nice.
 

bugnut

ALLIANCE MEMBER
Joined
Jul 14, 2012
Messages
3,837
Location
Central Ohio
Matt. sent chills down my spine when you mentioned drilling holes in the tool box drawers to mount the racks :eek:!
I too have a soft spot for the Craftsman USA tools and when out and about see them at a reasonable cost, I grab them. I think it is from my early years as my first tools were Penncraft and Sears Companion. I still have them but have upped my game to Craftsman. Extra tools are not a problem.

"For you Craftsman USA-o-files, here’s some of my collection I’ve assembled over time. As you can see, it’s non-trivial and I kinda went a little overboard. It all started as me wanting a complete made in the USA set. Then I’d find a good deal on a set, then another…"
 
OP
L

lilscorpion

Well-known member
Joined
Mar 15, 2010
Messages
3,599
Location
Colorado
Matt. sent chills down my spine when you mentioned drilling holes in the tool box drawers to mount the racks :eek:!
I too have a soft spot for the Craftsman USA tools and when out and about see them at a reasonable cost, I grab them. I think it is from my early years as my first tools were Penncraft and Sears Companion. I still have them but have upped my game to Craftsman. Extra tools are not a problem.
It’s sad that Sears, like it was for us, is no longer a thing. I remember going there with my parents for household stuff and walking by the tool section. Somehow my fascination for tools in general started there and grew there. I wanted every set, the bigger the better. Fond memories browsing the isles. Bummed we can’t pass that experience along.
 

Trapps

ALLIANCE MEMBER
Joined
Feb 10, 2017
Messages
1,992
Location
The Detroit Zoo
I spent a considerable amount of time with my grandfather as a young kid. He is absolutely and directly responsible for my DIY problem. A big part of that influence was the frequent trips to Sears with him, specifically the tool department. We also had a Sears Outlet that was a place we went a few times a year. It was a magical place for a kid. Yes they had appliances and vacuums. But they also had tools. And go-karts and minibikes.
 
OP
L

lilscorpion

Well-known member
Joined
Mar 15, 2010
Messages
3,599
Location
Colorado
Matt,
Nice work as always. What's the plan for the EZ-Red wrench racks? I'll be happy to take them off our hands if you don't have "space" for them. Make me an offer I can't refuse..... :ROFLMAO:
The plan for all of my previous organizers was to store them off so I have them when I get a bigger shop and have more space for more organization. If that never happens, the backup plan is to give them to my kids with my plan b tools when they have garages of their own to get them started.

Even the best laid plans tend to go to $hit when I run out of space so I’ll remember your offer. If I shared which things I’ve pitched in the past few years to make space some on here might pass out.
 
OP
L

lilscorpion

Well-known member
Joined
Mar 15, 2010
Messages
3,599
Location
Colorado
Matt. sent chills down my spine when you mentioned drilling holes in the tool box drawers to mount the racks :eek:!

forgot to comment: The bottoms aren’t metal I can’t use magnets to keep things where I want them. About the only way is to screw stuff down. Part of the design of these base cabinets was to have drawers with floating drawer bottoms that are fully replaceable in the event I need to. One reason I guess could be because they end up Swiss cheese from changing where things are screed internally over and over…
 

csp

Well-known member
Joined
Mar 23, 2010
Messages
5,719
Location
Franktown, CO
There are a few things I will enter Harbor Freight for. Their wrench racks are pretty handy.

My family bought everything from Sears when I was a kid. Hand tools, power tools, tires, batteries, appliances, mom's vacuum, you name it. I remember wearing "Toughskins" jeans early in gradeschool. One of my dad's drugstores was in a stripmall with a Sears as the anchor store, so we were in there fairly frequently.

I still cuss some of the Craftsman power tools my dad uses. They weren't exactly the best.
 

Attachments

  • IMG_5358[1].JPG
    IMG_5358[1].JPG
    431.5 KB · Views: 50
Last edited:
OP
L

lilscorpion

Well-known member
Joined
Mar 15, 2010
Messages
3,599
Location
Colorado
There are a few things I will enter Harbor Freight for. Their wrench racks are pretty handy.

My family bought everything from Sears when I was a kid. Hand tools, power tools, tires, batteries, appliances, mom's vacuum, you name it. I remember wearing "Toughskins" jeans early in gradeschool. One of my dad's drugstores was in a stripmall with a Sears as the anchor store, so we were in there fairly frequently.

I still cuss some of the Craftsman power tools my dad uses. They weren't exactly the best.
I do like their wrench racks and I think they're fairly common.

Toughskins...we wore them too and I still wore through the reinforced but usually just below it. So long ago.

I think my dad still has all of his original craftsman power tools. I remember seeing his hold *** drill hanging on the peg board wall last time I was there. So wimpy but it still runs.
 

bugnut

ALLIANCE MEMBER
Joined
Jul 14, 2012
Messages
3,837
Location
Central Ohio
forgot to comment: The bottoms aren’t metal I can’t use magnets to keep things where I want them. About the only way is to screw stuff down. Part of the design of these base cabinets was to have drawers with floating drawer bottoms that are fully replaceable in the event I need to. One reason I guess could be because they end up Swiss cheese from changing where things are screed internally over and over…

Okay I am relieved of my anxiety, as it is only plastic. I have a bottom roller that has a couple holes in the top surface because it logged a lot of miles in moving from building to building daily and the top stack was very shaky on the old floors. I cringe every time I change the cover. Oh the stupidity of our youth!o_O
 
OP
L

lilscorpion

Well-known member
Joined
Mar 15, 2010
Messages
3,599
Location
Colorado
Okay I am relieved of my anxiety, as it is only plastic. I have a bottom roller that has a couple holes in the top surface because it logged a lot of miles in moving from building to building daily and the top stack was very shaky on the old floors. I cringe every time I change the cover. Oh the stupidity of our youth!o_O
Couldn't agree more. It's so easy to just drill a hole and at the time it's "no biggie". Not quite as easy to undrill it and that's where regret forms...
 
OP
L

lilscorpion

Well-known member
Joined
Mar 15, 2010
Messages
3,599
Location
Colorado
Anyone have experience with blow off valves? We're trying to get our TubroSmart BOV dialed in and having some challenges (or its the best we're gonna get and we don't know it). We're running 8.5-ish lbs of boost, have 4.5 InHg vacuum at idle and peak at roughly 12.5 I think when we let off the gas. We've tried 4 different spring combos in the BOV.
  • 14-18 InHg - doesn't open
  • 11-15 InHg - opens, turbo flutters
  • 10-14 InHg - opens, turbo barely flutters
  • 6-10 InHg - BOV never closes
Based on my understanding, BOV is to relieve the boost as it keeps bulding after letting off the throttle. The spring in the BOV works with the boost to keep the valve closed until you let off the throttle at which time the throttle plate closes and the motor returns to vacuum. The vacuum then reverses the force on the sprint attempting to defeat it and the BOV opens releasing the built up boost.

I think we need an 8-12 but I'm kinda feeling like wanting to understand how to actually figure out which spring I'd need based on my parameters listed above. What I can't figure out is what the TurboSmart ranges mean...they almost seem abstract or guesstimates.

Thanks
 

86turbodsl

Well-known member
Joined
Jul 1, 2005
Messages
6,553
Location
Michigan
I miss my CNC plasma. It truly was game changing. Never really liked how it cut aluminum but I also didn’t try hard to dial aluminum in.

each machine has a thing it shines at. I’ve found a CNC mill to be more game changing than a CNC lathe. That may be why I’ve not tried really hard to get a CNC lathe…most basic parts/ops are fairly repeatable on a lathe. Anyway…it’s when you have all your machines CNC that everything becomes possible. Someday. 😜
This. My projects really went next level when i could do a quick **** bracket on cnc.
 

Pressingonward

Well-known member
Joined
Mar 9, 2016
Messages
522
Location
SW WA
Been a decade or so since I've messed with a BOV, but I think you have the gist of it - you need a spring strong enough to keep the BOV closed at idle, but weak enough to open when you shut the throttle. If you have a very fast responding boost gauge you could watch it to make sure the pressure isn't spiking when you close the throttle before the BOV opens (spring too stiff), and you can play around with the throttle a bit while feeling for boost leak past the BOV with your hand (undo the vent pipe and plug the end going into the intake if it's a recirculating BOV) if the turbo is small enough to spool easily without driving the vehicle - shouldn't vent anything until the throttle is closed significantly or rapidly.

Sounds like the 11-14 is closest, but you might need one very slightly softer if the turbo is fluttering. You can add shims to a soft spring to stiffen it up (slightly)
 
OP
L

lilscorpion

Well-known member
Joined
Mar 15, 2010
Messages
3,599
Location
Colorado
Been a decade or so since I've messed with a BOV, but I think you have the gist of it - you need a spring strong enough to keep the BOV closed at idle, but weak enough to open when you shut the throttle. If you have a very fast responding boost gauge you could watch it to make sure the pressure isn't spiking when you close the throttle before the BOV opens (spring too stiff), and you can play around with the throttle a bit while feeling for boost leak past the BOV with your hand (undo the vent pipe and plug the end going into the intake if it's a recirculating BOV) if the turbo is small enough to spool easily without driving the vehicle - shouldn't vent anything until the throttle is closed significantly or rapidly.

Sounds like the 11-14 is closest, but you might need one very slightly softer if the turbo is fluttering. You can add shims to a soft spring to stiffen it up (slightly)
Thanks, the idea of adding washers to stiffen a spring that's too soft is what I'll have to do then, great idea. Wish I could make a stiff spring a scosh softer...could I make a spring shorter by taking a coil off the end maybe?
 
OP
L

lilscorpion

Well-known member
Joined
Mar 15, 2010
Messages
3,599
Location
Colorado
The next step was to figure out how to machine a mirror of the long/right rail. After some futzing around, I figured out how to make a mirror version of the rail. There’s a mirror function. I used a piece of 1/4 6061 as a fixture base and cut the next revision.

F74DE482-BBFC-4DA7-B98E-507CD4E3B6BA.jpeg

A few heavy spot welds I’m the corner keep things where they need to be.

51B26B26-3C65-4BCE-B37D-ADE5308CC00E.jpeg

A quick sand blasting to prep for powder coat helps slightly break the edges and give the coating to something to bite onto.

9A4ED27C-411D-48CD-8ABC-C518DEF3849A.jpeg

The single in-wall kitchen oven can creating challenges for larger parts.

98EBA985-775A-4A83-A28F-B704C9B3872B.jpeg

Spaced it just so the box end of the wrenches would fit between the rack rail and the drawer side. This will keep them from sliding around as much as is possible.

B6D0ADBF-EF2D-44C9-84DB-78A416F4B051.jpeg

And loaded it up.

C11AE7DC-68A3-44BA-981B-1B890E97EABA.jpeg

I like the contrast of the red behind the clean wrenches. Now that I can see one finished, I know I’ll like the whole drawer organized this way.

BC58FC91-5A95-4F8E-ADD5-6122B9E28DEA.jpeg
 
To avoid these ads, REGISTER NOW!
Top Bottom