To avoid these ads, REGISTER NOW!

Truck's shop build

autoclassicnut

Well-known member
Joined
Nov 24, 2007
Messages
1,382
Location
Montana
Great work... I know from experience the agony of getting people to spent their free time to assist in your build. In my case I just made a jig to raise the panels, and suffered through 95 % of it on my own. I like the loft idea and am curious of your plans for the inside... Thanks for posting Truck! I'll keep my eyes on this one!
 
To avoid these ads, REGISTER NOW!

Jay H 237

Well-known member
Joined
Apr 24, 2005
Messages
1,994
Location
Torrington, CT
I'll tell you I've never thought of or seen yet someone build a "regular" wall on a quonset building until this one. Doing that and installing the siding helps take away the "commercial" look.

At the front, are you going to extend the fill or gravel to meet up with the man door?
 

hypnotoad

Well-known member
Joined
Jan 5, 2008
Messages
212
Location
SW Florida
Truck, glad to see you're getting it done. I'm finally putting mine up also. Pain in the ****. I'm not a fan of heights, but the scissor lift is my best friend now.
 
OP
T

truck

Well-known member
Joined
Feb 8, 2008
Messages
203
Location
Manassas, Va
Would you consider Mountain Laural bushes against the building to soften the look?

I hadn't thought of those. Are they evergreen? I definately need evergreen as I'm not worried about summer view only winter. That is why I'm thinking of Leyland Cypress (grow tall - up to 50ft and fast - 2ft/yr).

At the front, are you going to extend the fill or gravel to meet up with the man door?

No, I'm building steps and will have a landscape wall all down that side of the drive. I didn't want to over cover the roots of the tree in the corner and smother it. I'm also going to put in a path to my deck.

Truck
 
OP
T

truck

Well-known member
Joined
Feb 8, 2008
Messages
203
Location
Manassas, Va
Truck, glad to see you're getting it done. I'm finally putting mine up also. Pain in the ****. I'm not a fan of heights, but the scissor lift is my best friend now.

Not a big fan of heights either that is why I suckered my friends to do the tall stuff...glad you are getting started.

Truck
 

walt111

Well-known member
Joined
Nov 25, 2006
Messages
305
Location
TN
I looked at your pictures and told my wife deja vu. We put our building up ourselves last summer. My building is 25 by 50. Each arch is made up of seven panels. After the first two arches were up we put the rest of them together one panel at a time. When my wife was at work and not able to help, I got to where I could build one arch all seven panels in four hours by myself. I have a scissor lift that I built a makeshift wood frame to match the four twelve roof pitch and attached it to the lift this enabled me to be able to erect the arches alone. I am still working on the building inside.
Great job on the pictures .
Walt
 
OP
T

truck

Well-known member
Joined
Feb 8, 2008
Messages
203
Location
Manassas, Va
Leaves popped out between yesterday and today. When I drove home from work, I was like "Hey, somebody stole my shop!!!!" If I'd have started this in the summer neighbors probably wouldn't have bitched as much until the leaves fell and then it would have been to late to hassle the county and delay me like they did.

Truck
 

Attachments

  • DSCN0421-400.jpg
    DSCN0421-400.jpg
    21.7 KB · Views: 209
  • DSCN0422-400.jpg
    DSCN0422-400.jpg
    23.2 KB · Views: 193
  • DSCN0423-400.jpg
    DSCN0423-400.jpg
    28.3 KB · Views: 207
  • DSCN0424-400.jpg
    DSCN0424-400.jpg
    24.5 KB · Views: 269

Omphaloskeptic

Well-known member
Joined
Oct 11, 2008
Messages
2,346
Location
Ultima Ratio, Wa.
I hadn't thought of those. Are they evergreen? I definately need evergreen as I'm not worried about summer view only winter. That is why I'm thinking of Leyland Cypress (grow tall - up to 50ft and fast - 2ft/yr).

Truck's - check this website out:
http://en.wikipedia.org/wiki/Kalmia_latifolia

They are evergreen and can grow as a bush or tree depending on local conditions. Beautiful blossoms btw! Picture your shop as one humongous arbor.:)
 

babzog

Well-known member
Joined
Apr 20, 2009
Messages
2,117
Location
Eastern Ontario, Canada
Good build thread, gonna be a nice shop when you're done!

Knowing jack about these types of buildings, I'm curious how you attach stuff (walls, floors, angles to support garage doors, etc) to the steel shell while maintaining a strong and watertight structure?

How would you insulate this type of building?
 
OP
T

truck

Well-known member
Joined
Feb 8, 2008
Messages
203
Location
Manassas, Va
The building comes with a billion nuts & bolts. The bolts have a plastic washer to seal the hole. I also found screws at lowes made for metal roofs with rubber washer under metal washer.

As for the garage door brackets, the front was standard wood frame so no problems there. As to the back door I had to figure out a way to do it because the door was framed in steel. There are pictures above but I sandwiched 2 1x6s together on inside and outside of the steel frame. Then I just screwed 2x4 on to the 1x6s which gave me room to bolt the angle brackets for door track.

I'm hanging the lights by "double nutting" on the bolts that are already there. I was going to put some peg board up the same way.

The horizontal support for the loft joist on the building side I just replaced the bolt that were bolting arch pieces together with longer ones that went through the 2x8.

Several methods to insulate. The factory sells "barbs" the basically double nut on the bolts, but allow prepackaged "blanket" fiberglass insulation. Makes the insided look "quilted". If I insulate, I'm leaning toward spray foam even though it is expensive.

Truck
 

walt111

Well-known member
Joined
Nov 25, 2006
Messages
305
Location
TN
Spray foam is expensive but it is the only way to go as far as I'm concerned. I bought two kits last year at $700.00 per kit, these cover 600 square feet at 1 inch thick. They seal all air leaks at seams. I need to get two more kits this year. I bought from think green somewhere in the mid west. The only other one I found was tiger foam in New Jersey. I am in California so less shipping cost from think green.
 

walt111

Well-known member
Joined
Nov 25, 2006
Messages
305
Location
TN
No pictures now do not have equipment to do that. I plan to cover all the walls with 1/2 inch ply wood, then when I want to hang some thing it will stay.
 

Bigspook

Member
Joined
May 24, 2009
Messages
11
Man it is looking great you can not even tell it is there when the trees are green but keep us up to date with the inside :bowdown:
 
OP
T

truck

Well-known member
Joined
Feb 8, 2008
Messages
203
Location
Manassas, Va
Sorry fellas, there has not been much progress. The last couple of months have either had me swamped at work or on the road. I did get to take some time to go 4 wheeling in Hot Springs, AR at the Scrambler Owners Association National Event at which Extreme 4x4 (from HorsePower TV)decided to do the maiden run of the Scrambler they built. That was fun meeting and talking to Ian and the crew. Show should air end of this month or beginning of Aug....

Anyway, I haven't done much on shop I did get concrete poured into outside areas of U-channel - this should stop the water getting into the shop. I got my electric pet fence back up so my dogs now have freedom of the yard again. I will update as things progress.

Truck
 
OP
T

truck

Well-known member
Joined
Feb 8, 2008
Messages
203
Location
Manassas, Va
I filled in the "corrugated gaps" with concrete. This took almost 2 days of hand mixing 24 bags of cement. Put a little slope on them. Hopefully now the water will run off and no longer come into the building.

Truck
 

Attachments

  • DSCN0554-400.jpg
    DSCN0554-400.jpg
    11 KB · Views: 116
  • HPIM2964-400.jpg
    HPIM2964-400.jpg
    12.9 KB · Views: 104
  • HPIM2960-400.jpg
    HPIM2960-400.jpg
    12.4 KB · Views: 97
  • HPIM2963-400.jpg
    HPIM2963-400.jpg
    15.1 KB · Views: 102
Last edited:
OP
T

truck

Well-known member
Joined
Feb 8, 2008
Messages
203
Location
Manassas, Va
Okay, I'm going to try and figure out hooking up the electric service panels to meter base. I already hung the service panels. If any of you NOVA types wanna stop by and help, I'll be working all weekend.

Truck
 

Attachments

  • HPIM2961-400.jpg
    HPIM2961-400.jpg
    14 KB · Views: 79
  • HPIM2962-400.jpg
    HPIM2962-400.jpg
    18.5 KB · Views: 67

jopickens

Well-known member
Joined
May 29, 2009
Messages
176
Location
Grafton, WV
I ran a 400a underground service to my shop and hooked up two 'feeds' from it. The local power service guy gave me special 'dual lug' adapters for the customer hookup portion of the meter socket box/panel. They allow two connections to each of the three customer lugouts (hot/hot/neutral).
I ran one set of 3/0 copper wires to the 200a panel in my shop. The other set of 3/0 copper wires goes to a 200a disconnect in my shop - then back through the floor in conduit and underground over to feed my house 105' away. When I was building my shop I was also in the process of converting the power service to my house to underground - the local power company inspector allowed me to sub-feed my house from my shop. It's typically the other way around I guess... :cool:

Josh
 

fatboy99

Well-known member
Joined
Apr 23, 2009
Messages
908
Location
Indiana
Sorry fellas, there has not been much progress. The last couple of months have either had me swamped at work or on the road. I did get to take some time to go 4 wheeling in Hot Springs, AR at the Scrambler Owners Association National Event at which Extreme 4x4 (from HorsePower TV)decided to do the maiden run of the Scrambler they built. That was fun meeting and talking to Ian and the crew. Show should air end of this month or beginning of Aug....

The show aired Saturday and again Sunday i should have paid more attension to it not as fun to watch since Jessy left:)
 
To avoid these ads, REGISTER NOW!

R1chy

Well-known member
Joined
Sep 3, 2007
Messages
232
Location
Fairfax, VA
Sorry I didn't see your request for help before the weekend as I could have stopped by for a couple of hours on my way out to the valley. Poured like it was never going to end and thought about sleeping in the canoe just in case - LOL.

Let us know the next time you need an extra hand, you may want to post it on the VA Garage Gang thread.

R1chy


Okay, I'm going to try and figure out hooking up the electric service panels to meter base. I already hung the service panels. If any of you NOVA types wanna stop by and help, I'll be working all weekend.

Truck
 

IAFFCJ

New member
Joined
Sep 15, 2009
Messages
4
Location
Manassas, VA
Since you wouldn't post the pics on VaK you have sucked me in. And once again made me want to build a bigger garage also. Drawings are almost done, but still don't have the wife on board.:thumbup:
 
OP
T

truck

Well-known member
Joined
Feb 8, 2008
Messages
203
Location
Manassas, Va
Since you wouldn't post the pics on VaK you have sucked me in. And once again made me want to build a bigger garage also. Drawings are almost done, but still don't have the wife on board.:thumbup:

:bounce::bounce::beer:

That is what I like to hear.

Gettin' a lot of little stuff done. Update soon.

Truck
 
OP
T

truck

Well-known member
Joined
Feb 8, 2008
Messages
203
Location
Manassas, Va
It has been awhile since I updated with pictures. In late July, I got back to working on the shop. As previously stated I filled all of the outside 'holes' of the corrogated building with cement as per building instructions. I also spent a good deal of time researching how to do the electrical connections between the service panels (breaker box and the electric meter base). Finally figured it all out and got it done and inspected. After inspection, I called the power company to bring me power from the street. Did more paperwork and paid them in advance. This processes itself has taken awhile. Hopefully, we have power next week, as the utility companies have marked all the lines. I also had to pull out the tractor and grate the gravel. I wanted to pull the gravel back so I didn't lose it when they dig the ditch for power.

Truck
 

Attachments

  • DSCN0687-400.jpg
    DSCN0687-400.jpg
    20.3 KB · Views: 73
  • DSCN0686-400.jpg
    DSCN0686-400.jpg
    22.9 KB · Views: 74
  • DSCN0685-400.jpg
    DSCN0685-400.jpg
    24.9 KB · Views: 70
  • HPIM2999-400.jpg
    HPIM2999-400.jpg
    12.1 KB · Views: 72
  • HPIM2966-400.jpg
    HPIM2966-400.jpg
    14.5 KB · Views: 69
  • HPIM2965-400.jpg
    HPIM2965-400.jpg
    8.4 KB · Views: 67
Last edited:
OP
T

truck

Well-known member
Joined
Feb 8, 2008
Messages
203
Location
Manassas, Va
We did a little clean up and started working on framing the bathroom.

Truck
 

Attachments

  • HPIM2980-400.jpg
    HPIM2980-400.jpg
    15.2 KB · Views: 58
  • HPIM2979-400.jpg
    HPIM2979-400.jpg
    15 KB · Views: 58
  • HPIM2978-400.jpg
    HPIM2978-400.jpg
    15.3 KB · Views: 59
  • HPIM2976-400.jpg
    HPIM2976-400.jpg
    13.2 KB · Views: 59
  • HPIM2974-400.jpg
    HPIM2974-400.jpg
    10.2 KB · Views: 71
  • HPIM2973-400.jpg
    HPIM2973-400.jpg
    12.6 KB · Views: 66
Last edited:
OP
T

truck

Well-known member
Joined
Feb 8, 2008
Messages
203
Location
Manassas, Va
A friend made a suggestion to use a pocket door to save space. I though this was a great idea. So I bought a pocket door kit and I think it will turn out well. I also finally put up the cross braces on the garage door - I got tired of tripping over them. Finally there is a white haired knuckle head that wasn't giving much help but was doing a lot of supervising from his position on the floor.
 

Attachments

  • HPIM3034-400.jpg
    HPIM3034-400.jpg
    12.2 KB · Views: 62
  • HPIM2986-400.jpg
    HPIM2986-400.jpg
    14.6 KB · Views: 58
  • HPIM3004-400.jpg
    HPIM3004-400.jpg
    16.8 KB · Views: 63
  • HPIM3006-400.jpg
    HPIM3006-400.jpg
    15.7 KB · Views: 52
  • HPIM3005-400.jpg
    HPIM3005-400.jpg
    15.6 KB · Views: 52
  • HPIM2981-400.jpg
    HPIM2981-400.jpg
    14.2 KB · Views: 54
Last edited:
OP
T

truck

Well-known member
Joined
Feb 8, 2008
Messages
203
Location
Manassas, Va
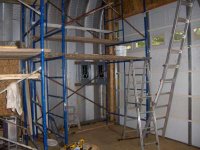
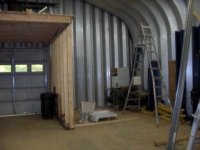
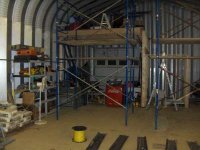
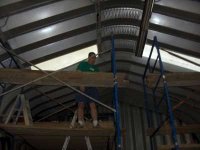
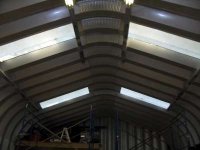
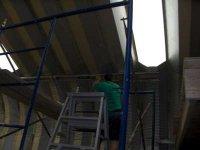
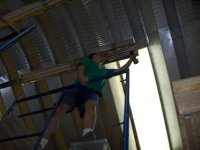
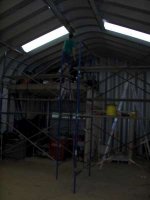
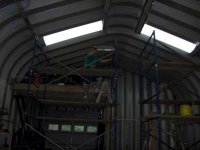
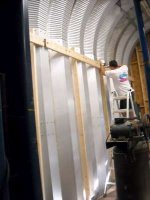
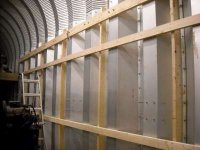
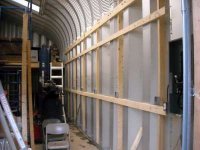
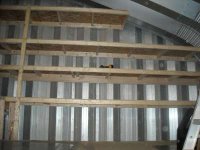
I spent a whole lot of time on the lights. The just seemed to take awhile, plus I really didn't like being that high on the scaffold. I had a friends come over and help a little which was a life saver because there were times I had had enough up there with both hands over my head lifting a light fixture and/or holding a drill or wrench. I figured the most secure way was to mount to the ceiling. So, I made a pattern off the existing bolts where the building panels were bolted together, drilled holes in the fixtures and double nutted them to the existing bolts. The lights consist of 8' fixtures with 2 pair of tandem 4' bulbs. I put 3 of these end to end from the front to the back, which get me right to the loft area. There are a total of 4 rows of across the building. The circuits will be the 4 across the building on 3 separate switches, so front, middle and back. I used flex conduit as a raceway to put the Romex through, because it looked better and once I ever insulate and something goes wrong I can repull wire if I have to. The flex conduit worked really well with the curvature of the building. You'll see, I got the first set up and wired. I put a plug on the end and plugged them into my extension cord, then I had light!! wohoo!!

Truck
 

Attachments

  • HPIM3013-400.jpg
    HPIM3013-400.jpg
    13.9 KB · Views: 55
  • HPIM3011-400.jpg
    HPIM3011-400.jpg
    14.3 KB · Views: 52
  • HPIM3009-400.jpg
    HPIM3009-400.jpg
    13.7 KB · Views: 53
  • HPIM2990-400.jpg
    HPIM2990-400.jpg
    11.7 KB · Views: 54
  • HPIM2989-400.jpg
    HPIM2989-400.jpg
    12.5 KB · Views: 52
  • HPIM2985-400.jpg
    HPIM2985-400.jpg
    14.3 KB · Views: 56
  • HPIM2984-400.jpg
    HPIM2984-400.jpg
    13.6 KB · Views: 63
Last edited:
OP
T

truck

Well-known member
Joined
Feb 8, 2008
Messages
203
Location
Manassas, Va
These pix are a little dark because of the skylight backlight but you should get the idea.

Truck
 

Attachments

  • HPIM3025-400.jpg
    HPIM3025-400.jpg
    10.8 KB · Views: 27
  • HPIM3024-400.jpg
    HPIM3024-400.jpg
    9.6 KB · Views: 26
  • HPIM3019-400.jpg
    HPIM3019-400.jpg
    12.1 KB · Views: 28
  • HPIM3018-400.jpg
    HPIM3018-400.jpg
    10.6 KB · Views: 25
  • HPIM3015-400.jpg
    HPIM3015-400.jpg
    11.8 KB · Views: 27
OP
T

truck

Well-known member
Joined
Feb 8, 2008
Messages
203
Location
Manassas, Va
Actually in between finishing the lights the boys & I put up the loft over the bathroom and workbench area. It is much lower then the other side because I didn't have to go over the garage door. It gives a lot of room up there. About 25' across by 12' deep when you total both of them. Now I just have to figure out how I'm going to get stuff up there.

Truck
 

Attachments

  • HPIM3044-400.jpg
    HPIM3044-400.jpg
    15.7 KB · Views: 48
  • HPIM3043-400.jpg
    HPIM3043-400.jpg
    13.1 KB · Views: 40
  • HPIM3040-400.jpg
    HPIM3040-400.jpg
    15.4 KB · Views: 41
  • HPIM3033-400.jpg
    HPIM3033-400.jpg
    13.1 KB · Views: 37
  • HPIM3032-400.jpg
    HPIM3032-400.jpg
    12 KB · Views: 49
  • HPIM3031-400.jpg
    HPIM3031-400.jpg
    9.7 KB · Views: 40
  • HPIM3046-400.jpg
    HPIM3046-400.jpg
    15.8 KB · Views: 64
Last edited:
OP
T

truck

Well-known member
Joined
Feb 8, 2008
Messages
203
Location
Manassas, Va
I've been trying to figure out how I was going to run the electrical lines for the outlets, water heater, washer/dryer, air compressor, lift etc, becuase I didn't want to put any more holes in the building for bolts. So I came up with an idea to remove a set of bolts where the shoulder (curve up part) and the vertical walls were bolted together. I then bolted in a 2x8 with longer bolts. This is similar to the way I did the joist hanger on the outside walls for the loft. This gave me something to bolt the conduit to for the electrical lines. I had another thought and decided to put a 2x4 vertically behind the 2x8 and then attach it to the 2x8 at the top and the steel channel at the bottom. These 2x4s sit inside the corregated part of the building therefore sit flush with the flat of the inside walls, so I won't lose any floor space. By putting these 2x4s in every 4 feet or every other section, this will allow me to bolt/nail/screw anything else horizontally on the walls without putting holes in the walls.

Truck
 

Attachments

  • DSCN0660-400.jpg
    DSCN0660-400.jpg
    14.5 KB · Views: 57
  • DSCN0659-400.jpg
    DSCN0659-400.jpg
    13.6 KB · Views: 48
  • DSCN0658-400.jpg
    DSCN0658-400.jpg
    16 KB · Views: 48
  • DSCN0657-400.jpg
    DSCN0657-400.jpg
    18.1 KB · Views: 41
  • DSCN0656-400.jpg
    DSCN0656-400.jpg
    12.2 KB · Views: 43
  • DSCN0663-400.jpg
    DSCN0663-400.jpg
    16.3 KB · Views: 49
  • DSCN0661-400.jpg
    DSCN0661-400.jpg
    13.7 KB · Views: 50
OP
T

truck

Well-known member
Joined
Feb 8, 2008
Messages
203
Location
Manassas, Va
I ran a set of 2x4s horizontally from the front to the back. These are 4' apart and start 4' from the floor. I'm going to put pegboard along that run. Below that to the floor I may put some plywood or osb just to have a smooth look up to 8' high. Above the pegboard I have about 36" before the shoulder prevents mounting anything flat against the wall. I'm thinking about putting cabinets up there for storage of things I don't need to get to often. I got 1 circuit of outlets (6 outlets) done on that wall. I still need to do the next circuit (I'm running 2 20A circuits of outlets, 6 from front to middle of shop and 6 from middle to back). Then that darn supervisor keeps sniffing around and putting his nose in...:)

Truck
 

Attachments

  • DSCN0683-400.jpg
    DSCN0683-400.jpg
    16.5 KB · Views: 46
  • DSCN0684-400.jpg
    DSCN0684-400.jpg
    18.7 KB · Views: 47
  • DSCN0689-400.jpg
    DSCN0689-400.jpg
    15.2 KB · Views: 50
  • DSCN0692-400.jpg
    DSCN0692-400.jpg
    17.3 KB · Views: 46
  • DSCN0680-400.jpg
    DSCN0680-400.jpg
    16 KB · Views: 73

supercomp

New member
Joined
Feb 3, 2008
Messages
1
I was thinking of putting up a Quonset Hut style building for as temp storage and dont really want to deal with pouring a slab. Is there anyway to put up one of these buildings without pouring a slab or footers... or would there be another way to secure the bottom?
 
OP
T

truck

Well-known member
Joined
Feb 8, 2008
Messages
203
Location
Manassas, Va
I was thinking of putting up a Quonset Hut style building for as temp storage and dont really want to deal with pouring a slab. Is there anyway to put up one of these buildings without pouring a slab or footers... or would there be another way to secure the bottom?

You have to at least have footers. Concrete floor is not required, you can have dirt, gravel, whatever. The building is supported by downward force on the base, thus the required footers.

Truck
 
OP
T

truck

Well-known member
Joined
Feb 8, 2008
Messages
203
Location
Manassas, Va
Been awhile...again, so I thought I would bring folks up to date that are curious. This starts back in Nov.

We have electricity!!!! NovEc finally came an put our power in. This is a huge step forward. So I spent the weekend with Dillon's help running gray conduit, pulling wires through and wiring several things. The wire through the conduit is for the "On Demand" water heater, air compressor and the washer/dryer. I ran it to a junction box and then ran romex from there. You can see the washer/dryer is done (inside the bathroom), the air compressor is done (high on the wall just outside the bathroom), the water heater is almost done (big box inside the bathroom). All with breakers in place and everything - all nice and tidy in the panel boxes. I ran 2 more circuits to the back of the shop using just plain romex. One is a dedicated circuit for the bathroom (was told it had to be dedicated), it will have light, vent fan and an outlet. The other circuit is for lights in the loft and in the workbench area. I got the workbench area done with a switch. The loft will wait until I have all the shelves configured so I know where to put the lights. So I still need to run a set of outlets for the back of the shop and wire power and switches to the overhead lights. Once this is done I can call the electrical done for inspection. Also worked the plumbing for pre drywall inspection.
 

Attachments

  • DSCN0821-400.jpg
    DSCN0821-400.jpg
    15.2 KB · Views: 25
  • DSCN0820-400.jpg
    DSCN0820-400.jpg
    17.3 KB · Views: 28
  • DSCN0818-400.jpg
    DSCN0818-400.jpg
    18.1 KB · Views: 31
  • DSCN0817-400.jpg
    DSCN0817-400.jpg
    17.8 KB · Views: 33
  • DSCN0719-400.jpg
    DSCN0719-400.jpg
    17.5 KB · Views: 33
  • DSCN0717-400.jpg
    DSCN0717-400.jpg
    17.7 KB · Views: 29
OP
T

truck

Well-known member
Joined
Feb 8, 2008
Messages
203
Location
Manassas, Va
I passed the pre drywall inspection for plumbing. I started to put the walls up. Using OSB and then I'll put masonite tile board on top of that. Finally putting walls up really closed things off and makes it all look small!! I also hung pegboard and one of the white boards to cover the conduit from the electrical runs.
 

Attachments

  • DSCN0839-400.jpg
    DSCN0839-400.jpg
    16.6 KB · Views: 31
  • DSCN0838-400.jpg
    DSCN0838-400.jpg
    15.2 KB · Views: 31
  • DSCN0841-400.jpg
    DSCN0841-400.jpg
    17.7 KB · Views: 29
  • DSCN0840-400.jpg
    DSCN0840-400.jpg
    17.4 KB · Views: 30
  • DSCN0834-400.jpg
    DSCN0834-400.jpg
    16.6 KB · Views: 24
  • DSCN0829-400.jpg
    DSCN0829-400.jpg
    15.6 KB · Views: 24
  • DSCN0830-400.jpg
    DSCN0830-400.jpg
    17.5 KB · Views: 24
OP
T

truck

Well-known member
Joined
Feb 8, 2008
Messages
203
Location
Manassas, Va
Since the walls were up I got to work on the floor. I put down black and white checker board VCT. Sealed and finished it. I also started to put up the tile board. I think it looks good. I need to cut a hole and notch a stud for the medicine cabinet over the sink. Then I have to figure out where I'm going to cut the hole for the dryer vent for the washer/dryer combo I picked up for free.

Mom and Dad came for Christmas so what did I do ... that's right ... I put them to work!!!

We built a bunch of shelves. We had to do a little rearranging first. But then we built a set of metal shelves by the back garage door. This set of shelves is 12 ft long by 8 ft high and 17 in deep. They fit in the area beside the garage door very nicely. They will prove very handy. I had installed the toilet, but never got to finish the walls. The little plastic things that go on the seams proved very difficult to get on. I did get the hole cut for the medicine cabinet. This was also a pain in the **** due to having to notch the 2x60 stud about 2.5 inches. Since I already had installed plumbing it was a chore to cut that 14 in notch out, but finally got it. Once the tile board was up, I was able to place the washer/dryer unit and figure out the best place for the sink cabinet and what size to cut the counter top.
Once we figured out a 3 in overhang would work best, Dad and I trimmed the counter top and cut the hole for the sink. It is all in place now, just need to connect up the drain, supply lines and mount the faucet. Still need to cut the hole for the dryer vent and mount the medicine cabinet before I can call it done...for now, the shower won't get installed for awhile.
 

Attachments

  • DSCN0997-400.jpg
    DSCN0997-400.jpg
    8.1 KB · Views: 24
  • DSCN0996-400.jpg
    DSCN0996-400.jpg
    12.1 KB · Views: 29
  • DSCN0994-400.jpg
    DSCN0994-400.jpg
    15.2 KB · Views: 33
  • DSCN1000-400.jpg
    DSCN1000-400.jpg
    18 KB · Views: 29
  • DSCN0938-400.jpg
    DSCN0938-400.jpg
    10.4 KB · Views: 22
  • DSCN0936-400.jpg
    DSCN0936-400.jpg
    14.9 KB · Views: 21
  • DSCN0935-400.jpg
    DSCN0935-400.jpg
    13.7 KB · Views: 26
OP
T

truck

Well-known member
Joined
Feb 8, 2008
Messages
203
Location
Manassas, Va
Next we started to build shelves in the loft. Again I had to do a lot of rearranging to get to the back wall. The shelves in the loft go the length of the back wall. Cody, Dillon and Dad all pitched in. They are 2ft deep and are about 20ft long except the top which is 12ft long. They are varying heights. We marked where we wanted them and and drilled through the back wall. I had decided they would be strongest if the supports were bolted to the back wall. So we nailed cross braces on and then hung them up. I climbed the ladder outside and drilled the holes through the wood shelf supports and then ran bolts through them while the Dad and the boys held the supports in place and then put nuts on the bolts and tightened everything up. A side effect of doing this was the rear wall really tightened up because it was all tied together now across the individual sheets.
 

Attachments

  • DSCN1049-400.jpg
    DSCN1049-400.jpg
    15.1 KB · Views: 28
  • DSCN1048-400.jpg
    DSCN1048-400.jpg
    15.3 KB · Views: 31
  • DSCN1039-400.jpg
    DSCN1039-400.jpg
    17.4 KB · Views: 34
  • DSCN1036-400.jpg
    DSCN1036-400.jpg
    11.9 KB · Views: 28
  • DSCN1035-400.jpg
    DSCN1035-400.jpg
    12.6 KB · Views: 27
  • DSCN1033-400.jpg
    DSCN1033-400.jpg
    14.2 KB · Views: 28
  • DSCN1056-400.jpg
    DSCN1056-400.jpg
    20 KB · Views: 50
To avoid these ads, REGISTER NOW!
Top Bottom