To avoid these ads, REGISTER NOW!

Truss installation suggestions

Wiebster

Well-known member
Joined
Jul 18, 2015
Messages
194
Location
Rapid City, Sd
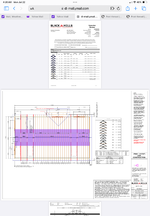
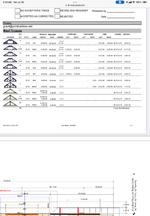
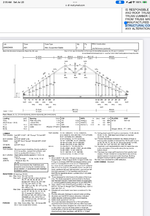
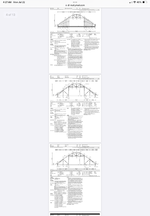
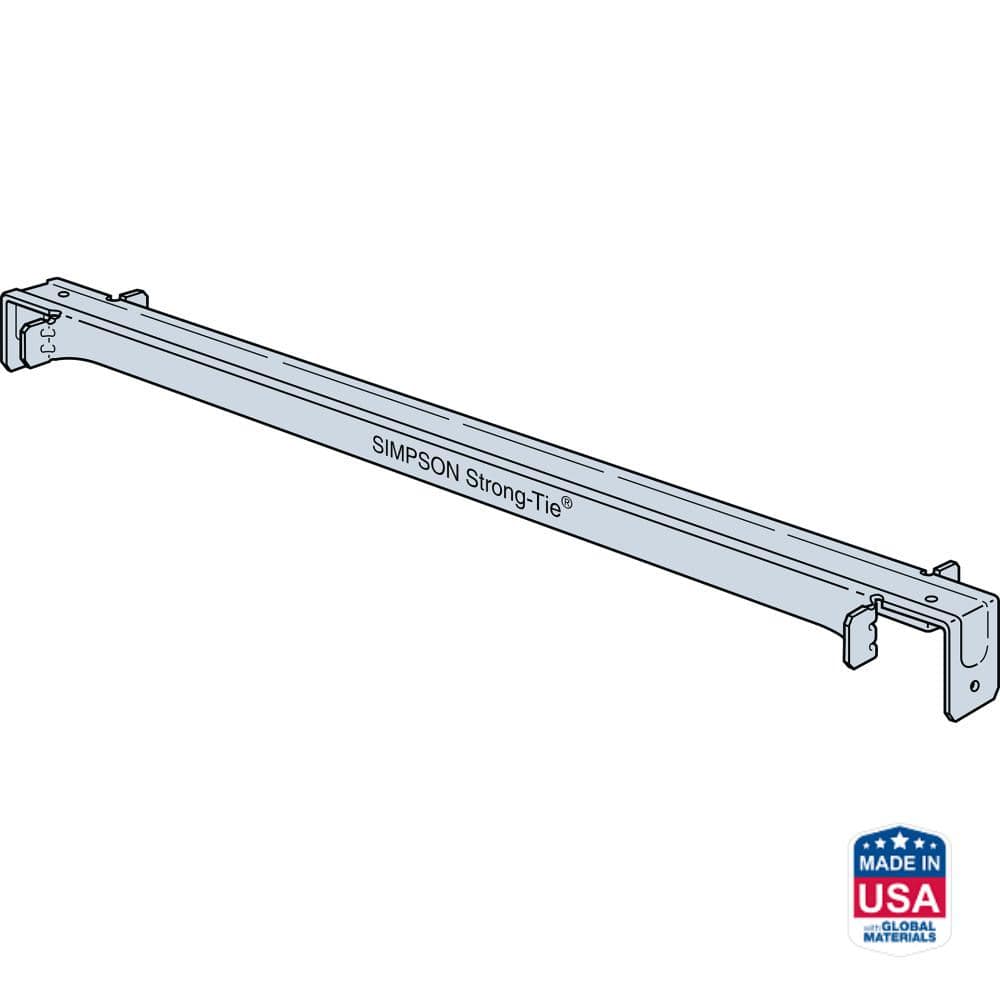
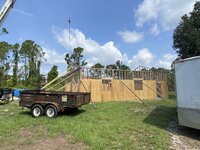
I’m to the stage where I’m ready to install my trusses. I have never installed them before and I’m looking for suggestions that will make the job easier and done correctly. They are 40’ attic trusses with a piggy back top, 2’ overhangs. I’m hiring a crane to set them and I only have a crew of four (inexperienced) including myself. I‘m using 6”truss screws for the ease of my inexperienced crew to attach. Most likely will come back and tie nail or screw, and then attach some hurricane ties. I’ll have a scissor lift on one side, scaffolding on the other, and I’ll be in a self propelled cherry picker in the middle. I know nothing so no suggestions will be too basic. Definitely interested in ways to brace them, where to position ones self with out crawling up on top of the trusses, best order to install them, best ways to brace the drop cord gable ends, etc. I am not looking forward to this part of the build but finding a crew to just install trusses is literally impossible during this time. I’ll attempt attaching the truss plans to this post. Thanks guys.
 

Attachments

  • IMG_0456.png
    IMG_0456.png
    659.7 KB · Views: 122
  • IMG_0458.png
    IMG_0458.png
    464.9 KB · Views: 95
  • IMG_0449.png
    IMG_0449.png
    396.5 KB · Views: 91
  • IMG_0452.png
    IMG_0452.png
    715.2 KB · Views: 88
  • IMG_0459.png
    IMG_0459.png
    622.3 KB · Views: 95
To avoid these ads, REGISTER NOW!

karoc

Well-known member
Joined
Dec 19, 2017
Messages
1,994
Location
Hemphill Tx
I did same thing several months ago, but you have help. First thing I would lay out where trusses go on top plate including the big X . Have good ladders on both sides or walk boards. You also need couple tall ladders for screwing on say 1x4’s or 2x up close to peak to hold them in place. Or use these Simpson braces either 16” or 24” OC which help hold trusses in place. After I got 6 trusses in place I put a diagonal brace to help hold trusses evenly spaced. I also installed 2x4’s on ceiling to help hold and stabilize them. I went through trouble using GRK 4” screws just so after dust settles I could make any adjustment. As far those 6” truss screws I pre drilled for them. Even if it says not needed.
These metal braces, I only use them as helping hands till I got 2x’s in place on top. But you can leave them and mail them in place. No experience necessary, only common sense. Good luck
IMG_8633.jpeg
 

Adaylate

Well-known member
Joined
Apr 19, 2021
Messages
612
Location
Washington
My caps didn't fit right from the truss co., I had to trim the tails to make the cap fit flush.
The peak was 28 feet and 10/12 so a bit of a hassle because we were lifting the caps by hand.
The caps can go on at a later date. Some guys like to put them on when the roof is being sheeted.

Communicate with each other make sure everyone knows what's happening.

Be careful of the wind.

Above all, work safely.

Good luck!
 

Adaylate

Well-known member
Joined
Apr 19, 2021
Messages
612
Location
Washington
Bracing is your friend. I used 1x4-8'. and some longer.
Once the truss is set on the top plate and before the crane releases it walk out on the bottom chord of the truss with the 1x4 and fasten as high on the truss as you can to that truss and the last one or two.
You will need more bracing just below where your piggy back caps go and some intermediate bracing also.

Good luck!
 
OP
W

Wiebster

Well-known member
Joined
Jul 18, 2015
Messages
194
Location
Rapid City, Sd
I did same thing several months ago, but you have help. First thing I would lay out where trusses go on top plate including the big X . Have good ladders on both sides or walk boards. You also need couple tall ladders for screwing on say 1x4’s or 2x up close to peak to hold them in place. Or use these Simpson braces either 16” or 24” OC which help hold trusses in place. After I got 6 trusses in place I put a diagonal brace to help hold trusses evenly spaced. I also installed 2x4’s on ceiling to help hold and stabilize them. I went through trouble using GRK 4” screws just so after dust settles I could make any adjustment. As far those 6” truss screws I pre drilled for them. Even if it says not needed.
These metal braces, I only use them as helping hands till I got 2x’s in place on top. But you can leave them and mail them in place. No experience necessary, only common sense. Good luck
IMG_8633.jpeg
Very impressed! Did you seriously do them yourself? If so, how long did it take and did you have a crane? I’m definitely planning on doing all things you mentioned. Thank you for the info and for not calling me a dumb *** for doing this myself😂.
 
OP
W

Wiebster

Well-known member
Joined
Jul 18, 2015
Messages
194
Location
Rapid City, Sd
My caps didn't fit right from the truss co., I had to trim the tails to make the cap fit flush.
The peak was 28 feet and 10/12 so a bit of a hassle because we were lifting the caps by hand.
The caps can go on at a later date. Some guys like to put them on when the roof is being sheeted.

Communicate with each other make sure everyone knows what's happening.

Be careful of the wind.

Above all, work safely.

Good luck!
Great advice, thank you!
 
OP
W

Wiebster

Well-known member
Joined
Jul 18, 2015
Messages
194
Location
Rapid City, Sd
Bracing is your friend. I used 1x4-8'. and some longer.
Once the truss is set on the top plate and before the crane releases it walk out on the bottom chord of the truss with the 1x4 and fasten as high on the truss as you can to that truss and the last one or two.
You will need more bracing just below where your piggy back caps go and some intermediate bracing also.

Good luck!
I can totally see the importance of that. Any pictures of your bracing and where you put it exactly? What equipment would make this job as safe as possible? I’m not afraid of heights but I’m 57 years old and if I fall, I built this whole shop for nothing. I considered osb flooring in the attic as I went along so I could ladder up from there fairly safely but that would be very time consuming as I pay my crane operator to watch me!
 

firebirdparts

Well-known member
Joined
Jun 8, 2016
Messages
10,585
Location
Kingsport, TN
That’s a hell of a truss. Sheer scale is going to be hard on you. For instance, you can’t put braces near the top by climbing on the truss. You can’t reach it.

Common sense has been mentioned. If you are up in there and one of them gets loose from the diagonal bracing, assume that you will be killed. That should help you think.

The first truss usually gets stiff armed above the wall but on your building that is a long way up. You need decent size lumber for that.

If you want to floor that, It would help you, but I would only do it when the crane guy is gone.
 
OP
W

Wiebster

Well-known member
Joined
Jul 18, 2015
Messages
194
Location
Rapid City, Sd
Killed is bad! Yes, the shear size is very intimidating. Do you typically nail on the bracing or use construction screws so it’s easier to remove when sheathing? I was thinking about using scaffolding in the middle to reach the top or even renting a self propelled bucket lift. Then I could floor it and do better blocking on the webs. As far as bracing the first truss, 2x6 bracing or heavier than that?
 

TurnipTruck

Well-known member
Joined
Aug 28, 2005
Messages
1,552
Location
Southcentral Alaska
My shop has 40’ attic trusses, too. Instead of a thousand words, here’s some pics:
58472543227__05150EC0-F971-4AC2-AE3C-2FA6BAD79470.jpegIMG_7586.jpegIMG_7590.jpegIMG_7591.jpeg

I used ladders at each wall and a roller scaffold in the middle, some anti-domino 2x12s (cuz I had extra) at each end, and every other bird block pre installed. Even with a dozen unskilled helpers, it was still an aaaaaalllllll daaaaaaay project.
 
Last edited:

karoc

Well-known member
Joined
Dec 19, 2017
Messages
1,994
Location
Hemphill Tx
Very impressed! Did you seriously do them yourself? If so, how long did it take and did you have a crane? I’m definitely planning on doing all things you mentioned. Thank you for the info and for not calling me a dumb *** for doing this myself😂.
I did 10 out of 38, it killed me. Didn’t have anyone near me. After 10 I hired out rest, I had crane set them on top plate which I put temporary beam down middle to support. He was in hurry which he put about 8 in pile. Hard spread them out like that. But it’s over now, glad I’m pass that point in my project. There’s pics someplace around here. I took up all ******* remarks, there’s none left😂 But I really enjoy doing this. I’m 70 so mentally unstable 😂
 

Adaylate

Well-known member
Joined
Apr 19, 2021
Messages
612
Location
Washington
Yes, we used construction screws on the bracing.
Like Turnip said we put the vent blocks in for spacing working from ladders on the wall and scaffolding down the middle.
How tall are your walls?

Have a plan for how you release the sling from the truss.
Your crane operator may have a plan for this.
Have a job briefing before beginning so everyone knows what is expected of them. If things change stop and have another.

Work safe!

You will experience pure joy when it done!
 

nmk_61802

Well-known member
Joined
Mar 6, 2008
Messages
965
Location
Central IL
Bracing is your friend. I used 1x4-8'. and some longer.
Once the truss is set on the top plate and before the crane releases it walk out on the bottom chord of the truss with the 1x4 and fasten as high on the truss as you can to that truss and the last one or two.
You will need more bracing just below where your piggy back caps go and some intermediate bracing also.

Good luck!

Premark your bracing with the correct spacing on the ground before lifting too. I set my trusses in two halves, first section I measured each spacing upon installation. Next day I had everything premarked. Made installation quicker, and I found that the later install required less messing with upon final straightening.
 

Adaylate

Well-known member
Joined
Apr 19, 2021
Messages
612
Location
Washington
If you do your vent blocks every other one like Turnip said, there is less chance of creep. If you do every block, have layout on the top plate so you can catch the creep before it's a problem.

nmk has a good idea on pre-marking. Anything to save time while the clock is ticking on the crane truck!
 
OP
W

Wiebster

Well-known member
Joined
Jul 18, 2015
Messages
194
Location
Rapid City, Sd
I did 10 out of 38, it killed me. Didn’t have anyone near me. After 10 I hired out rest, I had crane set them on top plate which I put temporary beam down middle to support. He was in hurry which he put about 8 in pile. Hard spread them out like that. But it’s over now, glad I’m pass that point in my project. There’s pics someplace around here. I took up all ******* remarks, there’s none left😂 But I really enjoy doing this. I’m 70 so mentally unstable 😂
I’m really impressed and motivated by you. Thanks for sharing the pics. They are very helpful. Nicely done!
 
OP
W

Wiebster

Well-known member
Joined
Jul 18, 2015
Messages
194
Location
Rapid City, Sd
Premark your bracing with the correct spacing on the ground before lifting too. I set my trusses in two halves, first section I measured each spacing upon installation. Next day I had everything premarked. Made installation quicker, and I found that the later install required less messing with upon final straightening.
Great idea. I’m assuming you mean the perpendicular bracing, not the diagonal (probably beyond my ability to do diagonal layout ahead of time). Thanks for the great suggestion!
 
OP
W

Wiebster

Well-known member
Joined
Jul 18, 2015
Messages
194
Location
Rapid City, Sd
Yes, we used construction screws on the bracing.
Like Turnip said we put the vent blocks in for spacing working from ladders on the wall and scaffolding down the middle.
How tall are your walls?

Have a plan for how you release the sling from the truss.
Your crane operator may have a plan for this.
Have a job briefing before beginning so everyone knows what is expected of them. If things change stop and have another.

Work safe!

You will experience pure joy when it done!
Lol, yes! Can’t wait for it to be over! Some great suggestions. My walls are 12’ so not ridiculously high. But I never thought about the sling release issue. I’ve reserved a 50’ self
propelled articulated boom lift. Depending on the bucket access I’ll probably just use a harness and lean out to screw on the bracing from above and then I can just release the sling while I’m up there. I’ll run this machine straight down the center of the building until I come to the other end, then park it out side the opposite gable end to finish up. All theory of course!
 
To avoid these ads, REGISTER NOW!
OP
W

Wiebster

Well-known member
Joined
Jul 18, 2015
Messages
194
Location
Rapid City, Sd
I'll reiterate bracing the **** of of them. I've seen what happens when they fold over on someone and a 40' truss is no joke. Go slow, don't let the crane dictate speed. An extra hour or two is a lot better than a mistake
Couldn’t agree more. Already told the crane operator we are inexperienced and plan on spending the whole day. I counted 32 trusses (10 of them girder trusses already joined)
 
OP
W

Wiebster

Well-known member
Joined
Jul 18, 2015
Messages
194
Location
Rapid City, Sd
Lol, yes! Can’t wait for it to be over! Some great suggestions. My walls are 12’ so not ridiculously high. But I never thought about the sling release issue. I’ve reserved a 50’ self
propelled articulated boom lift. Depending on the bucket access I’ll probably just use a harness and lean out to screw on the bracing from above and then I can just release the sling while I’m up there. I’ll run this machine straight down the center of the building until I come to the other end, then park it out side the opposite gable end to finish up. All theory of course!
That puts the top chord at 24’ 6” above the concrete (before piggy back is attached).
 

SKIPPINROCKS

Active member
Joined
Jun 10, 2021
Messages
30
Location
Missouri
My 40ft wide 6/12 attic trusses we used the metal spacers and nailed them. We installed the 3/4 subfloor as we went along with a long 2x4 down the center of the peak above the finished ceiling. Also added bracing that ran at a 45 degree angle on back of knee walls. Each angled board on wall hit 3 trusses and they overlapped. We had 4 people. A rope man, a person on each wall and one in the scissor lift to brace the high spots and guide truss. Mark your layout on the wall and make sure people know the plan. We had the crane operator for 5 hours. Well worth the cost being my first build besides a shed.
 
OP
W

Wiebster

Well-known member
Joined
Jul 18, 2015
Messages
194
Location
Rapid City, Sd
Wow, that looks sharp. Nice clean build! Hope mine goes that well. And you used the scissor lift to undo the sling?
 

SKIPPINROCKS

Active member
Joined
Jun 10, 2021
Messages
30
Location
Missouri
Wow, that looks sharp. Nice clean build! Hope mine goes that well. And you used the scissor lift to undo the sling?
Yeah if the crane operator didn't get it off when he dropped the sling I could raise up and get it off. I would set the scissor lift up parallel with each incoming truss to where I would be on the clear side away from where it would set. I would reach up and catch it in center along with guys on wall ends. Then once it was steady and resting I'd raise lift to safe working level. Let the wall guys get nailed to their mark then go up and brace.
 

ddurrett896

Well-known member
Joined
Mar 29, 2015
Messages
995
Location
VA
Set 27 trusses in less than 1.5 hours with 5 guys.

1 guy tied off the truss and walked into place.
2 guys on each side walking the top plate and each had a strap gun. They set the truss in place, then added two truss spacers on the bottom cord and two spacers on the top cord.
2 guys on each side standing on a set of bakers scaffolding under the truss, nailing it off to the top plate.

I've done it with as little as 2 guys, just more up and down the ladder with a guy guiding the truss...plus swapping back and forth between a strap gun and nailer but it's not bad, just longer.

Also, I recommend sheathing the gable before it goes up (leave a space for the crane to tie off) and if you have an overhang, build it on the ground with 1x etc before it goes up. Having the top plate already marked helps speed up the process too.

Last, buy a strap gun. It will save you so much time with the spacers and hurricane ties.

Truss Spacers

Strap Gun
 
Last edited:

cliffcharb

Well-known member
Joined
Nov 7, 2021
Messages
238
Location
North Port, Fl
I passed that part of my build off to a small 2 man framing crew. I recall bracing instructions in the truss package but simply braced to the ground during install.

Once installed we had specific bracing inside due to wind speed.
 

Attachments

  • IMG_8244.jpeg
    IMG_8244.jpeg
    972.3 KB · Views: 74
OP
W

Wiebster

Well-known member
Joined
Jul 18, 2015
Messages
194
Location
Rapid City, Sd
Set 27 trusses in less than 1.5 hours with 5 guys.

1 guy tied off the truss and walked into place.
2 guys on each side walking the top plate and each had a strap gun. They set the truss in place, then added two truss spacers on the bottom cord and two spacers on the top cord.
2 guys on each side standing on a set of bakers scaffolding under the truss, nailing it off to the top plate.

I've done it with as little as 2 guys, just more up and down the ladder with a guy guiding the truss...plus swapping back and forth between a strap gun and nailer but it's not bad, just longer.

Also, I recommend sheathing the gable before it goes up (leave a space for the crane to tie off) and if you have an overhang, build it on the ground with 1x etc before it goes up. Having the top plate already marked helps speed up the process too.

Last, buy a strap gun. It will save you so much time with the spacers and hurricane ties.

Truss Spacers

Strap Gun

I passed that part of my build off to a small 2 man framing crew. I recall bracing instructions in the truss package but simply braced to the ground during install.

Once installed we had specific bracing inside due to wind speed.
If I could find a crew to do this, I would gladly pass this off. It kind of scares the **** out of me!
 
OP
W

Wiebster

Well-known member
Joined
Jul 18, 2015
Messages
194
Location
Rapid City, Sd
Set 27 trusses in less than 1.5 hours with 5 guys.

1 guy tied off the truss and walked into place.
2 guys on each side walking the top plate and each had a strap gun. They set the truss in place, then added two truss spacers on the bottom cord and two spacers on the top cord.
2 guys on each side standing on a set of bakers scaffolding under the truss, nailing it off to the top plate.

I've done it with as little as 2 guys, just more up and down the ladder with a guy guiding the truss...plus swapping back and forth between a strap gun and nailer but it's not bad, just longer.

Also, I recommend sheathing the gable before it goes up (leave a space for the crane to tie off) and if you have an overhang, build it on the ground with 1x etc before it goes up. Having the top plate already marked helps speed up the process too.

Last, buy a strap gun. It will save you so much time with the spacers and hurricane ties.

Truss Spacers

Strap Gun
Some great ideas, I do have a strap gun but never used it before. Sounds like this is the perfect time to get some nails for it! I never thought about sheathing the gables before installing (even though I did that with the walls laying down). I like the idea a lot but I wonder about how much more wind pressure there would be on it, also how difficult it might be to now attach the smooth osb wall to supports and braces without access to the framing members? I think I’ll still do it just to avoid having to get 4x8 sheets 30’ into the air. I might as well attach the tips to the gable ends then too, right?
 
OP
W

Wiebster

Well-known member
Joined
Jul 18, 2015
Messages
194
Location
Rapid City, Sd
Another question I have is the braces on the gable ends will be literally 30+ ft long. What is the best method and materials to make these out of. Just overlap 12’ 2x6s, or make a T out of 16’ long 2x4s? I just have never done that long of braces before.
 

firebirdparts

Well-known member
Joined
Jun 8, 2016
Messages
10,585
Location
Kingsport, TN
Some great ideas, I do have a strap gun but never used it before. Sounds like this is the perfect time to get some nails for it! I never thought about sheathing the gables before installing (even though I did that with the walls laying down). I like the idea a lot but I wonder about how much more wind pressure there would be on it, also how difficult it might be to now attach the smooth osb wall to supports and braces without access to the framing members? I think I’ll still do it just to avoid having to get 4x8 sheets 30’ into the air. I might as well attach the tips to the gable ends then too, right?
Those things are so huge, I would be chicken. The sheathing weight is all on one side.

When I built my shop, the framed part starts at the 2nd floor. The lift and all that is on the second floor. Out of pure laziness, we sheathed the walls before set them up, and we worked from inside the building. The weight of plywood of course wants to just take it over the edge into the yard. They were really pretty heavy and I guess the sections we made were 1/5 the size of your gable end "not-a-truss".

My dad is am amazing person. He did not say anything about how we should do, he just showed up with a rollaround scaffold taller than the walls and a couple of tractor wheel weights that weighed 2 or 3 hundred pounds. He hung those weights on one side of his scaffold and then proceeded to hang the walls on the other side. We did not have to hang on to them that way.
 

nmk_61802

Well-known member
Joined
Mar 6, 2008
Messages
965
Location
Central IL
Yes, I see they are marked with an arrow designating the left side.

When I set mine, I set both gables ends first and centered them on the walls. Then I pulled a string between both peaks approx, 3" above the peak. I then aligned each truss peak with that string. This ensured a straight peak. On fascia installation, I pulled another string at my desired overhang cutting each to that length. This gave me a straight fascia.

For reference, I tied all of my trusses together and set them on the walls upright using a JLG forklift and then spread them by hand, so the string was never in the way for me.
 

NWOhioChevyGuy

Well-known member
Joined
Feb 20, 2007
Messages
1,922
Location
Buckeye Hill (Morenci, MI)
I did the layout on the walls and placed 2x blocking on top of the wall. So the ground crew had to do nothing but place it in it's spot, then drive a screw once aligned. Hurricane ties were added after all were placed. Also put the layout on some 2x4 to keep bottom cord of truss in line, as longer trusses tend to dance around. Experienced guys were up in trusses aligning the trusses to a string line down the ridge. (sort of, like yours trusses had a small triangular truss at the top, so string line went along the top edge of the main truss) I also used the metal braces for 24" spacing, make sure you set them snuggly! One helper failed to get them tight and a little extra space makes sheeting a challenge once it is multiplied across the structure.

We used a telehandler with an I-beam attached to the forks for more reach.
Place a steady on the end wall if it is not an attached structure. L or T shaped 2x'sIMG_2349.jpeg
62042797520__F735B490-F297-4DAE-9A1F-B24BF2205968.jpeg
 
Last edited:

paredown

Well-known member
Joined
Jan 12, 2012
Messages
544
Location
Pomona, NY
I simply can't imagine doing trusses with a crane and inexperienced crew. My only experience was being the lead on a Habitat crew. We had 2 ridiculously experienced carpenters, and probably 6 or so quite experienced volunteers, and were working on a two floor house.

One volunteer had experience with cranes, so he was the signal guy for the crane operator, and taking direction only from the senior carpenter. The experienced carpenters more or less had to be everywhere--we did have volunteers on each side for the nailing off.

It probably did not help that we were doing it in a torrential downpour, since the crane company was volunteering, and worse weather was expected and this was their open window on a Saturday. It was one of the harder days I have put in and that was just nailing and bracing, and scrambling around. But we had our two ringers who could set them in the right place, square 'em up and tell the rest of us where and when to nail.

I can't imagine doing that and taking responsibility for all the layout/procedure etc....
 
OP
W

Wiebster

Well-known member
Joined
Jul 18, 2015
Messages
194
Location
Rapid City, Sd
I simply can't imagine doing trusses with a crane and inexperienced crew. My only experience was being the lead on a Habitat crew. We had 2 ridiculously experienced carpenters, and probably 6 or so quite experienced volunteers, and were working on a two floor house.

One volunteer had experience with cranes, so he was the signal guy for the crane operator, and taking direction only from the senior carpenter. The experienced carpenters more or less had to be everywhere--we did have volunteers on each side for the nailing off.

It probably did not help that we were doing it in a torrential downpour, since the crane company was volunteering, and worse weather was expected and this was their open window on a Saturday. It was one of the harder days I have put in and that was just nailing and bracing, and scrambling around. But we had our two ringers who could set them in the right place, square 'em up and tell the rest of us where and when to nail.

I can't imagine doing that and taking responsibility for all the layout/procedure etc....
That’s not helping my confidence!😄. We are probably more experienced than we let on to be. I’ve been signaling heavy equipment most of my adult life. Been build things of various difficulty for at least 30 years. This is the pinnacle of my build…no pun intended. All this advice has really helped but I just want to get this behind me and make sure no one gets hurt. I’ll rent or buy whatever equipment that may be helpful to make this job safe. I do appreciate your input and experience though.
 

mike93lx

ALLIANCE MEMBER
Joined
Dec 9, 2013
Messages
37,408
Location
Richmond, VA
That’s not helping my confidence!😄. We are probably more experienced than we let on to be. I’ve been signaling heavy equipment most of my adult life. Been build things of various difficulty for at least 30 years. This is the pinnacle of my build…no pun intended. All this advice has really helped but I just want to get this behind me and make sure no one gets hurt. I’ll rent or buy whatever equipment that may be helpful to make this job safe. I do appreciate your input and experience though.
You got this. It ain't rocket surgery
 
OP
W

Wiebster

Well-known member
Joined
Jul 18, 2015
Messages
194
Location
Rapid City, Sd
I did the layout on the walls and placed 2x blocking on top of the wall. So the ground crew had to do nothing but place it in it's spot, then drive a screw once aligned. Hurricane ties were added after all were placed. Also put the layout on some 2x4 to keep bottom cord of truss in line, as longer trusses tend to dance around. Experienced guys were up in trusses aligning the trusses to a string line down the ridge. (sort of, like yours trusses had a small triangular truss at the top, so string line went along the top edge of the main truss) I also used the metal braces for 24" spacing, make sure you set them snuggly! One helper failed to get them tight and a little extra space makes sheeting a challenge once it is multiplied across the structure.

We used a telehandler with an I-beam attached to the forks for more reach.
Place a steady on the end wall if it is not an attached structure. L or T shaped 2x'sIMG_2349.jpeg
62042797520__F735B490-F297-4DAE-9A1F-B24BF2205968.jpeg
Dang that is impressive work and even more impressive building.
 
To avoid these ads, REGISTER NOW!
Top Bottom