

You are using an out of date browser. It may not display this or other websites correctly.
You should upgrade or use an alternative browser.
You should upgrade or use an alternative browser.
Truss installation suggestions
- Thread starter Wiebster
- Start date
 Love it! I know, it’s the anticipation that’s killing me. Once we get into it, it will be fine.
Good stuff here. If I have enough 2x I would like to do that. No way for them to screw it up except for me putting the blocking in the wrong spot.I did the layout on the walls and placed 2x blocking on top of the wall. So the ground crew had to do nothing but place it in it's spot, then drive a screw once aligned. Hurricane ties were added after all were placed. Also put the layout on some 2x4 to keep bottom cord of truss in line, as longer trusses tend to dance around. Experienced guys were up in trusses aligning the trusses to a string line down the ridge. (sort of, like yours trusses had a small triangular truss at the top, so string line went along the top edge of the main truss) I also used the metal braces for 24" spacing, make sure you set them snuggly! One helper failed to get them tight and a little extra space makes sheeting a challenge once it is multiplied across the structure.
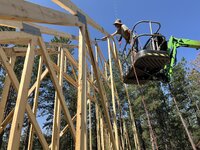
We used a telehandler with an I-beam attached to the forks for more reach.
Place a steady on the end wall if it is not an attached structure. L or T shaped 2x's


That’s what I wanted to do too, set both gables because they are on top of the stack and they will be the most work. Unfortunately I had to unload the trusses in the only flat spot…right in front of one of the gables. So now I wouldn’t be able to brace it in position and still pick up the trusses from under the wall bracing. It’s a bummer but that end will have to be set last and then braced. I’m trying to decide if I need a string for reference. My trusses have a large heel that is exactly 40’ wide heel to heel. If they set flush with each wall and that wall is straight and exactly 40’ wide, they should just be flush with the top plate all the way down….I think.When I set mine, I set both gables ends first and centered them on the walls. Then I pulled a string between both peaks approx, 3" above the peak. I then aligned each truss peak with that string. This ensured a straight peak. On fascia installation, I pulled another string at my desired overhang cutting each to that length. This gave me a straight fascia.
For reference, I tied all of my trusses together and set them on the walls upright using a JLG forklift and then spread them by hand, so the string was never in the way for me.
Dads are amazing human beings. They always have the answers and mine never once called me a *******Those things are so huge, I would be chicken. The sheathing weight is all on one side.
When I built my shop, the framed part starts at the 2nd floor. The lift and all that is on the second floor. Out of pure laziness, we sheathed the walls before set them up, and we worked from inside the building. The weight of plywood of course wants to just take it over the edge into the yard. They were really pretty heavy and I guess the sections we made were 1/5 the size of your gable end "not-a-truss".
My dad is am amazing person. He did not say anything about how we should do, he just showed up with a rollaround scaffold taller than the walls and a couple of tractor wheel weights that weighed 2 or 3 hundred pounds. He hung those weights on one side of his scaffold and then proceeded to hang the walls on the other side. We did not have to hang on to them that way.
 I wish mine was here to help but also just see this build but he passed a few years ago. Another reason not to wait as long as I did.
 I’ve decided to forgo sheathing the gable ends. I’ll figure out how to get the sheets up there when the time comes. The sheathing weight, that fact I can only get to one of the gable trusses, and strangely enough the truss company left the attic framing open on the gable ends. So I don’t have anything to attach the sheathing to anyway. I need to frame in a patio door up there anyway so I’m glad they didn’t fill it with webbing. I would need to get approval to cut those webs out. For the door.
mike93lx
ALLIANCE MEMBER
If you are using 2x4,Cut your blocks short... 1/8-1/4". Measure periodically and adjust if needed
Adaylate
Well-known member
Make to read and understand the stabilization guide for your trusses. I saw mention of it on your gable end sheet notes. Sorry I couldn't read all the sheets they got too blurry when I made them big enough for me to read....old eyes!
I wish I had taken the time to sheath and side my gables on the ground. Now it'll take 3 sections of scaffolding and a ladder, 28'2" to the peak!
Good luck!
I wish I had taken the time to sheath and side my gables on the ground. Now it'll take 3 sections of scaffolding and a ladder, 28'2" to the peak!
Good luck!
I think I might hedge and do the one side that has no openings in it. If I regret it I only have the one gable to fight. The other side will have a deck so I could always set up to sheath from that.Make to read and understand the stabilization guide for your trusses. I saw mention of it on your gable end sheet notes. Sorry I couldn't read all the sheets they got too blurry when I made them big enough for me to read....old eyes!
I wish I had taken the time to sheath and side my gables on the ground. Now it'll take 3 sections of scaffolding and a ladder, 28'2" to the peak!
Good luck!
I’ll spend some time looking over all the fine print on the plans.Make to read and understand the stabilization guide for your trusses. I saw mention of it on your gable end sheet notes. Sorry I couldn't read all the sheets they got too blurry when I made them big enough for me to read....old eyes!
I wish I had taken the time to sheath and side my gables on the ground. Now it'll take 3 sections of scaffolding and a ladder, 28'2" to the peak!
Good luck!
CraigStu
Well-known member
When you mark the wall tops for the trusses use 2 lines that the trusses go between. That avoids one guy thinking they go to the right of a single line and another guy thinks left.
mike93lx
ALLIANCE MEMBER
A line and an x really should be plenty, but it's not worth confusion especially with an inexperienced crewWhen you mark the wall tops for the trusses use 2 lines that the trusses go between. That avoids one guy thinking they go to the right of a single line and another guy thinks left.
CraigStu
Well-known member
Mike I could interpret the X as 'not here'. And an X is 3 lines.")
mike93lx
ALLIANCE MEMBER
When you try hard enough, there are lots of ways to screw stuff up.Mike I could interpret the X as 'not here'. And an X is 3 lines.
If I have time and lumber I really liked the idea of using 2x spacers between the trusses. Then all they have to do is drop it in the channel and screw it from underneath. But it is basically installing a whole additional plate all the way around and pretty time consuming to do by myself. I’m going to mark the layout for the trusses today. Then I’ll see if I have time for the spacers. I just picked this up yesterday and it is a game changer for working on that top plate. Monday is the big day and I’ll let you all know how it goes.
Tbender78
Well-known member
Make sure when the trusses are set to read and install the bracing the engineered drawings spec out.
make sure you have plenty of 2x4 for bracing as you go. Don’t want to have to run ad get some with your crane waiting.
make sure you have plenty of 2x4 for bracing as you go. Don’t want to have to run ad get some with your crane waiting.
mike93lx
ALLIANCE MEMBER
2 more bunks of 2x4 will only leave you one 8 footer shortI am worried about that. I have 450 linear ft of 16’ 2x4s plus 100 simpson spacers but still worried about not having enough bracing.

SKIPPINROCKS
Active member
Good luck tomorrow!
Beauregard
Well-known member
Workers overhead with tools and fasteners. This is why they invented hard hats.
It's a good policy everyone is wearing one.
It's a good policy everyone is wearing one.
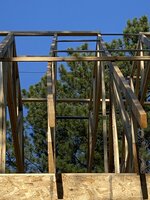
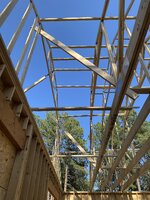
I don’t know where to begin. Thanks for all of the advice from everyone. I wish I could say the truss lift went well but it didn’t. Had a great crew and weather. Everyone did their job well except for me. I can contribute almost all of it to a faulty self propelled 4x4 Nifty Lift that was faulty and wouldn’t move while the boom was up. It truly ruined the day with EVERYONE waiting on me. This delayed us so much that the crane operator started getting frustrated (rightfully so) and we began to rush to get done before dark. My crew is gone so it’s back to a solo operation and it’s truly overwhelming. So my main issues are the trusses at some point developed a lean by about 2-3” also a nasty curve one just one side of the trusses. I was able to use blocking to pull the curve straight but the lean is very concerning and I don’t know where to begin to straighten. It seams pretty consistent starting fairly early. I was considering loosening the braces and using a come along and trying to straighten the entire 36 trusses at once. I used the metal bracing during the install but due to the large spaces between the girders and other odd sized spacing here and there, I couldn’t always use them and I believe that’s where we started developing the tilt. These trusses are so large and the attic opening so big, there is very little place to actually plumb them and almost no way to get up to them to even hold a level. Any suggestions on getting this straightened out? They are woefully under braced right now which is helpful for straightening but the clock is ticking for returning the only machine that can (slowly) get me to the top of this structure. It is not pretty!

SKIPPINROCKS
Active member
What bracing have you installed besides the spacers? Attic trusses require the floor and/or rigid ceiling as part of the bracing, among other braces that your plans specify. Any pictures that show the lean or areas of concern along with your current bracing ?
firebirdparts
Well-known member
Glad to see you're still with us.
nmk_61802
Well-known member
My thoughts for what they are worth:
- I had trouble with my truss alignment and spent a lot of time straightening.
- Don't try to move all the trusses at once. You are likely to either break something, or even worse, once they start moving they won't stop (See Newton's Law).
- You need to make certain each gable is straight and plumb first. Use multiple strong-back to the lower floor and bracing to the ground to hold them plumb once you get them there. (It looks like you have this done already)
- As another poster mentioned, you need to have the correct spacing starting at the lower chords. To hold this spacing you need to have the attic floor installed, or put temporary bracing at the lower chords.
- Once that spacing is held you can work on plumbing up the trusses between gables. My method was to use a level as high up as I could. I then used 1X4 (you could use 2X4) bracing and installed it on the bottom of the top chords. I attached it to the gable and leveled each truss and screwed off the trussed one by one as I leveled them. I put one brace on each side of the peak about 4'-6' down and another at the mid point of 36' trusses.
- I removed the bracing as I installed the roof deck as well as correcting any bow in the top chords as I nailed the sheating.
- Not sure how room in attic trusses work, but standard trusses require a pretty substantial strong-back and diagonal bracing internal to each gable to handle the wind load.
Last edited:
 It ain’t over yet!
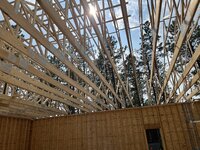
It did occur to me that the bottom chord could be out of alignment. I was hoping to do that later because I have two dormer openings that are 6’ wide and I can’t span that without hangers and joists so the floor would not be continuous from one end to the other. I believe I have so little bracing that it is still dangerous. I have Simpson metal spacers, about 4 laterals running on the ver top spaced about 30” apart. I am now installing two runs of 2x4 equally spaced down the length of the shop. I haven’t even started with diagonals. I hate putting too much blocking before the trusses are straight because it is so difficult and time consuming to get back up there to each screwed down brace. I would like it pretty close before I get too many braces installed. Too embarrassed to have taken any pictures of the bows. Got most of the bows out yesterday but then realized how out of plumb the rafters were.What bracing have you installed besides the spacers? Attic trusses require the floor and/or rigid ceiling as part of the bracing, among other braces that your plans specify. Any pictures that show the lean or areas of concern along with your current bracing ?
firebirdparts
Well-known member
Is the one on the end holding them all vertical?
I don't see any diagonal bracing truss-to-truss in your pic. Hope you got some and I just can't see it.
I don't see any diagonal bracing truss-to-truss in your pic. Hope you got some and I just can't see it.
Super nice explanation of the order. I will attempt to follow that. Just really hard to get safe access to the trusses now that there is only 22 inches of space between them and the are 30’ in the air. I like the idea of installing the floor but I still have this bucket lift rented and was trying to get the high braces installed because once it’s gone on Saturday, I’m really restricted to what I can reach safely.My thoughts for what they are worth:
- I had trouble with my truss alignment and spent a lot of time straightening.
- Don't try to move all the trusses at once. You are likely to either break something, or even worse, once they start moving they won't stop (See Newton's Law).
- You need to make certain each gable is straight and plumb first. Use multiple strong-back to the lower floor and bracing to the ground to hold them plumb once you get them there. (It looks like you have this done already)
- As another poster mentioned, you need to have the correct spacing starting at the lower chords. To hold this spacing you need to have the attic floor installed, or put temporary bracing at the lower chords.
- Once that spacing is held you can work on plumbing up the trusses between gables. My method was to use a level as high up as I could. I then used 1X4 (you could use 2X4) bracing and installed it on the bottom of the top chords. I attached it to the gable and leveled each truss and screwed off the trussed one by one as I leveled them. I put one brace on each side of the peak about 4'-6' down and another at the mid point of 36' trusses.
- I removed the bracing as I installed the roof deck as well as correcting any bow in the top chords as I nailed the sheating.
- Not sure how room in attic trusses work, but standard trusses require a pretty substantial strong-back and diagonal bracing internal to each gable to handle the wind load.
SKIPPINROCKS
Active member
If your trusses are spaced correctly on the walls maybe for now you could get some subfloor up there and start installing part of it and skip the dormer section. You could go on the underside and put some 2x4 between the doubled dormer truss gap to tie it in temporarily. Once you have the gable wall truss where you want it you could pull measurements from that and get the rest straight and plumb. This will also allow you to have a floor for a ladder in the attic room to work on other braces.It did occur to me that the bottom chord could be out of alignment. I was hoping to do that later because I have two dormer openings that are 6’ wide and I can’t span that without hangers and joists so the floor would not be continuous from one end to the other. I believe I have so little bracing that it is still dangerous. I have Simpson metal spacers, about 4 laterals running on the ver top spaced about 30” apart. I am now installing two runs of 2x4 equally spaced down the length of the shop. I haven’t even started with diagonals. I hate putting too much blocking before the trusses are straight because it is so difficult and time consuming to get back up there to each screwed down brace. I would like it pretty close before I get too many braces installed. Too embarrassed to have taken any pictures of the bows. Got most of the bows out yesterday but then realized how out of plumb the rafters were.
SKIPPINROCKS
Active member
as others stated if you don't have some diagonal braces, put some in even if temporary. You don't want your house of cards to fall over
Adaylate
Well-known member
Sorry things didn't go the way you wanted them to setting your trusses....
I missed your #7 post. Don't worry about your caps now. Just keep them out of the way and out of the sun.
You can put them up after all the trusses are up, lined and plumb.
I randomly picked your truss A03, it looks like you have four 2x4's that are spaced out on top of your trusses and run the length of your building. This will give you the correct spacing at the top of your truss. The caps should set directly on them. Like I mentioned earlier I had to trim my cap tails to get them to fit correctly.
I don't recall if we used structural screws or Timberloc for fasteners, probably structural screws.
My building has a dormer in the attic truss so I had room to hand the caps up to the top of the truss from the attic floor.
It was really handy having the attic floor to work from. But don't start putting the floor down until you resolve any issues you might have with the trusses. You want them lined and plumb or it will cause problems with your attic walls.
Don't rush it, be certain of your actions, it's a big building!
Good luck
Yes, I have pretty good bracing on the starting end. I used the Nifty Lift to set that the day before the crane arrived. Since there was no rush on it, i think I got that pretty well braced and plumb. No, I still don’t have any diagonal bracing. I’m going to work on that today. I’m a little confused on the diaganal bracing. So I should get that installed even though the trusses are not where I want them? I know I need to get on it but it seems counterproductive to then have to unscrew the diagonals along with the laterals to align and plumb the trusses. If it’s not too unsafe, I’d like to get the trusses plumbed and spaced, then install the diagonals to stiffen it. With both gables braced and lateral 2x4s running the entire length I feel it’s pretty stable. But I’m not a structural engineer so I’m probably missing something catastrophic that could happen.Is the one on the end holding them all vertical?
I don't see any diagonal bracing truss-to-truss in your pic. Hope you got some and I just can't see it.
Last edited:
Yeah, I didn’t foresee all of these alignment issues happening. I’m definitely not rushing even if I’m trying to hurry along. It’s going ridiculously slow, just to pull a tape from one peak to the other peak is a half an hour job!Sorry things didn't go the way you wanted them to setting your trusses....
I missed your #7 post. Don't worry about your caps now. Just keep them out of the way and out of the sun.
You can put them up after all the trusses are up, lined and plumb.
I randomly picked your truss A03, it looks like you have four 2x4's that are spaced out on top of your trusses and run the length of your building. This will give you the correct spacing at the top of your truss. The caps should set directly on them. Like I mentioned earlier I had to trim my cap tails to get them to fit correctly.
I don't recall if we used structural screws or Timberloc for fasteners, probably structural screws.
My building has a dormer in the attic truss so I had room to hand the caps up to the top of the truss from the attic floor.
It was really handy having the attic floor to work from. But don't start putting the floor down until you resolve any issues you might have with the trusses. You want them lined and plumb or it will cause problems with your attic walls.
Don't rush it, be certain of your actions, it's a big building!
Good luck
I finally queried the truss manufacturer about the caps and he sent me a detailed cap installation guide for them. Why I didn’t get that right away is beyond me. It’s also unbelievable how the engineer that designed the trusses have almost no knowledge of the installation, they only design them and even then can’t always explain the individual truss drawings. I now understand their installation process and agree with all your helpful comments above. I’ll keep you guys updated.
Yes, I own a scissors lift and once the Nifty Lift is gone if I ever hope to even get close to the top of this building ever again I need to keep the dormer areas clear of flooring. This the only area I can get supplies near the top of the building. So that is a good idea to just brace the dormer floor areas for now with spacers.If your trusses are spaced correctly on the walls maybe for now you could get some subfloor up there and start installing part of it and skip the dormer section. You could go on the underside and put some 2x4 between the doubled dormer truss gap to tie it in temporarily. Once you have the gable wall truss where you want it you could pull measurements from that and get the rest straight and plumb. This will also allow you to have a floor for a ladder in the attic room to work on other braces.
Nice easy to see diagrams! I think I can incorporate that concept into these trusses. If I can ever get them straightened out.My thoughts for what they are worth:
- I had trouble with my truss alignment and spent a lot of time straightening.
- Don't try to move all the trusses at once. You are likely to either break something, or even worse, once they start moving they won't stop (See Newton's Law).
- You need to make certain each gable is straight and plumb first. Use multiple strong-back to the lower floor and bracing to the ground to hold them plumb once you get them there. (It looks like you have this done already)
- As another poster mentioned, you need to have the correct spacing starting at the lower chords. To hold this spacing you need to have the attic floor installed, or put temporary bracing at the lower chords.
- Once that spacing is held you can work on plumbing up the trusses between gables. My method was to use a level as high up as I could. I then used 1X4 (you could use 2X4) bracing and installed it on the bottom of the top chords. I attached it to the gable and leveled each truss and screwed off the trussed one by one as I leveled them. I put one brace on each side of the peak about 4'-6' down and another at the mid point of 36' trusses.
- I removed the bracing as I installed the roof deck as well as correcting any bow in the top chords as I nailed the sheating.
- Not sure how room in attic trusses work, but standard trusses require a pretty substantial strong-back and diagonal bracing internal to each gable to handle the wind load.
nmk_61802
Well-known member
Nice easy to see diagrams! I think I can incorporate that concept into these trusses. If I can ever get them straightened out.
Those are from the BCSI-B3 bracing diagrams:
If your truss company did not send bracing requirements these are the minimum that should be followed. My trusses were marked at one location where bracing was required, but their software assumes minimum bracing to BCSI standards. As you said they are bad about communicating this as they also assume the builder will know this.
FYI, there are multiple BCSI sheets that are worth looking up. Here is a quick summary of what each covers:
Last edited:
A really slow but productive day. I reinforced the gable truss as straight as I could get it and worked back from there. I only straightened 5 trusses today but I think I can pick up the pace. It’s a little frustrating because I will measure from the gable end, screw down my bracing, work up and over the building and by the time I get done, the first blocking measurement is off sometimes by a 1/4” or more. Also occasionally there is a “kink” in the top chord only seen after all the bracing is screwed down and sighting up the truss top chord. Despite all that, it’s moving along. Thank you for the step by step procedures to straighten them out. I really struggled with this one! Here’s a couple of pics of what I have going on.
Attachments

firebirdparts
Well-known member
This would be terrifying to me. If one gets loose and you're up there, you'll be killed. So I would have diagonally braced them as I went. if you want to hurry through it for the crane, just use screws. You can put a screw through a 2 by 4 in a couple seconds. then you can turn one loose at a time later.Yes, I have pretty good bracing on the starting end. I used the Nifty Lift to set that the day before the crane arrived. Since there was no rush on it, i think I got that pretty well braced and plumb. No, I still don’t have any diagonal bracing. I’m going to work on that today. I’m a little confused on the diaganal bracing. So I should get that installed even though the trusses are not where I want them? I know I need to get on it but it seems counterproductive to then have to unscrew the diagonals along with the laterals to align and plumb the trusses. If it’s not too unsafe, I’d like to get the trusses plumbed and spaced, then install the diagonals to stiffen it. With both gables braced and lateral 2x4s running the entire length I feel it’s pretty stable. But I’m not a structural engineer so I’m probably missing something catastrophic that could happen.
You had a single point of failure there with the end truss the only thing holding it up.