
You are using an out of date browser. It may not display this or other websites correctly.
You should upgrade or use an alternative browser.
You should upgrade or use an alternative browser.
TXNinAZ's New Project
- Thread starter TXNinAZ
- Start date
j p smith
Well-known member
Absolutely. Superior Hardwoods on Latham near 59th Ave and I10. Quite a bit cheaper than Woodworkers Source and the like. Good selection and very nice folks.
Thanks, we are going to need a source when start to restore the Canopy for the 1915 Case Steam Engine.
motofool33
Well-known member
nice project
More progress on the workbench top. Handling these boards is not a lot of fun without having a helper or proper woodworking shop. Oh well, I'll do what I can with the tools I have.
Here is the result of planing both boards down to square. Since they were H&M processed, I could get away without a jointer, although it certainly would have helped.

All I have is a portable work site table saw, so popping these 80lb boards on it and expecting a straight cut was a fantasy. The front edge of the butcher block is fairly straight, so used that to get the first edge close. Then cut the second one to match the first, even though I would be far from perfect.

Not terrible:

Ripping 1 13/16" maple with my little contractor's circular saw was a challenge. Had to stop about every 18-24" to let the motor cool down. Compressed air helped a lot with that. Not a real fun process.

After 80, 120, and 220 grit sanding the top, it's pretty darn flat and smooth.

Now back to Home Depot for some 5"+ screws of some kind. Don't want to glue the backsplash to the top, in case I want to do something different in the future. Danish oil after its together, and we're done! I'll secure it to the Listas after they're all painted- though this thing won't move a whole lot thanks to the huge amount weight.
Here is the result of planing both boards down to square. Since they were H&M processed, I could get away without a jointer, although it certainly would have helped.
All I have is a portable work site table saw, so popping these 80lb boards on it and expecting a straight cut was a fantasy. The front edge of the butcher block is fairly straight, so used that to get the first edge close. Then cut the second one to match the first, even though I would be far from perfect.
Not terrible:
Ripping 1 13/16" maple with my little contractor's circular saw was a challenge. Had to stop about every 18-24" to let the motor cool down. Compressed air helped a lot with that. Not a real fun process.
After 80, 120, and 220 grit sanding the top, it's pretty darn flat and smooth.
Now back to Home Depot for some 5"+ screws of some kind. Don't want to glue the backsplash to the top, in case I want to do something different in the future. Danish oil after its together, and we're done! I'll secure it to the Listas after they're all painted- though this thing won't move a whole lot thanks to the huge amount weight.
j p smith
Well-known member
Can't wait to see it with the finish.


It was quite an adventure getting the bench top finished. To screw the backsplash on, I had to stand the top on its front edge and support it with concrete blocks and then somehow get the back to stay in place without tipping over. Made a little brace from 2x4 that was level to the back edge of the top, then lots of clamps where they would help.
Used 6" HeadLOK structural screws to tie the two pieces together. They claim no pre drilling required, and that was true when I used them before in pine, but this hard maple was was too tough. Fortunately I have a very small Bosch auger bit that chewed right through. Tipped down onto two furniture dollies.

Getting it up onto the cabinets was another ordeal. Since it's just me, I needed some mechanical assistance from my shop crane. I didn't take any pics of this process to discourage anyone else from trying something similar [emoji23]. 2 ton shop crane with a 2" tow strap around the middle, jacked up to get one end on a cabinet, then pushed closer to the wall. A little more heaving on the other end and it was up.
Now on top finishing. I did some final hand planing to remove any high spots on the top, and knocked off the corner on all new wood so it wouldn't chip as easily. Now for Danish oil. After first coat:

Finished:

Used 6" HeadLOK structural screws to tie the two pieces together. They claim no pre drilling required, and that was true when I used them before in pine, but this hard maple was was too tough. Fortunately I have a very small Bosch auger bit that chewed right through. Tipped down onto two furniture dollies.
Getting it up onto the cabinets was another ordeal. Since it's just me, I needed some mechanical assistance from my shop crane. I didn't take any pics of this process to discourage anyone else from trying something similar [emoji23]. 2 ton shop crane with a 2" tow strap around the middle, jacked up to get one end on a cabinet, then pushed closer to the wall. A little more heaving on the other end and it was up.
Now on top finishing. I did some final hand planing to remove any high spots on the top, and knocked off the corner on all new wood so it wouldn't chip as easily. Now for Danish oil. After first coat:
Finished:
Part of yesterday's fun was a chance for a Wilton C-1 bullet vise. I happened to be the first guy to contact the seller, so I got it for $100.

Based on current eBay prices, I got a great deal. Ordered a new rear end cap and swivel clamps from user KMscott, so when those get here it'll be time to have a real bench vise for the first time. Very excited!!
Based on current eBay prices, I got a great deal. Ordered a new rear end cap and swivel clamps from user KMscott, so when those get here it'll be time to have a real bench vise for the first time. Very excited!!
1949 caddyman
Well-known member
Looks to nice to work on LOL! Great job!
That is a work of art my friend! Good job!
Thanks so much!!
Looks to nice to work on LOL! Great job!
Ha, well the Danish oil pulled the grain out nicely, but it also pulled up the grain of the scratches that I couldn't remove LOL.
If I had access to a 30" wide planer, I'd be in good shape and could have made it perfect.
Last edited:
j p smith
Well-known member
Finish looks great!!!!!
rattle_snake
Well-known member
Some of the hardwood places may have one that big. I know Timber woodworking in Mesa had a big one and would plane whatever for a fee.If I had access to a 30" wide planer, I'd be in good shape and could have made it perfect.
All your progress makes me feel behind where I need to be.

Some of the hardwood places may have one that big. I know Timber woodworking in Mesa had a big one and would plane whatever for a fee.
All your progress makes me feel behind where I need to be.
Ha don't worry about anyone's progress relative to your own. I'll hit a wall soon enough and make no progress for a while [emoji23]
shortykorte
Well-known member
Well, Craigslist strikes again! Been looking for short Lista/Vidmar cabinets for a while. Hoping to get a pair, put a bench across the top, and have a solid, multipurpose bench. Stumbled on these ACT cabinets that a guy got from the casino he works for. They've been out in the weather for 4-5 years, so they need some attention, but are actually more solid than my tall Lista. Haven't found anything about the company, so I'm guessing these are actually made by Stanley or someone and rebranded. The casino may have federal-like purchasing requirements to buy from historically underutilized businesses and so these had final assembly at a small company. Just guessing at this point.
Either way, they are incredibly solid. Weigh at least 500 lbs each and I can stand on the end of one of the fully opened drawers and the thing doesn't flex or budge. $300 for all three [emoji3]

You ****!
Nice score.

shortykorte
Well-known member
Looking good. The bench top is very nice. Please explain "not having a clamping edge on my last bench" and how it relates to the back splash. Something new to me. Thanks.
Last edited:
Looking good. The bench top is very nice. Please explain "not having a clamping edge on my last bench" and how it relates to the back splash. Something new to me. Thanks.
Yeah I didn't word that very well. So my last bench was great, but had a 3"x1/2" vertical facia board, so it was tough to clamp anything to the front edge to work on (clamps easily slipped when tightened down).
With this new one, if I just set the butcher block on top of the Listas with the back butted against the wall, then the front edge would basically come to the front of the cabinets, but no further, so I wouldn't have anywhere to clamp along the length of the bench. By adding the thick backsplash, it moved the front edge of the top away from the wall another 3 1/2", which gives me a nice front edge to clamp. Hope that clarifies.
shortykorte
Well-known member
Ah, I see. I didn't realize the back splash was attached to the back edge of the butcher block. Smart move. Definitely nice having a bench top you can clamp to.
So I got the final parts needed for my vise to be complete, and now need to mount it on the bench. It had no swivel locks/clamps, dust cap, and only one swivel foot inside the base. Thanks for KMscott for the swivel clamps and dust cap- not cheap, but they're not cheaply made- all machined rather than a sheet metal stamped dust cover.
I'm having some trouble deciding on where to mount the vise, as I end up with compromises. I'm right handed, but the right end of the bench isn't a good spot, whereas the left corner is perfect otherwise- close to the SnapOn box, air compressor, and parts washer. The welder is a TIG machine on a cart, so that's no biggie (don't plan on a lot of welding on a wood top anyway).
So left front corner it is. Now the problem is the position of the holes. In order to have the static jaw hang beyond the front lip of the top, the larger feet of the base are on the front.

I'm assuming that is Wilton's intended mounting direction- finding a PDF template has failed. But then swiveling it to the left, the static jaw is behind the edge of the top.

I can't think of a way past this without the edge of the base hanging over air, which sounds like a bad idea to me. Suggestions?
I'm having some trouble deciding on where to mount the vise, as I end up with compromises. I'm right handed, but the right end of the bench isn't a good spot, whereas the left corner is perfect otherwise- close to the SnapOn box, air compressor, and parts washer. The welder is a TIG machine on a cart, so that's no biggie (don't plan on a lot of welding on a wood top anyway).
So left front corner it is. Now the problem is the position of the holes. In order to have the static jaw hang beyond the front lip of the top, the larger feet of the base are on the front.
I'm assuming that is Wilton's intended mounting direction- finding a PDF template has failed. But then swiveling it to the left, the static jaw is behind the edge of the top.
I can't think of a way past this without the edge of the base hanging over air, which sounds like a bad idea to me. Suggestions?
Another good craigslist day. Been calling about every drill press that might be decent and haven't found much that doesn't need a ton of work or isn't totally overpriced. Put up a wanted ad and several people contacted, including Frank who had a Craftsman 150 he wanted to sell. Agreed on a price and headed over this morning.

He had a handful of cool grinders, about a dozen neat vises and an old craftsman bench drill press on top of the 150. Decided to take it off his hands as well. Needs handle work and a switch to be in good shape, but it was cheap and projects like this are fun. Maybe repaint it as well, then give to family or sell.

He had a handful of cool grinders, about a dozen neat vises and an old craftsman bench drill press on top of the 150. Decided to take it off his hands as well. Needs handle work and a switch to be in good shape, but it was cheap and projects like this are fun. Maybe repaint it as well, then give to family or sell.
Well, finally got the Wilton mounted permanently. Took a few days for me to go get hardware once the swivel clamps arrived. There's a Grainger pretty close, but I only go there if I'm really desperate. North of me in Glendale is a nuts and bolts shop that has everything and for pretty cheap. The owner has never been very cordial to me, but today was the closest I've been to seeing a smile on him! 5/8 grade 8 bolts, USS washers and lock washers. This things not going anywhere.


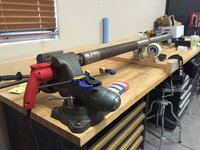
Now, time to put it to good use. I started a thread in the Vintage Tools subforum for the whole process, but today I started on cleaning/polishing the column for my new drill press. 5" casters, and 8 amp Milwaukee drill, and a lot of abrasives. This is how you have to do things when you don't have a lathe! [emoji23]

Time for some lunch and then back to the work that pays the bills. More polishing later.
Now, time to put it to good use. I started a thread in the Vintage Tools subforum for the whole process, but today I started on cleaning/polishing the column for my new drill press. 5" casters, and 8 amp Milwaukee drill, and a lot of abrasives. This is how you have to do things when you don't have a lathe! [emoji23]
Time for some lunch and then back to the work that pays the bills. More polishing later.
rattle_snake
Well-known member
... This is how you have to do things when you don't have a lathe! [emoji23]
Nice idea. Stolen/stored away for my future use. I use my drill press sometimes as a vertical lathe for polishing and such.
shortykorte
Well-known member
Nice score on the DP's. I was looking at KMScott parts also. I need the same end cap. My floor DP is in serious need of refurb so you,re polishing set has been filed for when I can tackle that project. Looking forward to more updates.
Nice idea. Stolen/stored away for my future use. I use my drill press sometimes as a vertical lathe for polishing and such.
Yeah it'd be better to have 4 casters, but the place I went to didn't have 4 in this size, so oh well. I used a plumber's test plug for a mount on the end, though I could have sacrificed the top cap and put a bolt through it.
Nice score on the DP's. I was looking at KMScott parts also. I need the same end cap. My floor DP is in serious need of refurb so you,re polishing set has been filed for when I can tackle that project. Looking forward to more updates.
Yeah his parts are pretty ridiculous- super craftsmanship and the end cap is heavy and feels indestructible. Very happy with them.
Runs pretty smoothly!!
https://vimeo.com/165377906
And before anyone says it, yes I know the gloves are a bad idea, but my workpiece is turning slowly at low power, so even if my glove did get caught (it did), I wouldn't (didn't) lose a finger.
https://vimeo.com/165377906
And before anyone says it, yes I know the gloves are a bad idea, but my workpiece is turning slowly at low power, so even if my glove did get caught (it did), I wouldn't (didn't) lose a finger.
More work in the shop today. The builder graciously put 3 duplex outlets in the entire 800 sq ft garage, so I have some work to do. Put a new 20 amp circuit behind the bench with 8 outlets (GFCI protected, of course). Pain in the neck but now I have fewer tripping hazards with the extension cords cleared out of the way.

Now I need to get one of my Reelcrafts cleaned up and get a new hose for it, then I'll have the air hose off the floor as well.
Now I need to get one of my Reelcrafts cleaned up and get a new hose for it, then I'll have the air hose off the floor as well.
Got the bigger Reelcraft cleaned and ready for a new hose that will arrive tomorrow along with Milton couplers and air wand.


Question now is where to mount it. I've been thinking of the end of the wall between the compressor and water heater, but I'm wondering if it would be better above the snap on box. Make it in line with the front edge of the bench so that I'm pulling on axis with the reel. Thoughts?

Question now is where to mount it. I've been thinking of the end of the wall between the compressor and water heater, but I'm wondering if it would be better above the snap on box. Make it in line with the front edge of the bench so that I'm pulling on axis with the reel. Thoughts?
Weekend_warrior
Well-known member
Awesome so far. Like the counter top. Hope to mine set up nice like yours! AC in Texas would be great. Likely won't happen though.
In the process with buying a house with a 3 car. About 3 weeks out from close.
In the process with buying a house with a 3 car. About 3 weeks out from close.
Awesome so far. Like the counter top. Hope to mine set up nice like yours! AC in Texas would be great. Likely won't happen though.
In the process with buying a house with a 3 car. About 3 weeks out from close.
Nice!! I miss my homeland so much, but we're trying to make the best of Arizona that we can. [emoji22]
shortykorte
Well-known member
Nice job on the reel.
If this is the only reel, I would suggest between single and double garage doors. This way you have the best coverage inside and outdoor. As far as pull, most times, I'll pull the hose out the at the reel the length needed before moving hose laterally.
Second choice would be in the corner beside single door.

So it was pretty hot here today. Being up above 118 does happen, but not all that often, and is usually in July or August. Took a few measurements with my contactless thermometer on the house and garage doors.
West side of the house:

Garage door:

Inside garage door between insulation panels:

On the panels:

Time to get solar screens for the west and south facing windows....
West side of the house:
Garage door:
Inside garage door between insulation panels:
On the panels:
Time to get solar screens for the west and south facing windows....
shortykorte
Well-known member
Wow.
That's some difference on the interior garage. I need to put some insulation on ours now.
That's some difference on the interior garage. I need to put some insulation on ours now.
So it was pretty hot here today. Being up above 118 does happen, but not all that often, and is usually in July or August. Took a few measurements with my contactless thermometer on the house and garage doors.
West side of the house:
Garage door:
Inside garage door between insulation panels:
On the panels:
Time to get solar screens for the west and south facing windows....


Wow!
Little toasty.
Does the gov't have an incentive if you redo insulation?
Here in VA there was a rebate for redoing insulation.
Wow!
Little toasty.
Does the gov't have an incentive if you redo insulation?
Here in VA there was a rebate for redoing insulation.
We used to have them, but nothing available now. LED bulbs get point of sale discounts from the power companies, though. They also give a good deal on home energy audits and whole house pressure tests to find leaks in windows etc. It's weeks like this that I hate life [emoji24]
dwall174
Well-known member
This is how you have to do things when you don't have a lathe!

[/QUOTE]
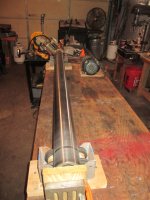
Digging this old post up, Since I sort of borrowed your concept of cleaning/polishing a drill press column without a lathe.
In my case, The column I'm working on is from a old 20" Walker Turner drill press & probably weighs close to 100lbs. (3-3/4" dia. X 7/16" wall X 66" long)
Everything was sort of thrown together from items I already had on-hand!
The brackets used for the wheel-blocks came from an old workbench, They were originally used as feet on the end of 4"X4" posts. The motor is 1/2HP. 3-phase 855 RPM which gives me about 450RPM on the column.
Doug
Attachments


rixtrix1
Well-known member
Are you on the East side? I am in Mesa. Getting a mini split this week.
Sorry to interupt, TXN. Congrats on the new place and to AZpilot on his new mini-split!
rburke65
Well-known member
You really did well on the Lista cabinets. You realize those go for about $100 a drawer!? You get a YOU ****!