To avoid these ads, REGISTER NOW!

Veeps' Garage

OP
B

bagged89s10

Well-known member
Joined
Mar 13, 2005
Messages
4,607
Location
CT
I haven't posted in a while but have been really busy cleaning out our basement and breezeway so we can start a house renovation. Waiting for architecturals to start that project. In the midst of our cleaning the house out, I acquired a free metal shed from my neighbor. I measured the shed with my neighbor before I built the floor and we got 10'x8' exactly.

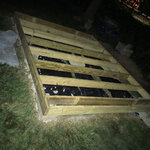
Built the floor out of all pressure treated 2x6 joists and 3/4 pt plywood.
6c7fba77fac162092b81a6b9d16bbe8d.jpg
c34bee32777d19a2dcaf4bd1b0d19ced.jpg

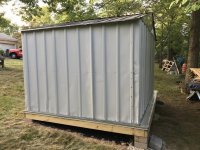
We got the shed over my neighbors 3ft fence and around to my yard. It was very easy with 8 guys.

I need to pressure wash it
8eb45f9fa78d9b774c1b8bf5003e42da.jpg
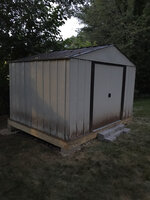
Notice the floor is too big towards the back? My neighbor measured the side he repaired and that was 8ft. He got the shed for like $20 from lowes because it was damaged. I'll have to take it slightly apart and adjust it square.
f97b448e19d58b8dcd20330c20615b07.jpg

Can't complain for a free shed and I know I can unscrew that back corner and square it up. I'll just have to install some type of z flashing to keep water out. My thought is to use drip edge or some other pre-bent flashing all the way around the shed base, and bend it up the inside to keep water out.
 

Attachments

  • 6c7fba77fac162092b81a6b9d16bbe8d.jpg
    6c7fba77fac162092b81a6b9d16bbe8d.jpg
    1.1 MB · Views: 0
  • c34bee32777d19a2dcaf4bd1b0d19ced.jpg
    c34bee32777d19a2dcaf4bd1b0d19ced.jpg
    1.5 MB · Views: 0
  • 8eb45f9fa78d9b774c1b8bf5003e42da.jpg
    8eb45f9fa78d9b774c1b8bf5003e42da.jpg
    836.9 KB · Views: 0
  • f97b448e19d58b8dcd20330c20615b07.jpg
    f97b448e19d58b8dcd20330c20615b07.jpg
    824.6 KB · Views: 0
To avoid these ads, REGISTER NOW!
OP
B

bagged89s10

Well-known member
Joined
Mar 13, 2005
Messages
4,607
Location
CT
Got the shed cleaned up and squared up. Apparently, someone didn't know how to measure because one side was the correct length at 92.75" and the other side was too long at 8ft. So I took it partially apart and squared it up. Used drip edge on the bottom and bent it up on the inside, then flashed it to let and water drain out and protect the floor.

It feels good to finally get all the lawn and garden equipment out of the garage!
 

Attachments

  • IMG_3660.jpg
    IMG_3660.jpg
    149.5 KB · Views: 83
  • IMG_3669.jpg
    IMG_3669.jpg
    149.2 KB · Views: 91
  • IMG_3686.jpg
    IMG_3686.jpg
    145.2 KB · Views: 104
  • IMG_3659.jpg
    IMG_3659.jpg
    150.4 KB · Views: 92
Last edited:
OP
B

bagged89s10

Well-known member
Joined
Mar 13, 2005
Messages
4,607
Location
CT
Ya! Free and extra garage space. That's a great deal. Nice work squaring it up and on a good foundation.


Thanks. Cost me about $200 to build a decent floor structure. Now I can wait a few years to build the larger shed. But maybe I can convince my wife that it will be easier to convert the current garage into a new master suite and I can just build a 30x24 "shed".
 
OP
B

bagged89s10

Well-known member
Joined
Mar 13, 2005
Messages
4,607
Location
CT
Again been super busy remodeling my house and and my new daughter was just born last month.
9cb5924b9d1a5f448d3ae17022294f3a.jpg

Almost a month old
2059e73c0311bac18ff64da80bbb61cf.jpg

Before she was born I was busy building a new staircase.
I think it came out pretty good. Still need to finish the half wall railing and trim.
986efa0cd7c10ee344ec8fc3fdac0402.jpg
29ab010fb1831ea81d2c9692c8693c80.jpg
Used a ton of spax screw.
3d0bc95355be3356164a29e744d40d7c.jpg

I moved the staircase from in between our kitchen to the side of the living room. Now I will install a 24’ lvl and remove the center wall to open up the floor plan.
The old staircase was where the ladder is.
55369948bc783ae57b6b2e71b9594691.jpg
 

Attachments

  • 9cb5924b9d1a5f448d3ae17022294f3a.jpg
    9cb5924b9d1a5f448d3ae17022294f3a.jpg
    831.2 KB · Views: 0
  • 2059e73c0311bac18ff64da80bbb61cf.jpg
    2059e73c0311bac18ff64da80bbb61cf.jpg
    891 KB · Views: 0
  • 986efa0cd7c10ee344ec8fc3fdac0402.jpg
    986efa0cd7c10ee344ec8fc3fdac0402.jpg
    787.3 KB · Views: 0
  • 29ab010fb1831ea81d2c9692c8693c80.jpg
    29ab010fb1831ea81d2c9692c8693c80.jpg
    770.1 KB · Views: 0
  • 3d0bc95355be3356164a29e744d40d7c.jpg
    3d0bc95355be3356164a29e744d40d7c.jpg
    827.9 KB · Views: 0
  • 55369948bc783ae57b6b2e71b9594691.jpg
    55369948bc783ae57b6b2e71b9594691.jpg
    903.6 KB · Views: 0

slik560

Well-known member
Joined
Oct 5, 2009
Messages
787
Location
Kansas, USA
Congratulations!!! A fine new addition to the family! That staircase looks great - by using screws, it will never creak or groan. :) Well done....on all levels. ;)
 
OP
B

bagged89s10

Well-known member
Joined
Mar 13, 2005
Messages
4,607
Location
CT
So I’ve finally upgraded my air compressor from the old oil less craftsman to a better v twin cylinder oil lubricated pump.

These sell for $449 at Home Depot but I found a local guy selling a brand new one for $250. Turns out he bought 8 of them when he found a clearance deal at Home Depot which was probably $100 each max. It’s a win for both of us.

Here are the specs from Home Depot’s website.

“Model #: C302H
Sku #: 1001655406
Internet #: 206695048
Husky Ultra-Quiet 30 Gal. compressor contains a cast iron, V-twin cylinder and oil-lubricated pump features 1-Piece cast iron crankcase, thermally stable cast iron cylinder body, aluminum head and machined cast iron valve plate, automotive style ball bearings and durable stainless steel reed valve. The compressor is ultra-quiet with a 75 dBA sound rating. Compressor has a heavy duty induction motor for maximum performance and efficiency. 155 MAX psi for optimum tool performance.
75 dBA sound rating for ultra-quiet, comfortable use
6.2 SCFM at 40 psi, 5.3 SCFM at 90 psi
30 Gal. ASME certified tank meets all safety standards and regulations
10 in. full pneumatic wheels provide the unit with maximum portability on all surfaces”

It’s not the best compressor but I’m getting a compressor that’s fairly quiet and suits my needs. My iPhone dB meter reads around 80dB while the old compressor had readings over 100dB. I basically use air to fill tires, use nail guns, use the blow off tool, and sometimes a little plasma cutting. I was originally looking for a newer tank to put my Campbell hausfeld pump on which I pulled from a 1970s-1980s sears craftsman compressor. That pump might actually be more powerful but I won’t know unless I decide to test them. Bottom lone is I can always upgrade the pump and motor on this compressor.

ac8ea55de2d44bc18fda1c8f4a9bca60.jpg
6c0dbd2d3aee8a2e79ed2583964f8634.jpg
f256cfa137185003de61fe1578d0fec7.jpg
a1c574878958fe4587cc3b0993ff0bf3.jpg

I had a nice smc water trap to I plumbed it up.
8eb4aa0f8ac3afea199703131f5dacb6.jpg
ed96da3ed388e8d98d9131b7f822969d.jpg

And I just sold the old craftsman for $150 to recoup some of the cost.
93cb1b41273cc7581f87731adcb47e16.jpg
Now I have an empty cabinet. I am going to move that workbench cabinet away from the wall. My plan is to have a workbench which I can walk all the way around and also use as an out feed table for my table saw.
 

Attachments

  • 93cb1b41273cc7581f87731adcb47e16.jpg
    93cb1b41273cc7581f87731adcb47e16.jpg
    815.1 KB · Views: 0
  • ed96da3ed388e8d98d9131b7f822969d.jpg
    ed96da3ed388e8d98d9131b7f822969d.jpg
    1.1 MB · Views: 0
  • 8eb4aa0f8ac3afea199703131f5dacb6.jpg
    8eb4aa0f8ac3afea199703131f5dacb6.jpg
    1 MB · Views: 0
  • a1c574878958fe4587cc3b0993ff0bf3.jpg
    a1c574878958fe4587cc3b0993ff0bf3.jpg
    779.3 KB · Views: 0
  • f256cfa137185003de61fe1578d0fec7.jpg
    f256cfa137185003de61fe1578d0fec7.jpg
    627 KB · Views: 0
  • 6c0dbd2d3aee8a2e79ed2583964f8634.jpg
    6c0dbd2d3aee8a2e79ed2583964f8634.jpg
    892.1 KB · Views: 0
  • ac8ea55de2d44bc18fda1c8f4a9bca60.jpg
    ac8ea55de2d44bc18fda1c8f4a9bca60.jpg
    824.4 KB · Views: 0
OP
B

bagged89s10

Well-known member
Joined
Mar 13, 2005
Messages
4,607
Location
CT
A few of my recent finds.

Delta 1/2HP grinder with stand for $40. Only thing wrong with it is the broken eye shield.

e5283856f1adcd662021853606122615.jpg
dc4ff9ecce8798efb9794e09f3c8174e.jpg
dca7ce9851a8f7120f7af6d3eb05bcf5.jpg


A second delta grinder for $62. This one is on a walker turner pedestal. The tag says 220v but it’s wired for 110v. The lights and bulbs work too. I think I will be using parts from the other one to complete and restore this one. Does anyone know the closest matching color to this one?

The water turner stand is a little damaged but it’s a very cool stand.

9e8346715fa335726c9e53ec79d329f0.jpg
9181c97913be4709bd33795f053377ee.jpg
d0bb902ed694b2a1df5a654fc84697ab.jpg

Picked this 6” Rock Island 577 today for $70. Need to find a swivel base for it but it’s in very clean shape under all the black. And the rust is just slight surface rust. If anyone has a lead on a swivel base please let me know. It weighs 130pounds without the missing swivel base.

26951634f061e7bd3ca8d1fa594abd96.jpg
fd69cf48e55b42f8808b302ac8c97581.jpg
2b50ed1aca2ca849692b9be691697ff3.jpg
cc82bdfeb87bf404ec5c0260157906a0.jpg
13a0e96045600216cfed5cb86c7e3390.jpg
 

Attachments

  • cc82bdfeb87bf404ec5c0260157906a0.jpg
    cc82bdfeb87bf404ec5c0260157906a0.jpg
    147.9 KB · Views: 0
  • fd69cf48e55b42f8808b302ac8c97581.jpg
    fd69cf48e55b42f8808b302ac8c97581.jpg
    184 KB · Views: 0
  • 26951634f061e7bd3ca8d1fa594abd96.jpg
    26951634f061e7bd3ca8d1fa594abd96.jpg
    221.7 KB · Views: 0
  • d0bb902ed694b2a1df5a654fc84697ab.jpg
    d0bb902ed694b2a1df5a654fc84697ab.jpg
    197.7 KB · Views: 0
  • 9181c97913be4709bd33795f053377ee.jpg
    9181c97913be4709bd33795f053377ee.jpg
    246.3 KB · Views: 0
  • 9e8346715fa335726c9e53ec79d329f0.jpg
    9e8346715fa335726c9e53ec79d329f0.jpg
    203.4 KB · Views: 0
  • dca7ce9851a8f7120f7af6d3eb05bcf5.jpg
    dca7ce9851a8f7120f7af6d3eb05bcf5.jpg
    160.3 KB · Views: 0
  • dc4ff9ecce8798efb9794e09f3c8174e.jpg
    dc4ff9ecce8798efb9794e09f3c8174e.jpg
    227.1 KB · Views: 0
  • 13a0e96045600216cfed5cb86c7e3390.jpg
    13a0e96045600216cfed5cb86c7e3390.jpg
    170.1 KB · Views: 0
  • e5283856f1adcd662021853606122615.jpg
    e5283856f1adcd662021853606122615.jpg
    164.1 KB · Views: 0
  • 2b50ed1aca2ca849692b9be691697ff3.jpg
    2b50ed1aca2ca849692b9be691697ff3.jpg
    137.5 KB · Views: 0

rmalkow2

Well-known member
Joined
Jun 26, 2009
Messages
4,087
Location
Brighton, MI
Both those grinders are nice ones and the stands they are on are very cool indeed. Even simple parts of tools were made with style back when these were made. You got good deals on those as well. I never see a grinder with nice stand go under $100 around me.
 
To avoid these ads, REGISTER NOW!
OP
B

bagged89s10

Well-known member
Joined
Mar 13, 2005
Messages
4,607
Location
CT
Both those grinders are nice ones and the stands they are on are very cool indeed. Even simple parts of tools were made with style back when these were made. You got good deals on those as well. I never see a grinder with nice stand go under $100 around me.


I lucked out. Now I can finally sell at least one of my craftsman grinders.
 
OP
B

bagged89s10

Well-known member
Joined
Mar 13, 2005
Messages
4,607
Location
CT
Moved my compressor and vacuum to the other corner of my garage. I also finally mounted my reel craft hose reels. This thing is so much nicer than that plastic hose craftsman reel I was using before. That old reel is going to get converted to a garden hose reel.
Now I just need run power to this side of the shop.

68976b029514c40b5961d8c34c088485.jpg

3fbb8a97fa02b051b96cc4038ae5bb7c.jpg
 

Attachments

  • 68976b029514c40b5961d8c34c088485.jpg
    68976b029514c40b5961d8c34c088485.jpg
    786.4 KB · Views: 0
  • 3fbb8a97fa02b051b96cc4038ae5bb7c.jpg
    3fbb8a97fa02b051b96cc4038ae5bb7c.jpg
    774.4 KB · Views: 0
OP
B

bagged89s10

Well-known member
Joined
Mar 13, 2005
Messages
4,607
Location
CT
Starting more rearranging. Luckily the rolling cart i had is almost the perfect size for this parts cabinet. I have no clue where it’s going. The empty space is going to be the location of my vise shelving.
c195374a30d39e8a9cfeb2941b7604af.jpg

d0519ed17e27792fc583fa59a1c137ad.jpg
 

Attachments

  • c195374a30d39e8a9cfeb2941b7604af.jpg
    c195374a30d39e8a9cfeb2941b7604af.jpg
    788.7 KB · Views: 0
  • d0519ed17e27792fc583fa59a1c137ad.jpg
    d0519ed17e27792fc583fa59a1c137ad.jpg
    807.7 KB · Views: 0

sdavis622

Well-known member
Joined
Mar 19, 2014
Messages
518
Location
Surprise, AZ
Starting more rearranging. Luckily the rolling cart i had is almost the perfect size for this parts cabinet. I have no clue where it’s going. The empty space is going to be the location of my vise shelving.

d0519ed17e27792fc583fa59a1c137ad.jpg


Looking good man! That cabinet is AWESOME! I keep eying some similar on buy sell trades but prices haven’t been right! Keep up the good work!
 

Attachments

  • d0519ed17e27792fc583fa59a1c137ad.jpg
    d0519ed17e27792fc583fa59a1c137ad.jpg
    139.2 KB · Views: 0
OP
B

bagged89s10

Well-known member
Joined
Mar 13, 2005
Messages
4,607
Location
CT
Looking good man! That cabinet is AWESOME! I keep eying some similar on buy sell trades but prices haven’t been right! Keep up the good work!


I love the cabinet. It was sitting in that empty spot where I’m building shelving to store my vises. I traded a gold craftsman radial arm saw cabinet for it to a GJ member. I’m trying to rearrange so I can build a workbench/our feed table for my table saw and start more woodworking.
 

sdavis622

Well-known member
Joined
Mar 19, 2014
Messages
518
Location
Surprise, AZ
I love the cabinet. It was sitting in that empty spot where I’m building shelving to store my vises. I traded a gold craftsman radial arm saw cabinet for it to a GJ member. I’m trying to rearrange so I can build a workbench/our feed table for my table saw and start more woodworking.


Very cool. I’ll keep checking in to see how your woodworking plans turn out.


Sent from my iPhone using Tapatalk
 

Squashfest81

Well-known member
Joined
Jan 14, 2012
Messages
1,475
Location
MA
Nicely done Veep, especially that little cutie!
I actually just cut a new top for that radial cabinet yesterday. Love the gold.
 
OP
B

bagged89s10

Well-known member
Joined
Mar 13, 2005
Messages
4,607
Location
CT
Very cool. I’ll keep checking in to see how your woodworking plans turn out.


Sent from my iPhone using Tapatalk


I’m getting ready to build a kitchen island and some built in shelves. Nothing too crazy but I need better space to build them without having to constantly move things around. I’m looking forward to having an out-feed table/workbench that I can walk all the way around. The old workbench against the wall is limited in uses.
 
OP
B

bagged89s10

Well-known member
Joined
Mar 13, 2005
Messages
4,607
Location
CT
Are you going to leave the cabinet on the roller? Looking good


I will keep it on the cart for now. I’m going to start putting everything on castors. It’s very handy. Not exactly sure what I’m doing with it yet. Once I get rid of the bench next to the garage door, I can start to figure out how everything can get rearranged.
 
OP
B

bagged89s10

Well-known member
Joined
Mar 13, 2005
Messages
4,607
Location
CT
I got my vise shelf built. 6ft wide by 18” deep and 36.5” tall. I only had time put a few of my vises on it but I should be able to get most of them in there.
e1b751e40b8aba55e7f8ef89055ba14b.jpg
0def98119955301d0a4430e199ec1fd7.jpg
f3702f350756c5debe82d5bce027eecc.jpg
b07e4453cd05805653bca7430c1d4471.jpg
 

Attachments

  • e1b751e40b8aba55e7f8ef89055ba14b.jpg
    e1b751e40b8aba55e7f8ef89055ba14b.jpg
    870.1 KB · Views: 0
  • f3702f350756c5debe82d5bce027eecc.jpg
    f3702f350756c5debe82d5bce027eecc.jpg
    784.5 KB · Views: 0
  • 0def98119955301d0a4430e199ec1fd7.jpg
    0def98119955301d0a4430e199ec1fd7.jpg
    944 KB · Views: 0
  • b07e4453cd05805653bca7430c1d4471.jpg
    b07e4453cd05805653bca7430c1d4471.jpg
    813.4 KB · Views: 0
OP
B

bagged89s10

Well-known member
Joined
Mar 13, 2005
Messages
4,607
Location
CT
I moved a little over half of my vises here so far.

dad8321ce68e5357722dc7f3f5615b71.jpg
a6072ace9ad17406fe945dd84bb8bc7a.jpg
eb02ad96f55fbe820b5abb2c1011fb53.jpg
b9ae396d00bde2fa530995b2cd9a2bae.jpg
 

Attachments

  • a6072ace9ad17406fe945dd84bb8bc7a.jpg
    a6072ace9ad17406fe945dd84bb8bc7a.jpg
    141.5 KB · Views: 0
  • eb02ad96f55fbe820b5abb2c1011fb53.jpg
    eb02ad96f55fbe820b5abb2c1011fb53.jpg
    159 KB · Views: 0
  • b9ae396d00bde2fa530995b2cd9a2bae.jpg
    b9ae396d00bde2fa530995b2cd9a2bae.jpg
    141.9 KB · Views: 0
  • dad8321ce68e5357722dc7f3f5615b71.jpg
    dad8321ce68e5357722dc7f3f5615b71.jpg
    156.6 KB · Views: 1
OP
B

bagged89s10

Well-known member
Joined
Mar 13, 2005
Messages
4,607
Location
CT
So I’ve been a little busy and haven’t posted updates so here they are.
Almost all the vises are moved now.
a86818f024d4337ba0732a8ddaa63751.jpg
d6126011eed5be8d50230952c4440032.jpg
That little shelf unit on top with the slats is from my work truck. I actually have another one too which I might take the 2 and make them more useful. We will see.

I moved the workbench off the wall to see my options. I do like not having that bench right next to the door. Yes now my shop is a complete disaster.
6b283c325f679cf8b2cdd96bf5dfbf65.jpg
I’m just not sure what I’m putting here exactly. It will either be tool chests or all my parts cabinets.
c264c2bbec753ffb1a681b537b4f819a.jpg
 

Attachments

  • 6b283c325f679cf8b2cdd96bf5dfbf65.jpg
    6b283c325f679cf8b2cdd96bf5dfbf65.jpg
    918.4 KB · Views: 1
  • c264c2bbec753ffb1a681b537b4f819a.jpg
    c264c2bbec753ffb1a681b537b4f819a.jpg
    811.4 KB · Views: 1
  • d6126011eed5be8d50230952c4440032.jpg
    d6126011eed5be8d50230952c4440032.jpg
    900.1 KB · Views: 1
  • a86818f024d4337ba0732a8ddaa63751.jpg
    a86818f024d4337ba0732a8ddaa63751.jpg
    882.4 KB · Views: 1
OP
B

bagged89s10

Well-known member
Joined
Mar 13, 2005
Messages
4,607
Location
CT
My reorganization project just had a curveball thrown at it. I’ve been searching for a bigger lathe and scored a deal on this 12” craftsman atlas.
I had fun unloading it this weekend. 362871218e77b75e71ecc38b49799616.jpg
ee42eebb9ad5029b66a2c6f3876af26a.jpg
1ec4c6f22c5427d31d7c0f6cc690d229.jpg

And sold my craftsman atlas 618 today.
4a39f76d31bfc61cef6773180f48acdf.jpg

Paid $600 for the 12” and sold the 6” for $600. I just need to spend a little to get the guards but I can’t be happier.
I think the new one is going here where the bandsaw and old lathe were. I just have to figure out if I want to move the drill press or not.
2c726368a2d8da0ddafb88e73bf24743.jpg
 

Attachments

  • 2c726368a2d8da0ddafb88e73bf24743.jpg
    2c726368a2d8da0ddafb88e73bf24743.jpg
    909.3 KB · Views: 1
  • 4a39f76d31bfc61cef6773180f48acdf.jpg
    4a39f76d31bfc61cef6773180f48acdf.jpg
    686 KB · Views: 1
  • 1ec4c6f22c5427d31d7c0f6cc690d229.jpg
    1ec4c6f22c5427d31d7c0f6cc690d229.jpg
    868.4 KB · Views: 1
  • ee42eebb9ad5029b66a2c6f3876af26a.jpg
    ee42eebb9ad5029b66a2c6f3876af26a.jpg
    949 KB · Views: 0
  • 362871218e77b75e71ecc38b49799616.jpg
    362871218e77b75e71ecc38b49799616.jpg
    1 MB · Views: 0
OP
B

bagged89s10

Well-known member
Joined
Mar 13, 2005
Messages
4,607
Location
CT
Nice score on the lathe. Looks like you've been busy.


Thanks. Trying to find time to do everything I want to do and balance what I need to do.

Things that I can just spend a few minutes on, let sit, and then come back to is basically what I have time for right now.

So the other day I simple greened these legs and then three some paint stripper on them.

182c097eed57d4517dc9dbedd2702421.jpg

Then I went back and tried to use the scraper but that was just a mess with cast-iron being so rough. Just wiping off the paint and paint stripper with paper towels worked the best.

39357bba8315af417ae3b1ed2ce7d5aa.jpg

And then last night I coated the back sides of the legs with paint stripper. After work I should be able to wipe off all that pain and maybe throw another coat on wherever the paint doesn’t come off.

1ccb959a2319d6521f014a265569606c.jpg

I’ll probably go over the legs with a wire wheel and then throw a coat of BLO on them before painting them gloss black.
 

Attachments

  • 182c097eed57d4517dc9dbedd2702421.jpg
    182c097eed57d4517dc9dbedd2702421.jpg
    857.2 KB · Views: 0
  • 39357bba8315af417ae3b1ed2ce7d5aa.jpg
    39357bba8315af417ae3b1ed2ce7d5aa.jpg
    982.5 KB · Views: 0
  • 1ccb959a2319d6521f014a265569606c.jpg
    1ccb959a2319d6521f014a265569606c.jpg
    1 MB · Views: 0
OP
B

bagged89s10

Well-known member
Joined
Mar 13, 2005
Messages
4,607
Location
CT
Lathe legs done. I love the look of cast iron so much hat I’m not sure if I’ll be painting them black anymore. I’m between 3 options. 1)BLO and then clear coat. 2)Jax blackener and then clear. I’ve never used a blackener product. 3)Gloss black paint. What do you guys think?

5b880fa176ac1fd00e8f7de03ac6a95a.jpg
1e594a8a089c107f83ef5a87fb942386.jpg
 

Attachments

  • 1e594a8a089c107f83ef5a87fb942386.jpg
    1e594a8a089c107f83ef5a87fb942386.jpg
    1.3 MB · Views: 0
  • 5b880fa176ac1fd00e8f7de03ac6a95a.jpg
    5b880fa176ac1fd00e8f7de03ac6a95a.jpg
    330.3 KB · Views: 0
To avoid these ads, REGISTER NOW!
Top Bottom