To avoid these ads, REGISTER NOW!

Vinyl planking,....easy, but

andyvh1959

Well-known member
Joined
Feb 15, 2020
Messages
2,611
Location
Green Bay WI
I installed Lifeproof brand vinyl planking in my kitchen remodel. This was my 1st ever floating vinyl planking installation, leanred some things.

Now, I've done sheet vinyl flooring, small tiles on mortar, large tiles on mortar, basically processes that involve glueing or mortar to bond the flooring product to the substrate. Doing any of those floors always meant you lay a chalk line in the middle of the room and start the flooring from there, so the edges on each side of the room are the same width. The Lifeproof product instruction says to start from a corner. I felt that would bother me, so I started from a center line and had the last edge pieces the same width. I think the reason Lifeproof instructs to start from a corner has to do with how the planks lock into each other to make tight joints rather than aligned to a center line.

The idea of floating a floor over substrate had me a bit doubtful, yet so many people claim no issues. At least this planking weighs a good amount per plank. My kitchen floor had been tiled with 2.5" square tile. I used a powered chisel to remove the tile and much of the motar under the tile. Some areas left some mortar, but it was all pretty level, so I laid the vinyl planking over the residual motar, making sure nothing projected up to cause the planking not to lay flat. The instructions from Lifeproof said it could handle 1/4" variations. If I were to do it again I would have gone over the floor with a drum sander after getting the tile off the substrate to remove or grind down all the residual mortar. Now in some areas I can sense just a bit of flexing as I walk on the vinyl planking, some clicking sound as I walk over joints.

Other things: I found it is critical to fully engage the long side locking edge of the planking by angling it into engagement. Yes with careful blocking and hammer I could push/force the edges to lock in, but far better to angle/swing it into engagement. A few areas on the kitchen floor "click" as I walk on them, indicating the edges are not fully/tightly engaged. In some areas I had to cut or notch to fit, I wasn't able to use the plank end overlap/lock edge. On those I created a lap by cutting back a bit of the underside of the cut piece to lap onto the adjoining piece, and if it laid a bit "proud" I used some Gorilla Glue (the water activated type) to flow some glue under the lap.

I'll soon be applying the same flooring in the dining room and main hallway of the house. This time I will make certain the entire substrate is completely clean and flat. Since the dining room starts from the last edge of the kitch floor I'll start just my locking in the next pieces. For certain I'll make sure any long edge is fully engaged by angling/swinging it into place before setting it down.
 
To avoid these ads, REGISTER NOW!

Youngandfree

Well-known member
Joined
Dec 29, 2020
Messages
877
Location
VA
Starting from the center means half the floor is installed from the wrong side, which is a huge pain. I did a room with the wrong edge against the starting wall. Too far in to swap due to cuts made around a fireplace. It sucked.
 

kbeefy

Well-known member
Joined
Sep 14, 2013
Messages
3,508
Location
Harington, Eastern Washington
If the room (and the starting edge) was absolutely square I'd start in the corner, it's way easier.

If your confident with a tape measure, I was taught to start 1 row out, with a couple inches of extra room. After a few rows are down so everything stays together, make any cuts and install the first row, then scoot the hole thing into place.

It doesn't work all the time, but when it does it makes getting the first wall to fit very easy. If your math/measuring is on the last row lays in perfect.

I was also taught to lay out 10 boards to get a measurement of how wide they are assembled before starting.
 

DGersic

Well-known member
Joined
Mar 12, 2017
Messages
6,449
Location
DeKalb, IL
I haven’t done vinyl yet, but I have three rooms of floating floor. Starting in the centre sounds like a pain. Measure carefully to establish the cuts for the partial width first row, then just go to town on it. Get the guillotine chopper for cutting to length, way faster than using a saw.

I think you’ll always get a little movement, it’s a floating floor. But, yeah, you want the substrate as flat as reasonably possible. I use thinset to level any holes or other imperfections.

I buy a piece of 1/4” thick rectangular trim. I think Lowe’s calls it “lattice”. Shove pieces of that between the wall and your first row, it helps keep the gap from closing up as you hammer on later. Rows.
 

PoorUB

Well-known member
Joined
Mar 29, 2021
Messages
11,877
Location
Fargo, ND
I just did my kitchen floor with solid vinyl snap together tile. I forget the brand. It was designed to start at the "top" left and work left to right across the room. My problem was there was not a decent edge to start from, and no other square wall to measure from. I gave up, took a chance and started in the middle of the room and worked my way in both directions. I figured the worst that would happen is I would unsnap it all and start over. It was a bit of a pain, but I figured out how to get the tile to snap together in the wrong order. Often I used a wide block of wood, and hammer and gave it a few good taps on the edge to get it to snap in place. As I got closer to the wall I could use a couple wood blocks and pry bars against the wall. I few times I pried against the wall, and took the hammer and gave it a few taps on the seam I was trying to get to pop together. The tapping seemed to help.
 

Fav Onefour

Well-known member
Joined
Jul 14, 2022
Messages
772
Location
MN cold and hot
I've done a number of these floors.
The brand mentioned has quite a variety of products. That matters because flexibility varies. I did a couple rooms with a very stiff version and it would not work with much variance from completely flat. That version would break off the locking tabs pretty quick if it clicked when walking.
The flexible versions "settle in" a bit more. They still don't do real well without a nearly flat substrate. I've never tried with 1/4" variation but it takes days with 1/8" variation on plank length.

I've used the tricks @PoorUB , mentioned with tiles near the wall. I also like using a soft face dead blow. With those hammers, I'm able to hit with an angled blow on the top face to push seams together. I smack the locking tabs together tight by using the deadblow and square faced hardwood blocks. The blocks are sized just a bit smaller than seam width. That little trick seems to help the tabs lock tighter.
 

OccupantRJ

Well-known member
Joined
May 15, 2009
Messages
11,450
Location
Eastern North Carolina
I build a few rows then measure across the room to get a measurement for equal margins. I then cut a row the correct width to attach to the wall side of the section, push to the wall spacers, then across the room I go. I made a cutting board and used razor knife with the snap off method to cut my vinyl planks. Even wearing knee pads due to bad knees at the time it was an easy install by eliminating getting up and down to cut most pieces.
 

PopcornSutton

Well-known member
Joined
Jun 10, 2024
Messages
821
Location
Northern Tip of VA
I suppose these planks move some, but once installed and normalized, is it an issue? Maybe in a house that has varying temps and/or no humidity control, it would be an issue. My house temp stays within a 5 degree spread, it's drier in the winter but the cooling keeps humidity down well.
The planks I used had the foam backing.
 

Fixr

Well-known member
Joined
Dec 23, 2012
Messages
9,855
Location
SW VA
I suppose these planks move some, but once installed and normalized, is it an issue? Maybe in a house that has varying temps and/or no humidity control, it would be an issue. My house temp stays within a 5 degree spread, it's drier in the winter but the cooling keeps humidity down well.
The planks I used had the foam backing.
AFAIK, solid vinyl plank doesn't move to speak of with humidity changes, and there was one product I read about a few years back that was claimed to not measurably change size with temperature swings.
 

bassJAM

Well-known member
Joined
Jun 10, 2020
Messages
868
Location
Cincinnati, OH
If you are sensing clicking or flexing you're going to have a problem eventually. I did my entire basement when I finished it, starting from one corner of the kids' play room and moving into an office and bedroom. I learned quickly that sometimes the tongue and groove looks like it's fully snapped together until you view it from an angle close to the floor, so after having to go back and remove a couple rows a couple times, I then worked with a flashlight and inspected each row with my head to the floor, looking for connections that weren't fully locked in. That was 2017 and the only problem area I have is where I was too lazy to build up an area where the concrete was a little low. At the time I wasn't concerned because it was a low traffic area into a small storage closet, but then in 2020 we converted that room into a bathroom and suddenly that became a high traffic area. After 3 years of flexing when that area was stepped one the joints there finally snapped. It's close to a wall and I kept a box of spare boards, eventually I'll fix it the right way.
 
OP
A

andyvh1959

Well-known member
Joined
Feb 15, 2020
Messages
2,611
Location
Green Bay WI
Does that use a layer of thin foam underneath? Or does it lay directly on the substrate?
Lifeproof lays directy on the substrate, it has a firm rubber like bottom layer.

Thanks for all the input. When I do the next areas I'll probably start with a group of plank sections clicked together end then set that parallel to a known wall that checks for square and straight, go from there. Part of my project is the main central hall/walkway that is open for 20' on both sides. That area gets the most traffic through the house. I may have to start with that area to make sure its all fully engaged and flat. Fortunately the planking will run the long way with the walking direction. However, the walkway eventually goes into an enclosed hallway that makes a 90 degree turn. I may do a mitered transition from one direction to the other to avoid the planking being 90 degrees to the walking direction.
 
To avoid these ads, REGISTER NOW!

cgrutt

Well-known member
Joined
Mar 4, 2016
Messages
8,441
Lifeproof lays directy on the substrate, it has a firm rubber like bottom layer.

Thanks for all the input. When I do the next areas I'll probably start with a group of plank sections clicked together end then set that parallel to a known wall that checks for square and straight, go from there. Part of my project is the main central hall/walkway that is open for 20' on both sides. That area gets the most traffic through the house. I may have to start with that area to make sure its all fully engaged and flat. Fortunately the planking will run the long way with the walking direction. However, the walkway eventually goes into an enclosed hallway that makes a 90 degree turn. I may do a mitered transition from one direction to the other to avoid the planking being 90 degrees to the walking direction.
I'd run the flooring in same direction throughout house. Unless you have someway to glue the miters together I think that joint will open up and look horrible over time. Not sure if this would work or not but you might be able to glue joint with carpeting tape if you decide to go that route.
 

Fav Onefour

Well-known member
Joined
Jul 14, 2022
Messages
772
Location
MN cold and hot
How long is the section after the 90 degree?
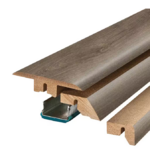
It would be a challenge to get a mitered transition to stay down properly without a transition strip over the two edges. I use aluminum T molding anchored to the substrate when I do transitions with this material.
1748095773062.jpeg
It works best when you select a height dimension just slightly more than tile thickness.
The product takes slightly more work to install properly. I remove the foam rubber backing on the tile where it fits into the molding. If you do it correctly, the tile will not move and pop. Tile movement over time billows enough air to **** debris under the tile.

The retail locations keep trying to force the matching snap in place vinyl trim molding on buyers. Stay away from the stuff! The product is a setup for failure. Installation might be quick, but there are thousands of ways it can be installed wrong. It usually is done wrong. It doesn't take long for the molding to be loose because of the kerf breaking or anchor piece coming loose. Once the molding starts to move, it fails quick. Some of them split - break, some just pop out of place. Doesn't matter how the transition fails, the tile edge will start lifting and debris ends up under the tile.
I don't want to replace tile until the top wears out. If the tile is moving, the interlock edges will fail long before the top wears.
 
OP
A

andyvh1959

Well-known member
Joined
Feb 15, 2020
Messages
2,611
Location
Green Bay WI
I'd run the flooring in same direction throughout house. Unless you have someway to glue the miters together I think that joint will open up and look horrible over time. Not sure if this would work or not but you might be able to glue joint with carpeting tape if you decide to go that route.
I agree on the mitered joint. Miter joints only look good if they are tight and closed, or with a narrow even gap filled with some sort of "mortar?". In the kitchen I had some tight corners where is was difficult to get the next piece locked in, or where I had no end lock lip to connect pieces. For those areas I butted pieces together, and then lightly wetted the **** joint for Gorilla Glue. If flows into the joint and then expands as it sets. I wiped the glue off the top with a wetted paper towel. Then after it fully set I carefully scraped any excess off with the chisel.

I may do a test with scrap pieces to see if I can do a miter **** joint with a 1/16" gap at most, and then use the Gorilla Glue to bond the joint togehter onto the substrate. If that works, I'd lay the planks into the corner area, then lay a straight edge into the corner to determine the miter line, then trim the pieces to that line. Then lay the product from that corner into the direction of the hallway turn, like wise straight edge aligned to the 1st edge and trim the pieces to that line. After finishing that transition, wett the miter **** and apply the Gorilla Glue.
 

Fav Onefour

Well-known member
Joined
Jul 14, 2022
Messages
772
Location
MN cold and hot
Rubber foam backing creates a challenge if you want to try gluing tiles down. The backing is soft enough to tear away. Glue and rubber backing will stay attached to substrate. I've never tried wide carpet tape. Maybe it will allow you to spread the strain enough for the rubber to stay attached to tile? I really don't know.

Gorrilla glue is nice stuff but it will have a hard time bonding enough to hold the plank edges together at the miter. The vinyl is tough and somewhat slippery. You may get by with filling the cut but it won't grip cut edges enough to hold the joint with traffic.

In theory, you could do a wide bond with something like the carpet tape underneath and glue the whole works down. I'd be cautious about making back side thick enough to leave a floating gap at the edge of your bond.

I can't stress it enough, the flooring works great if it lays flat without movement. If it can move up and down, all bets are off. Extra glue to the substrate is just more material to remove when the flooring needs to be replaced.
 
OP
A

andyvh1959

Well-known member
Joined
Feb 15, 2020
Messages
2,611
Location
Green Bay WI
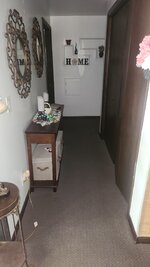
Here are views of the main walkway leading to the 90 turn in the hallway. You can see where the planking into the kitchen has finished. I'll continue that into the dining room area laid in the same direction. I laid some pieces on top of the old carpeting to play around with the placement. So the majority of the flooring down the walkway will be parallel to the sides. Now I am leaning to not mitering the planking at the 90 turn in the hallway. It will only be seen when making the turn in the hallway. From the mid-point of the walkway it won't even be noticeable.
20250524_134533 (1).jpg20250524_134549 (1).jpg

Here is another pending idea. That brick section in the 2nd pic is part of the massive central fireplace. There is a wood burning fireplace into the living room (down seven steps), and under that slightly offset is a gas fireplace in the lower den area (down seven more steps). The gas fireplace is almost directly under the wood burning fireplace. The flue from the gas fireplace angles up into the flue for the wood fireplace. That brick corner area is wasted space, nothing under it. It was a "planter area" initially for indor plants, nothing inside of it. I am thinking of taking most of it out to form an angled cabinet feature, brick would remain at the back of the angled cabinet, to which I'd attach wood panels to mount cabinet framing (stiles and rails) and shelves, with a top wood surface for placing servings for group events in the dining room to the right (all open concept). I'd also wire in power outlets to plug in hot plates/slow cookers, etc. It would open up that sharp brick corner more floor space. My wife seems to think it would look weird for some reason, but I envision a built in cabinet space with glass panel doors, or cabinet doors to match the new ones in the kitchen. Oh and I have to finish some baseboard trim. Open to comments or ideas. The area just beyond the birck is the middle level of this tri-level, which is the 16x20 living room. The back hallway leads to the main bath and three bedrooms, one with a loft area.
 

Fav Onefour

Well-known member
Joined
Jul 14, 2022
Messages
772
Location
MN cold and hot
Tough layout if you want to use one material for all areas. It's certainly not impossible but I'd be leery about committing to a single material.
Maybe it's just my way, but I'm always thinking about how I'm going to repair or replace down the road. If you do the whole works with one material, you are basically tied to replacing it all when one area starts to fail.
I've done a few of my projects with the T rail type edging at doorways between rooms. That allowed me to use different tile in the various rooms. Typical examples tile changes are bath to hall and kitchen to dining-living room. With different tile, I can replace one side and leave the other in place until it's shot.
That hallway is likely a high traffic section. It's also a lot of pathway. Would it work as a stand alone zone of different material?
 

CraigStu

Well-known member
Joined
May 22, 2014
Messages
4,075
Location
Blacksburg, Va
I discussed plank direction w/ the people who did our house. He said 99% of the time they run it in the direction one would if doing a wood floor. 90deg to the floor joists. And it is run the same through out the house.
 

R07AG

Well-known member
Joined
Feb 26, 2024
Messages
58
Location
Wisconsin
I discussed plank direction w/ the people who did our house. He said 99% of the time they run it in the direction one would if doing a wood floor. 90deg to the floor joists. And it is run the same through out the house.
This is what I did when I did a floating floor in my basement. I planned mine to go lengthwise with the hallway. It was a pain clicking the floor backwards for the rooms on the left of the hall, but not bad once you got a hang of it. I think it looks better going all in one direction. I'll do the same when I do my upstairs in the future.

On the topic of transitions, I did the whole thing as 1 piece with a transition strip at the bathroom and to the utility room. I went with Pergo so Lifeproof might be different, but I would not attempt a miter. I used the Performance Accessories transition strip and have been really liking it.
1748358124775.png
 
OP
A

andyvh1959

Well-known member
Joined
Feb 15, 2020
Messages
2,611
Location
Green Bay WI
Tough layout if you want to use one material for all areas. It's certainly not impossible but I'd be leery about committing to a single material.
Maybe it's just my way, but I'm always thinking about how I'm going to repair or replace down the road. If you do the whole works with one material, you are basically tied to replacing it all when one area starts to fail.
I've done a few of my projects with the T rail type edging at doorways between rooms. That allowed me to use different tile in the various rooms. Typical examples tile changes are bath to hall and kitchen to dining-living room. With different tile, I can replace one side and leave the other in place until it's shot.
That hallway is likely a high traffic section. It's also a lot of pathway. Would it work as a stand alone zone of different material?
Oh I've given this a lot of thought before commiting. My wife wanted one flooring material from the kitchen to the dinning room and main hall/walkway. So yes it is challenging, but as a floating floor its also easily replaced/adaptable if needed.

The main bath is large tile I installed back in 2018 (and doing well). So that transition, likewise the carpet in the bedrooms will be handled with the T-rail products. Again, replaceable if worn/damaged. We're retired, no kids or anyone else in the house, my two cats passed a few years back (one at 18, the other at 21). After asking flooring opinions on this forum the replies came back almost all in favor for high grade vinyl, even over floating hardwood/bamboo.

We plan to sell this house in ten years max, so easy/adaptable flooring may be a selling point.
 

Fav Onefour

Well-known member
Joined
Jul 14, 2022
Messages
772
Location
MN cold and hot
@andyvh1959 , I appreciate the info.
Your plan with one flooring is definitely doable without going to mitered corners. It might take a bit to get the layout started but should work great once that is done.

I do my installs from the top left. It's nice if that first run can be set up to be along a long wall. I plan the cuts on my first row so the last row or transitions have enough tile width to lay well. When I start laying the tile I do a couple rows along the the long wall. One trick with "floating flooring" I didn't see posted is the fact that it is floating. If it doesn't quite lay square or transitions look like they won't be square, the "floating" factor comes into play. You can move the entire section of flooring pretty easily. I recheck the layout after my first couple rows and throughout the installation to verify square with the room specs. I've moved and squared 20' long sections with a flat bar against the wall or a good block of hardwood and hammer.

Another advantage of starting in the top left is that your outer edge only has the bottom kerf exposed. A good square edge hardwood block can sit on top of the kerf and but against solid tile when you tap the flooring around. You won't break locking edges with that trick. Another advantage to top left installation is the ease of stopping midway through the install. The bottom kerf isn't going to break off when people walk on the unfinished edge. If you lay the tile backward, the exposed edge will chip and crack easily.
 

bwringer

Well-known member
Joined
Jan 1, 2013
Messages
10,373
Location
Indianapolis
I love this stuff, and the biggest secret I've found is to make sure the floor is surgically clean. Don't let the the slightest speck of dust, grit, sand, etc. get under it. I even take off my boots and wear a cleaned pair of sneakers in the room.

I also wipe and sweep and clean as I go.
 
To avoid these ads, REGISTER NOW!
Top Bottom