To avoid these ads, REGISTER NOW!

Vinyl siding mystery

IT_Architect

Active member
Joined
Sep 8, 2014
Messages
41
I tore off all of the wood siding, and replaced the sheeting on the bottom 2' of a 22' deep by 20' wide garage. Now it's time to reside the garage in vinyl. The siding is Certainteed Monogram double-4. The garage has a gabled roof and the sides are 7' high. The front doesn't need to be done because it is brick. The back wall is flat wall with no windows. The starter strips all measure the same distance down from the soffit. The first row of siding lines up all the way around. Then we snapped lines 8" apart to fall in the nailing hem. The sides worked out fine. On the back wall we cannot follow the lines and by the top of the wall we end up 3/4" low. We tore it all off and checked everything. We ended up with the same result. This is unbelievable! :headscrat

If you know what the problem is, I'd love to hear it.
 
To avoid these ads, REGISTER NOW!

Dan_inthewind

Well-known member
Joined
Oct 3, 2009
Messages
348
Location
Temiskaming Shores, Ontario Canada
Fixing up older building and had a similar problem.

I used a four inch piece of pipe to come out from the wall and remeasured. Sure enough I had a slight bulge in the wall or old siding and my line was off. Long shot I know but that is how my problem happened.

Still not sure where the bulge is but is is so slight I still cannot pin the exact location down.

Good luck.

Dan
 

evildky

Well-known member
Joined
May 1, 2005
Messages
774
Location
Louisville, KY
Do your chalk lines line up around the corner? When hanging vinyl you can cheat it a bit, snugging or sagging one end to keep the runs level. Not a lot but a 1/16 x a2 pieces is 3/4". I've never chalked lines other than starter or evening out around windows and doors.
 

jkwilson

Well-known member
Joined
Dec 5, 2012
Messages
758
Location
SW Indiana
On the back wall we cannot follow the lines

What do you mean by that? The siding strip won't reach the lines without too much pulling or what? Are you uniformly 3/4 low or does it vary?

I'd check the lines with a laser level. If your starter strip is level, the siding has to be level unless something weird is going on with the wall
 
Last edited:
OP
I

IT_Architect

Active member
Joined
Sep 8, 2014
Messages
41
Sure enough I had a slight bulge in the wall
The bulge theory might be the fit. The house and garage were built in the early to mid fifties. There is a 5 1/2' long by 2' deep cantilever shelf made up of 2 x 4s nailed into the studs on the back wall, that runs from about the middle to 2' short of one side. The weight would push in at the center of the studs, and cause those studs to be longer, without changing their height much, due to the difference between the modulus of compression and tensile. I'll have to see if I can come up with an easy way to prove that.
 

nmk_61802

Well-known member
Joined
Mar 6, 2008
Messages
965
Location
Central IL
Sounds like you are trying to hard to get perfect. Everytime I have done vinyl, I just made certain that the starter strip was parallel with the eave. After that I only checked to ensure that I was still parallel with the eave after the halfway point, and then evey third row after that, and pushed or pulled the siding up in accordance.

At the corners (assuming the starter strip lined up), I just verified that any discrepancy was not noticable from any view point. If their was a large discrepancy (greater than 1/4") I pulled out the nails and again pushed or pulled as needed.

Vinyl siding covers a multitude of sins, if you do not try and get it dead nuts perfect. I usually try and get the best results I am capable of, but with vinyl, I discovered that good enough usually provides the best results at the end of the day.
 

volleyball

Well-known member
Joined
Aug 29, 2011
Messages
4,127
Location
NY, not NYC
Snap a line across the back from side to side for every row. Don't know if it will turn out level, but it will look level. If you hit something that throws you off, the chalk line will show that and allow you to correct it.
 
OP
I

IT_Architect

Active member
Joined
Sep 8, 2014
Messages
41
Snap a line across the back from side to side for every row. Don't know if it will turn out level, but it will look level. If you hit something that throws you off, the chalk line will show that and allow you to correct it.
We did. See original post.
 
OP
I

IT_Architect

Active member
Joined
Sep 8, 2014
Messages
41
You can't cut the last strip to fit?
No. I would end up needing to add another row, plus when viewed from the corner it looks crazy with the back siding being offset 3/4" from the sides. The whole thing seems impossible. When the rain stops I'm going to check to see if there is really a bulge that could be that big, or a siding problem, or what, and report back.
 
Last edited:

rancherbill

Well-known member
Joined
Oct 18, 2007
Messages
5,335
Location
Foothills County, Alberta, Canada
Then we snapped lines 8" apart to fall in the nailing hem. The sides worked out fine.

The top piece does not have a nailing hem. You use utility strip. Using it you can trim the siding to get rid of some of the natural dimension errors on any job.

absnaplock.jpg
 
To avoid these ads, REGISTER NOW!

kbs2244

Well-known member
Joined
Nov 11, 2006
Messages
14,065
If you are an architect you should be familiar with the term
"as built."

Now you know why it exists.
 

HoosierMark

Well-known member
Joined
Jan 31, 2013
Messages
1,444
Location
Southeast IN
you say it looks crazy? at one level does it look crazy. If the side lines of the siding are not lining up with the back, when did the differance start? I doubt if it just showed up at the top of the wall. You always need to check how the corners are lining up from one side to the other. That is the telling item? Sounds like you depended too much on lines and measurements rather then eye sight. It does not matter if it is perfectly level if it looks good.
 

fteufert

Well-known member
Joined
Oct 24, 2013
Messages
382
Location
Near Scranton, PA
Only you will truly notice the imperfections. My house is 100 years old, and each corner matches. If you truly pay attention, you can see the top row where it tapers.

Make a choice and hide the imperfection where it wont bother you.
 
OP
I

IT_Architect

Active member
Joined
Sep 8, 2014
Messages
41
The sides worked out fine. On the back wall we cannot follow the lines and by the top of the wall we end up 3/4" low.

You can't cut the last strip to fit?

No. I would end up needing to add another row

The top piece does not have a nailing hem. You use utility strip. Using it you can trim the siding to get rid of some of the natural dimension errors on any job.

As mentioned, it would require another course, in which case I would not be able to have a utility on the back as it would clip directly to the J. Moreover, 5/8" to 3/4" off on the siding on the corner and the start of another course is unacceptable from an appearance standpoint.

As mentioned, it the weather cooperates later today, we'll give it another go.
 

rancherbill

Well-known member
Joined
Oct 18, 2007
Messages
5,335
Location
Foothills County, Alberta, Canada
As mentioned, it would require another course, in which case I would not be able to have a utility on the back as it would clip directly to the J.

I am having an oldsheimer day. This doesn't make sense, this is what I am talking about.

The J channel goes at the top. The utility strip then get nailed on. Start you siding at the bottom. Assuming there is 8' of siding, that is 96" of siding. With 8" siding there is 8" showing so the pieces are bigger than 8". In theory you need 12 pieces of siding.

You have a lot of wiggle room with 12 pieces. Hang then 'loose' or 'tight' by 1/8" and you can 'hide up to 1 3/8' (11 x 1/8"). Cut of the top nailer strip and install it into the utility strip. It has to be cut off as it is UGLY.

The other thing is remember something my father-in-law used to say when we were doing stuff.

'You are not going to notice it from a galloping horse.'

You won't see irregularities after a while.
 
OP
I

IT_Architect

Active member
Joined
Sep 8, 2014
Messages
41
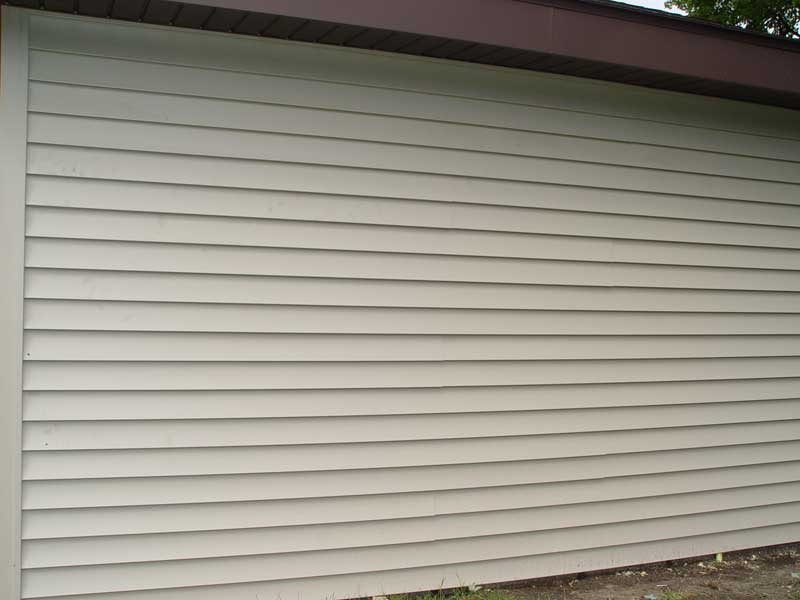
Third time is a charm. :D I was looking for a bow out in the garage wall. That amounted to only about 1/8", which couldn't possibly make any perceptible difference in height. What I did discover is somehow the garage wall in the back bows UP by 5/8" to 3/4" I pushed the siding high enough to where I could match the siding on the sides to make the corners look good. That still left me with a problem where the wall bows up on the back wall. Certainteed Monogram 46 has a double thickness hem. For the top course, I spread the hem fold-over and ran a razor knife along the top on the inside thereby making it a single thickness hem. I used the nailing strip slots to clip it into the utility channel. No part of the hem shows below the utility channel. It looks like 4" clapboard all the way up except for the last row, where it looks like there is a piece of 5" clapboard. Since it is 5" high, the variation of 5/8" to 3/4" in height is not noticeable. Contrast that with adding an 11th course on that back that would have been visible very visible in the middle and disappear under the J on the ends. Shucks, it looks better than if the normal ten courses were to run out in the middle of a 4" clapboard without a bow.
Thanks everyone for you suggestions.
 
Last edited:
OP
I

IT_Architect

Active member
Joined
Sep 8, 2014
Messages
41
Here is a picture of how it turned out. If you look closely you can see the top J and Utility follow the soffit's upward bow, and the top clapboard gets 5/8" - 3/4" taller in the center, and then tapers back down again. Due to the relative perspective, the difference is minimized to the human eye, but if you consciously force yourself to view it relative to the 4" clapboard below it which is also influenced by the relative perspective, you can see it. The extra height of the top clapboard helps to hide the difference because the variation is a smaller percentage of the total clapboard height. Leveling the J and Utility so it varied how much it protruded from the soffit, or using an 11th course, would not have looked nearly as good.
siding1.jpg
 

chamoisfive

Well-known member
Joined
Jan 11, 2013
Messages
136
Location
NewZealand
Looks good from this side of the pond! Well done and executed, everyone. Wanna working holiday over here and do mine?;)
 
OP
I

IT_Architect

Active member
Joined
Sep 8, 2014
Messages
41
Looks good from this side of the pond! Well done and executed, everyone. Wanna working holiday over here and do mine?;)
I don't think sooo... I own an IT company and did this for only for exercise. However, it turned out to be a WAY bigger project than I anticipated. I could have hired a personal trainer and contracted the siding job and still been money ahead when I consider all of the time it cost me. LOL!
 
To avoid these ads, REGISTER NOW!
Top Bottom