To avoid these ads, REGISTER NOW!

vinyl tile removal

duneslider

Well-known member
Joined
Jan 20, 2013
Messages
2,247
Location
Riverton, Utah
I wonder if they put the VCT down over the top of something else? I haven't seen anything like that before. VCT does not have a paper or felt backing.

In a small area, pour some hot water (or hot water mixed with a little dish soap) on the felt stuff and let it sit for a few minutes and see if it will scrape up easier at that point.

I have a stand up razor floor scraper that I would use to get up the backing of vinyl flooring, it has like a 6" razor blade.

Does the heat seem to help getting the tile part up? I could get vct up pretty quick with a putty knife and heat gun. Even a putty knife and hammer, I usually just used a 2-3" putty knife.
 
To avoid these ads, REGISTER NOW!
OP
M

Motordoctor

Active member
Joined
Mar 17, 2014
Messages
35
Location
NYC
Well, this place was built in 1949~50 so maybe that was the standard practice back then. I tried pouring a cup of boiling water on a section, didn't really make much difference. Tried two more sections, one with mineral spirits and one with Goo Gone. Same thing, no effect. Now I'm down to just getting the somewhat easy top layer off until I figure out what to do with the paper/felt sections. This floor reminds me of scraping off Kawasaki base gaskets. They come off in little slivers. I've tried everything with those too. Power scrapers, chemicals, heat. I even went as far as yanking all the cylinder studs and using a 3"roloc disk on them. The bottom line is you're going to be spending an hour to 2 hours no matter how you do it. Now I'm down to just using a flexible exacto blade to get under it, lever as much off as I can, use a carbine scraper on the hard bits and finish it off with a fine scotchbrite roloc disc. Few more pictures for your amusement :) One is showing the transitional area, as you can see, putting down wonderboard would give you almost an inch step up.
You ever use one of those floor drum sanders like they have @ HomeDepot? Would that take off that ****? My concern is the sandpaper rolls would just load up every couple of feet and you would go through a case of them. They would just have to take off the paper and the felt down to bare wood. I tried an orbital finish sander I have at home with some coarse paper on it, at the rate it worked, I should be done sanding the floors about the turn of the century.
 

Attachments

  • More kitchen floor pictures tile to wood floor transition.jpg
    More kitchen floor pictures tile to wood floor transition.jpg
    94.4 KB · Views: 14
  • More kitchen floor pictures progress so far.jpg
    More kitchen floor pictures progress so far.jpg
    95.9 KB · Views: 14
  • More kitchen floor pictures tile remnents.jpg
    More kitchen floor pictures tile remnents.jpg
    93.3 KB · Views: 13

duneslider

Well-known member
Joined
Jan 20, 2013
Messages
2,247
Location
Riverton, Utah
You wanna tear up the plywood too? You could go back over the dimensional lumber with a 1/2" plywood then you wouldn't be so much higher than the hardwood floor?

If that stuff is that stuck to the floor you might be able to test the bond of thinset over it and see how it will work? With Ditra, if the thinset sticks well, you would be fine.
 
OP
M

Motordoctor

Active member
Joined
Mar 17, 2014
Messages
35
Location
NYC
Here's a picture of a tile again the hardwood floor. Basically it's going to be the height of the tile/thinset/Ditra above the hardwood floor. Personally I think it's going to be a toss up between what takes more time: scraping/sanding/cursing/etc the old floor or just bite the bullet and rip up the old plywood and put down some new stuff. It's not screwed down, has nails and I doubt it's glued. So if I decide to try that route, would you recommend 1/2" plywood or 1/2" cement board?
 

Attachments

  • transitional height to kitchen 001.jpg
    transitional height to kitchen 001.jpg
    95 KB · Views: 11

stage20

Well-known member
Joined
Nov 5, 2013
Messages
3,722
Location
pcola FL
Cement board is not a subfloor, its an underlayment.. if you take it to the joists, you will need to use plywood
 

duneslider

Well-known member
Joined
Jan 20, 2013
Messages
2,247
Location
Riverton, Utah
You have dimensional lumber it looks like under the plywood. So, pull the plywood and put down new plywood that is at least 3/8" thick over the dimensional lumber. I would pick the combination that will get you to the level you want. If 3/8" ply plus 1/4" wonder board and tile will get you close to level with the oak floor I would do that. If the plywood is nailed down it should come up fairly easily. I would run my circular saw over it , set to the depth of the plywood, in a 2x2 grid and then try to pull up the 2x2 squares.

Good luck!

Sounds like your day has gone about as good as mine. My boy plugged the toilet, didn't tell me, the flapper stuck open and flooded the house for an hour while I was outside. I pulled up carpet in the basement, fans going trying to dry stuff, just noticed the hardwood is cupping. Good day!
 
OP
M

Motordoctor

Active member
Joined
Mar 17, 2014
Messages
35
Location
NYC
Sorry to hear about that, had that once myself. The niece flushed the toilet, and she plugged it with too much paper. So she flushed it again. Not a good move. So what did she do after it started overflowing? Flushed it again. :willy_nil

I have one concern about sawing the old plywood off. Getting into the diagonal floor planks over the joists will be unavoidable. There's too much thickness variation not to. That going to be a problem? The floor joists are on 16" centers and the diagonal planks are 1/2" thick. Thanks again.
 

Attachments

  • Kitchen floor joists basement view.jpg
    Kitchen floor joists basement view.jpg
    97.6 KB · Views: 6
  • Kitchen floor joists top view.jpg
    Kitchen floor joists top view.jpg
    96.9 KB · Views: 5

stage20

Well-known member
Joined
Nov 5, 2013
Messages
3,722
Location
pcola FL
Set your saw short of the plywood. It will splinter but once you get a piece up the rest should go, but as dune said 1/8 won't hurt. Don't go a 1/2 though. Lol
 
OP
M

Motordoctor

Active member
Joined
Mar 17, 2014
Messages
35
Location
NYC
So if I'm replacing the subfloor with 1/2" exterior plywood and the 1/4" cement board do I still need to use the Ditra? Only reason I'm asking is the cost of the plywood and the cement board is about the same as the Ditra will cost. The best price I'm seeing on the Ditra is $252 for 162 square feet. Thanks as always. Haven't tried the sawing on the floor yet, still moving all the rest of the stuff out of the kitchen, instead of moving it from one corner to the other.
 

duneslider

Well-known member
Joined
Jan 20, 2013
Messages
2,247
Location
Riverton, Utah
So if I'm replacing the subfloor with 1/2" exterior plywood and the 1/4" cement board do I still need to use the Ditra? Only reason I'm asking is the cost of the plywood and the cement board is about the same as the Ditra will cost. The best price I'm seeing on the Ditra is $252 for 162 square feet. Thanks as always. Haven't tried the sawing on the floor yet, still moving all the rest of the stuff out of the kitchen, instead of moving it from one corner to the other.

Nope, no need for the ditra if you use the cement board.
 
OP
M

Motordoctor

Active member
Joined
Mar 17, 2014
Messages
35
Location
NYC
Should I use anything between the plywood and the diagonal planks? Other than screw it down? What screws do you suggest for that? The old standby drywall screws? Or deck screws. So far I've gotten up about one sheet of plywood.
Have to say it's much easier than scraping that old **** off :beer:
This the right stuff for plywood? I love the name (Plytanium)
http://www.lowes.com/pd_12192-99899...terior+plywood&facetInfo=&state=R#reviews_tab

Maybe they should be calling it Plyunubtanium + or that's what they will call it next year ;)
 

Attachments

  • Kitchen subfloor under plywood 001.jpg
    Kitchen subfloor under plywood 001.jpg
    96.7 KB · Views: 7
  • Kitchen subfloor plywood.jpg
    Kitchen subfloor plywood.jpg
    94.9 KB · Views: 5
Last edited:

404

Well-known member
Joined
Aug 23, 2014
Messages
3,463
Location
Mass
Suggest you FIRST screw down the planks to the floor joists. Any springiness left is death to tile.

To mount the plywood I have used waterproof carpenters glue and painted both the planks and then the plywood with a roller. Lay it on good. Let it soak in, put on another coat. If the planks are dusty clean them and you may need to scrub the glue into the surface.

Bonding the two layers greatly increases stiffness.

Use a premium deck screw that prevents lift up to avoid a gap between the planks and the plywood. At the very least make sure the screw has a smooth non threaded length under the head long enough to not grab the thickness of what you are screwing down

Otherwise the screw can jack apart the two materials and leave a gap.. which will flex and be death to tile.
 

duneslider

Well-known member
Joined
Jan 20, 2013
Messages
2,247
Location
Riverton, Utah
That should work great. The minimum recommended is a 3/8" Exposure 1 with plugged face.

Lay it perpendicular to the joists and screw it down with deck screws. Deck screws are stronger than drywall screws. You don't want the screws to be long enough that they hit the joists though. I would think 1 1/4" would be what you would want.

If you have squeaks now would be the time to screw the dimensional lumber down to the joists to prevent the squeaks.

I would not glue the underlayment down or you may not ever be able to get it up. Who knows when you will want to get it up. Properly screwed it will not have movement.
 
Last edited:
To avoid these ads, REGISTER NOW!

404

Well-known member
Joined
Aug 23, 2014
Messages
3,463
Location
Mass
That should work great. The minimum recommended is a 3/8" Exposure 1 with plugged face.

Lay it perpendicular to the joists and screw it down with deck screws. Deck screws are stronger than drywall screws. You don't want the screws to be long enough that they hit the joists though. I would think 1 1/4" would be what you would want.

If you have squeaks now would be the time to screw the dimensional lumber down to the joists to prevent the squeaks.

I would not glue the underlayment down or you may not ever be able to get it up. Who knows when you will want to get it up. Properly screwed it will not have movement.

Why would anyone be getting up up after a tile job. That is the problem of the next person, not the OP. Bonding the 2 layers gives four times the stiffness over just having 2 layers screwed.
 

duneslider

Well-known member
Joined
Jan 20, 2013
Messages
2,247
Location
Riverton, Utah
Why would anyone be getting up up after a tile job. That is the problem of the next person, not the OP. Bonding the 2 layers gives four times the stiffness over just having 2 layers screwed.


If you have a problem with the floor not being stiff enough you should address it the correct way. 3/8" plywood is not a structural piece and is considered underlayment and not subflooring and will only help with deflection between the joists a little and will do little if there is deflection along the joists.

Recent studies have shown that gluing underlayment leads to more issues because it isn't done correctly, and the benefit it does provide generally isn't worth the extra time and effort. Structural issues should be addressed the correct way. Laying it down with a roller probably is not going to give it full coverage and would then do nothing. It would need to be put down with a trowel to get enough that it would evenly distribute between the layers to give full coverage.

So, if you want to trowel out a few gallons of tightbond feel free but people smarter than me say it isn't needed.
 
OP
M

Motordoctor

Active member
Joined
Mar 17, 2014
Messages
35
Location
NYC
You don't want the screws to be long enough that they hit the joists though. I would think 1 1/4" would be what you would want
Well, With 1/2" plywood and a 1/2" diagonal and not hitting the joists, I would have to use 1" or slightly less, right?

I guess if I'm to use deck screws, 1 1/4" is the only short size they offer from the big orange box store. One other question: #6 or #8 screws? Thanks again.
 
Last edited:

duneslider

Well-known member
Joined
Jan 20, 2013
Messages
2,247
Location
Riverton, Utah
1 1/4 will be fine, it won't make it much into the joist if you do hit one. Make sure you never have 4corners meet. You don't want your end joints right over the top of a joist either. Halfway between is ideal.
 
OP
M

Motordoctor

Active member
Joined
Mar 17, 2014
Messages
35
Location
NYC
Ok, the room size is such that it will take 3 1/2 sheets (14ft) lengthwise and 2 ft on each sheet to make the wall (10 ft)width. So I would run all three sheets together and stagger the 2 ft sections so I don't get 4 corners? Or alternate the sheets, meaning left to right, first sheet, 8ft + 2ft, second sheet, 2ft + 8ft? That would alternate the end joints. When I have the plywood down, do I need to tape the joints? I know you're supposed to on the cement board.

Regarding the tile layout. On the width, it will take 6 tiles plus about 6 inches. Lengthwise it will take 9 tiles plus about 5 inches. The odd tiles on the length will be under the cabinets so that's no biggy. What do you think about splitting the difference with some 3” trim tiles around the perimeter? Have to be a different color unless they made something that size in this color.

When you do a job like this, would you find the center of the room, snap a couple of lines and work your way out from the center? Or start at the wall and proceed toward the other wall. No doubt I’m going to be slow as hell doing this, how much thinset would you mix up at a time (how much working time do you have?) Being a total rookie at this, never laid a single tile before (except self stick vinyl) I’m assuming I would set the first tile, check the level X & Y, use that as a reference to all the rest so there’s no “lippage”. When you use a ½ X 1/2 trowel, and back butter the tile, how much “sink” is there, meaning is the tile normally parallel to the underlayment or is there a significant amount of operator adjustement?

Sorry for all the rookie questions, you must feel like you’re wet nursing me on this one.
 

duneslider

Well-known member
Joined
Jan 20, 2013
Messages
2,247
Location
Riverton, Utah
They recommend you leave about a 1/16-1/8" gap between the sheets and cover them so they don't fill with thinset when you lay the backer board. Some guys will caulk the joint, I would usually just run masking tape over it so thinset couldn't fill it in.

Stagger them however you like, you just don't want four corners coming together. You can rip a 4x8 in half and start a run with a 4x4 too. This same stuff all applies to the backerboard too. Except you will be filling the joints of the backerboard with thinset and using a mesh tape made for tile.

Layout can be difficult. I generally like to keep at least a half tile in visible areas. Good call on burying a small cut under the cabinets where it won't be seen, that is one of my favorite tricks. In your case, find your center line and then measure over 9" (half a tile) and use that as your center line to tile from. This will give you a 12" tile on one wall then 5 full tiles then a 12" tile on the other wall. So, you visible walls would be a full tile and 2 12" tiles and the 5" cut will be buried under the cabinets where you won't see it. That is how I would do it if it were me. I don't think you would be happy with the 3" tile on the boarder, unless you were planning to boarder the whole room then that might work.

For setting the tile use the flat side of the trowel to "burn" the thinset into the backer board (just a skim coat) and burn a coat into the back of the tile, Then trowel the ridges onto the floor. Set the tile onto the floor and while applying downward pressure move it perpendicular to the ridges to flatten them. This should give you an even coat of thinset under the tile. Every now and then pull one up and make sure you have full coverage, if you pull it up and you see ridges you don't have enough thinset or you aren't pushing it in hard enough. If you are getting a lot of thinset squishing up between the joints you might need to change trowels to something that is smaller than a 1/2 x 1/2.

Starting out I would say just mix a 1/4 to 1/2 a bucket of thinset. You should have a couple hours of pot life though before it isn't workable. Follow the instructions for mixing, it will say mix 5 minutes, let stand 10-15, then mix again for 3 minutes. It seems weird but do it, it does make a difference and helps the pot life.

Here is a video that is pretty good that might offer some help. Its ditra but the same principles apply.


duneslider

Well-known member
Joined
Jan 20, 2013
Messages
2,247
Location
Riverton, Utah
On youtube if you look up Sal DiBlasi he has a bunch of vids he has made that might be helpful. He was one of the guys that spent a lot of time on the john bridge forum helping people so his information should be good.

I literally have thousands of posts on the JB forum helping DIY'ers. I really would rather you asked questions than messed it up and had to fix it later.
 
OP
M

Motordoctor

Active member
Joined
Mar 17, 2014
Messages
35
Location
NYC
Back to the questions again.


  1. Thinset. The game has changed since I'm not using the Ditra. My options here on local procurement seems to be either the Versabond/custom products from Home Depot or the tile store has the full line of Bostik thinsets.
  2. If I go with a border around the entire room, I won't have to cut any tiles. If I need to cut tiles, what do you recommend?
  3. I have a scrap piece of plywood, was going to try a trial run putting down some practice tiles before I mess up the real job. Should I get a few extra's of the tile I'm using or just buy some cheap closeout tiles and use those? Meaning practicing on smaller tiles more or less the same as the bigger tiles?
 

duneslider

Well-known member
Joined
Jan 20, 2013
Messages
2,247
Location
Riverton, Utah
Versabond is great. I am not really familiar with with the bostik line, they do make really nice thinset but they aren't one that is common in my area.

If the border is what you want go for it. You can rent a saw from HD for not too much. You can set everything and save all the cuts for last and just rent the saw for long enough to make all the cuts.

For practicing, I would use a cheaper tile. Similar size would be more realistic but practice is practice.
 
OP
M

Motordoctor

Active member
Joined
Mar 17, 2014
Messages
35
Location
NYC
Thanks. The project got back burnered for a couple of days, got called into work for a few last minute projects. Usually this time of year there's nothing to do so when there's money to be had, I'm there ;)
 
OP
M

Motordoctor

Active member
Joined
Mar 17, 2014
Messages
35
Location
NYC
Got all the old plywood up. Probably a good thing I went that way, had some rotten spots going. Would you suggest putting a deck screw into each plank @ the joists just to be sure no squeaks? The planks are the tongue and groove style with nails driven in at an angle to keep them tight.

Couple more rookie questions.

You said it was a bad idea to put screws through the plywood into the joists. Any reason why? Weakens the joist?

The plywood will go down perpendicular to the joists?

The cement board will be parallel to the joists? (perpendicular to the plywood)

Does the cement board break cleanly on a lengthwise score? If not I will put the ragged side against the wall?

These are my choices for cement board

James Hardie HardieBacker 3 ft. x 5 ft. x 1/4 in. Cement Backerboard

DUROCK Brand Cement Board

PermaBase UltraBacker Cement Board

Any one better? Or cement board is all the same?

RE: grout. Any particular brand/style? You said 3/16" would be a good gap?

Thinset: White or Gray?

Thanks again, hopefully this weekend I will get all the supplies and get that underlayment down ready to be tiled.
 

duneslider

Well-known member
Joined
Jan 20, 2013
Messages
2,247
Location
Riverton, Utah
Got all the old plywood up. Probably a good thing I went that way, had some rotten spots going. Would you suggest putting a deck screw into each plank @ the joists just to be sure no squeaks? The planks are the tongue and groove style with nails driven in at an angle to keep them tight. If you have time it should help. Squeaks are caused by the wood rubbing the metal so I would put the screw closer to the edge where the nail is.

Couple more rookie questions.

You said it was a bad idea to put screws through the plywood into the joists. Any reason why? Weakens the joist? The studies I have read say you want the additional subfloor to be attached to the existing subfloor as an assembly and not be tied to the structure. I am not a structural engineer so I don't know a lot more about it then that.

The plywood will go down perpendicular to the joists? Yes. Strongest this way.

The cement board will be parallel to the joists? (perpendicular to the plywood) Check the instructions of the board you choose on this, I personally don't think it really makes a difference. The bigger concern is not having 4 corners meet.

Does the cement board break cleanly on a lengthwise score? If not I will put the ragged side against the wall? Hardi breaks pretty clean but the cement boards can be more ragged, they all should break pretty good.

These are my choices for cement board. I personally like working with Hardiebacker the best, I think it is the easiest to cut and work with. Read through the instructions for which ever you choose.

James Hardie HardieBacker 3 ft. x 5 ft. x 1/4 in. Cement Backerboard

DUROCK Brand Cement Board

PermaBase UltraBacker Cement Board

Any one better? Or cement board is all the same?

RE: grout. Any particular brand/style? You said 3/16" would be a good gap? You will want whatever sanded grout you can easily get in the color you want. They all are about the same.

Thinset: White or Gray? Gray is less expensive and if your grout will be darker you are fine with gray. Clean your joist from excess thinset as you go with a damp sponge.

Thanks again, hopefully this weekend I will get all the supplies and get that underlayment down ready to be tiled.


Good luck, answered up in the quote.
 
OP
M

Motordoctor

Active member
Joined
Mar 17, 2014
Messages
35
Location
NYC
Thanks again, hopefully this weekend I will get all the supplies and get that underlayment down ready to be tiled. 2/04/2015
You have to say I am an optimist :) 
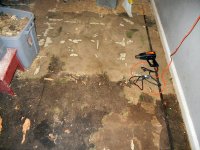
I actually put the last floor tile down about a month ago. Having to deal with a floor that had a couple of high spots (1/2"+)took way more time then I imagined. I actually put down another layer in the low spots of 1/4" CBU just so I didn't go through so much mortar.
I was putting about 5lbs/mortar on a single tile, just to set it level, so half a bag was doing about 5~6 tiles at a time. Put down the mortar, back butter the tile, set the tile, not level. Pull it back up, repeat a couple of times adding more material until I got it set and level. Move on to the next one. It was taking more than 20 minutes a tile that way. filling up the low spots with CBU really sped up the operation.

In retrospect, I really should have paid somebody to put down some SLC. I was afraid of doing that myself as the consequences of getting it wrong would have really caused me some grief. First major kitchen remodel for me and probably the last. I would have to pay myself about $30K just to break even on the time involved. Now that the floor is more or less done (still have to do the hallway and bathroom) putting in the new wall and floor cabinets is the next issue.

Have the wall cabinets up, that was a real treat. Set the corner ones in first and continued out. I set them right up against the ceiling to give maximum distance between the lower and upper cabinets as the ceiling is low in the kitchen (84”). Turns out the ceiling goes one way on the X axis and a different way on the Y axis. So I had to trim the tops of the adjoining cabinets to match the ceiling so all the bottoms matched. Good thing I’m not getting paid for this job, I would be living in a dumpster right now.

I see now the obvious way is to use a ledger board, and leave a 1”+ gap at the top to account for the ceiling, fill that in with some sort of molding. Finding a stud in a plaster/lath wall was another fun time. Tried the fancy stud finder from HD and it was right about 50% of the time. Otherwise it was the drill a series of holes until I found a stud, then go 16” and see if there’s another one. Plaster walls kill drill bits/diamond grit jig saw blades/etc. The only thing that really works well is the diamond blade for the angle grinder and using it throws dust like a sand dune dragster. Since I’m putting in all new floor cabinets, the power outlets are in the wrong place, so they have to be moved up. Had to add a couple of outlets also, took about 75ft of BX cable and more holes in the wall.

Once I get that done, and figure out exactly where to place the base cabinets, plumbing the dishwasher will be the next piece of the puzzle. Also I need to put a backsplash behind the stove and refrigerator since the wall will be visible behind them. Between the counter top and bottom of the cabinets will need to be tiled too. Hopefully that goes better than the floor did. It’s like building a puzzle, you have to put the pieces in order. At this rate I should be done by new years eve. Thanks to Bryan (Duneslider) for his answers to my never ending questions.
 

Attachments

  • Kitchen pictures 7_27_2015 064.jpg
    Kitchen pictures 7_27_2015 064.jpg
    76.4 KB · Views: 8
  • Image2.jpg
    Image2.jpg
    93.8 KB · Views: 8
  • Image3.jpg
    Image3.jpg
    96.7 KB · Views: 10
To avoid these ads, REGISTER NOW!
Top Bottom