To avoid these ads, REGISTER NOW!

Vinyl wrap toolbox

Bellaireroad

Well-known member
Joined
Mar 22, 2013
Messages
636
Location
Fort Worth
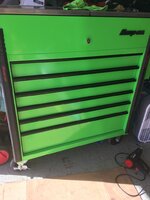
Anyone had a vinyl wrap done on their toolbox?
How much did it cost you?
How does it hold up?
Is it easy to remove if you get tired of it?

Thx
 
To avoid these ads, REGISTER NOW!

gdocktor3

Well-known member
Joined
Apr 18, 2015
Messages
5,419
Location
Connecticut
I have never had anything vinyl wrapped, but if I ever buy a brand new truck I will have it wrapped. Just like a tool box, it will prevent it from scratches, rust, corrosion, etc, etc. Not a bad idea, especially considering how much tool boxes cost and how much they hold their resale value when mint.
 

thor80

Well-known member
Joined
Nov 13, 2014
Messages
93
The trucks I've seen that had long term vinyl removed it hammered the paint getting the vinyl off, not sure if thats normal
 

Tony G

Well-known member
Joined
Sep 7, 2014
Messages
167
Location
NewHampshire
We have our motor coaches wrapped when new. I have never wrapped a tool box but I can tell you it comes off fairly easy with a heat gun. It's a lot of work to apply and the more details in the metal means more labor cutting around it. That ups the labor cost.
 

gdocktor3

Well-known member
Joined
Apr 18, 2015
Messages
5,419
Location
Connecticut
The trucks I've seen that had long term vinyl removed it hammered the paint getting the vinyl off, not sure if thats normal

Ya I don't think that's normal. A kid I went to high school with now owns a very credible, exotic car customization shop and they wrap and rewrap cars all the time for different shows each year. I'm talking lambos, gt-r, Mercedes, Audi, etc. I could be wrong, but I don't think they'd risk destroying a 1/4 million dollar car with vinyl wraps.
 

fos373

Well-known member
Joined
Aug 18, 2015
Messages
104
I wrapped my used (but new to me KRL) myself, just to keep it from getting damaged by my clumsiness. Ordered some vinyl off of the 'bay and it took me a couple of hours. You will need an extra hand for the larger areas - sides and back.

Overall its a good protectant and no one can tell that it was done (box was black to begin with).

Clean the box before hand and you should have no problems.
 
OP
B

Bellaireroad

Well-known member
Joined
Mar 22, 2013
Messages
636
Location
Fort Worth
I wrapped my used (but new to me KRL) myself, just to keep it from getting damaged by my clumsiness. Ordered some vinyl off of the 'bay and it took me a couple of hours. You will need an extra hand for the larger areas - sides and back.

Overall its a good protectant and no one can tell that it was done (box was black to begin with).

Clean the box before hand and you should have no problems.

Sounds good, I have a black bottom Krl 722 and a green top 791... Will need to call around and get some quotes
 
OP
B

Bellaireroad

Well-known member
Joined
Mar 22, 2013
Messages
636
Location
Fort Worth
I wrapped my used (but new to me KRL) myself, just to keep it from getting damaged by my clumsiness. Ordered some vinyl off of the 'bay and it took me a couple of hours. You will need an extra hand for the larger areas - sides and back.


Overall its a good protectant and no one can tell that it was done (box was black to begin with).


Clean the box before hand and you should have no problems.


Yes please post some pics, I think I'm going to get the top and bottom wrapped in black, nothing extreme like flaming skulls ... but will see if it is affordable ... I don't think it would turn out well if I did it [emoji39]


Sent from my iPhone using Tapatalk
 

fos373

Well-known member
Joined
Aug 18, 2015
Messages
104
Give me a day or two and I'll post some pics of the finished product and the steps. Just got back from a trip.
 
To avoid these ads, REGISTER NOW!

fos373

Well-known member
Joined
Aug 18, 2015
Messages
104
Ok, here's how I did it and with some thoughts of how I would do it better.

Most of you are more talented than me so this should be pretty straight forward. You can watch some online videos showing how to apply vinyl, but a tool box is flat and square so it's pretty straight forward vs the curves of a car or motorcycle.

I did the outside of my tool box - back, sides and front, including drawer fronts and the small top sections. I didn't wrap the insides in any real way.

Items used: Vinyl wrap (I'd recommend 3m with air release), cleaner, rubbing alcohol, razor, exacto knife, scissors, tape measure, plastic putty scrapper, heat gun and felt edged squeegee.

1. I cleaned the entire box with some mild cleaner/degreaser. Make sure you get it into any area where you think you will apply the vinyl - i.e. the bottom, back and inside of a drawer front.

2. Lay out vinyl on a table/floor etc face down and weight so it "unrolls" a little.

3. Start with a smaller drawer front and measure. I added about an inch to the length and width to give myself some extra material. Most of the material I've worked with has a graph like backing making it easy to cut (I actually slid the scissors down my cut line vs "cutting").


4. Before pulling the backing test fit your piece - just to get a feel of how it should go.

5. Wipe down the area you plan to wrap with rubbing alcohol to get any remaining grease/finger prints off.

6. Remove the backing of the vinyl. For a small section, I would just peel the whole thing off. When I did larger sections (back, sides) I would peel a section at a time so not to have the vinyl grab to itself.

7. For a drawer front, I would slide the vinyl as far to the top of the drawer as i could - behind the drawer lock releases - starting at a top edge. When I made sure it was approximately where it needed to be, I would start to use the squeegee to push out the air. As these are flat surfaces this is pretty easy. I rolled the vinyl around the bottom of the drawer (Make sure to clean here......) and the sides. You will have to make some cuts to remove any excess.

8. For larger areas, edges - you may need to break out the heat gun to stretch the vinyl and also to have it adhere deeper. If you get an air bubble - don't freak out - take a pin and poke a small hole to release the air.

I did this for the whole box. I didn't do a perfect job - i had some bubbles on the large side areas. If I did it again, I would do these last after getting some experience.

The only other area of some difficulty is around the lock mechanism. I removed mine and then cut a small "X" as necessary and reinserted.

Here are some pics - its really hard to tell as it's gloss black to begin with a gloss black wrap.


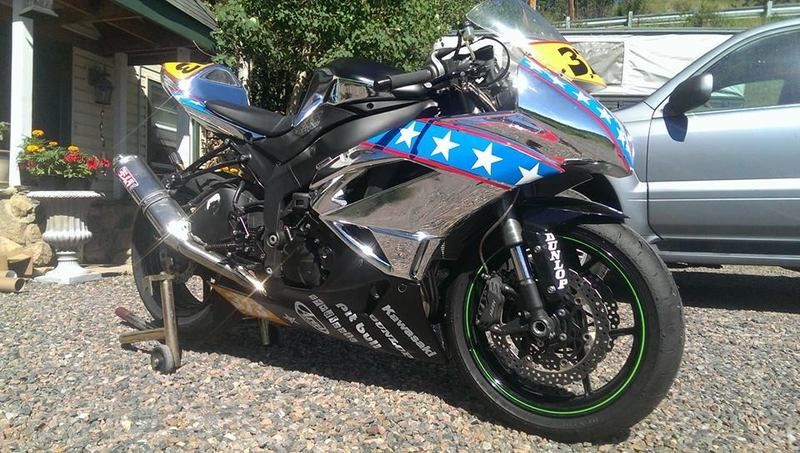
To give you an idea what is possible, this is my race bike from a couple of years ago and was wrapped with vinyl by a friend. This is much curvier and looked perfect.
 

MrJason

Well-known member
Joined
May 26, 2013
Messages
438
Location
Bakersfield, CA.
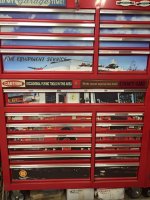
The options for this, are truly limitless. Here's how some are represented, and most vinyl graphic shops are up for doing this- if they can do truck wraps. The labor is a little more, but the overall cost is equivalent of a new paint job, if not less.
option2.jpg
option1.jpg
 
OP
B

Bellaireroad

Well-known member
Joined
Mar 22, 2013
Messages
636
Location
Fort Worth
Ok, here's how I did it and with some thoughts of how I would do it better.


Most of you are more talented than me so this should be pretty straight forward. You can watch some online videos showing how to apply vinyl, but a tool box is flat and square so it's pretty straight forward vs the curves of a car or motorcycle.


I did the outside of my tool box - back, sides and front, including drawer fronts and the small top sections. I didn't wrap the insides in any real way.


Items used: Vinyl wrap (I'd recommend 3m with air release), cleaner, rubbing alcohol, razor, exacto knife, scissors, tape measure, plastic putty scrapper, heat gun and felt edged squeegee.


1. I cleaned the entire box with some mild cleaner/degreaser. Make sure you get it into any area where you think you will apply the vinyl - i.e. the bottom, back and inside of a drawer front.


2. Lay out vinyl on a table/floor etc face down and weight so it "unrolls" a little.


3. Start with a smaller drawer front and measure. I added about an inch to the length and width to give myself some extra material. Most of the material I've worked with has a graph like backing making it easy to cut (I actually slid the scissors down my cut line vs "cutting").


4. Before pulling the backing test fit your piece - just to get a feel of how it should go.


5. Wipe down the area you plan to wrap with rubbing alcohol to get any remaining grease/finger prints off.


6. Remove the backing of the vinyl. For a small section, I would just peel the whole thing off. When I did larger sections (back, sides) I would peel a section at a time so not to have the vinyl grab to itself.


7. For a drawer front, I would slide the vinyl as far to the top of the drawer as i could - behind the drawer lock releases - starting at a top edge. When I made sure it was approximately where it needed to be, I would start to use the squeegee to push out the air. As these are flat surfaces this is pretty easy. I rolled the vinyl around the bottom of the drawer (Make sure to clean here......) and the sides. You will have to make some cuts to remove any excess.


8. For larger areas, edges - you may need to break out the heat gun to stretch the vinyl and also to have it adhere deeper. If you get an air bubble - don't freak out - take a pin and poke a small hole to release the air.


I did this for the whole box. I didn't do a perfect job - i had some bubbles on the large side areas. If I did it again, I would do these last after getting some experience.


The only other area of some difficulty is around the lock mechanism. I removed mine and then cut a small "X" as necessary and reinserted.


Here are some pics - its really hard to tell as it's gloss black to begin with a gloss black wrap.


To give you an idea what is possible, this is my race bike from a couple of years ago and was wrapped with vinyl by a friend. This is much curvier and looked perfect.





Thanks for the pics...looks really great


Sent from my iPhone using Tapatalk
 

fireeqpsrv

Well-known member
Joined
May 8, 2014
Messages
406
Location
Mississippi
[/ATTACH]I ordered custom ones but has them put on magnetic sheet material to put on the box.
 

Attachments

  • 11012585_10207949985612576_3683036540203516336_n.jpg
    11012585_10207949985612576_3683036540203516336_n.jpg
    99.2 KB · Views: 95

miguelvldz

Well-known member
Joined
Sep 26, 2016
Messages
58
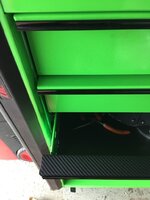
Today I started to do the trim on my cart. I have an older box where the paint started to rub on top of the bottom drawer from the weight of the drawers. Here are a few pics of the progress so farf07024f1cac5a124f8906f1a5949d37a.jpg32136d76666a6f03c52b87e6a78c8122.jpg


Sent from my iPhone using Tapatalk
 

Attachments

  • 32136d76666a6f03c52b87e6a78c8122.jpg
    32136d76666a6f03c52b87e6a78c8122.jpg
    212.2 KB · Views: 6
  • f07024f1cac5a124f8906f1a5949d37a.jpg
    f07024f1cac5a124f8906f1a5949d37a.jpg
    184.2 KB · Views: 2

miguelvldz

Well-known member
Joined
Sep 26, 2016
Messages
58
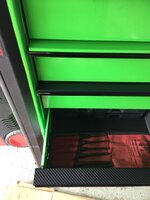
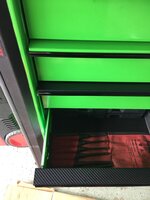
Finished up 87a69c1096b646aa886825d6964afecc.jpgd5069ea5660d7c40c4c39dd4a4c1b4f4.jpg


Sent from my iPhone using Tapatalk
 

Attachments

  • d5069ea5660d7c40c4c39dd4a4c1b4f4.jpg
    d5069ea5660d7c40c4c39dd4a4c1b4f4.jpg
    212.6 KB · Views: 2
  • 87a69c1096b646aa886825d6964afecc.jpg
    87a69c1096b646aa886825d6964afecc.jpg
    217.1 KB · Views: 2
To avoid these ads, REGISTER NOW!
Top Bottom