To avoid these ads, REGISTER NOW!

Vise Handle Replacement

gregthor

Well-known member
Joined
Feb 24, 2010
Messages
267
Location
MICHIGAN
Dear GJ Vise friends,
Here is a new thread about vise handles. Most vise handles have either a steel ball or formed ends to keep the handle attached to the vise. This thread will offer one way to replace a “formed end” vise handle. I am not a blacksmith and there is probably a better way to do this but … here is what I am doing.
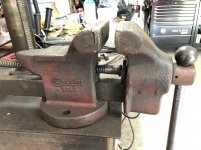
Photo 1 - I picked up this Desmond Stephens 41S Simplex Steel Slide vise from CL last summer. It has had a hard life!! I should name this vise “school of hard knocks” since I am going to learn a lot fixing up this vise. It will not be easy like the Chas Parker I just did.
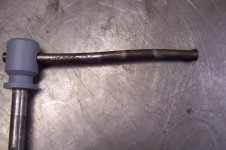
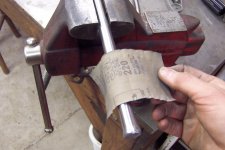
Photo 2 - The handle was totally wasted. At first I thought I could straighten it so I heated it and began to work on it. I was able to get it 80% good but the main screw kept getting in the way. So… I fixed that problem.
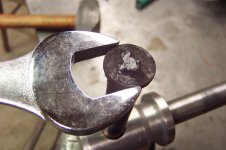
Photo 3 – I ground off the formed end of one side of the handle so I could work on the handle alone.
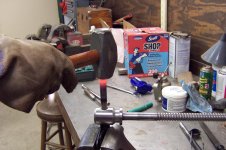
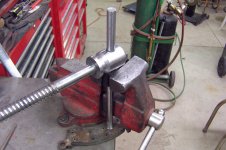
Photo 4 – More heated straightening effort.
Photo 5 – I got the handle about 95% straight. At this point I am starting to feel good about it so I began to polish up the handle. After polishing, it still looked terrible. You can’t see it in the photo but the whole handle looks like a beaver was chewing on it. It had gouges and nicks along the whole length.
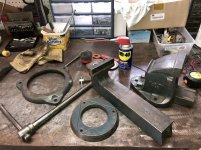
Decision time, I decided to scrap the handle and make a new one. Almost all vises have 5/8 or ¾ diameter handles. This vise has a 9/16 diameter handle. Maybe that’s why it is all bent up. I struck out finding 9/16 round bar stock locally, so I went fishing for donor material. I found a jack handle that was 9/16 and I was just ready to cut it up and I thought hmmm… where did this come from and why is it in my garage?? I decided not to cut it up. I did have some 5/8 diameter stock on hand so I am going to use that. This will require increasing the hole in the main screw.
Photo 6 - The existing hole for the handle was19/32 (1/32" over the 9/16 handle) so I ran a 19/32 drill thru the whole to set it up for re drilling. With the 19/32 drill inserted in the main screw, I clamped it all to the drill press. not shown is the C clamp holding the drill vise to the table. I redrilled with tap magic
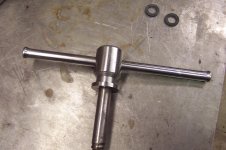
Photo 7 - I opened up the hole to 1/32 over 5/8 using a 4 flute hole enlarging drill. The 4 flute works best for this application.
I am at my 7 photo limit so I will post the other half of this procedure later.
Take Care,
Greg
 

Attachments

  • 100_5588.jpg
    100_5588.jpg
    131.4 KB · Views: 457
  • 100_5592.jpg
    100_5592.jpg
    144.6 KB · Views: 399
  • 100_5594.jpg
    100_5594.jpg
    141.2 KB · Views: 421
  • 100_5595.jpg
    100_5595.jpg
    139.7 KB · Views: 415
  • 100_5596.jpg
    100_5596.jpg
    146.6 KB · Views: 400
  • 100_5676.jpg
    100_5676.jpg
    138.9 KB · Views: 462
  • 100_5623.jpg
    100_5623.jpg
    139.3 KB · Views: 480
To avoid these ads, REGISTER NOW!

tool_scrounge

Well-known member
Joined
Jul 20, 2010
Messages
4,168
Location
Southern California
Nice post! The only hesitation I have had in increasing the diameter of vise handles is that I figured the engineer who designed the vise sized the handle diameter so it would be the weak link and bend before catastrophic damage occurred elsewhere in the vise. But if you do not intend to beat on the vise then it is not an issue. On the last vise I had to replace the handle (due to corrosion and pitting) I went with stainless steel. Its not original but will hopefully hold up better. Small lengths can be had on Ebay for pretty cheap.
 

autopts

Well-known member
Joined
Jul 4, 2009
Messages
2,268
Very nice post. McMaster no longer caries threaded polished balls. I found these at Reid Supply. I bought 6 of the 1" and 6 of the 1 3/8". like for the Reeds http://www.reidsupply.com/detail.aspx?itm=SB-9
http://www.reidsupply.com/detail.aspx?itm=SB-5
Then I bought 3ft lengths of Stainless Steel rod 5/8" & 9/16" I had my machinist friend open the threaded holes to 9/16" which was no problem. I cut the rod to about 12 inches and with a couple of dies, turn the ends down to 9/16. Then I threaded on the ends using locktite to secure the balls. It didn't cost an arm and a leg either.
Handle4.jpg

Handle3.jpg
 

AZ_Catskinner

Well-known member
Joined
Jan 29, 2011
Messages
1,354
Location
Morenci, AZ
That looks good! I did the vise on my old service truck with a ¾"-10x14" bolt. Cut off all the threads except for what the nut covered and brazed the nut on.
 

jxxxoxxxe

Well-known member
Joined
Feb 15, 2007
Messages
265
I've got a Yost 34C....

Yost 34C Link

...that I got for $80 at an auction. The handle is bent over at a 90* angle though. I've thought about just trying to straighten it, but maybe I'd be better off just building a new one...

I'm interested to see yours put together..
 
OP
G

gregthor

Well-known member
Joined
Feb 24, 2010
Messages
267
Location
MICHIGAN
Dear GJ friends,
Here is part 2 of 3 for the vise handle replacement.
Photo 1 – This is mounting the 5/8 bar stock in the vise. I decided to have the finished length be 12inchs. This seems to be the common length for vise handles. Note – many people on the forum ask; why do you need a swivel vise? This picture is a good way to answer that question! The brake pad between the bench & the handle is only to spread the load from hammering and not to beat up the bench. I used an old belt in the jaws to keep from scratching my new handle.
Photo 2 – (note: my photos jump from doing the first end of the handle and the other because I picked the clearest photos… sorry if it confuses anyone) Here is getting ready to forge the second side of the handle. Do not forget to put the main screw on when you do the second end!!
Photo 3 -This is forging the end. I used an oxygen acetylene torch to heat the end to bright orange for about 1 inch from the end. Then I hit the end about 10 times. Then I heated it again. Then another 10 hits. The key was to hit as even as possible. It took approx. 50 hits to get it formed where I wanted it.
Photo 4 – I used a 13/16 wrench as a gage to know when to stop forging and to make sure the formed end was round. (I have a 0-1 inch micrometer but my toolmaker grandfathers would roll over in their graves if they knew I used a precision mic to measure a red hot piece of steel)
Photo 5 – Here is a comparison between the new and old handle prior to belt sanding. The end is very flat at this point. The black one is the new one.
Photo 6 – Here is belt sanding the first end. I supported it in my left hand and twirled it with my right hand. With the second end the main screw is there and you just hold the main screw with your left hand and twirl with your right hand. (if you need a photo of this just ask) I just tried to match the original shape as good as possible.
Photo 7 –Here is after belt sanding.
OK I am at my 7 photo limit. I will post part 3 later.
Greg
ps - I will respond to the above posts soon. This post is already getting long...
pss - if you look in the background of photo 3 you can see I have a little vice with vises...
 

Attachments

  • 100_5703.jpg
    100_5703.jpg
    143.9 KB · Views: 520
  • 100_5700.jpg
    100_5700.jpg
    141.3 KB · Views: 462
  • 100_5693.jpg
    100_5693.jpg
    143.2 KB · Views: 450
  • 100_5704.jpg
    100_5704.jpg
    136.8 KB · Views: 456
  • 100_5697.jpg
    100_5697.jpg
    144.4 KB · Views: 456
  • 100_5698.jpg
    100_5698.jpg
    137.5 KB · Views: 463
  • 100_5699.jpg
    100_5699.jpg
    128.3 KB · Views: 595
To avoid these ads, REGISTER NOW!

Packard V8

Well-known member
Joined
Mar 16, 2009
Messages
7,380
Location
Spokane, WA
Very nice post. McMaster no longer caries threaded polished balls. I found these at Reid Supply. I bought 6 of the 1" and 6 of the 1 3/8". like for the Reeds http://www.reidsupply.com/detail.aspx?itm=SB-9
http://www.reidsupply.com/detail.aspx?itm=SB-5
Then I bought 3ft lengths of Stainless Steel rod 5/8" & 9/16" I had my machinist friend open the threaded holes to 9/16" which was no problem. I cut the rod to about 12 inches and with a couple of dies, turn the ends down to 9/16. Then I threaded on the ends using locktite to secure the balls.
FWIW, I've done the same operation, but didn't bother to enlarge the holes in the balls. Since the balls are just there to keep the handle from falling through the hole in the screw, there isn't much force on them. I just reduced the diameter of the handle and threaded it to match the balls. Cut the threads for an interference fit and use Loctite Stude and Bearing Mount.

jack vines
 
OP
G

gregthor

Well-known member
Joined
Feb 24, 2010
Messages
267
Location
MICHIGAN
Dear GJ friends,
Part 3 the final results
Photo 1 shows the final polishing using 220 sandpaper. Then I used Mothers polish and then to stop rust I applied auto paste wax.
Also I forgot to mention earlier that I had to put a fairly good size chamfer on the main screw handle hole because the handle tended to wedge in and get stuck in the main screw where I formed the end. With a chamfer the problem went away.
Photo 2 is the final result. It turns out a garden hose washer fits perfect on the handle as a finger pincher guard. They can easily be stretched over the end. They may not have the best durability on a shop vise but at $.20 a piece you can put new ones on every year.
I hope you all enjoyed the post and were able to gain some useful knowledge. I welcome any ideas to do this better. Especially ideas from some blacksmiths about forging the ends. I was really happy with the formed shape compared to the original handle but it is not quite as nice as the formed handle on my Chas Parker 974 1/2. But I am sure they had tooling for that process.
Take Care,
Greg
Ps I am working on a response about weakest link and is it ok to put a bigger handle on a vise.
 

Attachments

  • 100_5705.jpg
    100_5705.jpg
    134.7 KB · Views: 300
  • 100_5706.jpg
    100_5706.jpg
    143.3 KB · Views: 411
OP
G

gregthor

Well-known member
Joined
Feb 24, 2010
Messages
267
Location
MICHIGAN
Dear GJ friends,
Thanks for the interest and kind words about the thread.
In this thread the vise handle diameter was increased from 9/16” to 5/8”.
A reasonable question has been raised; should one increase vise handle diameter since it may have been designed to be the weak link of the vise??
Here are some random thoughts, in random order, on the subject.
• 25% or more of the vises I see at auction or CL have bent handles.
• It is probably easier to bend a handle with a formed end than a ball end since it is easier to find a pipe or something to fit over the smaller formed end than the bigger ball end.
• Both a formed end and a ball end can be beat with a hammer or other blunt object.
• It is rare to see ball end handles without witness marks from a hammer.
• Vises do not come with a rating or clamping force capacity. So it is difficult to calculate the proper handle size based on engineering calculations.
• It would be hard to argue that the handle isn’t the weakest link. The handle is probably the correct part to be the weakest link since it gives the user an immediate visual indication the vise has been pushed beyond its limit.
• Another plus of the handle being the first mode of failure is the vise is still usable with a bent handle. Clumsy but still useable.
• The main nut is probably the second mode of failure. I am just guessing, maybe it is the main screw. Actually it is easier to fix a main nut than a handle. But a failed main nut offers no visual indication the vise has been over loaded until it fails catastrophically, and the user goes flying on his rear when the he tries to tighten the vise the next time.
• On the vise in this post, the main screw threads looked like it just left the machine shop and the main nut also looked good. For comparison, I will measure the main screw diameter on some other similar size vises and report the findings in a later post.
• With rare exception one should never beat on or use a pipe on a vise handle. The exception would be to loosen the vise!!! Sometimes I have tightened a part in my vise (the red Craftsman you see doing the work in this thread) worked on the part a little, retightened it by hand, worked a little more, retightened the vise again by hand. Then when I go to un-tighten it, it is impossible to un-tighten by hand. I assume all vises do this, certainly my Craftsman does.
• If you have a vise you cannot open here is my suggested order to open it.
o First - If you are an old fart like me, get one of your 20 year old sons to open it or a younger guy in the shop.
o Second – strike carefully with a rubber mallet
o Third – strike carefully with a hammer with a 2x4 between the vise handle and the hammer.
o Last - Last and only last use a short pipe carefully
o Always wear safety glasses and remember when you open a vise with these methods, often it opens more than you planned on and the part in the vise falls on your foot….yeah, I been around a long time….
• The only vise I ever bought new was the red Craftsman noted above. Maybe someone who has bought a new USA vise lately can add to this thread what the owner’s manual says about pipes and striking on a vise handle. Probably says do not strike handle!
• In my opinion a vise handle should never bend when a good size man puts his weight into it with the handle fully extended to one side and in the horizontal position. With pipes and hammers all bets are off. I think if you run some quick stress calculations you will see it will take a big man to bend the handle.

Ok, so after reading all of that did I answer the question? No, I didn’t so here is my answer. Every other vise I have seen in this size and weight category has a 5/8” handle. My big 105 Reed has a ¾”. (Ok at GJ you have to have a 109 to call it big but the 105 is the biggest I have..LOL) I think this Desmond Stephens 41S was under designed with a 9/16 handle. In this case I think putting a bigger 5/8’ handle on this vise will be just fine. I think putting any bigger handle like a ¾’ or 1” handle may have been bad, plus it would look stupid!! The 5/8” round material I used was hot rolled 36,000 psi minimum yield. Very low strength steel. I do not know the material of the 9/16” original handle. If it was also 36,000 psi minimum yield then I did increase the strength of the handle. I hope that is the case. If it was a higher yield material then I may have actually installed a weaker handle. That would stink!! Now I have to know more about the original handle, I am going to get a hardness check on the old handle this week. I will post results when they come in. Anyways, I really used the 5/8” because of material availability, not strength, but it would be nice to have increased the strength a little.


Autopts – Thanks for the advice on the ball end handles. You must also have a crystal ball!! I need this information soon. A month ago I picked up a Reed 204 with a missing ball on the handle. It has a drilled hole, a cotter pin and a washer instead. Better wear gloves with this vise. Later this winter I will be restoring it and your ideas will help. I think I will go with a stainless handle on that vise.

Packard V8 - Thanks for the advice on the ball end handles. I will save this also for my next handle job.

Take Care,

Greg
 

bgott

Well-known member
Joined
Oct 31, 2005
Messages
3,512
Location
Houston, TX.
I doubt enlarging the diameter of a vise handle will create much of a problem. Now, if you add a foot of length you might have enough leverage to bust something.
 

CaseyJoes.

Well-known member
Joined
Apr 2, 2011
Messages
482
Location
Strasburg, PA & Eastern Shore Maryland
Nice work on that new handle end! I bet for the handles that use more of a ball end, somebody who is good with a lathe could make a die that they could hammer on to form the ball end once the new handle end is heated red hot. Maybe if somebody had the peices used for setting large rivets?
 

Ray j

New member
Joined
Dec 21, 2017
Messages
2
Can anybody tell me will a Bernzomatic Premium Torch Kit 8000 heat the stainless steel rod enough to shape. beginner here. any answer appreciated Ray
 

jrh65

New member
Joined
Aug 24, 2020
Messages
1
Location
Loretto, TN.
Thanks autopts. That's exactly what I was looking for threaded balls. I am working on my 1st vise rebuild for my son and the handle is not bad but I thought the same as others here and making a new longer and bigger one. But others bought up about it could lead to damage somewhere else maybe the treads or nut damage? Does that really happen? I have an old champion vise I’ve had for 35-40 years and it has an oversized homemade handle and I have really put lots of pressure on over the years using it for a press and nothing broke yet? It was a find in a junkyard and the handle and threaded rod was missing. Back then I worked at a plant that had plenty of equipment to use and made the threaded rod and handle, the balls are welded on ball bearings that we all kept drawers full of back then. I sure do miss all that stuff since retiring, lol. Anyway, maybe I’ll just leave the stock handle and hope my son does not have to put on a cheater someday?
 

Attachments

  • IMG_2158.jpg
    IMG_2158.jpg
    155.9 KB · Views: 77
  • IMG_2159.jpg
    IMG_2159.jpg
    152.9 KB · Views: 87
To avoid these ads, REGISTER NOW!
Top Bottom