To avoid these ads, REGISTER NOW!

Visible Pump Restoration

turbowoodworker

Well-known member
Joined
Mar 18, 2012
Messages
3,533
Location
Apex NC
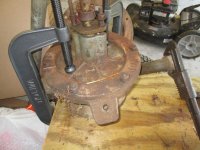
I've been at work restoring a Gilbert and Barker visible gas pump. I thought it was time to post a few pictures of the progress and see if there is any interest here on GJ. It has been a fun, if not sometimes frustrating project.

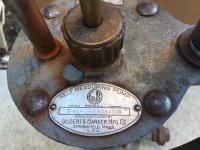
With the help of some over at Oldgas.com, I have been able to get it all apart and identify it as a G&B 177 (I think).

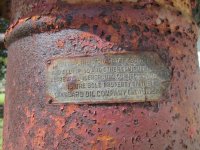
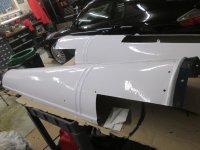
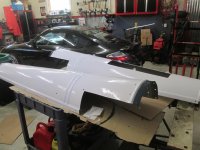
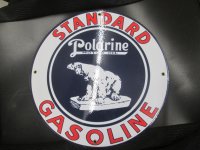
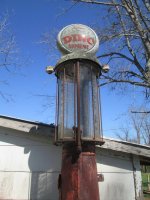
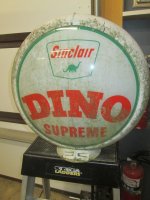
The pump was on my in laws' farm and had been used until maybe sometime in the 80's, no one is quite sure. These were often bought by farmers once they were obsolete with mechanical and electric pumps. One of the family members put on a plastic Sinclair globe, but as you will see, it is a Standard Oil pump. I want to restore it to its glory days but I will be using Standard Oil colors, not just the original color. I think it was all red. Most of the old pumps were supplied in one color and repainted by the distributor.

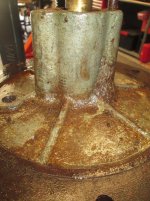
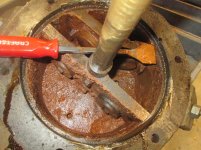
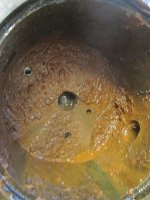
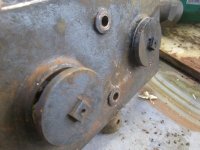
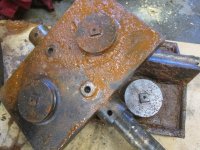
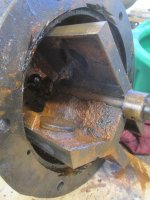
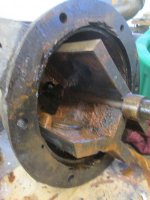
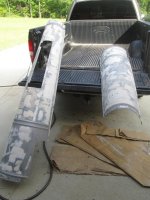
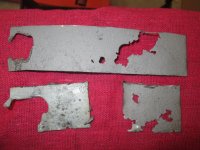
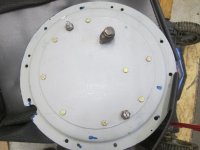
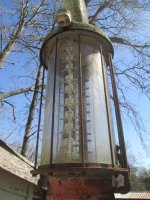
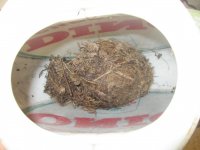
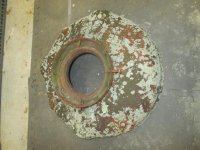
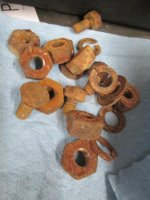
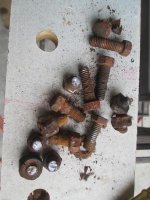
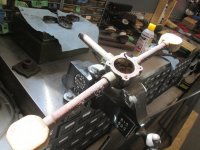
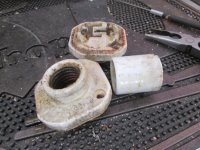
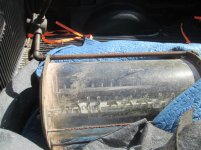
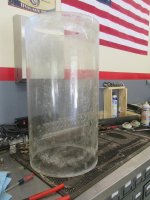
The pump is mostly there including the 5/16"thick glass tank. The hose and nozzle is gone, the lower panel around the pump handle was replaced with some galvanized farm waste. Most, but as I am learning not all, of the innards are there.

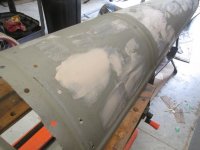
This has been a fun project combining a number of skills. Some I am not so good at (welding), others I have never done before (body work), and mechanical. But being in the shop and learning new stuff with a final product in sight has been satisfying too.

I am slow at tasking, slower at posting so be patient with updates.

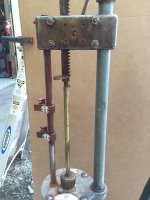
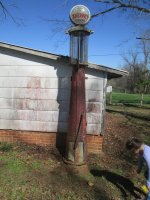
Thanks for viewing and enjoy. Here it is as it sat for years/decades. It was not hooked to an underground tank at this point so was not functional:
 

Attachments

  • IMG_0240.jpg
    IMG_0240.jpg
    122.3 KB · Views: 187
  • IMG_0242.jpg
    IMG_0242.jpg
    108.6 KB · Views: 171
  • IMG_0243.jpg
    IMG_0243.jpg
    140.4 KB · Views: 157
  • IMG_0237.jpg
    IMG_0237.jpg
    155.9 KB · Views: 149
To avoid these ads, REGISTER NOW!
OP
T

turbowoodworker

Well-known member
Joined
Mar 18, 2012
Messages
3,533
Location
Apex NC
Here are a few pictures of the placards and some of the deep rust.
The first identifies it as the property of Standard Oil of New Jersey. The second is a licensing or regulatory placard from the State of NC. The other is a roached out Lead sign. Not sure when the lead sign would have been added; probably not when it was first in service (late '20's?).
 

Attachments

  • IMG_0233.jpg
    IMG_0233.jpg
    156.7 KB · Views: 103
  • IMG_0235.jpg
    IMG_0235.jpg
    132.6 KB · Views: 94
  • IMG_0234.jpg
    IMG_0234.jpg
    155.1 KB · Views: 101
OP
T

turbowoodworker

Well-known member
Joined
Mar 18, 2012
Messages
3,533
Location
Apex NC
Once disassembled, I returned the plastic Dino globe to the family as it had some sentimental value to them and absolutely no restoration value. Rodents had enjoyed a nice rain free shelter there for some time.
 

Attachments

  • IMG_0257.jpg
    IMG_0257.jpg
    107.7 KB · Views: 89
  • IMG_0256.jpg
    IMG_0256.jpg
    84.3 KB · Views: 88
OP
T

turbowoodworker

Well-known member
Joined
Mar 18, 2012
Messages
3,533
Location
Apex NC
A few parts pictures. Severe rust. Most of the hardware was beyond saving. It was interesting how nuts and bolts from the 20's or 30's look so different. They are beefier, heavier and just shaped different. Not a lot of square fasteners, mostly hex.
 

Attachments

  • IMG_0251.jpg
    IMG_0251.jpg
    150.7 KB · Views: 93
  • IMG_0252.jpg
    IMG_0252.jpg
    157.7 KB · Views: 95
  • IMG_0253.jpg
    IMG_0253.jpg
    79.3 KB · Views: 103
  • IMG_0267.jpg
    IMG_0267.jpg
    123.4 KB · Views: 100
  • IMG_0254.jpg
    IMG_0254.jpg
    72 KB · Views: 85
OP
T

turbowoodworker

Well-known member
Joined
Mar 18, 2012
Messages
3,533
Location
Apex NC
More hardware pics. Some aluminum an bronze or brass stuff.
 

Attachments

  • IMG_0362.jpg
    IMG_0362.jpg
    107.7 KB · Views: 88
  • IMG_0367.jpg
    IMG_0367.jpg
    121.6 KB · Views: 80
OP
T

turbowoodworker

Well-known member
Joined
Mar 18, 2012
Messages
3,533
Location
Apex NC
The electrical was there too. The electrics was only for lighting. The porcelein fixtures are all in fair shape. I'm considering reusing them
 

Attachments

  • IMG_0355.jpg
    IMG_0355.jpg
    145.6 KB · Views: 97
  • IMG_0363.jpg
    IMG_0363.jpg
    151.3 KB · Views: 88
  • IMG_0371.jpg
    IMG_0371.jpg
    49.2 KB · Views: 85
OP
T

turbowoodworker

Well-known member
Joined
Mar 18, 2012
Messages
3,533
Location
Apex NC
The glass cylinder is dirty but otherwise in perfect shape without BB holes. That stuff is thick and heavy. With all the craftsmanship retiring and dying off, I question if a US made replacement would be available. I know there are acrylics out there for restoration. I'm just trying to keep my kids from whacking it.
 

Attachments

  • IMG_0347.jpg
    IMG_0347.jpg
    151.8 KB · Views: 90
  • IMG_0358.jpg
    IMG_0358.jpg
    151.4 KB · Views: 81
  • IMG_0356.jpg
    IMG_0356.jpg
    123.5 KB · Views: 83
  • IMG_0361.jpg
    IMG_0361.jpg
    89.3 KB · Views: 88
OP
T

turbowoodworker

Well-known member
Joined
Mar 18, 2012
Messages
3,533
Location
Apex NC
So here are the innards. Rodents felt the need to populate this undisturbed space for a long while. You may notice that some parts are missing from the mechanism. I think there would have been a selector lever and a gallon measure inside the shell. Not really sure what it would have looked like.


More on the mechanics of the pump tomorrow...
 

Attachments

  • IMG_0374.jpg
    IMG_0374.jpg
    153.9 KB · Views: 106
  • IMG_0376.jpg
    IMG_0376.jpg
    101.9 KB · Views: 118
  • IMG_0369.jpg
    IMG_0369.jpg
    138.6 KB · Views: 95
  • IMG_0350.jpg
    IMG_0350.jpg
    110.4 KB · Views: 101
OP
T

turbowoodworker

Well-known member
Joined
Mar 18, 2012
Messages
3,533
Location
Apex NC
Honored to have you along for the ride, Lugz. I wasn’t sure if this would go best under “general garage discussion” or “vintage tools”. Not a tool but surely vintage.

More pics of the pump later today.
 

thehorse13

Well-known member
Joined
Mar 15, 2015
Messages
3,477
Location
Jefferson County, WV
Absolutely beautiful. I'm a regular on oldgas myself and love projects like this one. My vintage tool addiction crosses over into vintage petro items.
 

Private Lugnutz

Well-known member
Joined
Mar 30, 2012
Messages
30,544
Location
The Authentic Jersey Shore
I wasn’t sure if this would go best under “general garage discussion” or “vintage tools”. Not a tool but surely vintage.
I don't think it really matters, but you would probably get more interest (and probably more information and advice, wanted or not :)) on the General Garage Discussion or Garage Gallery boards. I think it's fine down here and others who have an interest in old pumps who aren't necessarily regulars down here may find it anyway.

A few other old pumps have popped up on GJ before, chiefly in 1930's garage resto threads, usually as ornaments, not as original equipment. I can't recall a thread on a pump resto in particular, and certainly not one as old as yours. Here are some links:

Vintage filling station photos
https://www.garagejournal.com/forum/showthread.php?t=277257&highlight=vintage+gas+pump

1935 Gas Station Resurrection
https://www.garagejournal.com/forum/showthread.php?t=337182&highlight=gas+pump&page=51

Indoor Texaco gas station
https://www.garagejournal.com/forum/showthread.php?t=157290&highlight=gas+pump

Getting started...
https://www.garagejournal.com/forum/showthread.php?t=47100&highlight=pump&page=3
 
OP
T

turbowoodworker

Well-known member
Joined
Mar 18, 2012
Messages
3,533
Location
Apex NC
Kabin, thanks for stopping by and for the link. I will investigate that. I have been using GasPumpHeaven.com with good success but I have only been buying a little at a time (placards, signage and the lower sheet steel door) as that stuff gets expensive. I think I still have to buy another $500ish to complete the job (hose, nozzle and globe).

Lugz, thanks for the links. I have seen those and they have been quite helpful

I look forward to posting more info, much of it my mistakes, so others can laugh and heckle at will.
 
OP
T

turbowoodworker

Well-known member
Joined
Mar 18, 2012
Messages
3,533
Location
Apex NC
Question for anyone who wants to chime in. I have always thought of placing this outside my detached shop on a concrete pad (yet to be poured). That would display it nicely for all to see. But with that comes a few problems: weather exposure, vandalism, theft, and accidental injury like UPS truck or my truck bumping it.

Lately, as it starts to look fairly impressive (my biased view), I've thought of leaving it in my shop where it would be a little safer and have no weather exposure. But it takes up valuable footprint a little bigger than a drillpress. It is close to nine feet tall, maybe more with the globe.

What say you?:beer:
 
OP
T

turbowoodworker

Well-known member
Joined
Mar 18, 2012
Messages
3,533
Location
Apex NC
And now for a little of the pump. It is cast iron pot with a cool mechanism inside. I searched and searched but it wasn't until a member on oldgas posted pics that I realized what the inside would look like. That is IF I was ever able to get it apart. I will get to that. It was frozen tight and I tried everything short of heat (giant cast iron heat sink).
 

Attachments

  • IMG_0350.jpg
    IMG_0350.jpg
    110.4 KB · Views: 78
  • IMG_0406.jpg
    IMG_0406.jpg
    149 KB · Views: 75
  • IMG_0410.jpg
    IMG_0410.jpg
    119 KB · Views: 74
OP
T

turbowoodworker

Well-known member
Joined
Mar 18, 2012
Messages
3,533
Location
Apex NC
I saw that there had been a repair, either ****** welded or brazed. That made me very cautious not to go gorilla on it and lose the pot to my testosterone and frustration. That weld later proved to be very soft so it is likely a braze with silver/ lead/?.

The top is held on with a heavy ring and bolts. There was also a paper gasket beneath the ring.
 

Attachments

  • IMG_0481.jpg
    IMG_0481.jpg
    151 KB · Views: 58
  • IMG_0477.jpg
    IMG_0477.jpg
    156.9 KB · Views: 60
  • IMG_0480.jpg
    IMG_0480.jpg
    133.9 KB · Views: 64
  • IMG_0479.jpg
    IMG_0479.jpg
    147.3 KB · Views: 67
OP
T

turbowoodworker

Well-known member
Joined
Mar 18, 2012
Messages
3,533
Location
Apex NC
First is another picture of the top. You can see the separation which defines the top from the pot body.

Next pic is the gland nut where the "packing" goes. There are decals/placards/warnings on some internet pump pics telling one to "keep the stuffing tight". This is where gas might leak around the pump handle shaft. The stuffing reminded me of old time kapok or string tamped into cast iron pipes before the plumber poured molten lead. I was corrected by the OldGas guys that it is usually graphite. Whatever it was, it was in there and rock solid. Came out one little ****** at a time. Oh and yes I broke a few bolts in this project.
 

Attachments

  • IMG_0564.jpg
    IMG_0564.jpg
    144.3 KB · Views: 64
  • IMG_0565.jpg
    IMG_0565.jpg
    103.9 KB · Views: 57
  • IMG_0548.jpg
    IMG_0548.jpg
    133.8 KB · Views: 55

Private Lugnutz

Well-known member
Joined
Mar 30, 2012
Messages
30,544
Location
The Authentic Jersey Shore
What say you?
If your detached shop was a restored service station the conservator in me would vote OUTSIDE. After putting all the time and effort into its restoration, I think INSIDE gets my vote. Someone did that in one of those GJ resto garage links, with an old air station, too. If you want more people to see it, put in a big window, instead! :)
 
To avoid these ads, REGISTER NOW!
OP
T

turbowoodworker

Well-known member
Joined
Mar 18, 2012
Messages
3,533
Location
Apex NC
So life got in the way of my gas pump project. From roughly May until November, my available time was shortened by baseball practices, games, and by trips to the Shenandoah Valley and Disney World. But this worked to my advantage as I was frustrated and tempted to bring out the BFH. Instead the pump pot was filled with ATF, old oil and even some acetone. Homeland Security might have it as evidence of a new sort of pressure cooker bomb had I not been ultimately succesful.
More later
 

Attachments

  • IMG_1855.jpg
    IMG_1855.jpg
    156.4 KB · Views: 80
OP
T

turbowoodworker

Well-known member
Joined
Mar 18, 2012
Messages
3,533
Location
Apex NC
The top came off, but not because of the ATF, oil and acetone.

This is where I ask all the gas pump afficianados and vintage tool purists to turn away, go have a beer and reserve all judgments.

I drilled the back side in a couple of places and used a punch/drift pin to pressure the back side of the pump top. It was really tight and corroded into the "race" that I had to smack it for hours, all the time worrying about breaking the cast iron.

Remember I had no real schematic or prior knowledge; but I did have a hammer! But the pot itself is integral to the structure of the upright pump. The skins and the entire top are supported by 1 1/4" pipe emanating from the pot. So break the pot, the pump can't stand up.
 
OP
T

turbowoodworker

Well-known member
Joined
Mar 18, 2012
Messages
3,533
Location
Apex NC
Forgot the pictures.
 

Attachments

  • IMG_1861.jpg
    IMG_1861.jpg
    108 KB · Views: 63
  • IMG_1862.jpg
    IMG_1862.jpg
    95.6 KB · Views: 60
  • IMG_1857.jpg
    IMG_1857.jpg
    154 KB · Views: 58
  • IMG_1858.jpg
    IMG_1858.jpg
    107 KB · Views: 56

Oregon rock crusher

Well-known member
Joined
Jun 28, 2016
Messages
1,907
Location
West of Salem
Question for anyone who wants to chime in. I have always thought of placing this outside my detached shop on a concrete pad (yet to be poured). That would display it nicely for all to see. But with that comes a few problems: weather exposure, vandalism, theft, and accidental injury like UPS truck or my truck bumping it.

Lately, as it starts to look fairly impressive (my biased view), I've thought of leaving it in my shop where it would be a little safer and have no weather exposure. But it takes up valuable footprint a little bigger than a drillpress. It is close to nine feet tall, maybe more with the globe.

What say you?:beer:

That's a nice G&B project pump you have there turbo. I'm looking forward to seeing how it turns out. Very nice that you have good glass. I have a fairly early Gilbert and Barker T-81 curb pump in my collection but would like to add one like yours eventually but they are not easy to find. There is quite a bit of similarity under the skin between our pumps. Mine just calculated volume by set travel stops on the hand cranked rack. I think they are far better off after restoration inside than out unless you have a covered area. Mine's perched on a narrow shelf by some other petrolina where it doesn't take up much space. Ed.
 

Attachments

  • IMG_0603.JPG
    IMG_0603.JPG
    125.5 KB · Views: 59
  • IMG_0597.jpg
    IMG_0597.jpg
    58 KB · Views: 48
  • IMG_0599.jpg
    IMG_0599.jpg
    74.2 KB · Views: 45
  • IMG_0598.jpg
    IMG_0598.jpg
    77.9 KB · Views: 49
  • IMG_0595.jpg
    IMG_0595.jpg
    84.4 KB · Views: 53
  • IMG_0593.JPG
    IMG_0593.JPG
    138.9 KB · Views: 53
  • IMG_0602.jpg
    IMG_0602.jpg
    114.8 KB · Views: 56

coljar

Well-known member
Joined
Sep 26, 2010
Messages
6,243
Location
Belpre, Ohio
Considering two visables use to set in front of my building next door, which is 50ft. from where I'm sitting right now, I'm very interested in your restoration. I wish they would have survived into my lifetime. Subscribing to this thread.
 
Last edited:

don long

Well-known member
Joined
Mar 31, 2012
Messages
8,845
Location
southern california
I too have several visible pumps waiting on me to find time for them.
I'm very interested to watch and learn with you.

As for inside or out you will see it every day if it is outside and with the automotive paints available the weather is not much of an issue.

But I only have one pump outside and it's not restored.
 
OP
T

turbowoodworker

Well-known member
Joined
Mar 18, 2012
Messages
3,533
Location
Apex NC
Honored to have all you guys following along. Thanks for watching.

Crusher, that is a beautiful little previsible specimen. Love all that nice brass.

:beer:
 
OP
T

turbowoodworker

Well-known member
Joined
Mar 18, 2012
Messages
3,533
Location
Apex NC
A little about the inside of the pump. After it was apart and cleaned up, I wire wheeled the inside and smoothed out some of the pitting. The tolerances were so close that I needed to file some of that tolerance off the vanes just to get it to go back together.

The pump consists of the pot, a lid, a gland nut with packing around the shaft and two vanes or impellers. Those impellers have two spring loaded valves (which were surprisingly smooth operating despite all the corrosion). All of the innards are bronze. One of the impellers is stationary and the second moves about 30 degrees in each direction as the handle is "pumped". This creates essentially three chambers sucking gas from the underground tank to and through each chamber to the pipe leading out and up to the glass cylinder. Here the gas is dispensed by gravity.

My pump is missing the gallon selectors mentioned by Crusher in his post. The farmer who modified it probably saw them as complicated or problematic or unnecessary or just broken and did away with them.

Once reassembled, I pumped the handle and with my ear over the outflow pipe, you get a gentle burst of pumped air with each stroke.

I thought of taking a video of the pump mechanism functioning with the lid off and promptly forgot before reassembly. It is a pain to get apart but if there is enough interest, I might be persuaded.

Now the previously frozen pump handle moves nicely. I always thought that the pump would never be functional, but anyone walking up to a finished pump is going to want to touch it and crank that handle. A frozen pump just would not do. Since the pump will never pump gas again, and since I never wanted to see the inside again, I coated the pot, lid and vanes with bearing grease and closed her up for good...unless you really want to see it work.:bounce:
 

Attachments

  • IMG_1867.jpg
    IMG_1867.jpg
    65.5 KB · Views: 48
  • IMG_1868.jpg
    IMG_1868.jpg
    144.4 KB · Views: 49
  • IMG_1863.jpg
    IMG_1863.jpg
    155.9 KB · Views: 54
  • IMG_1860.jpg
    IMG_1860.jpg
    98.4 KB · Views: 53
  • IMG_1859.jpg
    IMG_1859.jpg
    82.2 KB · Views: 55
OP
T

turbowoodworker

Well-known member
Joined
Mar 18, 2012
Messages
3,533
Location
Apex NC
Time for some body work. I have never done any body work before, unless you count the baja bug I built back in college and tried to paint myself. Call me the king of orange peel.

The skins are fairly thick sheet metal and fairly rigid. My first step was to disassemble and get the parts to the sand blaster. That was surprisingly expensive, or maybe they just saw me coming. $200 for all the parts. But well worth it as it really revealed my tasks ahead.

The metal consists of two long skins, a front door, the lower door (missing and replaced by galvanized thin trash) and the bonnet. The bonnet is the round piece on top seen in a previous picture covered in lichens. This thing lived under an oak tree for decades.

Once blasted, I set to filling and smoothing the skins. I left the bonnet pits in place as a reminder of the pump's history as scars and wounds would.

These pictures illustrate the amount of pitting I was faced with. The worst damage was found under some of the placards. Not sure if the gasoline was the corrosive entity or if trapped moisture beneath the placard was the culprit.
 

Attachments

  • IMG_0233.jpg
    IMG_0233.jpg
    156.7 KB · Views: 52
  • IMG_0251.jpg
    IMG_0251.jpg
    150.7 KB · Views: 50
  • IMG_0407.jpg
    IMG_0407.jpg
    95.6 KB · Views: 51
OP
T

turbowoodworker

Well-known member
Joined
Mar 18, 2012
Messages
3,533
Location
Apex NC
Blocking, and more blocking.
 

Attachments

  • IMG_0562.jpg
    IMG_0562.jpg
    94.6 KB · Views: 54
  • IMG_0560.jpg
    IMG_0560.jpg
    102.6 KB · Views: 54
  • IMG_0550.jpg
    IMG_0550.jpg
    116.1 KB · Views: 52
  • IMG_0547.jpg
    IMG_0547.jpg
    148.4 KB · Views: 51
OP
T

turbowoodworker

Well-known member
Joined
Mar 18, 2012
Messages
3,533
Location
Apex NC
Had to excise a little cancer along the bottom. This allowed my to practice my TIG welding skills ("skills" not an exacting term). But as I mentioned from the outset, a project like this incorporates lots of techniques and I welcome the chances to practice and use the tools and the self taught knowledge to get to an end product.

Not perfect. Just fun! :)
 

Attachments

  • IMG_0563.jpg
    IMG_0563.jpg
    149.9 KB · Views: 45
  • IMG_0551.jpg
    IMG_0551.jpg
    68.4 KB · Views: 45

1982fxr

Well-known member
Joined
Jan 7, 2012
Messages
10,007
Location
Phoenix
Put it in the living room.

Was at Russo and steel car auction last week. A guy had some restored stuff he did in Parrot. Really cool. Couple Lincoln bench/toolbox dealyos.
 
OP
T

turbowoodworker

Well-known member
Joined
Mar 18, 2012
Messages
3,533
Location
Apex NC
Wife likes it but probably not enough to put it front and center in living room.

Russo and Steele is my favorite auction. Lots more “attainable”cars there.
 
OP
T

turbowoodworker

Well-known member
Joined
Mar 18, 2012
Messages
3,533
Location
Apex NC
Finally getting to the reassembly process. Putting all the fittings back in the top cap that fits beneath the bonnet.
 

Attachments

  • IMG_1922.jpg
    IMG_1922.jpg
    104.3 KB · Views: 49
  • IMG_1923.jpg
    IMG_1923.jpg
    54.2 KB · Views: 46
  • IMG_1924.jpg
    IMG_1924.jpg
    64.7 KB · Views: 45
OP
T

turbowoodworker

Well-known member
Joined
Mar 18, 2012
Messages
3,533
Location
Apex NC
Starting the paint process. Utilized Rustoleum products, alkyd primer and enamels.
 

Attachments

  • IMG_1877.jpg
    IMG_1877.jpg
    124.7 KB · Views: 54
  • IMG_1879.jpg
    IMG_1879.jpg
    92.5 KB · Views: 48
  • IMG_1918.jpg
    IMG_1918.jpg
    139.8 KB · Views: 53
OP
T

turbowoodworker

Well-known member
Joined
Mar 18, 2012
Messages
3,533
Location
Apex NC
This is a Standard Oil of NJ pump so I decided to go with the red, white and blue colors. The original pump I think was all red (or all rust!) but I am following the Powerine scheme. My daughter is a big fan of polar bears so her vote counted over the usual Standard Oil signage.
 

Attachments

  • IMG_1921.jpg
    IMG_1921.jpg
    147.2 KB · Views: 49

Private Lugnutz

Well-known member
Joined
Mar 30, 2012
Messages
30,544
Location
The Authentic Jersey Shore
Love the context/rationale for all your decision-making! I am the same way on projects. A fine balance of historical accuracy and personal prerogative driven by making yourself or family happy. You can't ever go wrong with that kind of approach! :)
 
OP
T

turbowoodworker

Well-known member
Joined
Mar 18, 2012
Messages
3,533
Location
Apex NC
I ordered the apparent "bible" on gas pump history and restoration so that I can be as accurate as possible, but as you suggested, you have to live with it. So it should be accurate and appealing to the family.

I do have one question. The pump as found on the farm, had a "contains lead" placard that was way eaten up by rust. I ordered a replacement. But now I am questioning that it is likely the "lead" sign would have been added way after the pump went into service (probably 1928-35). I doubt there was a need to label fuel with a "lead placard" until way later. So IF that is the case, should I put the "lead" sign on or not? What do you think?
 
To avoid these ads, REGISTER NOW!
Top Bottom