To avoid these ads, REGISTER NOW!

Walker 93632 Jack Rebuild

cpearson1342

Member
Joined
Aug 27, 2015
Messages
16
Also thank you for this thread and anyone who has contributed. We have successfully rebuilt one of our 93632's and will be doing another one soon. We need to build a socket for it though, seeing that we almost broke the other one taking it off with a flattened chisel.
 
To avoid these ads, REGISTER NOW!

Hiball

Well-known member
Joined
Apr 30, 2009
Messages
14,027
Location
Missery
Also thank you for this thread and anyone who has contributed. We have successfully rebuilt one of our 93632's and will be doing another one soon. We need to build a socket for it though, seeing that we almost broke the other one taking it off with a flattened chisel.

That will do it.. Chisels, Air Hammers and Pipe wrenches should be avoided at all costs, I've actually seen tank nuts split in two pieces over the years. HPS actually sells a version of there tool to remove the spanner type tank nuts, I not a big fan of it, but it does the trick without damaging the groove if used properly.
 

cpearson1342

Member
Joined
Aug 27, 2015
Messages
16
That will do it.. Chisels, Air Hammers and Pipe wrenches should be avoided at all costs, I've actually seen tank nuts split in two pieces over the years. HPS actually sells a version of there tool to remove the spanner type tank nuts, I not a big fan of it, but it does the trick without damaging the groove if used properly.

I just wish we knew that before, oh well thanks for the info, probably won't get a new tank nut unless it starts leaking but I'll definitely look into it.

The problem with my jack was pretty obvious though, the u-cup on the end of the ram was in about a million pieces at the back of the cylinder, I love these jacks as compared to the new stuff and we have a few more older jacks that I will definitely take out and try to fix also, I'll keep everyone updated in another thread.
 

cpearson1342

Member
Joined
Aug 27, 2015
Messages
16
Does anyone know if this kit will work for the 93632? It doesn't say it is for it, but it looks like the exact same stuff that I needed for the other one, but much cheaper than the kit that I got last time which is this one, which I barely needed half the parts from.
 

Hiball

Well-known member
Joined
Apr 30, 2009
Messages
14,027
Location
Missery
Does anyone know if this kit will work for the 93632? It doesn't say it is for it, but it looks like the exact same stuff that I needed for the other one, but much cheaper than the kit that I got last time which is this one, which I barely needed half the parts from.

Looks pretty generic, missing spreader, valve balls but dependent on the 93632 series it might fit, you can probably pick the universal kit up from HPS in my signature for just about the price of the 1st one.
 
Last edited:

Unmarked Bill

Well-known member
Joined
Dec 20, 2012
Messages
290
Location
Northeast Los Angeles
I disassembled my SnapOn YA642 jack and replaced the UCup and the square Oring in the bore, they looked fine but it was apart. Reassembled, no improvement.

This is the condition of my release valve, I am guessing it needs replacement? I got this jack used, I think the PO must have had strong hands for shutting the valve! Do I need to replace the seat for this valve as well?

Is crosshatching going to be an issue (JK)...

<a href="http://s19.photobucket.com/user/picturedlife/media/20160314_191242_zps1zqpm2zu.jpg.html" target="_blank"><img src="http://i19.photobucket.com/albums/b168/picturedlife/th_20160314_191242_zps1zqpm2zu.jpg" border="0" alt=" photo 20160314_191242_zps1zqpm2zu.jpg" style=""></a>

<a href="http://s19.photobucket.com/user/picturedlife/media/20160314_190932_zpsrswoy9qb.jpg.html" target="_blank"><img src="http://i19.photobucket.com/albums/b168/picturedlife/th_20160314_190932_zpsrswoy9qb.jpg" border="0" alt=" photo 20160314_190932_zpsrswoy9qb.jpg" style=""></a>
 

wildecoyote1966

New member
Joined
Mar 8, 2016
Messages
4
Location
Mount Gambier, South Australia
Hi
I'm new to using forums so please bear with me.
I got this Mechanical jack when we closed a radiator business.
I've been told it's a walker jack built 1920-early 1940s
I have got some parts of it but don't know what to do next
Any help would be appreciated
(sorry about the quality I took the pics with my Iphone)
 

Attachments

  • 2016-03-22 00.33.47.jpg
    2016-03-22 00.33.47.jpg
    141.1 KB · Views: 41
  • trolley jack.jpg
    trolley jack.jpg
    91.2 KB · Views: 46
  • 2016-03-22 00.47.05.jpg
    2016-03-22 00.47.05.jpg
    147.1 KB · Views: 36
  • 2016-03-22 00.46.53.jpg
    2016-03-22 00.46.53.jpg
    123.8 KB · Views: 38
  • 2016-03-22 00.46.35.jpg
    2016-03-22 00.46.35.jpg
    129.8 KB · Views: 38
  • 2016-03-22 00.46.21.jpg
    2016-03-22 00.46.21.jpg
    146.2 KB · Views: 33
Last edited:

469 runner

Well-known member
Joined
Jan 5, 2006
Messages
353
Location
North Carolina
Mechanical? Not Hydraulic? I would say a good inspection for broken or worn parts, anything found would require fabrication. Otherwise, clean, lube, and should be good for another few decades.
 

Hiball

Well-known member
Joined
Apr 30, 2009
Messages
14,027
Location
Missery
certainly not hydraulic
I'm trying to get it a part so I can clean it then paint it

The best advise I can give is to be very careful when dismantling, if your memory is iffy, documents with pictures. If you break something crucial, better think about finding a solid machine shop, Here in the states a lot of the older mechanical jacks have been sold to the scrap dealers.

If your wanting to document the process, might want to start a new thread.
 

wildecoyote1966

New member
Joined
Mar 8, 2016
Messages
4
Location
Mount Gambier, South Australia
I finally got most of the jack apart without breaking anything
I'm going to start a tread for it when I work out how to

all I need to do is work out how to get this apart

also does anyone know how to retrieve print on a piece of tin on the jack. it looks like it has ROG or ROC but barely visible
oh and the jack looks like it was red or orange
 

Attachments

  • 2016-03-27 20.06.21.jpg
    2016-03-27 20.06.21.jpg
    135.9 KB · Views: 30
  • 2016-03-27 20.06.26.jpg
    2016-03-27 20.06.26.jpg
    136 KB · Views: 34

wxm

Well-known member
Joined
Dec 15, 2008
Messages
901
Location
NJ
I will need to get one of those impact socket to fabricate one to open the ram nut of the walker 93632. Can someone confirm the size of the socket I need to get?
 

Hiball

Well-known member
Joined
Apr 30, 2009
Messages
14,027
Location
Missery
I will need to get one of those impact socket to fabricate one to open the ram nut of the walker 93632. Can someone confirm the size of the socket I need to get?

In this thread David used a 1 1/2" budd socket, it was a good choice as it leaves a lot of meat on the bone when fabricating to fit the spanner grooves.
 
Last edited:

Jeeper

Well-known member
Joined
Dec 25, 2006
Messages
2,124
Location
Round Rock, TX
Here is a thread on the topic: http://www.garagejournal.com/forum/showthread.php?t=169040


Personally, I used a 1-1/2" northern tool impact socket.
DSC_1641.jpg

DSC_1642.jpg
 
To avoid these ads, REGISTER NOW!

123Go

Well-known member
Joined
Oct 7, 2012
Messages
199
Just curious if one knows if there is a difference inside between the lincoln CJ4000 vs 93642?
I see several outside changes such as the CJ having much smaller flanges on the side plates & a round lift pad? Some have a 2 piece handle I know but is everything else the same?
Strange as if the CJ didn't say USA I'd sure have guessed them as foreign. Thanks


*
 

craig h

New member
Joined
Feb 9, 2016
Messages
1
old floor jack, blue, maybe 50s, 60s or 70s. what is the best way to id this thing? it uses some large c clips to keep pivot shaft to the side plate, which is not that common in my search so far. how to post pictures of this thing? thanks craig it is probably not a walker though.
 

Pottman1

New member
Joined
Jul 20, 2016
Messages
1
The pics and text were great help. My jack and 4 5 ton jackstands were a wedding gift from my wife 40 years ago and finally needed rebuilt.Wish I would
have read the forum before I started.Thanks again.
 

jacked_72

Well-known member
Joined
Jul 22, 2012
Messages
1,237
Just got my tank nut off of my pre-1984 Walker 93632. The seal is bad and cracked. Its black rubber and is kind of tacky. The rod is the same configuration as the one in post 119. It looks like the seal just presses over the machined button at the end of the rod. Is this correct?

Couple of more questions: (1) is this a standard size seal that I can just replace instead of buying the whole kit; (2) there is not washer on the base of mine where tank mates with the block. Is this where I use the aerobic gasket maker compound?

Edit: I found an old post discussing the seal size and it is as follow: PN 227919, 15/16 X 1-7/16 X 1/4. This jibes with my measurements, but I would have called it a 32nd taller.
 
Last edited:

Hiball

Well-known member
Joined
Apr 30, 2009
Messages
14,027
Location
Missery
Just got my tank nut off of my pre-1984 Walker 93632. The seal is bad and cracked. Its black rubber and is kind of tacky. The rod is the same configuration as the one in post 119. It looks like the seal just presses over the machined button at the end of the rod. Is this correct?

Couple of more questions: (1) is this a standard size seal that I can just replace instead of buying the whole kit; (2) there is not washer on the base of mine where tank mates with the block. Is this where I use the aerobic gasket maker compound?

If it's a UCup, Yes it simply snaps over the button end.

Sure.. You can probably find someone willing to sell you only the Ucup, in my experience it's foolish to tear the Jack down and only replace the main ram seal. At Minninum you might as well replace the tank nut seal, but your better off to clean the valves out, replace the release oring, Pump Vees, valve components (balls).

I always use Aerobic gasket material where metal meets metal on both end of the tank, it's extra insurance IMO.
 

jacked_72

Well-known member
Joined
Jul 22, 2012
Messages
1,237
Another PSA. I got my seal kit from Hydraulic Parts Supply. At $27 I thought it was a bargain. However, the tank nut seal that seals the rod (Walker/Lincoln calls it a quad seal) is about 1/16" larger in the OD than the old one. I thought the old one might have just shrunk, but no way the new one was going in that slot. The quad seal OD in the kit (its labeled Kit No. 574 for the Walker 93632) is bigger than the backup ring OD in the kit. I have the Series E jack, and although this is a universal kit, the new quad seal won't fit. Maybe it will fit other series, but not the E. I suspect the wrong seal got sourced into the kit. The new quad seal was also a lot harder than the old one. Usually orings (buna n) get hard over time, but the one that came out was much softer than the new one. Price is good for the kit, but be careful taking out the old rod seal that is built into the tank nut.
 
Last edited:

Hiball

Well-known member
Joined
Apr 30, 2009
Messages
14,027
Location
Missery
Another PSA. I got my seal kit from Hydraulic Parts Supply. At $27 I thought it was a bargain. However, the tank nut seal that seals the rod (Walker/Lincoln calls it a quad seal) is about 1/16" larger in the OD than the old one. I thought the old one might have just shrunk, but no way the new one was going in that slot. The quad seal OD in the kit (its labeled Kit No. 574 for the Walker 93632) is bigger than the backup ring OD in the kit. I have the Series E jack, and although this is a universal kit, the new quad seal won't fit. Maybe it will fit other series, but not the E. I suspect the wrong seal got sourced into the kit. The new quad seal was also a lot harder than the old one. Usually orings (buna n) get hard over time, but the one that came out was much softer than the new one. Price is good for the kit, but be careful taking out the old rod seal that is built into the tank nut.

Pictures? Rod size didn't change from series to series in regards to the 93632, only the type of seals used, packing versus a quad ring. It's possible that the wrong size seal was included, but my gut tells me your issue is a related to trying to install the wrong part from the universal kit or the old backup ring is still in the groove.
 
Last edited:

jacked_72

Well-known member
Joined
Jul 22, 2012
Messages
1,237
No, its the right seal, just the wrong size. They must have included the wrong one in the kit then. I didn't take a picture comparing the old with the new, but the new one had an OD of 1.65". The new back up ring had an OD of 1.5". The new back up ring was the same OD of the quad seal I took out of the jack.
 
Last edited:

Hiball

Well-known member
Joined
Apr 30, 2009
Messages
14,027
Location
Missery
No, its the right seal, just the wrong size. They must have included the wrong one in the kit then. I didn't take a picture comparing the old with the new, but the new one had an OD of 1.65". The new back up ring had an OD of 1.5". The new back up ring was the same OD of the quad seal I took out of the jack.

IC, we'll give them a call and I'm sure they will send a replacement out, 1 1/2" is correct.
 
Last edited:

jtrichard

New member
Joined
Dec 5, 2016
Messages
1
Anyone have a old 93632 laying around they been parting out? I need a roller and pin (in the handle that pushes the pump plunger) Also a return spring Thanks guys for any help
 

Hustler388

Well-known member
Joined
Dec 26, 2012
Messages
191
Well I got it apart,The nut was tuff to get off,buggered up some, the shaft is showing some rust pitting, I already have the seal kit. soaking all the parts now,

The jack had started leaking down awhile back,but it started back to working, Figured better not trust it

What do you all think? Suggestions?

Recommend color/paint, last shop painted over all the labels.

I gota go back thru this thread read up some more

Thanks for any help

Rob
 

Attachments

  • IMG_7105 (Custom).jpg
    IMG_7105 (Custom).jpg
    100.3 KB · Views: 55
  • IMG_7104 (Custom).jpg
    IMG_7104 (Custom).jpg
    139.5 KB · Views: 58
  • IMG_7103 (Custom).jpg
    IMG_7103 (Custom).jpg
    120.6 KB · Views: 59
  • IMG_7101 (Custom).jpg
    IMG_7101 (Custom).jpg
    81.2 KB · Views: 60
  • IMG_7100 (Custom).jpg
    IMG_7100 (Custom).jpg
    106.2 KB · Views: 62
  • IMG_7110 (Custom).jpg
    IMG_7110 (Custom).jpg
    140.5 KB · Views: 68

FJ40Jim

Member
Joined
Sep 26, 2010
Messages
24
Location
central Ohio
Thanks to this thread I was able to successfully rebuild the hydraulic unit in my NAPA Fleet 91-632 F jack, which is simply a rebranded Walker 93632F.

The symptom was jack would not go up at all. Cause was a totally crumbled u-cup on the ram.

Hardest part was getting the tank nut loose. A chicomm 32mm impact socket was machined away to make a deepwell socket with 1/4" wide drive tangs, which did the trick eventually.

The rebuild kit was sourced off eBay. Putting the cleaned parts back together with new seals & cups was pretty straightforward. Hardest part of reassembly was getting the 2 return springs reattached. Grabbing the spring with a vise-grip and muscling it back on the pin eventually worked.

Thanks again to everyone who contributed to this thread.

Next project: rebuild chicomm floor jack that leaks externally.
 

dnolder

New member
Joined
Aug 23, 2014
Messages
2
I know this is an old post but I'm unable to get the pictures it says go to photo bucket.com/p500 but when I go to that site it says it is disabled. Anybody know how I can get pictures? I have this same jack and want to re build it. My problem is it jacks up but I have to use channel lock pliers to tighten handle more but it still slowly comes down.
 

123Go

Well-known member
Joined
Oct 7, 2012
Messages
199
Photobucket held millions of pics for ransom but try your browser settings? I have chrome and see them on my Samsung phone.
If a setting on your browser is clearly not the issue you can try downloading photobucket hotfix or photobucket embed fix. Just Google those you'll find them but read up some on them.
There are similar fixes for most other search browsers, very annoying I know and I hope that helps, but it caused a real problem for many websites not just here.
 

dnolder

New member
Joined
Aug 23, 2014
Messages
2
123GO thanks for reply. Maybe because I'm using a mac. I know I have to use chrome to look at my local credit union ifo. I'll give it a try
 

GoodGrief

New member
Joined
Oct 25, 2020
Messages
1
Location
Nampa, ID
Thanks so much for the write-up and info.

This weekend, I re-sealed my newly acquired 93632 with seals from Lazzars. I also machined a large impact socket to get the tank nut loose. The work was pretty strait forward -except the 3 leather seals in the pump which I overtightened slightly thinking they'd break in and free up.. which they didn't. It was fairly easy to pull the pump off, loosen the nut up slightly and re-install.

Of course, in the process of pulling the pump off again, I dropped the entire jack on my foot! Apparently, I've still a few lessons to learn the hard way.
 

50rdmstr

New member
Joined
Jun 20, 2010
Messages
2
Well,

My buddy asked for his vent cap back (mine broke off) and the jack was starting to leak down so a PM was sent to Hiball for a Walker 93632 kit and vent cap. It came in yesterday (thanks Steve...) so I thought this would be a good Saturday morning project.

I don't know if you guys would be interested or not but thought I would add this in case anyone else wanted to know how this series of Walker jack comes apart.
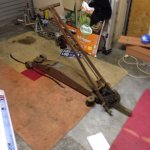
Walker01.jpg
The jack....

Walker02.jpg
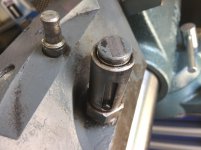
Implements of destruction and partially disassembled. All you need to do on this jack to get the bottle out is remove the 4 side bolts and then loosen the nuts on each side of the lift arm pivot.

Walker03.jpg
Bottle jack free of the frame and the fun can start.

Walker04.jpg
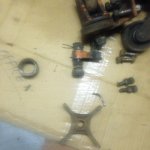
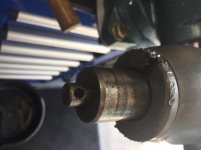
Pump assembly removed from the jack and partially disassembled as well as the release assembly.

Walker05.jpg
Disassembled pump assembly.

Walker06.jpg
Completely torn apart pump assembly. Just take your time when driving the retaining pin out and everything should go fine.

Walker07.jpg
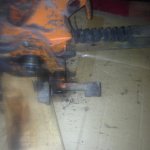
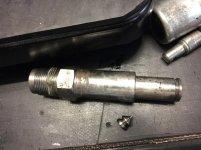
Next up was the ram but I did not have a homemade socket for this particular tank nut. I usually make one from schedule 80 or 120 pipe, a piece of plate and a nut welded to it but this time I decided to cheat. The local bargain tool store had some VERY cheap Chinese Budd sockets on sale so what the hell... 15 minutes with a cutoff wheel, a little file work to make it fit and a little bit of impacting with the MG725 and presto.

Walker08.jpg
Tank nut loose in 5 seconds.....

Walker09.jpg
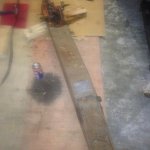
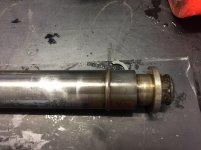
Main ram and reservoir pulled.

Walker10.jpg
Easy to spot the problem with this one. The main seal is ripped from the center section along half of its diameter.

Walker11.jpg
Almost forgot the release valve. It should have been removed when I pulled the release assembly out. It's tough getting old and forgetting things...

Walker12.jpg
Next up are the pressure and safety valves under these expansion plugs. I just center punch them and then pop them out.

Walker13.jpg
Here they are removed and ready to start with the valves. The valve on the left is the safety valve and the one on the right is the pressure/suction valve.

Walker14.jpg
First up is the safety valve. NOTE !!!!! make sure you look at the location the screw is at and then TIGHTEN and count the total amount of turns until it bottoms out. This way you can get the jack back to where it was (+/-). In this case 1 1/2 turns was the magic number. The valve is to the left, next is the spring and cup and then the adjustment screw.

Walker15.jpg
Next up is the pressure and suction valve. This screw will take a LOT to break it loose. Get your big screwdrivers out with a bolster and wrench. You WILL need them. From left to right we have the suction valve, suction spacer, discharge valve, discharge spacer, gasket and high pressure plug.

Walker16.jpg
Just for grins, I removed the gallery plug that is located under one of the side bolts holding the pump in the jack frame. I just like to make sure that everything is nice and clean before starting to put it back together.

One thing that you will need on most of these rebuilds is a GOOD set of mini picks. The best that I have found so far are these little Snap-on ones but make sure yours are tough and sharp.

That's it for a complete teardown of the jack. Now I just need to find the time this weekend to clean it all up and re-assemble the little ******. If you guys want me to take photos on putting Humpty Dumpty back together again, just let me know.
 
To avoid these ads, REGISTER NOW!
Top Bottom