To avoid these ads, REGISTER NOW!

Walker Floor Jack worth repairing?

OP
B

bdresch

Well-known member
Joined
Mar 2, 2015
Messages
126
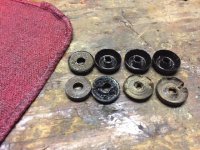
I'm still waiting on the seal kit, so in the meantime I turned to the casters.
ImageUploadedByTapatalk1426301736.501577.jpg
They had been worn almost into cams. The shafts were pressed in, so I had to cut them out and drill out the remaining pieces of shaft.
ImageUploadedByTapatalk1426301810.470641.jpg
$6 worth of box store cast iron casters and I'm back in business! I really wanted to use American made casters, but I couldn't find any local.
 
To avoid these ads, REGISTER NOW!
OP
B

bdresch

Well-known member
Joined
Mar 2, 2015
Messages
126
Got the seal kit Saturday and let the leather ones soak for 2 full days. First thing I noticed was that the suction ball in the kit was 7/32 but the suction ball I pulled out of my valve was only 5/32. I used the 7/32 ball like the service manual said.

Secondly, the ram didn't go in too bad. I didn't have the a nice machined aluminum block to crimp it, so I just kept pressing and rolling it against my vise anvil until it was crimped small enough to go in.

Thirdly, problems with the pump. I built it up with the 3 leather Vees and the rubber seal. Then added the steel washer as EDGAR suggested and nut as loosely as possible. The pump is damn near impossible to move. I installed it into the jack with the spring and filled it. When I press down on the pump, the jack extends but the pump piston doesn't pop back out without me grabbing the coil and pulling fairly hard. I thought maybe working it would help so I reinstalled it back into the jack and tried working it for a while. I worked it for a good 10-15 minutes but it piston still won't come out without pulling it. The arm raises and holds as it should.

Should I pull out that washer from the pump? Any other ideas?
 
OP
B

bdresch

Well-known member
Joined
Mar 2, 2015
Messages
126
I pulled the pump back out and took out the leather Vees. The pump moves smooth without the seals but with the seals in, it's almost impossible. I soaked them in oil for 2 days and they are still hard as a rock. Should they be somewhat soft/pliable? Did I get bad/old Vees?
 

Hiball

Well-known member
Joined
Apr 30, 2009
Messages
14,035
Location
Missery
I pulled the pump back out and took out the leather Vees. The pump moves smooth without the seals but with the seals in, it's almost impossible. I soaked them in oil for 2 days and they are still hard as a rock. Should they be somewhat soft/pliable? Did I get bad/old Vees?

The Vee's hardness is dependent on how much wax it was impregnated with during the manufacturing process. Something is wrong.. Maybe some pictures showing your assembly order. Where did you get your seal kit from?

Compare the stack height of your older seals/spreader versus the Newer seals/spreader/washer, obviously the older seals will be more compressed. Do the Vees appear to have the same OD? It's possible that over the years that the stem was damaged/shortened and/or the washer is too thick and causing too much compression, which can cause too much cylinder wall pressure. IRC the older ones didn't use washers but had a much more robust spreader, so you might try reusing the old spreader/new vees.
 
Last edited:
OP
B

bdresch

Well-known member
Joined
Mar 2, 2015
Messages
126
ImageUploadedByTapatalk1426648080.899472.jpg
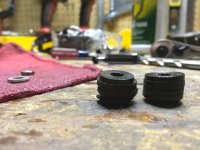
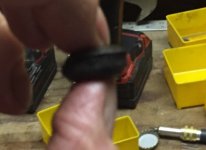
I have the spreader switched. The one next to the old seals is actually the new spreader.
ImageUploadedByTapatalk1426648101.055909.jpg
ImageUploadedByTapatalk1426648119.552297.jpg
I don't think a short stem is the issue, I tried it without the washer and with the nut actually loose on it. Still can't move the piston.

I bought the seal kit from an eBay user out of Ohio called buckeye1298.
 
Last edited:

Hiball

Well-known member
Joined
Apr 30, 2009
Messages
14,035
Location
Missery
ImageUploadedByTapatalk1426648080.899472.jpg
I have the spreader switched. The one next to the old seals is actually the new spreader.
ImageUploadedByTapatalk1426648101.055909.jpg
ImageUploadedByTapatalk1426648119.552297.jpg
I don't think a short stem is the issue, I tried it without the washer and with the nut actually loose on it. Still can't move the piston.

I bought the seal kit from an eBay user out of Ohio called buckeye1298.

Just to clarify... With the seals installed, It will be fairly snug in the cylinder bore. Below is my Method that I have used for years and passed onto many members.

1. Install the Vees, very gently tighten the nut to hand tight.
2. Lube, I have a cup full of oil and I simply immerse the entire end of the pump piston.
3. PULL the pump piston Into the cylinder, it will take a gentle tap on solid surface to fully clear the cylinder.
4. Install cross pin and believe it or Not if you get off spline it can cause enough expansion where it will bind the pump piston in the bore at the upper end. This is why I recommend marking the piece and installing it in the same direction as it was removed.
5. Push the pump piston to the upper limit, install the spring, caging and C-Clip.
6. Mount the pump piston assembly into a vice on the hex portion, where you can push down on the piston and adjust the nut to where there is good resistance but not enough to where the spring can't fully retract. It's a delicate setting that can create enough vacuum to pull oil off load and not ruin the seals under pressure when they expand.

Does the pump piston pressure increase when the pin is installed? I wonder if #4 is your problem.
 

Hiball

Well-known member
Joined
Apr 30, 2009
Messages
14,035
Location
Missery
Oh.. And after I get thee tension set correctly, I dot punch the inside of the nut to prevent it from backing off.
 

Laro13

Well-known member
Joined
Oct 8, 2011
Messages
219
Location
The Netherlands, Europe
I'm still waiting on the seal kit, so in the meantime I turned to the casters.
ImageUploadedByTapatalk1426301736.501577.jpg
They had been worn almost into cams. The shafts were pressed in, so I had to cut them out and drill out the remaining pieces of shaft.
ImageUploadedByTapatalk1426301810.470641.jpg
$6 worth of box store cast iron casters and I'm back in business! I really wanted to use American made casters, but I couldn't find any local.

Where did you found those casters?

Mine are also a bit worn.:bounce:

 
OP
B

bdresch

Well-known member
Joined
Mar 2, 2015
Messages
126
Where did you found those casters?


Mine are also a bit worn.:bounce:


The casters came from a wonderful store we have in WI called Fleet Farm.

http://www.fleetfarm.com/detail/shepherd-hardware-produc-cast-iron-rigid-caster/0000000052780

I used the 2.5" OD ones. For an axle I used an M12 x 75mm class 10.9 bolt. The 75mm bolt gave me a 45mm long unthreaded length, so the roller can run on the solid shank instead of the threads. Then I just cut the extra length off the end. I also used nylon insert lock nuts so I didn't have to run the nut tight against anything.
 
OP
B

bdresch

Well-known member
Joined
Mar 2, 2015
Messages
126
Just to clarify... With the seals installed, It will be fairly snug in the cylinder bore. Below is my Method that I have used for years and passed onto many members.

1. Install the Vees, very gently tighten the nut to hand tight.
2. Lube, I have a cup full of oil and I simply immerse the entire end of the pump piston.
3. PULL the pump piston Into the cylinder, it will take a gentle tap on solid surface to fully clear the cylinder.
4. Install cross pin and believe it or Not if you get off spline it can cause enough expansion where it will bind the pump piston in the bore at the upper end. This is why I recommend marking the piece and installing it in the same direction as it was removed.
5. Push the pump piston to the upper limit, install the spring, caging and C-Clip.
6. Mount the pump piston assembly into a vice on the hex portion, where you can push down on the piston and adjust the nut to where there is good resistance but not enough to where the spring can't fully retract. It's a delicate setting that can create enough vacuum to pull oil off load and not ruin the seals under pressure when they expand.

Does the pump piston pressure increase when the pin is installed? I wonder if #4 is your problem.


I put the Vees in finger tight. Lubed then up good and pulled the piston in from the end. It takes more than a gentle tap to clear the end. Once the piston is in, I can't move the piston either direction by hand. The only way to budge it either direction is to rap on each end with a dowel, or if I run a punch through the hole I can just barely get enough leverage to move it by hand without rapping on the ends. ImageUploadedByTapatalk1426681101.147732.jpg
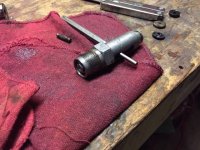
I then tried the piston without seals thinking maybe I deformed the piston or housing. ImageUploadedByTapatalk1426681167.562973.jpg
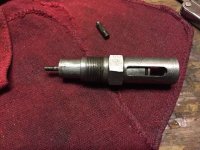
The piston starts sliding in freely.
ImageUploadedByTapatalk1426681192.908147.jpg
When the end of the piston reaches the end of the slot I get a lot of resistance and have to give the piston a good rap on the end to get past this point.
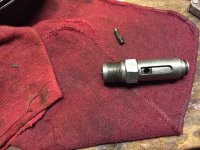
ImageUploadedByTapatalk1426681300.212457.jpg
But once the piston gets into the working range it moves smoothly with no resistance.

So without seals, the piston moves freely through the working range with no binding, but with the leather Vees it binds. I wonder if maybe the housing is a little deformed, not enough to affect it without seals but with the extra resistance of the seals it binds?

As an additional test/thought I tried using one of the other seal types that came with the kit. There was an O-ring backed U cup (I think that's the term for it) that fit in the pump so I tried that. The pump moved smoothly and easily with that installed in place of the Vees so I tried putting it in the jack. It was able to lift the arm of the jack with no load, but when I tried it with a load, oil shot out of the pump. I assume that's because the U cup had no way of sealing around the threaded stem.

So at this point I'm stuck. Should I try to get a different set of Vees and see if that's it? Is there a way to use that U cup and seal around the stem? Or should I just give up on this pump and try to replace it?
 
Last edited:

Hiball

Well-known member
Joined
Apr 30, 2009
Messages
14,035
Location
Missery
Look down inside the cylinder, paying close attention to the inside of the slotted grooves, Also feel around with your fingers and see if you might have swollen some of the material when removing the cross pin. Outside of that, look for any out of roundness if you have any ID mic's, something has happened :confused: on occasion Ive had to file a little material off near the grooves, and almost always near the top of the pump piston where the repeated contact of the handle Assembly roller has made contact over the years. Did you have any problems removing the piston from the cylinder bore on initial tear down?

EDIT.. Im on the computer now, Check the Entire Pump Piston looking for any Burs, Especially near the bottom End as it appears in the picture it might be a bit rough.
 
Last edited:
To avoid these ads, REGISTER NOW!
OP
B

bdresch

Well-known member
Joined
Mar 2, 2015
Messages
126
The edges of the slots in the housing had some good edges. I deburred those and the edges on the piston while I was at it. Cleaned again, lubed, assembled, and now it works! It still moved a little harder than I expected without the spring installed, but once in put it all together it lifted the backing my 6000lb Ford Flex! Thanks for all the help! It was definitely more work than I expected but for less than the cost of a HF China special, I have an American made one so I'm happy! I wouldn't have been able to get it working without this forum![emoji482]
 

EDGAR

Well-known member
Joined
Aug 21, 2010
Messages
437
But did you put back the washer over the rubber expander? The old rubber expander had the depression on top indicating the size of the washer. The use of washer is to spread the pressure of the nut over a wider area but also to prevent the rubber expander from flexing up every time the pump piston moves down because there is no support for the expander back side outer edge without the washer. The leather seals will push against the rubber expander and this will flex back some distance, maybe a little or maybe a lot. This may cause a problem over time, :dunno: but anyway, the washer is there for a reason. The nut alone does not provide the necessary support for the outer edge of the rubber expander, and this edge is the one that actually expands and supports (or backs) the leather seals lips.

The parts breakdown for the early Walkers as well as the parts breakdown for the more modern Hein Werner version calls for the use of the washer. In the early Walker parts breakdown is identified as part # 34. In the newer HW parts breakdown it is #20. In other in-between parts breakdown is identified as part no. 204233.

http://www.hcrcnow.com/uploads/drawings/Walker_93632_Series_F_Hydraulic_Service_Jack_1.5_Ton.pdf

http://www.hcrcnow.com/uploads/drawings/Hein-Werner_HW93642_Service_Jack_2_Ton.pdf
 

Hiball

Well-known member
Joined
Apr 30, 2009
Messages
14,035
Location
Missery
In the case of the OP's series 8xx/7xx "If" the Oem specific rigid spreaders are utilized, the Washer doesn't need to be utilized. Here is a link to the OP's Era, which doesn't show a washer because I suspect the spreader was more ridgid/robust and pre-dates the current Buna-N that came in later series and is utilized in current production. I know for a Fact based off my own experiences that on occasion you will run across the older ones, Obviously as jacks are serviced throughout the years parts are generally updated, So if you decide to use the updated version or your jack utilized the newer version, you definitely need to use a washer as they are much smaller and softer.


:3gears:
 
Last edited:
OP
B

bdresch

Well-known member
Joined
Mar 2, 2015
Messages
126
I did reuse the older wider speader without the washer. The old one doesn't really seam any stiffer than the new one though, just bigger in diameter. I actually think I will be pulling the pump off to adjust the tension as I just left it finger tight to see if it would move. Since mine has the exposed spring that just bears upon the manifold block and not the enclosed spring like the current ones, I couldn't preassemble the spring on and test it in a vise like you mentioned.
ImageUploadedByTapatalk1426789359.445247.jpg
My thought was to clamp the hex in my vise and install the spring with it just bearing up on the vise and adjusting the seal tension that way.
 

Hiball

Well-known member
Joined
Apr 30, 2009
Messages
14,035
Location
Missery
I did reuse the older wider speader without the washer. The old one doesn't really seam any stiffer than the new one though, just bigger in diameter. I actually think I will be pulling the pump off to adjust the tension as I just left it finger tight to see if it would move. Since mine has the exposed spring that just bears upon the manifold block and not the enclosed spring like the current ones, I couldn't preassemble the spring on and test it in a vise like you mentioned.
ImageUploadedByTapatalk1426789359.445247.jpg
My thought was to clamp the hex in my vise and install the spring with it just bearing up on the vise and adjusting the seal tension that way.

I would advise utilizing a washer to support the spreader/vee's more evenly then, Also don't get to caught up in over tightening the seals. The Vee's will expand under load, as mentioned earlier you are really only trying to maintan vaccuum on the up stroke.
 
OP
B

bdresch

Well-known member
Joined
Mar 2, 2015
Messages
126
How do I know whether or not I'm maintaining vacuum on the up stroke?

I only ask because it makes a slurpy sound on the upstroke and was wondering if that's anything.
 
Last edited:

Hiball

Well-known member
Joined
Apr 30, 2009
Messages
14,035
Location
Missery
How do I know whether or not I'm maintaining vacuum on the up stroke?

It's not Rocket Science, the main thing is simply not to overtigntened the nut to the point where you are wearing the seals prematurely, as previously discussed you don't want to get to the point where the seals cant overcome the spring off load. Obviously if the seals where too loose, you would "eventually" suffer in the performance department and more than likely get some leakage, as you use the jack the vee's will compress on there own and almost be formed as 1 solid piece. The beauty of this type of seal as it lends to longevity with the ability to sure up any leakage as the Jack is used over the years.

I only ask because it makes a slurpy sound on the upstroke and was wondering if that's anything.

Its Hard to Say.. Did you by chance remove the Tank Nut? I only ask because if you didn't remove it and simply replaced the Piston seal, Its extremely plausible that there could be a considerable amount of sludge in the bottom of the reservoir. If you couple that with the fact that the Intake is at the bottom, and More than likely the Screen is still intact as they where held in place with a small peened bracket, The "Slurpy" sound could be the oil being restricted through the screen. Does the "Slurpy" Sound come after the Jack is nearing its lift limit, Which could be a indication of not enough Oil in the reservoir and you are simply hearing Oil/Air being pulled into the pump cylinder.

BTW.. As im sure your not surprised, That Pump Piston spring and lack of caging isn't factory.. LOL.
 
Last edited:
OP
B

bdresch

Well-known member
Joined
Mar 2, 2015
Messages
126
Its Hard to Say.. Did you by chance remove the Tank Nut? I only ask because if you didn't remove it and simply replaced the Piston seal, Its extremely plausible that there could be a considerable amount of sludge in the bottom of the reservoir. If you couple that with the fact that the Intake is at the bottom, and More than likely the Screen is still intact as they where held in place with a small peened bracket, The "Slurpy" sound could be the oil being restricted through the screen. Does the "Slurpy" Sound come after the Jack is nearing its lift limit, Which could be a indication of not enough Oil in the reservoir and you are simply hearing Oil/Air being pulled into the pump cylinder.

I did get the tank nut off and clean the tank out. I went out and tried it tonight after work. When I lifted the car I only noticed the slurpy sound for the first few strokes. Once the jack starts taking load the sound goes away.
 

Hiball

Well-known member
Joined
Apr 30, 2009
Messages
14,035
Location
Missery
I did get the tank nut off and clean the tank out. I went out and tried it tonight after work. When I lifted the car I only noticed the slurpy sound for the first few strokes. Once the jack starts taking load the sound goes away.

Lower seat needs some work, IRC you mentioned earlier that the Jack had a improper sized suction ball when you got it, when you put the correct sized ball in, the seating area changed. Obviously it's close as it's working, but with only the lift arm load it's not creating enough down pressure fast enough to force the seat, thus "Slurp" as oil is transferred back into the reservoir. Once the lift arm contacts the load, it increases the valve pressure required to lift the upper ball, thus seating the lower ball enough to lift the load (probably still losing some oil) My advice, elevate the rear of the Jack to sway the oil to the opposite end of the reservoir, pull the valve components out, drop the proper lowered ball back in the hole, find a suitable sized punch that will fit into the lower hole and is bigger than the ball. Lightly give the ball some taps with a hammer to attempt to re-form the seat back to the proper size. Rinse and repeat as necessary..
 
Last edited:
OP
B

bdresch

Well-known member
Joined
Mar 2, 2015
Messages
126
I'll put that washer back in and working on the valve seat hopefully this weekend. I gotta change out the struts on my car first though. You had mentioned letting the jack sit under load after installing a leather seal so I jacked up my car last night and left it. It didn't drift down or leak overnight, so good sign!

ImageUploadedByTapatalk1426872728.144623.jpg
 
To avoid these ads, REGISTER NOW!
Top Bottom