

You are using an out of date browser. It may not display this or other websites correctly.
You should upgrade or use an alternative browser.
You should upgrade or use an alternative browser.
Walker Floor Jack worth repairing?
- Thread starter bdresch
- Start date


Lx460
Well-known member
Contact member Hiball. He is the resident hydraulic jack guy here and really knows his stuff. I'm fairly sure he sells the kits. I'd bet they're around $50 but you'd have to ask him. I'd say it most definitely worth getting rebuilt, they certainly don't make them like that anymore. Not for under a $100 with new seals anyways...
Its Impossible to say whether its worth rebuilding without knowing Internal condition, Everything can be Repaired/Made but in the end is it worth it from a $$$$. What is it a 867? So like $30 bucks or so for a seal kit.
Lx460
Well-known member
Should be a 1.5T model I think.
$25 plus $30 for a seal kit and I'm in half the price of a HF jack. I guess it's worth a shot. Is an 867 any good if that's what it is? I don't do anything huge. Just the normal maintenance of my 2-3 cars.
The design is solid, what you need to aware of is that it utilizes Leather Pistons seals on the ram, which take some care to install properly, the tank nut is a spanner version and will require some socket modifications along with a Hefty impact and Stable platform capable of securing the hydraulic unit so you can remove it. If you pursue the Jack, inspect the wheels, casters and the ram finish for major indications of Rust/pitting and tear the Jack down and inspect "Prior" to buying a kit. The Jack itself is 60+ years old, things happen especially when they sit empty for extended period of times.
A HF jack comparison is so wrong.
Just got off the phone with the guy. It was his dad's and he doesn't know much about it. He said last time he remembered it working was maybe 15 years ago. For $25, I'll try it. I've got a big vice and big breaker bars so I should be able to handle the rebuild. I'll post some pics when I get it.
Picked it up today. Damn is this thing heavy! Gotta love American! Good news is there isn't much rust on the jack itself, mostly just grime. The casters swivel and turn perfect. The front wheels turn good but have a bit of wobble, I am assuming I can replace those bearings? Bad news is that i pulled the plug and its completely dry. No water came out and no visible rust from looking in the plug, so hopefully the internals are good. I don't have any jack oil or atf fluid so I will pick some up tomorrow, fill it, bleed it, and try it. Maybe it will lift?
BTW, the tag says Walker Lift A Car Model 867 Series E if that means anything.
BTW, the tag says Walker Lift A Car Model 867 Series E if that means anything.
I tried filling it tonight and have some questions. It was totally dry, so full of air. The plug is in the block and I filled it until it was just below where the plug would go in. I put in the plug and try to pump and get nothing, just the sound of sucking air. I pull the plug out again and the level has dropped so I add more and try again. Same thing. I read on Hyjacks.com to prime it by pulling out the rod with the release closed, then open the release. I pulled the rod out fully and it retracted by itself (with the springs) about 3/4 of the way, then I had to open the release to retract it the rest of the way. I am wondering where to go from here, is it not primed and I have to get it primed? Or are my pump seals probably shot and I need to start the teardown?
When I pulled out the rod, no pitting on it so that seems good. Also the jack mechanism worked smoothly. And when I used the release for that 1/4 of the stroke that seemed to work smoothly and controlled too.
When I pulled out the rod, no pitting on it so that seems good. Also the jack mechanism worked smoothly. And when I used the release for that 1/4 of the stroke that seemed to work smoothly and controlled too.
Lookin4'67Galaxieconv
Well-known member
I've been looking for a floor jack on CL and ran across this one for $25. Seller says it doesn't work and he doesn't know why, but he thinks its repairable.
Of course he's going to say that, he's trying to sell it!

I tried filling it tonight and have some questions. It was totally dry, so full of air. The plug is in the block and I filled it until it was just below where the plug would go in. I put in the plug and try to pump and get nothing, just the sound of sucking air. I pull the plug out again and the level has dropped so I add more and try again. Same thing. I read on Hyjacks.com to prime it by pulling out the rod with the release closed, then open the release. I pulled the rod out fully and it retracted by itself (with the springs) about 3/4 of the way, then I had to open the release to retract it the rest of the way. I am wondering where to go from here, is it not primed and I have to get it primed? Or are my pump seals probably shot and I need to start the teardown?
When I pulled out the rod, no pitting on it so that seems good. Also the jack mechanism worked smoothly. And when I used the release for that 1/4 of the stroke that seemed to work smoothly and controlled too.
Leather Piston Seals, Especially USED seals Generally don't carry enough cylinder wall pressure to Create the Vacuum to Pull Oil and "Prime". About the Only time I ever lift up on the Lift Arm to assist with bleeding is with Air operated Jacks to help purge the Air side of things. Im not trying to be a ****, But Generally there is a reason things sit in the Corner of shops for 15 years. MY Advice and take it as you will, Tear into the Jack and get a first hand view of what your dealing with in regards to the Seal/Surface conditions etc.. Don't Guess.
Oh.. And that style of Walker is a Bear to fill with Hydraulic Jack oil, I generally fill them before installing in the Frame after I remove the Release Valve. I do this to create a Secondary path for air to escape while filling via the fill hole and Don't want to fill it completely up.
Good Luck.
Last edited:
Leather Piston Seals, Especially USED seals Generally don't carry enough cylinder wall pressure to Create the Vacuum to Pull Oil and "Prime". About the Only time I ever lift up on the Lift Arm to assist with bleeding is with Air operated Jacks to help purge the Air side of things. Im not trying to be a ****, But Generally there is a reason things sit in the Corner of shops for 15 years. MY Advice and take it as you will, Tear into the Jack and get a first hand view of what your dealing with in regards to the Seal/Surface conditions etc.. Don't Guess.
Oh.. And that style of Walker is a Bear to fill with Hydraulic Jack oil, I generally fill them before installing in the Frame after I remove the Release Valve. I do this to create a Secondary path for air to escape while filling via the fill hole and Don't want to fill it completely up.
Good Luck.
Not taken as a **** at all. I'm trying to learn what I can as I go, the only jack I've ever had was a Autozone trolley jack and none of the info on the web I've dug up has said anything about how to fill through the block so I wanted to make sure I wasn't just missing something. The only reason I was even going to try to fill it was that I thought on the 1 in 1,000,000 chance the jack just slow leaked in the guys garage over the years and a refill would get it to work was worth the 10 minutes it would take. Now that I know filling it isn't the problem, I will start tearing into it.
2 more questions then. If/when I would go around to filling this style, how do I know how full? I read in your sticky to just cover the main cylinder, but since I'm filling through the block I can't see that.
Secondly. How do I get at the relief and check valves? They both have what appear to be solid plugs where I though there should be screws. Do I gotta drill those plugs out?
Not taken as a **** at all. I'm trying to learn what I can as I go, the only jack I've ever had was a Autozone trolley jack and none of the info on the web I've dug up has said anything about how to fill through the block so I wanted to make sure I wasn't just missing something. The only reason I was even going to try to fill it was that I thought on the 1 in 1,000,000 chance the jack just slow leaked in the guys garage over the years and a refill would get it to work was worth the 10 minutes it would take. Now that I know filling it isn't the problem, I will start tearing into it.
2 more questions then. If/when I would go around to filling this style, how do I know how full? I read in your sticky to just cover the main cylinder, but since I'm filling through the block I can't see that.
Secondly. How do I get at the relief and check valves? They both have what appear to be solid plugs where I though there should be screws. Do I gotta drill those plugs out?
I don't know the Exact fluid Ounce figure for the 867, but 8 ounces should get you close. The Valves are covered with concave freeze plugs, You can either drill them out or use a sharp punch to create a hole and then simply pry them out.
Here is a thread concerning a 93632, If you notice the Block will have some similarities with subtle changes to the type of Main Seal and Tank Nut Seal and the Fill Hole location.
Do I need to remove both the inner and outer nuts to get the ram out, or can I get the ram out just by removing the inner nut and the packing? That's what I think this x section is trying to tell me.
Yes. Some of the early models could be serviced by removing the inner/washer but I'm sure the 8xx won't allow that, not to mention it was damn near impossible to get the **** out of the bottom that way.
Hiball. Do you think it will be a waste trying a bearing locknut hook spanner with a big cheater instead of cutting up an impact socket to get off the tank nut?
http://m.protoolwarehouse.com/prod-...-To-3%22.htm?gclid=CN2A6ozglMQCFVFp7AodTmMAPQ
http://m.protoolwarehouse.com/prod-...-To-3%22.htm?gclid=CN2A6ozglMQCFVFp7AodTmMAPQ
Hiball. Do you think it will be a waste trying a bearing locknut hook spanner with a big cheater instead of cutting up an impact socket to get off the tank nut?
http://m.protoolwarehouse.com/prod-...-To-3%22.htm?gclid=CN2A6ozglMQCFVFp7AodTmMAPQ
That will work for the inner spanner, but won't touch the tank nut. I honestly don't think a breaker bar/socket will work either, it will just want to cam out.
Sounds good. I'll order a couple sockets to cut up then. If I can't get it off with my little impact at home I can take it to work and use the big guns. We got all the way up to 1" drive hydraulic impacts that go over 3000 ft-lb there.
I got the inner spanner off and pulled out the packing and ram. It came off easy with a hook spanner wrench. It looked like someone had taken it off before with a hammer and punch. I haven't gotten the tank nut off yet because I haven't had a chance to make a HF run and get a socket, but I thought I would get as far as I could.
The packing was 3 leather seals as expected looking at that cutaway, but the ram seal looks rubber or plastic and pretty shot.
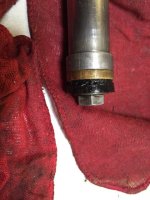
How does the ram surface look? Seems s little scratched up to me, but I don't know how smooth this stuff needs to be. The inner bore looks similarly scratched.
The packing was 3 leather seals as expected looking at that cutaway, but the ram seal looks rubber or plastic and pretty shot.
How does the ram surface look? Seems s little scratched up to me, but I don't know how smooth this stuff needs to be. The inner bore looks similarly scratched.
I got the inner spanner off and pulled out the packing and ram. It came off easy with a hook spanner wrench. It looked like someone had taken it off before with a hammer and punch. I haven't gotten the tank nut off yet because I haven't had a chance to make a HF run and get a socket, but I thought I would get as far as I could.
The packing was 3 leather seals as expected looking at that cutaway, but the ram seal looks rubber or plastic and pretty shot.
How does the ram surface look? Seems s little scratched up to me, but I don't know how smooth this stuff needs to be. The inner bore looks similarly scratched.
It's possible in that jacks lifetime that's it's been serviced a time or two, A lot of shops don't know how to properly install leather seals, so as materials have evolved they replaced it with a poly material. In regards to the scratches, it will be in the best interest of the seals longevity to clean them up as much as possible.
Also, is there anything to be gained by pulling off the tank at this point? It seems that I can replace all the rod seals right from the end. Is there something I should or definitlt shouldn't use to flush the cylinder out with? I've been cleaning all the parts in simple green.
Holding the rubber seal in was this steel backer ring, and between the steel ring and the ram was this little (leather?) seal. Is that steel ring and small seal original?
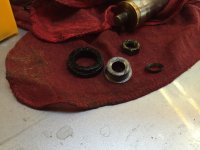
None of that is OEM, outside of the Nut. It appears someone made a insert to fit the ID of the seal.
Also, is there anything to be gained by pulling off the tank at this point? It seems that I can replace all the rod seals right from the end. Is there something I should or definitlt shouldn't use to flush the cylinder out with? I've been cleaning all the parts in simple green.
It will be damn near impossible to clean the inside of the reservoir without removing the tank nut, unless you don't have the means of fear damaging the tank nut, I would just remove it.
So am I stuck just replacing with the same size U Cup? Or is all that's needed for using a leather seal the deal and nut? I've never seen a leather seal installed.
The Only thing missing in regards to OEM parts to Utilize a Leather piston seal is the Washer that fits down inside the Seal and gives the Nut something to distribute the clamping force. I Cant comment on what you have there in regards to Modifying the Ram to Utilize a Modern Ucup, The Only Downfall I can see is preventing the Pressurized Oil from getting between the ID of the Adapter and the Threaded Portion, I suspect that is what the Small Leather washer/Beveled portion is trying to contain. I have Numerous pictures of Leather Piston seals floating around here, The biggest downfall is people don't get enough Crimp and or Damage the Sealing lips during installation.
Anything special about the sealing washer? Do I just get something as close as I can to the ID of the leather seal lip?
What's the procedure for installing the ram with the leather seal? I assume the lip points down so the pressure would expand it against the walls.
Sorry for so many questions, I just wanna do it right.
What's the procedure for installing the ram with the leather seal? I assume the lip points down so the pressure would expand it against the walls.
Sorry for so many questions, I just wanna do it right.
Anything special about the sealing washer? Do I just get something as close as I can to the ID of the leather seal lip?
What's the procedure for installing the ram with the leather seal? I assume the lip points down so the pressure would expand it against the walls.
Sorry for so many questions, I just wanna do it right.
Nothing special, it's a thicker washer that closely matches the ID of the piston seal along with the threaded stem.
Seal needs to soak in hydraulic Jack oil for 36-48 hours, this will soften it up enough to where you can crimp the face so it's not damaged upon installation. The crimping die is a big piece of aluminum block that has been machined down similar to the inside of a funnel, you install the seal on the ram (face towards pressure) and then with a hammer drive the ram into the crimping die until the flared portion is pulled inward. Once installed you put the Jack under load and leave it, this will expand the face to the cylinder walls.
Okay next few questions/mysteries. When I took apart the pump there was 1 neoprene seal stacked on top of 3 leather seals. Is that correct? I wouldn't have questioned it, but know they changed the ram seal, I don't know what else got messed with. 
Secondly, there was both a leather seal and an o ring sealing where the release assemble goes into the block. Is this right or should it be one or the other?
Secondly, there was both a leather seal and an o ring sealing where the release assemble goes into the block. Is this right or should it be one or the other?
Okay next few questions/mysteries. When I took apart the pump there was 1 neoprene seal stacked on top of 3 leather seals. Is that correct? I wouldn't have questioned it, but know they changed the ram seal, I don't know what else got messed with.
Secondly, there was both a leather seal and an o ring sealing where the release assemble goes into the block. Is this right or should it be one or the other?
Everything looks and sounds correct.
The rubber washer stacked over the 3 leather seals serves the function of an expander for the leather seals. It is used to adjust the tension of the leather seals against the pump cylinder. So, do not tighten the nut completely or the leather seals will expand too much and make it difficult or impossible to insert the pump piston in the cylinder.
After the required oil soaking of the 3 leather seals and the mounting of such in the pump piston, insert the pump piston in the cylinder (lubrication required) and tighten the nut a bit and then, move the piston up and down the cylinder and feel how tight or loose it is. If it is too easy to move tighten it a bit more, if it is rather hard to pull, or push, loosen the nut a bit. To tighten (or loosen) the nut, it is not necessary to remove the pump piston from the cylinder, just get the nut a little past the bottom edge of the cylinder, if you use an open wrench or deeper if you use a socket.
The nice thing about this is that years later you may tighten the nut a bit if there is some leakage from the pump piston (assuming the leather seals are still in a good enough condition to allow this).
It seems there is a steel washer over the rubber expander shown in the photo; if there isn't, one should be installed between the rubber seal and the nut.
As for a conversion from a leather piston cup to an u-cup, the preferred method would be to machine a solid adapter (aluminum, brass, steel, nylon) and not use a stamped adapter. The inside hole of the adapter could be threaded or left unthreaded in which case, it should be a close fit with the threaded stem. In both cases, a liquid sealant has to be used to prevent oil from leaking through the hole. Also, a big enough washer has to be used under the nut to retain the u-cup. Not that there is a need to do this adapter thing, just in case someone desires to use an u-cup instead of a leather piston cup.
After the required oil soaking of the 3 leather seals and the mounting of such in the pump piston, insert the pump piston in the cylinder (lubrication required) and tighten the nut a bit and then, move the piston up and down the cylinder and feel how tight or loose it is. If it is too easy to move tighten it a bit more, if it is rather hard to pull, or push, loosen the nut a bit. To tighten (or loosen) the nut, it is not necessary to remove the pump piston from the cylinder, just get the nut a little past the bottom edge of the cylinder, if you use an open wrench or deeper if you use a socket.
The nice thing about this is that years later you may tighten the nut a bit if there is some leakage from the pump piston (assuming the leather seals are still in a good enough condition to allow this).
It seems there is a steel washer over the rubber expander shown in the photo; if there isn't, one should be installed between the rubber seal and the nut.
As for a conversion from a leather piston cup to an u-cup, the preferred method would be to machine a solid adapter (aluminum, brass, steel, nylon) and not use a stamped adapter. The inside hole of the adapter could be threaded or left unthreaded in which case, it should be a close fit with the threaded stem. In both cases, a liquid sealant has to be used to prevent oil from leaking through the hole. Also, a big enough washer has to be used under the nut to retain the u-cup. Not that there is a need to do this adapter thing, just in case someone desires to use an u-cup instead of a leather piston cup.
Last edited:
@bdresch
Just to follow up on what Edgar is describing in regards to re-building the Pump Seals, The Pump piston is secured inside the cylinder by use of the small splined Pin, You can see it in your pictures as it rides inside the grooves of the upper cylinder. IME These pins like to be replaced the same direction they are removed, I Normally Mark the Head so to reinstall the same direction. Outside of that and MOST IMPORTANTLY Always PULL the Vee's (3 Leather pieces) INTO the cylinder from the bottom (Obviously Not compressed) versus trying to install from the Top, If you don't follow this advice the Seal will be Damaged trying to get past the Over Extension guides regardless of amount of lube. I always remove the piston versus trying to Push the seals up into place individually, Even in the compressed state the Vees are a tight fit and its extremely difficult to try and work into the cylinder bore without damaging them, Let alone trying to keep them flush in the concave base of the piston.
Its a Common Mistake..
Just to follow up on what Edgar is describing in regards to re-building the Pump Seals, The Pump piston is secured inside the cylinder by use of the small splined Pin, You can see it in your pictures as it rides inside the grooves of the upper cylinder. IME These pins like to be replaced the same direction they are removed, I Normally Mark the Head so to reinstall the same direction. Outside of that and MOST IMPORTANTLY Always PULL the Vee's (3 Leather pieces) INTO the cylinder from the bottom (Obviously Not compressed) versus trying to install from the Top, If you don't follow this advice the Seal will be Damaged trying to get past the Over Extension guides regardless of amount of lube. I always remove the piston versus trying to Push the seals up into place individually, Even in the compressed state the Vees are a tight fit and its extremely difficult to try and work into the cylinder bore without damaging them, Let alone trying to keep them flush in the concave base of the piston.
Its a Common Mistake..
Last edited:
Thanks for the advise on the pump. I gave a half hearted attempt at driving the pin out but it didn't move and I was afraid if I hit too hard I might damage the pump body. If it's really that much easier to install the seals, aI will give it another try maybe with a bigger mallet.
Thanks for the advise on the pump. I gave a half hearted attempt at driving the pin out but it didn't move and I was afraid if I hit too hard I might damage the pump body. If it's really that much easier to install the seals, aI will give it another try maybe with a bigger mallet.
Yep, they can be a bear. I have a cradle to protect the threads while it sits on top of the vise, generally a good starter punch/big hammer will persuade it. If it doesn't go one way? Flip it over and try the other direction.


Is there anything in particular I need to do with the breather? It appears to have a rubber seal in it. Is that seal part of the normal service kit? I didn't want to damage it attempting removal if it's not in the kit.
It just unscrews from the block, Oem should be a copper sealing washer that is included in most kits.
I'm talking about the little rubber seal inside the plug. Unless this plug isn't oem which wouldn't surprise me at this point.
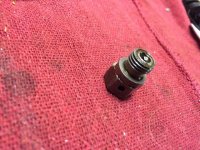
The older breathers had inserts similar to baffles that allowed the unit to breathe and prevent dirt ingestion, I wouldn't worry about dissasembling the breather
 Unless someone deliberately plugged the hole and air can't pass thru it.
Last edited: