To avoid these ads, REGISTER NOW!

Welder for electro etching?

Ststephen7

Well-known member
Joined
Sep 24, 2016
Messages
165
Location
Elkins Park, PA
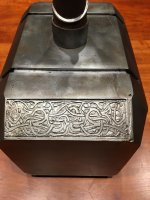
Hey guys, I need some guidance here...

I make and sell Mjolnir. I use electro etching, and in the past I have successfully used 2 batteries left over from my old bass boat.

I etch 4 1/8" pieces of SS at a time, and I etch pretty deep, like 1/64 to 1/32". I used both batteries, both positives to the part being etched, and both negatives to the cathode(?).

This set up put out a LOT of power. I had to use 1/8 or larger steel rod to attach to my parts, otherwise the rods (usually welding rod) would actually get red hot and start to melt!

It would take about 30/40 minutes to etch all 4 parts to a nice depth. The longer the parts are in the solution (and etching) the better the chance of the decals coming loose and ruining the etching, so quicker is better.

Now, my batteries are failing (for whatever reason, I've topped off the water) and I can't afford more batteries. So.... I picked up a vintage battery charger. It works great for rust removal, which is a plus.

I tried it for etching and if failed miserably! I let it go for about 90 minutes and it barely etched at all. That ruined 2 almost completed hammers, and cost me quite a bit of time.

Now to my question(s)...

I have a Miller Econotig A/C D/C welder... can I use it on D/C for etching? And if yes, how do I know what settings to use?

I have a multimeter, and really only know the most basic uses.

How do I hook up the multimeter to the leads to know how many amps/volts the welder is putting out (and what settings on the meter)? I have a stinger (for arc welding) so for leads I would use the ground and the stinger (and without the foot pedal).

I hope I have covered all of the information you might need to help me out.

The Econotig does not have a great interface... it only states output as a % of max, and that changes depending on the process. So that's why I feel the need to use the meter to know how much amperage (if I'm using the correct terms here) to kind of match up with the 2 batteries I was using (one starting battery and one deep cycle battery, hooked up pos to pos and neg to neg).

Please let me know if you need more info in order to give me some guidance.

Thank you so much!
Steve
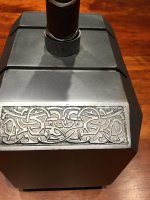
IMG_4881.jpg

IMG_4887.jpg

IMG_4898.jpg
 
To avoid these ads, REGISTER NOW!

TractorJeff

Well-known member
Joined
Dec 8, 2013
Messages
3,309
Location
Elkhorn, WI
If you were pos to pos/neg to neg, then you were etching at 12 volts with the capability of lots of amps. You need to put a DC Amp Clamp on to see how much current you are drawing. Then 12 X amps gives you watts (approx.). Then compare your welder output as the owners manual should have should have a couple of volts and amps charts to compare too. Older AC type Lincolns use to allow thawing water pipes at the 75 amp setting. Older DC machines you could probably do it also?
As far as the meter connection, set it for DC volts and put it across the ground(black lead) and the stinger (red lead) to get an open circuit value (40 to 75 volts?). You would need to go across the ground and stinger to measure while welding to show what the output value under use would be. But this info should be in the manual. If you don't have it, take the serial and model numbers to the Miller website and download for free!
Disclaimer: If it is an older transformer technology machine, this would probably work. If it is a newer Inverter style, I don't think I would risk it?
 
Last edited:

dogdog

Well-known member
Joined
Nov 15, 2011
Messages
12,711
No direct answer for you question, but Nice Hammers or artworks.. :thumbup:

I have used a 24V 10/20AMP dc power supply for etching into some metal as marking and that worked really fast, better than the 12V I used for rust removal.. But I just used a large cotton over some bare copper wire and table salt water, a q-tip look alike contraption... and swap around the top till it etches... no way as good of a detail you have.. What I found was the higher the voltage , it works better, at least in my case of noob attempts .. So not sure about how if your ecotig would work or I would risk it...

as far as measuring current... Not sure what most of these etching draws... to measure current it's either using the AMP function of the multimeter which you connect in-line (in-series) with either the pos or neg (not both) of the power supply to the work piece... and it will measure... but keep in mind most meter can handle about 10AMP or 20AMP at most... so you are risking frying your meter... There are clamp type meters but I have never able to get good accuracy... that is just me..... Ebay also have those shunt type DC meters for pretty cheap...if it is something some what permanent use.
 
Last edited:

LXCam

ALLIANCE MEMBER
Joined
Apr 23, 2013
Messages
19,172
Location
AZ
Too add to what jef said you need to know the wattage of your original set up to compensate for the increased voltage using the welder. You also didn't mention (maybe I missed it) if you have the batteries hooked up in parallel or series so for this example I'll assume they were in parallel, another words a 12 volt supply. Calculating wattage for a DC circuit is as simple as multiplying the voltage times the current. You will need a clamp on DC current meter to confirm all this.

So let's assume the dead short you created is drawing 200amps. So 12v times 200amps is 2400watts. The welder output voltage will increase as you dial up the settings so compensating for your actual working current will take some effort to dial it in. Basically let's say the output voltage of the welder is at 36volts. You'll need to divide the 2400watt value by 36 and set the output to where it's supplying 66amps.


Now a couple of things. Bud this is not safe but you knew the job was dangerous when you took it. Also Welders all have what's called a duty cycle which is nothing more then how long they can continually work within a one hour period and that value is based upon the max output, so there's some variables here to account for. Another words if the welder has a max output of 300amps and a duty cycle of 30%, that means you can "safely" run it at wide open throttle for 18 minutes before it either goes into an overload situation and shuts off or starts melting down. The other thing to account for is the AC supply circuit rating. Don't be surprised if the supply breaker trips on you (I'm not going to expand on this for the time being).

Honestly I'd suggest you purchase a true power supply that's made to do this kind of operation. Problem being they are flipping pricey. I used to do my own anodizing and my stupid little PS that had a rated output of 30amps ran me $800. But these are made to provide either a constant voltage or constant current output.


Good luck and please don't get hurt or burn the joint to the ground.


If you were pos to pos/neg to neg, then you were etching at 12 volts with the capability of lots of amps. You need to put a DC Amp Clamp on to see how much current you are drawing. Then 12 X amps gives you watts (approx.). Then compare your welder output as the owners manual should have should have a couple of volts and amps charts to compare too. Older AC type Lincolns use to allow thawing water pipes at the 75 amp setting. Older DC machines you could probably do it also?
As far as the meter connection, set it for DC volts and put it across the ground(black lead) and the stinger (red lead) to get an open circuit value (40 to 75 volts?). You would need to go across the ground and stinger to measure while welding to show what the output value under use would be. But this info should be in the manual. If you don't have it, take the serial and model numbers to the Miller website and download for free!
Disclaimer: If it is an older transformer technology machine, this would probably work. If it is a newer Inverter style, I don't think I would risk it?
 
Last edited:

Zeke

Well-known member
Joined
Aug 13, 2009
Messages
17,176
Location
Long Beach CA, the sewer by the sea.
I don't understand why the battery charger isn't used on the batteries while they are hooked up for etching. Also, if you can't afford to buy 2 batteries, you're not 'charging' enough for your hammers.

Google how to revive a battery. It sometimes does work.
 

wyliesdiesels

Well-known member
Joined
Aug 14, 2012
Messages
20,051
Location
Modesto, CA
So is this a hobby or full time business?

If the latter then you should be charging enough to cover equipment costs, overhead and profit.

I would buy a PS that is made to do this. The initial investment may be high but it will peobably enable you to reduce your laboe time thus paying for itself over x amount of units done.
 
Last edited:
OP
S

Ststephen7

Well-known member
Joined
Sep 24, 2016
Messages
165
Location
Elkins Park, PA
OK... my step son just came home from RPI, and while graduating in May with a computer engineering degree, he did take some electrical engineering courses and can help me out with the meter.

I do have one more question for you guys though (no guarantee it will be the last)... when using the batteries I put the Pos to the part being etched away. With the welder, if I want to put the stinger on the part being etched I'd want Electrode Positive, correct?

Oh, and the Econotig is an 80lb welder from the '90's, so probably transformer, right?

Thank you!
Steve
 
To avoid these ads, REGISTER NOW!

Milton Shaw

Well-known member
Joined
Feb 11, 2011
Messages
4,844
Duty cycle was mentioned by one poster wrong. It's a 10 minute period not an hour. So 30% would be 3 minutes out of 10 not 18 minutes straight. Watch out for fumes from this as they could be explosive and any spark could set them off. At the very least they would be corrosive and ruin anything around the setup.
 

LXCam

ALLIANCE MEMBER
Joined
Apr 23, 2013
Messages
19,172
Location
AZ
Duty cycle was mentioned by one poster wrong. It's a 10 minute period not an hour. So 30% would be 3 minutes out of 10 not 18 minutes straight. Watch out for fumes from this as they could be explosive and any spark could set them off. At the very least they would be corrosive and ruin anything around the setup.


You're right, my bad.
 
OP
S

Ststephen7

Well-known member
Joined
Sep 24, 2016
Messages
165
Location
Elkins Park, PA
Thank you all for your input!

Am I correct in thinking at duty cycle is at a given % (like 80% or 100%)? If so I'm pretty safe...

I did a quick test on a small piece at 40% and that was too much, as it was strong enough to quickly undercut the edges of the decals I use as resist. My next test will be at 30%.

I did use my meter to test the volts coming from my 1 working battery... it was about 10.5 volts measured from the anode to cathode, although I'm sure that dropped by quite a lot over the 30/40 minutes of etching. The change in the 'action' of the solution is quite visible. In initial testing I found that 40% on the welder was around 14 volts.

And... as someone suggested I might, I went ahead and blew both fuses in my meter checking amps ; ) Only the fuses though.

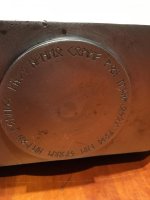
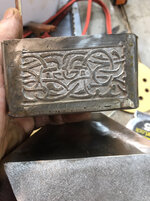
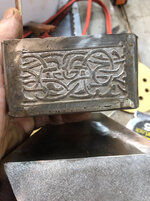
The picture below is my very first test. The runes are for the round part on the bottom of the hammer, the much deeper celtic design goes on either end of the hammer. You'll see how some lines are very thin because of the undercutting. That could also be due to other variables, like how well I cleaned the steel, and/or how well the decal was adhered to the steel, or some combination.

For those interested, it used to take about 40 minutes to deeply etch 4 parts (one side of a hammer) with the 2 batteries positive to positive. The very deep etching show in the picture (granted only a small area being etched) took only 15 minutes. I've found the longer any part takes to etch the higher the odds of decals coming loose/undercutting and messing up the parts.

I'm happy to answer more questions about hammer building or etching (just from my experience, I am obviously in no way an expert at either).

Thank you again!
Steve

IMG_4927.jpg
 

dogdog

Well-known member
Joined
Nov 15, 2011
Messages
12,711
..........
I'm happy to answer more questions about hammer building or etching (just from my experience, I am obviously in no way an expert at either).

Thank you again!
Steve

IMG_4927.jpg

Can you share your etching process... maybe start a thread in the fabrication section ? I only know to use a cotton ball type dip in salt solution... but never could get the details as nice as yours...
 
OP
S

Ststephen7

Well-known member
Joined
Sep 24, 2016
Messages
165
Location
Elkins Park, PA
Can you share this technique... maybe start a thread in the fabrication section ? I only know to use a cotton ball type dip in salt solution... but never could get the details as nice...


I will “intend” to! ; ) If I don’t it’s just because I forgot so remind me. I did another test before attempting a whole hammer. It came out pretty good, so a hammer is next. I’ll be holding my breath!

3f985f3c53f69a79f8df34f89f3500e7.jpg


Sent from my iPhone using Tapatalk
 

Attachments

  • 3f985f3c53f69a79f8df34f89f3500e7.jpg
    3f985f3c53f69a79f8df34f89f3500e7.jpg
    821 KB · Views: 1
OP
S

Ststephen7

Well-known member
Joined
Sep 24, 2016
Messages
165
Location
Elkins Park, PA
I did make a 22 part series on figuring out how to make a welded steel mjolnir, and that includes I think 3 videos on etching. I used the batteries only because that’s what other people were doing...


Sent from my iPhone using Tapatalk
 
To avoid these ads, REGISTER NOW!
Top Bottom