To avoid these ads, REGISTER NOW!

welder worked then doesn't

1930artdeco

Well-known member
Joined
Dec 28, 2010
Messages
1,109
Location
Lynden, Wa
So I fired up my Century (now Lincoln) MIG welder for the first time after getting it back from the shop. So I am practicing and just figuring out how the things works when it stopped working. It would start to weld (sputter and splatter) and then it stopped welding. All I can get it to do is a quick zap and then the wire would fuse to the metal. Nothing beyond that, any ideas? I cleaned the ground clamp, the metal and swapped out the tip.

Mike
 
To avoid these ads, REGISTER NOW!

ronr80

Well-known member
Joined
Feb 13, 2013
Messages
504
Location
ontario
maybe bad ground on the material,loose clamp wire , circuit breaker , old machine. Mine was acting up and the wire on the spool was slipping on the roller. is the mig wire rusted or dirty. R
 

rdoty

ALLIANCE MEMBER
Joined
Feb 7, 2018
Messages
650
Location
Massachusetts
Try clicking the amperage selection switch, the one with A B C D E selections, back and forth several times and then make sure it clicks into place on the setting you want. It is easy to get one of these switches just a touch out of place and have a dead welder.

Don't ask me how I know this...
 

Mr_B

Well-known member
Joined
Nov 21, 2016
Messages
5,379
Location
Reading
wire feed issue such as dirty/damaged liner or feed roller/motor problem .
 
OP
1

1930artdeco

Well-known member
Joined
Dec 28, 2010
Messages
1,109
Location
Lynden, Wa
Thanks for your tips. I will check it over this weekend. I am sure it is something simple as I just sent it in for a full rebuild.

Mike
 
OP
1

1930artdeco

Well-known member
Joined
Dec 28, 2010
Messages
1,109
Location
Lynden, Wa
This machine was made for sheet metal in body shops in the 80's so it is all solid state. No chance to change polarity, and wire seems to feed fine when I hit the switch on the machine. I will check out all of your tips this weekend.
 
OP
1

1930artdeco

Well-known member
Joined
Dec 28, 2010
Messages
1,109
Location
Lynden, Wa
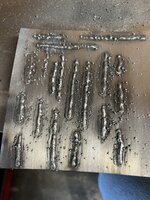
Ok, figured it out, I thought I cleaned the metal enough. Apparently not-fixed and now I can weld again. So….for not having been in a class in several years and learning to weld on my machine, I think I have it mostly dialed in.

So please tell what I am doing wrong here. She does well if I keep the torch off the metal about 1/4” and go fairly slowly.

I just don’t know why she is spattering? The welds don’t look high and I am getting good depth so I think the heat is fine. The wire speed is almost as slow as I can make it. I am going to keep doing these weld beads for now and then I will move onto **** welding practice. So please critique the welds and let me know to improve my technique.

Thanks,

Mike
 

Attachments

  • image.jpg
    image.jpg
    359.7 KB · Views: 104
  • F46610C0-BC30-482E-B26D-5CA17A76C43A.jpeg
    F46610C0-BC30-482E-B26D-5CA17A76C43A.jpeg
    552.7 KB · Views: 100

PCustoms

Well-known member
Joined
Jul 23, 2011
Messages
23,539
Location
VT
What wire are you using?

What gas are you using? What is your flow rate?
 
OP
1

1930artdeco

Well-known member
Joined
Dec 28, 2010
Messages
1,109
Location
Lynden, Wa
I will check the wire as I bought it several years ago but tried to keep it dry indoors. The liner is new when I got the unit serviced. I am using the pictures wire at about 20 cfh(?) argon/co2 mix. As for temp i will try and up the temp. Right now, I have almost complete penetration through to the underside. I can see it starting to melt through, but I am only using 18 ga. steel.
 

Attachments

  • image.jpg
    image.jpg
    276.4 KB · Views: 96

corn chip

Well-known member
Joined
Jul 15, 2021
Messages
672
those beads look terrible. also your wire is self sheilded fluxcore. no sheilding gas required and it uses opposite polarity from solid wire. shut the gas off and get the polarity set right and you should be good
 

Jswain

Well-known member
Joined
Apr 26, 2013
Messages
2,466
Location
Calgary, AB
Get some solid mig wire and you will be golden, save the flux core wire for if you need to do some welding outside on a windy day. If you're mostly welding sheet metal .023/.025" wire is what you want. If you do 3/16-1/4+ as well maybe step up to .030"
 
To avoid these ads, REGISTER NOW!
OP
1

1930artdeco

Well-known member
Joined
Dec 28, 2010
Messages
1,109
Location
Lynden, Wa
OK, I will check into getting some smaller solid wire. I know the drive wheels are size specific and this machine is so old I may or may not be able to get them.

Thanks,

Mike
 

PCustoms

Well-known member
Joined
Jul 23, 2011
Messages
23,539
Location
VT
OK, I will check into getting some smaller solid wire. I know the drive wheels are size specific and this machine is so old I may or may not be able to get them.

Thanks,

Mike
Should be no issue getting 0.035 solid wire.

Though is that really the size rollers you have? A little large for sheet metal imho, and you mentioned it was setup from a body shop I believe.
 

Firebrick43

Well-known member
Joined
May 12, 2015
Messages
14,227
Location
West central Indiana
Should be no issue getting 0.035 solid wire.

Though is that really the size rollers you have? A little large for sheet metal imho, and you mentioned it was setup from a body shop I believe.
The wrong rollers would make sense as it looks like the feed speed is inconsistent
 
OP
1

1930artdeco

Well-known member
Joined
Dec 28, 2010
Messages
1,109
Location
Lynden, Wa
The wheel has .035 stamped into it so figured that is the wire I needed for that wheel. The guy who gave it to me ran a body shot and that is where he used it or had it used. And that is what he told me so that is what I am going with at this point.
 
OP
1

1930artdeco

Well-known member
Joined
Dec 28, 2010
Messages
1,109
Location
Lynden, Wa
Correction, looks like I can use either .024/.035 wire.
 

Attachments

  • 2C0E5CA6-CBA9-4F57-8201-D77827B2E038.jpeg
    2C0E5CA6-CBA9-4F57-8201-D77827B2E038.jpeg
    306.4 KB · Views: 58
OP
1

1930artdeco

Well-known member
Joined
Dec 28, 2010
Messages
1,109
Location
Lynden, Wa
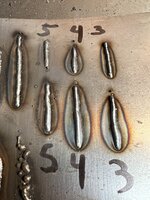
Ok, changed out the wire for solid core @.024 and am MUCH happier with the results. My really crappy beads went to just plain novice bad beads.

I am not happy with the bead height (although that may be normal) and am not sure about the heat ring around the weld beads. I know it is normal to a point.

And as far as heat settings go 3 does a good job and gets good penetration, 4 does a better job but I think 5 is probably the max heat I would go.

What are the experts thoughts?

Thanks for all of the help,

Mike
 

Attachments

  • C4A1E565-FEC8-41EE-AF5D-3F2C8AFCBCEF.jpeg
    C4A1E565-FEC8-41EE-AF5D-3F2C8AFCBCEF.jpeg
    459.4 KB · Views: 42
OP
1

1930artdeco

Well-known member
Joined
Dec 28, 2010
Messages
1,109
Location
Lynden, Wa
Sorry one last question. I know this just scrap metal and I am just running beads. But what is the best way to keep the metal from warping?
 

Attachments

  • 7B630D2D-3461-4BE5-99E9-896F46B46813.jpeg
    7B630D2D-3461-4BE5-99E9-896F46B46813.jpeg
    283.2 KB · Views: 37

The Cobbler

Super Moderator
Staff member
Joined
Oct 24, 2013
Messages
25,996
Location
Niagara Region, Ontario, Canada
warped metal is from the heat. any videos I watch on sheet metal welding they tack in about 1" increments , then go back & tack beside the tack. they continue to tack until they have a bead . some guys blow compressed air to cool the metal, some say that's not good as it will shrink the metal by doing that .
 

hefnerconstructionlc

Well-known member
Joined
Nov 1, 2016
Messages
665
Location
Kansas
You could use an aluminum block on backside to help pull the heat out a heatsink. As said spread your welds out to minimize distortion. Spot weld. Allow time for cooling.
 

Jswain

Well-known member
Joined
Apr 26, 2013
Messages
2,466
Location
Calgary, AB
On thin sheet metal for sure you will want to be just doing a tack every inch or so and working around the piece. After a lap around let it cool. They all look 1000 times better then the last photos. Practice with some thicker stuff too it will be more forgiving to getting the hang of running beads


Watching this guy can be more entertaining then TV if you're looking to do bodywork
 
OP
1

1930artdeco

Well-known member
Joined
Dec 28, 2010
Messages
1,109
Location
Lynden, Wa
Ok, first attempts at **** welding to see how things work with this machine. Took my time to just spot them and let them cool down. Some are OK but thought I should be able to weld all of the way through. Some are welded about 3/4 of the way and that is all. Is that normal for sheet metal? I tried to slow down and just seemed to burn through the metal. Will try some more when I get home.
 

Attachments

  • 49EDDBC6-8172-4546-8DF0-AB71F7C30D18.jpeg
    49EDDBC6-8172-4546-8DF0-AB71F7C30D18.jpeg
    635.3 KB · Views: 16
  • 09F3D407-C8D1-4264-A2AE-17D653834F5A.jpeg
    09F3D407-C8D1-4264-A2AE-17D653834F5A.jpeg
    1.2 MB · Views: 13
  • 17397833-E1A5-4217-9D0C-CF4BA29B40F9.jpeg
    17397833-E1A5-4217-9D0C-CF4BA29B40F9.jpeg
    1.3 MB · Views: 11
  • 1D88B468-FF09-4B05-851E-62C1727495A8.jpeg
    1D88B468-FF09-4B05-851E-62C1727495A8.jpeg
    1.2 MB · Views: 10
  • CBFF97B9-E278-4A9F-B622-30592AEF7B48.jpeg
    CBFF97B9-E278-4A9F-B622-30592AEF7B48.jpeg
    1,010.7 KB · Views: 9
  • 0F32965C-D969-4D66-8775-361DCADB41A7.jpeg
    0F32965C-D969-4D66-8775-361DCADB41A7.jpeg
    874.9 KB · Views: 8
  • 687210C2-7CE7-4A74-9BB8-7BBF5BB2EF6C.jpeg
    687210C2-7CE7-4A74-9BB8-7BBF5BB2EF6C.jpeg
    917.1 KB · Views: 19

Jswain

Well-known member
Joined
Apr 26, 2013
Messages
2,466
Location
Calgary, AB
Post a picture of how you have the machine setup that will help.

Turn the heat up until it's fully penetrated, any amount of gap at all in the steel will make the job harder. Instead of running short beads just do 1 single tack then move, don't do another tack beside that one until it's cooled back down.

Your machine looks to have a spot feature too not sure if you are using it or just manually tacking, but it may help you get more consistent results. Even if you're just practising try and get the metal as clean as possible...either way your results are looking better and better!
 

cannuck

Well-known member
Joined
Nov 30, 2021
Messages
4,662
Location
Rural SK
It
looks as if you are just moving the gun along. You need to learn to watch the puddle and control how deeply it penetrates, that is washes out on the sides instead of sitting on top and all that good stuff. Are you pushing the puddle or pulling? When it comes to thin sheet, most of the time it works better to push the puddle so the arc stays on the more massive bead. As thickness goes up (relative to wire size and welding amperage) you transition to pulling the bead so the arc is blasting through a good root. When you get your **** welds just right, you will have a tiny bit of bead on the backside (suspect you have a crack still there now by beads sitting on top. Practice, practice, practice.

As far as distortion goes, it doesn't matter so much how you cool it, as that just allows a more even bead than one that is accumulating temperature as it goes along. On thin sheet, as mentioned, you need to start with a LOT of little tacks and learn to join short stitches together (often alternating in location to keep more even heat. The ONLY way to prevent distortion is not to weld it. When you lay ANY bead down, it logically starts at melting temp, and as it solidifies it is still relatively hot compared to the substrate/base metal part. As that bead continues to cool it will develop progressively more strength as it continues to shrink/shorten leaving a LOT of stress in the weld that will relieve itself by straining (distorting) the welded part. The longer and more continuous the weld, the greater the distortion (thus why the alternating stitches after tacking). Another thing to do to minimize distortion is pre-heat the part, but in doing so you have to reduce your welding heat input (amperage).

Again: follow these three steps: 1. Practice, 2 practice and 3 practice. Study as much as you can before each session
 
OP
1

1930artdeco

Well-known member
Joined
Dec 28, 2010
Messages
1,109
Location
Lynden, Wa
Thank you all. The video helped as I was trying to do he said to do, just was t going about quite right. So when I get home I will practice some more.
 
To avoid these ads, REGISTER NOW!
Top Bottom