To avoid these ads, REGISTER NOW!

Welding in patch panels

jteck75

Well-known member
Joined
Nov 25, 2009
Messages
294
Location
Benton Ky.
I've got an upcoming project,I have a 1968 Chevy truck that I bought a few years back,my 14 year old son has had a fit for it ever since I got it,and I plan to restore it for his first ride. I have rebuilt the engine,and now I have to take care of some cancer spots here and there. I have a good mig welder,I was just wondering,how do you keep a steel patch as square and flush as possible with the rest of the panel before welding it in? I've painted some vehicles and tractors and did a little bondo work here and there,but this is my first foray into welding in patches. I thought I remembered seeing in an old hot rod mag years ago,there were some kind of clips that you can use,but I'd like to hear from some of you guys exactly what to do. Any help would be greatly appreciated. Thanks!!
 
To avoid these ads, REGISTER NOW!

t100

Well-known member
Joined
Sep 3, 2009
Messages
6,101
yes, it is. it's best done with tig welder. mig is kind risky, blow through and lots of grinding. you are welding **** joint sheet metal. the key is keep a gap between the panels.

buy a bunch of panel clamps:

1732.jpg
 

MP&C

Well-known member
Joined
Oct 21, 2009
Messages
4,396
Location
Leonardtown, MD
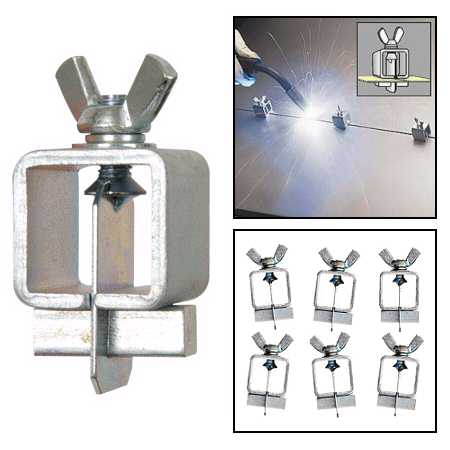
I've used the clamps you speak of, and in some cases find it easier to just use vise grip c-clamps. Depends on the scenario. Here's a couple of different versions I've done:

***************
Time to fix the driver's fender, but this one has more rust action and will need the lower area repaired. It had a galvanized patch spot welded over the rust hole, and we'll get that removed as well.

Picture127.jpg

Picture128.jpg

The repair piece is started by bending the rear flange, and cutting the relief for the lower bend.

Picture129.jpg

The lower bend is made using a 1/4" radius die in the press brake, but can be done with incremental bends in a regular brake.

Picture138.jpg

Picture131.jpg

Some shrinking and stretching of the rear flange on the Lancasters will start to shape the rear edge.

Picture134.jpg

Followed by some "gentle" bends in the press brake again to match that contour across the piece.

Picture133.jpg

Test fit:

Picture135.jpg

Picture137.jpg

We'll save the welding for another night, need to sandblast the inner stiffener to make sure it's solid and epoxy prime all the stuff that will be hidden.

The inner fender brace was sandblasted, with no holes showing up in the pitted areas. A quick check with an ice pick showed it was plenty solid, so the brace was epoxy primed, as well as the inside of the repair panel.

HPIM6287.jpg

HPIM6288.jpg

HPIM6289.jpg

Once the primer has had a few days to cure, we'll start welding and finish the lower fender. The first order of business is to clamp the lower edge flush with the bottom, align the side, and tack weld in place.

HPIM6336.jpg

It helps to planish out the weld tacks as you go, minimizing any shrinkage issues from the heat

HPIM6337.jpg

With any welding you are doing, check the back side to insure full penetration, or adjust your machine accordingly. If you need to weld it from both sides due to lack of weld penetration, you just increase your chance of shrinking the area from all the excess heat.

HPIM6339.jpg

Ground some welds off as I went, gets some of the excess out of the way for planishing the new welds.

HPIM6342.jpg

HPIM6345.jpg

HPIM6346.jpg

The inner fender brace is pulled in snug and plug welded to the lower fender. The rest of the welds are filled in, skipping around as usual to minimize heat buildup, and then ground smooth.

HPIM6348.jpg

HPIM6350.jpg

HPIM6352.jpg

*******************

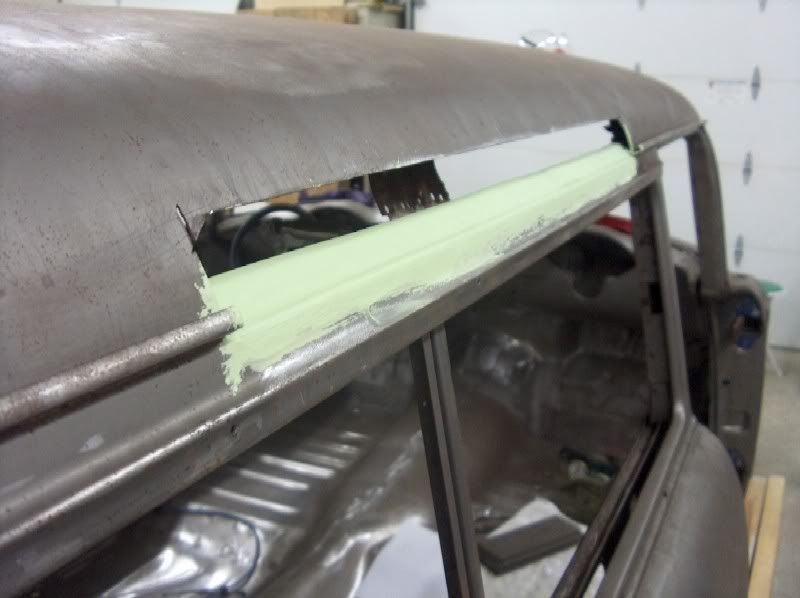
Time to continue on up front with the fender eyebrows. These parts were primed when we sprayed the inside of the door skins, so they were ready to go. First, both fenders had repairs done already, and the "caps" were slipped over the existing, and held on with tack welds and sheet metal screws. After removal I saw that part of the contour to the inside of the headlight was mashed in so the "cap" would fit better. (thanks for the favor)

HPIM6194.jpg

HPIM6195.jpg

HPIM6196.jpg

The headlight mounting ring will be the next thing removed, but first, let's take some reference measurements on the holes.

HPIM6197.jpg

Clamped in place and welded on

HPIM6198.jpg

Next, to trim away some of the leftover eyebrow, so the new eyebrow can be **** welded in place this time around.

HPIM6201.jpg

It was fitted and trimmed, fitted and trimmed. Repeat as necessary.

HPIM6204.jpg

HPIM6205.jpg

HPIM6207.jpg

HPIM6208.jpg

HPIM6209.jpg

The tighter you can get the gaps, the easier it will be to weld.

HPIM6210.jpg

All tacked in place, we'll finish it up another day.

HPIM6211.jpg

HPIM6212.jpg

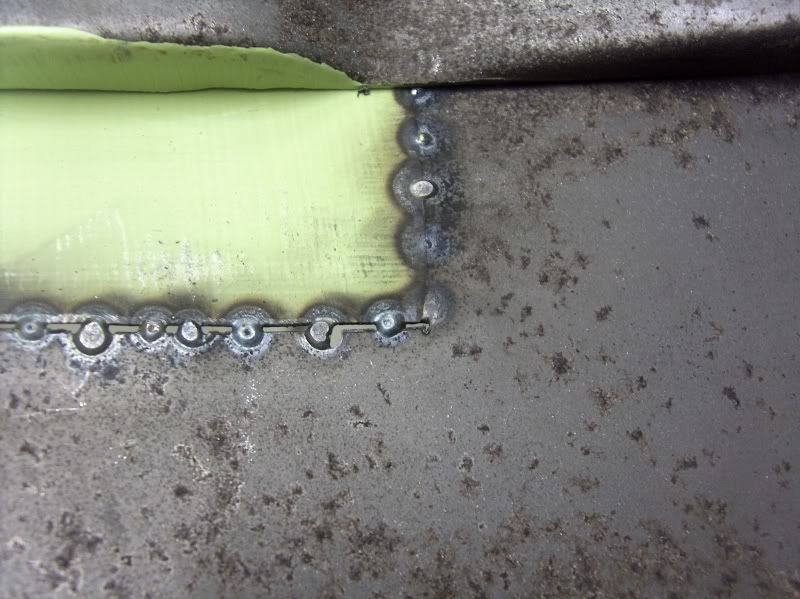
Well it's about time to play connect the dots, or should I say, let's use some dot weld technology! The existing tack welds from the initial install were planished and then ground down until the were just above the metal surface to get them out of the way. Then I tacked in between these again, and then started to fill in the gaps.

Picture150.jpg

Picture151.jpg

Don't forget to check your welder setup by observing for weld penetration on the back side.

Picture153.jpg

As you weld the heated area of the weld will have a tendency to drop down, almost as if forming a valley. This is caused by the metal shrinking, from the heat. Planish the dot slightly (as needed) using a body hammer with a small dollie pushing up from the inside, and it removes the majority of any deformity.

Picture155.jpg

Picture156.jpg

Picture157.jpg

Picture158.jpg

Picture159.jpg

There are a few slightly low areas, but when the fender is removed next time, the welds will be ground smooth from the back side and some hammer and dolly work should straighten things out nicely.

***********************


AS you can see, the clamps worked well in keeping oddball shapes where they should be, especially when the vice grips just won't reach. One thing to keep in mind, heat from welding causes the metal to shrink, so if you tack weld on either side of one of those clamps, the panel may lock down on the clamp and make it difficult to remove. In this case (when using said clamps) start at one end with your tacks and work toward the other, moving/removing the clamps as you go, so they don't get "trapped" from welding on either side. Hope this helps, good luck!
 

Rigmaster

Well-known member
Joined
Nov 17, 2008
Messages
1,061
Location
Elm Grove Farm, NC
WOW! MP&C that's some nice work and great pictures!!


I have done some patch panels with my MiG welder and it works fine IF you're careful and are able to trim all the rust out so you're working with solid steel. I'm all for buying new toys to get a project done, but buying a TiG welder to weld some patch panels on an old truck seems a bit overkill, especially since the OP already has a MiG.
 

djjsr

Well-known member
Joined
Sep 4, 2006
Messages
4,796
Location
In the cornfields
There's another type called a cleco. They've been around forever. The difference is with a cleco, you overlap the edges.

381388408.jpg
 
Last edited:

MP&C

Well-known member
Joined
Oct 21, 2009
Messages
4,396
Location
Leonardtown, MD
As most people have a mig in their home shop, I think you'll quickly find that the tighter your **** joint is, the less chance you have of blowing holes. Next, your heat setting used should be determined by the obtaining of a full penetration weld when welding the dots. If you don't get a full penetration weld, and it just looks like the bead is sitting on top of the metal, your heat is not sufficient. By the time you grind the welds down there will be little holding your patch in and a year or so of road vibration will undo all of your hard work. Now, if you do find you are still blowing holes, before turning down the heat, increase the wire feed. It's like this, if you have enough heat to perform the weld but not enough filler going in, somethings gotta give, hence a blowout. The less the gap, the less the chance of a blowout. Wider gap = more weld filler = more heat = more shrinking = more hammer and dolly work in the end. As far as the TIG welder, they seem to be even more prone to blowing out holes (yes, I have both), and for the novice welder, a very tight gap is almost a neccessity.
 
Last edited:

mike13u

Well-known member
Joined
Mar 1, 2008
Messages
616
Location
S.Florida
Nice work Robert. I have also use the sheet metal clamps in above posts and they work well.
 

MP&C

Well-known member
Joined
Oct 21, 2009
Messages
4,396
Location
Leonardtown, MD
Thanks for the comments guys.

Jteck, you may need this as well for grinding welds:


First off, when grinding, the bigger your contact patch, the more heat buildup you are going to have. so usually smaller = better. Many people for this very reason use the 3" cutoff wheel to grind welds until they are at a manageable level to switch to sanding discs. As a disclaimer, with this cowl section sample, the welds were right next to creases, so I was less concerned with panel movement. If it had been in the middle of a large panel, i.e.: door, fender, qtr, etc, it would be more appropriate to dot weld and planish and grind those dots before welding the ones that overlap the last.


HPIM5790.jpg


HPIM5792.jpg


It's kinda hard to take pictures and grind at the same time, but we'll do the best we can.


HPIM5793.jpg


I use a 3" cutoff wheel, 1/16 thick, and hold it perpendicular to the weld bead. I work this back and forth along the weld bead, covering about a 1/2" area. Don't sit in one spot or it will tend to cut and not grind. next, if we just stayed in the center of the weld bead, you would wind up with a concave depression in the middle of the weld when done, so make a few passes down the middle, then work toward one side, then the other, in attempt to keep what you are grinding fairly flat. Try to stop when you are just above the surface of the sheet metal, or otherwise you will have grinding gouges, like some of the ones shown here: :mad:


HPIM5795.jpg


HPIM5794.jpg


This takes a bit of patience and finesse (something I'm still working on), but getting rid of the bulk of the weld in this fashion keeps the heat buildup down (less contact area = less heat buildup), allows you to see better what you're doing vice using a sanding disc and thus has less chance of taking away metal on either side of the weld from not seeing what you're doing, and makes the sanding discs last quite a bit longer when you do get to that stage. After the welds are down to a workable level, then I switch to the 3" angle sander, I use a 3" Roloc type 60 or 80 grit sanding disc in the angle sander.


HPIM5796.jpg


finished the rest up:

HPIM5798.jpg


HPIM5800.jpg
 
OP
J

jteck75

Well-known member
Joined
Nov 25, 2009
Messages
294
Location
Benton Ky.
Is your boy doing some of the work? It's a great learning experience for a kid (and a Dad).

LOL Oh yeah we have a group effort going on with this project. Every time he's over here,we are always working on some kind of project together. He has learned alot from his old man and we are having a blast.:thumbup:
 

FLACOMAN

Well-known member
Joined
Nov 13, 2006
Messages
113
Autobody 101.com has a bunch of good p00p for home / beginning hammer swingers
hth
jorge
 

TA^Guy

Well-known member
Joined
Jan 4, 2010
Messages
205
I've got an upcoming project,I have a 1968 Chevy truck that I bought a few years back,my 14 year old son has had a fit for it ever since I got it,and I plan to restore it for his first ride. I have rebuilt the engine,and now I have to take care of some cancer spots here and there. I have a good mig welder,I was just wondering,how do you keep a steel patch as square and flush as possible with the rest of the panel before welding it in? I've painted some vehicles and tractors and did a little bondo work here and there,but this is my first foray into welding in patches. I thought I remembered seeing in an old hot rod mag years ago,there were some kind of clips that you can use,but I'd like to hear from some of you guys exactly what to do. Any help would be greatly appreciated. Thanks!!
You can use panel clamps or if the panels are small a few good strong welding magnets can hold it in place for you to put a few tack wleds down.

Remember to just tack weld it and give it plenty of time to cool down so you don't warp it. Also becareful how hot it gets grinding down welds, I've seen many people warp a panel with a grinder without even thinking about it.
Is your boy doing some of the work? It's a great learning experience for a kid (and a Dad).
Would agree. My daughter was 11 when she first picked up a saw and helped me chop down my rear bumper and weld it back up. My son was two when he started to help me sand, and it now 4 and anytime I go to work on my truck he loves to come help.
 
Last edited:

fusionspecialists

Active member
Joined
Nov 9, 2009
Messages
33
Obviously MP&C's metal finishing work is stellar and he'll be able to prime, seal, and shoot base right over his repairs without the use of filler. That type of work is tedious and time consuming and is likely to blow away whoever strips the paint off that car next; if they even notice that a repair was done.

However...you don't need expert skill to make these repairs if you don't mind covering your sins with a thin layer of filler. I'm talking about 1/8" max filler thickness, which is a limit that is plenty easy to stay under even for a novice like myself. For most people it's easier to sand the filler to a perfect shape than to form the metal to the perfect shape.

When I watch the guys on Musclecar on SpikeTV do patches, they never planish their welds and the patches are never seamless. They cover the minor flaws with filler.

I am slowly learning to do sheet metal work and believe me, for my own projects I want to become as good as MP&C is. I'm just saying...if your patch isn't perfect and your hammer welding isn't perfect (or doesn't exist at all), you can blend it with filler and it's respectable.
 

akdiesel

Well-known member
Joined
Aug 8, 2008
Messages
2,617
Location
Wasilla, AK
I just have to say the body work shown is incredible. Very nice bends and patch work.
I have tried a couple of patch pieces on a tailgate and nowhere close to your ability but maybe with lots more practice.
I never knew they made clamps like those, I thought they were just prefabed.
 

MP&C

Well-known member
Joined
Oct 21, 2009
Messages
4,396
Location
Leonardtown, MD
is that green paint anything "special"?

It's KP-2CF by House fo Kolor, their epoxy primer. I've had fairly good luck with it, so it's what I use. The only downside is that it's NOT compatible with ospho-type rust conversion products. (FYI)

CRus, right now it has .035 in it. I have used .023 on sheet metal as well, but for my machine set up, my technique, etc, the .035 works better for me. The .023 and .035 are both within the range of 18 ga steel, so take your pick. I tell people to adjust their machine heat setting and wire feed per the post above, and if you still can't get it dialed in, then as a last resort try a different wire size. Most machines will have enough adjustment to use either size, but some of the cheaper (HF type) may not have as much adjustment, where a wire size change may make the difference. I've always been told, try the cheap stuff first when attempting to fix something. To me, a machine adjustment or fine tuning one's technique is about as cheap as you can get. :thumbup: Spend money on new wire once you've exhausted those efforts.
 

joeswamp

Well-known member
Joined
Jul 25, 2007
Messages
2,418
Location
Massachusetts
Wow, this was all done with MIG? I'm certainly no expert at this, but I was under the impression that MIG wire was too hard for such fine work and would crack during the planishing process, esp if the weld was still warm.
 

Rusty Kustoms

Well-known member
Joined
Feb 13, 2009
Messages
427
Location
Litchfield, MN
With sheet metal the gap is not necessary, I try to have little to no gap when doing patches. The clamps work great when you need them but that is pretty rare. The trick is to do tacks, alternate around the panel and give plenty of time to cool, let them air cool and NEVER accelerate the process with water, damp rag, compressed air. Accelerating the cooling process will create brittle and weak welds that can crack later in time. As shown above you should occasionally grind down your tacks to see where you are at. Make sure the metal is clean, no paint, oils, etc., this will keep the weld clean. One thing that I will point out is in the pictures above the metal has epoxy primer on it, this will be debated but this is generally a bad idea. If it is absolutely necessary then make sure it is ground off about 1" away from the weld area, not only will it dirty the weld but it ends up needing to be ground off later anyways. As for wire size, .023 is pretty much standard, .035 can be used on the thicker metal but not all cars have 18ga. sheet metal. Clecos are a bad idea, this is not their intended use and flanged patches are a huge no no, they will retain moisture in the flange and fail in short order due to corrosion.
 
To avoid these ads, REGISTER NOW!

MP&C

Well-known member
Joined
Oct 21, 2009
Messages
4,396
Location
Leonardtown, MD
Thanks for the comments guys, TAftw, I'm using an L-TEC Migmaster 250. This is the predecessor to ESAB, so it is going on about 20 years old.

Wow, this was all done with MIG? I'm certainly no expert at this, but I was under the impression that MIG wire was too hard for such fine work and would crack during the planishing process, esp if the weld was still warm.


Joe, with a full penetration weld, I have yet to see any cracks occur while planishing. I don't know where this information is coming from, I have read it before online in various forum responses similar to this thread (with no pictures to back up the claims) but have yet to see it in my own experience. I could only guess someone did not have their welder set on a high enough heat setting, and once they ground the welds down there was nothing there to hold the pieces together. The other thing you mention, yes, the welds are fairly hard, especially if you try to planish a complete weld bead. Much of this difficulty goes away by planishing one dot at a time. You can plainly see the single weld dots in the following picture (this is the back side shown), flattened from planishing and no cracks whatsoever.

HPIM6339.jpg


I've backed up my statements with pictures, the next naysayer who informs you otherwise, please ask to see pictures of proof, I'll do the same. If they do indeed have any (my guess is they are just repeating mis-information) I would look for cold weld joints, lack of weld penetration, and the like. There you should find the answers.

RK, I hear what you're saying and yes, I could have ground down a bit more paint on the inside, but the experience I have had with H/K epoxy primer, 1" of bare metal is hardly needed. I try to epoxy prime anything that will be a pain to get to afterward, and the headlight eybrows, as I'm sure you are well aware of, are especially prone to dirt collection and rust thereafter. This is why the part was painted first. I use the same practice on overlapped parts in an attempt to get some rust prevention between the panels before the moisture returns there and starts the rust process over again. I use a modified drill bit (flattened and backfaced to mimmick an end mill) to clean out plug weld holes. By spraying the EP on all the parts prior to welding, you now have paint in between the lapped panels where likely from the factory there was none. Here is an example of this:

Just prior to welding, I will clean the epoxy primer out of the hole using a drill bit the same size as the plug welds, that I have flattened and backfaced to form a cutter similar to an end mill. Does a nice job of cleaning out the plug weld hole, and by the end being flat, it is has little to no tendency to drill into the adjacent panel:

146d4d8e.jpg


pic001.jpg


pic002.jpg


Also, I've found that if the epoxy is allowed to cure for about a week there is minimal if any damage from heat. Of course, I can only speak to the EP I am using, I have not tried this using other brands. But I can say there is a noticeable difference in how the EP will react to heat from welding from a one day cure (slight burning around the edges) to a one week cure (slight discoloration around the edges). I have yet to try weld through primers, I have heard both good and bad. I did read in a restoration publication a few years back that EP offered better long term rust protection than weld through primers, and I have been using the above method for lapped joints since. But I would suggest that whether someone chooses to use EP or a weld-through, something would be better than nothing at all.
 
Last edited:

APEowner

Well-known member
Joined
Oct 2, 2009
Messages
4,164
Location
Sunny, New Mexico
I've done a ton of but welded patch panels using a MIG welder and I've never had a problem with the weld cracking. I will say however that since I bought my TIG I have no desire to go back to the MIG for that application. There's just so much control with the TIG that's just not there with the MIG and the weld is so much softer that metal work after the weld is much quicker. The extra control with the TIG also gives you more opportunities to do it wrong and it makes it that much harder to do but once you get the hang of it....

To answer the OPs question. I use a combination of magnets, vice grips, C clamps and but clamps depending on the panel. Sometimes I'll tack the patch in place and form the patch as I weld it in. As you can see from MP&C's posts (BTW: Really nice work!) there's no one solution that works for every patch.

I've been using weld through primer with good results. I had the unpleasant opportunity to see inside a four year old repair that I did after the car was wrecked and it looked just like I had just done the repair. You still need to clean the paint off the actual weld but the burn back is almost non-existent. In fact it looks like the primer melts and then flows back in. I buy it in rattle cans so I don't have to mess around with cleaning the gun. It dries pretty quickly to so I can weld a panel in the same day I fab it.
 

scopx

Active member
Joined
Jan 4, 2010
Messages
37
Quality workmanship, regardless of the fixturing process used. Am open to variety of processes and ideas here.
 

fusionspecialists

Active member
Joined
Nov 9, 2009
Messages
33
I read the thread about using clecos on the ChevyTrucks forum. Looks good. I would like to get some cleco fasteners and use them the same way.

I think instead of making those plugs myself, I will just buy #10 washers. If there's a good reason why he's making the plugs himself (maybe the washers don't have a big enough outer diameter), I would change the order of operations for making the plugs. I have the Roper Whitney type hand punch tool that he uses. I would punch the 3/32" hole first, then put the self centering tip of the 9/32" punch in the small hole and punch the plug out of the sheet. It looks like he does it the other way around, which just seems like more work to me.
 

lilredex

Well-known member
Joined
Apr 29, 2006
Messages
5,948
Location
Toronto
Would anyone recommend brazing to install patch panels?


I have done that in the past, when it was really the only option open to me. The patch is best overlapped and brazed using the smallest tip you can get (I used a Victor #000). If you look through the below link, you can see that the durability of my work was put to the test, and survived.

Today, I have a Millermatic 135 and would proceed as above.......with close connected **** welded patches and make an attempt to come close to those beautiful examples shown.

That has to be the best Tutorial on patch work yet, thank-you for taking the time to present it..............MP&C!!


GMBBS

Well-known member
Joined
May 11, 2009
Messages
48
Great thread, real info from a real master!

Can anyone chime in on filling a sun roof panel??? We're talking a large panel, in the middle of a relatively flat and unsupported roof panel, so warping would be a big concern. Thx!
 

mikeatrpi

Well-known member
Joined
Jan 10, 2006
Messages
383
Location
Home
Fantastic thread with pictures and an explanation too!

MP&C - It looks like you brush on the epoxy rather than spray. Do you find any issue with this? I'm in the "too lazy to clean the gun for a quick shot" camp, and a brush seems like a great way to solve that problem.
 

MP&C

Well-known member
Joined
Oct 21, 2009
Messages
4,396
Location
Leonardtown, MD
Mike, I've been caught! If I have a bunch of stuff I'll go ahead and mix & spray, but for one piece, or an isolated part on the car, a brush is better than nothing!

Primarily the panel gets prepped the same, and as long as you wait the proper cure time before welding, I haven't had any adverse issues with doing it.
 
Last edited:

cat06

Well-known member
Joined
Oct 22, 2005
Messages
229
Location
in tha garage
Would anyone recommend brazing to install patch panels?

years ago is was considered not a good idea because then body fillers didn't stick well to the braze, and over time would bubble.

Not sure now though, fillers are a lot better now than then.
 

stricht8

Well-known member
Joined
Apr 20, 2008
Messages
1,714
Stricht8, some nice fabrication you did there!

Thanks. Beautiful work you did also! I like the bit idea to remove the primer from the plug weld holes. What is backfacing? I'd like to make one of these bits as I've been using a screwdriver blade to scratch out the weld thru primer from the hole. Not an ideal method. Also what kind of EP are you using?
 

joeswamp

Well-known member
Joined
Jul 25, 2007
Messages
2,418
Location
Massachusetts
Fantastic work Stricht8, couple of questions:

How did you clean out the surface rust inside that door? (In other words what did you do to get from picture 17 to picture 18?)

What was the purpose of welding on all those pull stud things? Was it not possible to shape the panel off the car?

Amazing how good this repair looked when you were done, really looked perfect. Thanks for sharing.
 

MP&C

Well-known member
Joined
Oct 21, 2009
Messages
4,396
Location
Leonardtown, MD
What is backfacing? .........Also what kind of EP are you using?


146d4d8e.jpg


I use about a 120 or so grit 3" sanding disc to completely flatten the end of the drill bit (I use a letter A for all my plug welds, works good with the heat setting I am at), You end up with what looks somewhat like a figure 8. With all that flat surface, it would be more difficult to remove paint, so on the back side of the leading edge of the cut, using the sanding disc again, and angled "relief" is formed in each side. This now leaves about a 1/16" wide flat straight across, as you can see above, which works much better to remove the paint. The EP I'm using is KP-2CF from House of Kolor.
 

stricht8

Well-known member
Joined
Apr 20, 2008
Messages
1,714
Fantastic work Stricht8, couple of questions:

How did you clean out the surface rust inside that door? (In other words what did you do to get from picture 17 to picture 18?)

What was the purpose of welding on all those pull stud things? Was it not possible to shape the panel off the car?

Amazing how good this repair looked when you were done, really looked perfect. Thanks for sharing.

I cleaned the rusty inner door area with naval jelly. Many applications over 2 days completely removed the rust. I don't have a sandblaster and don't like the mess it makes anyway. I then painted the inside with POR-15. Any mating surfaces were painted with weld-thru primer.

The studs were welded on the panel at the end because it was slightly lower than the surrounding areas. This happened because the heat of welding created shrinkage in a zone called the HAZ or heat affected zone. Basically this is the area about 1/2 inch on either side of the weld. This is fixed by stretching this zone or basically the weld area with a hammer and dolly. It is easier to grind down the weld first and to stretch incrementally as you weld. Weld a little, then grind then stretch the weld and so on so that you are not overwelmed with a very distorted panel. I have very limited access to the back side of the weld so I could not perform this task adequately. I therefore had to resort to pulling the metal back up with the stud welder.
 
To avoid these ads, REGISTER NOW!
Top Bottom