To avoid these ads, REGISTER NOW!

Welding table fabrication

pottsie454

Well-known member
Joined
May 1, 2012
Messages
61
Hey guys, I see most people that build one like posting pictures of their welding tables. Well here are some of the one I am building. Feel free to comment, I broad shoulders and can handle the criticism. Its almost complete, maybe 8 hours left plus and extra ideas you guys might come up with.

Table is 3'x8' with a half inch plate on top. I hope to upgrade to a 1inch top in the future, so I build the framework so that it will be able to support it.

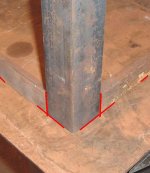
I started off using the 1/2 plate sitting on 2x4 crossmembers on saw horses. I then built a border of 3 inch angle plate to support the outsite edge and still have clamping abilities. Clamped and tacked..

IMAGE_87E8AB0A-6FBA-4AF5-B232-3413A49D1D69.JPG


IMAGE_6ACAAA38-73E3-4BD4-BFCA-82900DA1C7E6.JPG


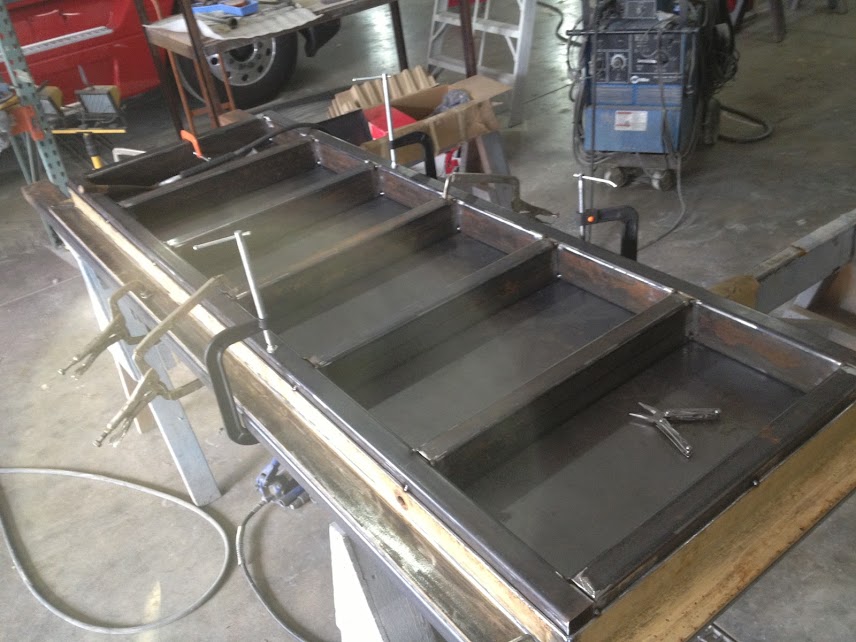
Then I built the table top support out of 2x4 1/8 steel tube. I can get 10 foot sticks of it for $25 a piece so I build almost everything with it.. ;)

IMAGE_684E6018-8D2E-45E8-88B2-135EA95917B0.JPG


After getting the frame work welded I started coming up with ideas for the legs. This was what I started with.

IMAGE_E8D7083C-C182-4E00-BE2C-68CA8D2F435E.JPG


I had bought some casters with a bunch of scrap steel over the winter so I put them to use. I made 4.5"x4.5" 1/4 plates and welded nuts on the backside.

IMAGE_4D914E9A-101D-4F5F-881A-5E080C9F5D59.JPG


I then focused my attention to the leveling feet. Because my legs are off set 3 inches all the way around I wanted to extend the levelers out in order to make sure I had a wide base. After many failed designs, I finally found one I liked. Here is the rough idea...

IMAGE_29EA3EC3-20DB-4D12-AB09-C786423D0B41.JPG


Well after consideration I thought that the table would look silly with these decorative leveling legs without doing something else that would make it look cool. So I fired up the drill press and cut out 2 inch lightening holes with 2 inch thick wall pipe as filler.

IMAGE_BD44F1F5-2CED-4122-B55A-DC74EE2C7D9D.JPG


IMAGE_725BD909-A56E-448B-98CF-BDFE2E7C3498.JPG


IMAGE_102141D2-07B8-481D-989B-ACD5C895D03F.JPG


Thats where I am at now. I am going to make some 12"x12" gussets to make the top frame to the legs. I will probably drill some lightening holes in them aswell. I only plan on bracing the sides and back legs together at the bottom. I want the front open to slide carts in and out for storage. I hope to bring you more pictures within the next week.

Considerations I still have to figure out... paint? Whats the strongest/best to use? and I noticed that my top frame is bowed a bit in the middle.. about a 1/16 equally from both far sides to the middle. I think I might try and stand the frame up and chain it to the floor to pull the bow out and then weld my gussest in. Think it will work? Or better ideas? I cant really shim because the plate will be held off my 3 inch angle iron defeating my purpose...


Thanks for looking!
 
To avoid these ads, REGISTER NOW!

kazlx

Well-known member
Joined
Oct 30, 2012
Messages
2,851
Location
Tustin, CA
Looks good, I like it. I bolted the my top down with 3/8-16 countersunk bolts. You may want to consider doing the same thing. There's some discussion on welding bowing the top a little. I didn't want to risk it. Plus, I was able to adjust out a slight bow. If you really want nice paint, you could use automotive base/clear. Otherwise, rattle cans work, just aren't as durable. Another middle road option is an alkyd enamel. It can be brushed or sprayed.
 
Last edited:

LG63

Well-known member
Joined
Sep 7, 2012
Messages
1,003
Nice work, looks stout enough for the 1" plate that's for sure. On paint, my suggestion would be Hammerite or PPG ALK-200. Both are easy to work with.
 
OP
P

pottsie454

Well-known member
Joined
May 1, 2012
Messages
61
May not mean much.. But I've already accepted the challenge for myself. Ill see if I can get it out. And I will either succeed and learn or I will fail and learn. ;)
 
OP
P

pottsie454

Well-known member
Joined
May 1, 2012
Messages
61
Update...

Got it turned right side up. I still have to gusset and cross brace the table legs. Then paint!

IMAGE_ADF71320-63DA-4991-8D12-7DDBA5A77498.JPG


IMAGE_08C90230-97CA-4206-A2E5-3F2E212601D1.JPG


IMAGE_66C7CC0D-3EB0-45C8-823D-CC9B7ECB3F13.JPG


IMAGE_B999A536-B8E7-492F-A6BF-1207740677FA.JPG
 

Perrorojo

Well-known member
Joined
Jun 8, 2012
Messages
1,762
Location
Northern IN
You sure those leveling feet will hold the table up when you put the 1" top on it? I think the supports will be ok but what are the threaded rods rated at? The 1" top will be 980lbs.
 

sberry

Banned
Joined
Jun 18, 2005
Messages
35,747
Location
Brethren, Michigan
I would skip the inch top and the gussets, add 2 angles and a shelf about half way up.

I see now you are going to roll stuff under for storage. This is so strong a full pallet of roofing shingles wont deflect it.
 
Last edited:

sberry

Banned
Joined
Jun 18, 2005
Messages
35,747
Location
Brethren, Michigan
I know this is a fun, one off project for you but there are a lot of benches built on here and they are one at a time and most are a hobby so this isn't relevent.

But with 1/2 plate would have built it in 13 structural pcs in a couple of hrs.

One winter I built some benches for a plant. You could change the length with 4 pcs and the top, the end was typical, threw 4 pieces in a jig and it was all square one way by setting it on the plate when it came to assembly. (had my helper building them) Designed the welding, took about an hour to finish one up, all built upside down.
 

sberry

Banned
Joined
Jun 18, 2005
Messages
35,747
Location
Brethren, Michigan
This shop looks a lot like mine. Got it all on carts or wheels and what isn't moves with a pallet jack. I got a couple carts I move a little bit but my work bench is fixed and is easy to work around. I actually have 2, I suspect you already have one with a fixed vise?
 

porschedude996TT

Well-known member
Joined
Oct 28, 2007
Messages
2,384
Location
Santa Maria, California
Here is an idea!

How about the pneumatic jacks that are installed on some open wheel race cars that jack it up on its' wheels when you want to move it. Other wise when you remove the air supply it lower to the adjustable feet.
 

sberry

Banned
Joined
Jun 18, 2005
Messages
35,747
Location
Brethren, Michigan
I am not sure how much weight you could put on this but without bracing it would crush the wheels right off of it before any part of it failed. The top is suitable for semi traffic.
 

bullfrog123

Well-known member
Joined
Feb 10, 2011
Messages
477
Location
SE Idaho
I really like it. But...... I think your leveling feet are going to plant you on your ****!!! I would have put them to the inside of the table. Sticking out like that is going to be a toe stubber for sure.:thumbup:
 
OP
P

pottsie454

Well-known member
Joined
May 1, 2012
Messages
61
sberry - You are absolutely correct. You could make a table in no time that would perfectly suit most persons needs. But, I am a firm believer in over engineering... especially when it comes to my tools. I do not weld professionally (Im sure my welds can attest) so this table will also be a double duty piece. Work table, layout table, welding table... ect you get the point. I wanted a strong, heavy, study table... and thats what I built. ;) As far as the casters, I bought them second hand from a friend He told me they were rated for 800#s a piece. So they should hold up, 99% of the time the table will be up on the levelers anyway.

perrorojo - I hope they will be. They are supposed to be rated at 5,000 pounds. The frame work is about only about 400#. So should be plenty of leeway. As you can see I designed the mount to keep the feet screws as close to the ground as possible.
http://www.use-enco.com/CGI/INSRIT?PARTPG=INLMKD&PMPXNO=3009869&PMAKA=990-2065

porsche - the holes are just for fun. I figure it could be useful when bending things maybe... or they might hold something. I just like having things around me that inspire creativity.

Bullfrog - I agree, but the leg uprights are already spaced inside the top by 3 inches in all directions, and I was concerned that if I put levelers inboard that I might have a problem with it trying to se-saw when I put to much weight on an edge...
 
To avoid these ads, REGISTER NOW!
OP
P

pottsie454

Well-known member
Joined
May 1, 2012
Messages
61
Couple updates... I havent painted it yet because I have still been adding on features.. To be honest I might not paint it. Ive been spraying wd-40 on the top to keep it from rusting, I may just do that to the frame work too..

Anyway, picture of its home, but its mobile to bring it to the middle of the shop when needed.

IMAGE_6.jpeg


A picture of my vise mount. I made it so that I could slide it all the way in so that it would be out of the way when I needed the space. I also have holes drilled to allow it to slide all the way out for the bigger pieces to chuck up.

IMAGE_7.jpeg


Future plans to add more reese hitch mounts and to make the file cabnet mounts so it will roll with the table..
 
OP
P

pottsie454

Well-known member
Joined
May 1, 2012
Messages
61
I was doing some tig welding today and noticed the mill scale on the table top was causing a bad connection issues. How have you all over come this? I feel like if I pull the mill scale off the table it would just rust immediately. I live I'm a humid climate (Ohio valley) so rust is a huge issue for me.

Any suggestions?????
 
OP
P

pottsie454

Well-known member
Joined
May 1, 2012
Messages
61
Yah, clamping will work. But sometimes, like tonight I was welding some small, thin angle pieces that I couldn't really get my my ground lead attached without making it difficult to keep the part alignment.

I was hoping to get some advice to get the mill scale off the table top and to keep it from rusting after removal.
 

kazlx

Well-known member
Joined
Oct 30, 2012
Messages
2,851
Location
Tustin, CA
On small parts, I've used a small piece of plate, aluminum or steel, to clamp to. You can weld a stud to it so you have a good place to put your clamp.

Fwiw, my fab table doesn't have any mill scale. The top is Blanchard ground and I just wipe it down every so often with WD-40.
 

greenlizard

Well-known member
Joined
Dec 4, 2012
Messages
186
Location
Chapin, SC
A Steampunk welding table! How cool is that? You might investigate Hollyweird commercial possibilities. Selling style to the industry is big business. Who knows, your stuff might be the next big thing.
In any case, I like it.

-Steve
 

dr_clyde

Well-known member
Joined
Jan 7, 2009
Messages
6,425
Location
Holland, MI
If you are welding delicate parts and want to avoid the mill scale grounding issue, get a chunk of 1/4 plate aluminum and use it as a sub plate, then attach the clamp to that. This will also double as a heat sink for small parts you don't want to overheat.
 

Adam McLaughlin

Well-known member
Joined
Oct 13, 2008
Messages
1,843
Location
Santa Rosa, CA
Just clamp directly to the work......
And make certain that all of the materials are clean-clean
I always thought that clamping to the welding table was a lazy-thing

Adam
 

E.rodz

Well-known member
Joined
Nov 11, 2009
Messages
2,434
Location
st.paul MN.
couple of suggestions here great looking bench and perfectly functional. if you have not painted it yet I would weld up a frame to hold that file cabinet under your bench to hold your clamps and welding supplies and fab up some welding rod holders as well if you mount the file cabinet in far enough to be able to clamp pieces on the edge.here is a pict of mine to give a visual to help give you more ideas. hope this helps and keep up the great work!:thumbup:
 
OP
P

pottsie454

Well-known member
Joined
May 1, 2012
Messages
61
Thanks for the suggestions and the kind words. I like the idea of the aluminum chunk, I will be on the look out for one.

I chose the steel casters because they choose me. Lol. A buddy of mine sold me a ton of scrap metal he was going to use to build a smoker but gave up. He happened to have those casters and asked if I wanted them. Threw them in the deal for free, plus I have two spares just in case. I suppose the other styles of casters might work better, but honestly I doubt the table will be on the casters often.

Ez, I've already got something in mind the get the file cabinet mounted but I've been waiting until I've made a few more mods to decide on its location first.

Steampunk? I had to look that one up. But your absolutely right. I actually plan on adding some copper for air line hookups and possibly some electric outlets mounted to the table for easier access.

Any reason I couldn't use copper for electric conduit other then cost?
 

macdonge

New member
Joined
May 13, 2010
Messages
4
WD40 can give off some nasty fumes if it sees arc temps. I wipe down my table top with MIG anti-spatter paste from time to time. Keeps the corrosion at bay and prevents stuff sticking to it. Nice job. Love the levelers!
 
To avoid these ads, REGISTER NOW!
Top Bottom