To avoid these ads, REGISTER NOW!

Welding two nuts inline- how to w/o binding?

tarbellb

Well-known member
Joined
Apr 17, 2011
Messages
5,776
Location
Oregon
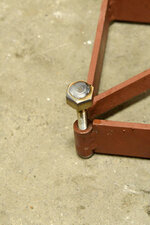
Is there a method to achieving this fabrication design without them binding up?

I've been seeing others here like @Beerhippie and more hitting this same issue

My latest example was my welding table build, for the stabilizers I used this design. And while I tried everything I got mixed results. Two turned out pretty good, one needed cycling, and one needed full blown rethread and still isn't great?


So is there a surefire way to incorporate this or is it a flawed design?

table has 3/4x10tpi all thread not acme thread


1000002511.jpg
1000002512.jpg
 
Last edited:
To avoid these ads, REGISTER NOW!

Beerhippie

Well-known member
Joined
Oct 13, 2023
Messages
10,006
Location
Far NE Oregon
In my experience, no. The alignment needs to be too perfect for the world I live in.

A good way to get more thread engagement is to use coupling nuts instead of regular nuts.

shopping


You could also drill out the upper nuts to just exactly the OD of the all-tread to add stability without the threads binding.
 

LopezBart

Well-known member
Joined
Oct 13, 2023
Messages
2,563
Location
Lopez Island, WA
If you use a hot dipped galvanized nut on the top (and grind off the galvanizing before welding), it will be easier - those have a much looser thread tolerance. That's probably the quickest fix; obviously a design where the nut retains some freedom to rotate while still constraining side to side motion would be less finicky.
 

whateg01

Well-known member
Joined
Mar 13, 2006
Messages
11,470
Location
doo dah, kansas, usa
Why do you need nuts at top and bottom? The threads of one should have plenty of strength to support that.

If I had to have that, I would back the top one off just a smidge so as the weld cools and pulls them towards each other, there's a bit of slop for that to happen.

But I wouldn't do that at all. I'd just use a single nut at the bottom.
 

Hohn

Well-known member
Joined
Aug 25, 2016
Messages
2,707
Location
Diesel Central, Indiana
Is there a method to achieving this fabrication design without them binding up?

I've been seeing others here like @Beerhippie and more hitting this same issue

My latest example was my welding table build, for the stabilizers I used this design. And while I tried everything I got mixed results. Two turned out pretty good, one needed cycling, and one needed full blown rethread and still isn't great?


So is there a surefire way to incorporate this or is it a flawed design?

table has 3/4x10tpi all thread not acme thread
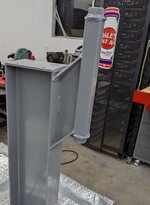

1000002511.jpg
I'd suggest a design change. Two nuts both tied to the same axis on a common threaded rod is a design flaw, IMPO.

With two nuts both tied to the structure, only one of them can actually carry load anyway. One of the nuts is carrying axial load and the other (even if perfectly executed) is at best just locating your all-thread within the rectangular tube section.

You're trying to use one nut as a bushing. You need a bushing or a bearing. But bushings need smooth shafting, not threaded rod.


I'd think it would be preferable to transition from the all-thread to smooth shafting.
With smooth shafting, you can use a plate mount bearing on an end cap of your rectangular tubing.


With the portion of shaft that protrudes up, you can mount almost anything-- handwheel, pulley, or even a hex.
 

whateg01

Well-known member
Joined
Mar 13, 2006
Messages
11,470
Location
doo dah, kansas, usa
I'd suggest a design change. Two nuts both tied to the same axis on a common threaded rod is a design flaw, IMPO.

With two nuts both tied to the structure, only one of them can actually carry load anyway. One of the nuts is carrying axial load and the other (even if perfectly executed) is at best just locating your all-thread within the rectangular tube section.

You're trying to use one nut as a bushing. You need a bushing or a bearing. But bushings need smooth shafting, not threaded rod.


I'd think it would be preferable to transition from the all-thread to smooth shafting.
With smooth shafting, you can use a plate mount bearing on an end cap of your rectangular tubing.


With the portion of shaft that protrudes up, you can mount almost anything-- handwheel, pulley, or even a hex.
Unless that table is getting raised and lowered 5 times every day, a simple hole through a piece of 1/4" is plenty. There's not going to be that much radial load on it if the nut is at the bottom.
 

Hohn

Well-known member
Joined
Aug 25, 2016
Messages
2,707
Location
Diesel Central, Indiana
Sorry, a bit more spit balling....

Since the top nut isn't needing to bear any axial load, why does it need to be welded? Why nut use a four-sided nut, drop it INSIDE the rectangular tube end and use a cold bond (epoxy) or such so secure it?

You're really just using the top nut to keep the all thread from located within the tube. If you ground down a nut (or found one) that *just* fit inside the tube ID, it would not rotate and the only issue would be the clearance of the nut within the tube making a rattle under vibration. Does that matter?
 

whateg01

Well-known member
Joined
Mar 13, 2006
Messages
11,470
Location
doo dah, kansas, usa
Sorry, a bit more spit balling....

Since the top nut isn't needing to bear any axial load, why does it need to be welded? Why nut use a four-sided nut, drop it INSIDE the rectangular tube end and use a cold bond (epoxy) or such so secure it?
For location it wouldn't even need that. It could float
 
OP
T

tarbellb

Well-known member
Joined
Apr 17, 2011
Messages
5,776
Location
Oregon
Agreed on all these points fellas

Interesting point from @LopezBart about the lower tolerance galvy nut🤔

I did realize that only 1 nut was needed for the load, but I don't have the tooling to hone out the diameter on the opposing nut...

Hind sight I wouldve run just one and let the all thread float above
 

rancherbill

Well-known member
Joined
Oct 18, 2007
Messages
5,335
Location
Foothills County, Alberta, Canada
Weld the bottom collar nut and install on the leg. Weld another collar nut for the top and let it cool. Put it on the threaded rod and do 2 tacks, go away and let it cool and come back and do 2 more tacks. Let it cool and if you want more you should be able to go wild.

Tension is important to get it to move later. Don't have it tight or loose the other way have the tension neutral while finish welding.
 

danielbuck

Well-known member
Joined
Apr 15, 2014
Messages
931
when I weld up control arm tube inserts for vehicles, it's often a similar sized thread. I just insert a bolt in the threads with high temp anti-seize on the threads. let it cool and then remove the bolt. I've never had one bind up. I know that's not exactly the same.
 

Beerhippie

Well-known member
Joined
Oct 13, 2023
Messages
10,006
Location
Far NE Oregon
Agreed on all these points fellas

Interesting point from @LopezBart about the lower tolerance galvy nut🤔

I did realize that only 1 nut was needed for the load, but I don't have the tooling to hone out the diameter on the opposing nut...

Hind sight I wouldve run just one and let the all thread float above
You don't have a drill and bits? It ain't high-tolerance work--just making a nut into a loose bushing.
Weld the bottom collar nut and install on the leg. Weld another collar nut for the top and let it cool. Put it on the threaded rod and do 2 tacks, go away and let it cool and come back and do 2 more tacks. Let it cool and if you want more you should be able to go wild.

Tension is important to get it to move later. Don't have it tight or loose the other way have the tension neutral while finish welding.
If this can be done--and I'm sure it can--I have never gotten it to work.

A locking nut above the top nut--that you've now converted to a bushing--would do a better job.

For levelers that need to be adjusted frequently and quickly:

54409077090_b5973304fc_b.jpg

That's a coupling nut welded to the portable vise stand. The big nut on top is a knob. Q&D to adjust.
 

T444e

Well-known member
Joined
Feb 25, 2016
Messages
454
If you use a hot dipped galvanized nut on the top (and grind off the galvanizing before welding), it will be easier - those have a much looser thread tolerance. That's probably the quickest fix; obviously a design where the nut retains some freedom to rotate while still constraining side to side motion would be less finicky.
HDG nuts are tapped oversize to account for the galvanizing.
 

Beerhippie

Well-known member
Joined
Oct 13, 2023
Messages
10,006
Location
Far NE Oregon
If you use a hot dipped galvanized nut on the top (and grind off the galvanizing before welding), it will be easier - those have a much looser thread tolerance. That's probably the quickest fix; obviously a design where the nut retains some freedom to rotate while still constraining side to side motion would be less finicky.
Dissolve the galvanizing off with Muriatic or phosphoric acid. It's what I do when I need to weld on galvy. Takes a minute.
 
To avoid these ads, REGISTER NOW!

T444e

Well-known member
Joined
Feb 25, 2016
Messages
454
Sorry too far away, and I only stayed at a Holiday Inn last night. As I like to say, I only stick metal together at home.
 

Hohn

Well-known member
Joined
Aug 25, 2016
Messages
2,707
Location
Diesel Central, Indiana
Since some folks think this is something that can be done relatively easily, I'm throwing down the gauntlet: Weld two nuts on the ends of a 3" piece of pipe so a bolt can be threaded through both using fingers only.

If you pull it off, I'll shout you a beer at TG.
Theres a reason that any manufacturing operation would cut the threads AFTER it’s welded. Welding on pre-machined parts and holding any kind of true position tolerance is all but impossible.
 

imagineer

Well-known member
Joined
Dec 13, 2015
Messages
1,018
Location
Ohio
When you reference "binding", do you mean the threads were buggered due to welding, or that the two nuts were not clocked correctly to allow the bolt to turn though both nuts at the same time?

A few years ago, I designed a purpose-built vise for a weld fixture, and to ensure the nuts were clocked properly, after I welded one of the nuts, I installed threaded rod with 2 nuts installed. Instead of tightening the 2nd nut to be welded to the assembly, I ran it the opposite direction, using the 3rd nut as a jam nut to lock the nut to be welded. Whereas this made the set up somewhat loose (maybe by 1/32") and I needed to be careful to keep it all aligned, when the welds on the 2nd nut cooled and shrunk, it pulled the nut toward the assembly just a little and ensured the threads were clocked. It worked well.

Another trick I use when welding a nut where the threads have to remain aligned, where possible, I'll use a machine tap in place of a bolt for holding the nut. The male threads on a machine tap are much more accurate than a bolt.
 

KwikFab

Well-known member
Joined
Jul 27, 2024
Messages
1,217
Location
Central Valley, CA
when I weld up control arm tube inserts for vehicles, it's often a similar sized thread. I just insert a bolt in the threads with high temp anti-seize on the threads. let it cool and then remove the bolt. I've never had one bind up. I know that's not exactly the same.

Did something similar at my first fab job when we made park benches and the sort.

Threading anything through never seemed to "bind" as others explained here.
 

sz0k30

Well-known member
Joined
Feb 12, 2014
Messages
886
Location
SE Michigan
!st choice is a coupling nut as mentioned in an earlier post. But if you think you really need to have all that much thread engagement, make your own. Buy some hex bar stock, cut to the length you need, drill & tap. I've done that (well I should say a buddy did it for me). Luckily I have a buddy with some nice shop equipment including a Bridgeport & a lathe!
 

danielbuck

Well-known member
Joined
Apr 15, 2014
Messages
931
I wonder if the issue is not the threads distorting, but the nuts actually being pulled towards each other slightly while cooling. It might be best to weld one of them up, let it fully cool, then tack the other nut in place with threaded rod aligning them, let that cool and then fully weld the other nut. I imagine that would cut this effect roughly in 1/2, maybe a little more.

When you thread a bolt in, does each nut spin freely, and only bind once you get the all-thread into both of the nuts?
 
Last edited:

PugetDude

ALLIANCE MEMBER
Joined
Mar 13, 2013
Messages
22,463
Location
Superstition Mountains, AZ
Soak a galvanized nut in Citric Acid overnight, the threads will be loose enough that you can probably get it to work on the top side.
If not, run a tap through it a half dozen times using a drill, forwards and backwards with a bit of side pressure to open up the threads. As other have said you really only need a bushing; this will give you a very sloppy threaded one. Bottom nut is doing all the work anyway.

A thin jam nut would probably also work, fewer threads to bind up. Since you have already welded the legs up, just take half the width off the top nuts with a cutoff wheel in an angle grinder, then clean up the threads with a tap.
 

WillyBoy

Well-known member
Joined
Nov 10, 2021
Messages
648
Location
Genesee valley area of New York state
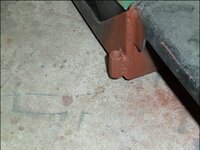
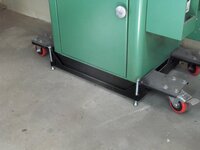
Here are some pictures of the coupling nut style stabilizing feet that I use. These, shown, are on a frame I fabricated for a Powermatic 90. I also have the same style on the frame that holds two cabinet saws, the cabinet for a Logan metal lathe, and the frame I fabricated for a Clausing mill.

100_1313.JPG


100_1446.JPG

Unfortunately the black paint on the second photo doesn't show a lot of detail. There is a carriage bolt threaded through the nut upside down so the head of the bolt is on the floor when extended. After the bolt is in place, a nut is welded to the top end of the bolt. A long extension and an battery impact wrench work fine for running the bolts up and down when the machine needs to be moved.

I discovered right away that welding two faces of the coupling nut distorted the nut just enough to prevent a bolt from threading easily though it. Finding a socket that would slip over the end of a tap, and using an impact driver or drill to run the tap up and down through the coupling nut with some lube on the tap solved that problem.

It helps to sing the "grinder and paint" song while looking at the close-ups of the welding.
 

Beerhippie

Well-known member
Joined
Oct 13, 2023
Messages
10,006
Location
Far NE Oregon
Here's another problem: COE. As the tube with the nuts welded to each end changes temperature, it changes length--the longer the tube, the more it changes. With changing length, you effectively get changing clocking between the two threaded nuts.
 

whateg01

Well-known member
Joined
Mar 13, 2006
Messages
11,470
Location
doo dah, kansas, usa
Here's another problem: COE. As the tube with the nuts welded to each end changes temperature, it changes length--the longer the tube, the more it changes. With changing length, you effectively get changing clocking between the two threaded nuts.
I happen to really like the old cab-over-engines. I would like to have an early 40s Ford COE!
 

danielbuck

Well-known member
Joined
Apr 15, 2014
Messages
931
Here's another problem: COE. As the tube with the nuts welded to each end changes temperature, it changes length--the longer the tube, the more it changes. With changing length, you effectively get changing clocking between the two threaded nuts.
I think that's probably the real issue here. I've welded a single nut on the bottom of alot of table legs, and in other places on alot of projects and almost never do I have one bind. I think the issue is the distance changing.
 

T444e

Well-known member
Joined
Feb 25, 2016
Messages
454
Here's another problem: COE. As the tube with the nuts welded to each end changes temperature, it changes length--the longer the tube, the more it changes. With changing length, you effectively get changing clocking between the two threaded nuts.
In my experience, hardware, like most steel products, is manufactured to the min. Meaning there is plenty of slop in the hardware. I'm not sure CTE is enough to affect thread clearance at the length the OP has.

I may need to try this for the hell of it. I'm sure I have some 3/4-10 ATR laying around.

OP, what is the face to face dimensions on the weldment? Did you use finish hex or heavy hex nuts? I'm know I have both of those laying around.
 

PugetDude

ALLIANCE MEMBER
Joined
Mar 13, 2013
Messages
22,463
Location
Superstition Mountains, AZ
I have welded two nuts together before with decent results; threaded then onto a piece of all thread with a very small gap in between. Tack them together with a very small tack weld. Then use a pair of wrenches to turn them to see how they bind up; the small tack can be deformed one way or the other to get the threads clocked. Repeat on the other side, test again. Then weld the perimeter. I also run a tap through with my cordless drill when I am done.
(But, I also have an assortment of coupling nuts, a lot faster when I want a longer thread engagement on a weldment. Much easier )
 

Muckin_Slusher

Well-known member
Joined
Apr 1, 2017
Messages
465
Location
Abitibi
Maybe after fabricating you could add something gritty (lapping compound?) to a sacrificial all-thread, then run it up and down a bunch while loaded to wear out the nuts a little. The part of the nuts causing binding should wear out fastest...
 
OP
T

tarbellb

Well-known member
Joined
Apr 17, 2011
Messages
5,776
Location
Oregon
In my experience, hardware, like most steel products, is manufactured to the min. Meaning there is plenty of slop in the hardware. I'm not sure CTE is enough to affect thread clearance at the length the OP has.

I may need to try this for the hell of it. I'm sure I have some 3/4-10 ATR laying around.

OP, what is the face to face dimensions on the weldment? Did you use finish hex or heavy hex nuts? I'm know I have both of those laying around.

The face to face dim is 11.5"

Give it a shot, I'm interested to hear the outcome. What's the difference between a finish and heavy hex nut? Got mine from the local industrial supply, didn't spec anything besides grade 5.
 

T444e

Well-known member
Joined
Feb 25, 2016
Messages
454
Heavy hex nuts are an 1/8" wider across the flats than a finish hex nut (standard) I'll try next time I weld something up, hopefully this weekend. It's been awhile.
 

kctgb

Well-known member
Joined
Jul 7, 2024
Messages
305
Why do you need nuts at top and bottom? The threads of one should have plenty of strength to support that.

If I had to have that, I would back the top one off just a smidge so as the weld cools and pulls them towards each other, there's a bit of slop for that to happen.

But I wouldn't do that at all. I'd just use a single nut at the bottom.
That’s what I was going to say, you beat me to it.
 
To avoid these ads, REGISTER NOW!
Top Bottom