To avoid these ads, REGISTER NOW!

Welding up and Weding down

bmxdad

Well-known member
Joined
Feb 18, 2014
Messages
2,539
Location
Puyallup, WA
Welding up and Welding down

Having issues welding up and down a joint ... going up is OK, but going down ... yikes. So, how do you control the puddle? I was thinking of a wider bead, but no time to try tonight ...

Images below ... guess which one was going down :bounce:
 

Attachments

  • OBTest6.jpg
    OBTest6.jpg
    141.5 KB · Views: 411
  • OBTest8.jpg
    OBTest8.jpg
    139.6 KB · Views: 397
Last edited:
To avoid these ads, REGISTER NOW!

why worry

Well-known member
Joined
Oct 3, 2014
Messages
301
When welding vertical, up hill usually gives the best penetration. Down hill is used for sheet metal typ 1/8" and lighter as you will burn through when trying to go uphill. On the heavier metals when going down the weld just kind of "hangs" there and falls away without penetrating the base metal. I would say pic 2 was done down hill and the pic was taken after the part was flipped.
 

Bobhdus

Well-known member
Joined
Oct 20, 2012
Messages
262
Location
Missouri
With welding down hill, you can use a slight upside U or V movement ( push the weld into the root). Uphill welding is a regular U or V manipulation. Uphill is stronger if both are done correctly. Check out weldingtipsandtricks.com for quick info on techniques.


Sent from my iPad using Tapatalk
 
OP
B

bmxdad

Well-known member
Joined
Feb 18, 2014
Messages
2,539
Location
Puyallup, WA
Yea, the skinny one is down hill.

So an upside down U when going down hill? Does trying for a wide bead help at all?
 

Bobhdus

Well-known member
Joined
Oct 20, 2012
Messages
262
Location
Missouri
You can spread it around a bit, if you like and not sit in one spot too long, (slow the wire speed down so it doesn't droop) but it's really not going to penetrate as much as uphill welding. Usually, the weld doesn't need to be any wider than the thickness of the material. When welding "around" something, it's sometimes best to tie in our wrap your welds.


Sent from my iPad using Tapatalk
 
OP
B

bmxdad

Well-known member
Joined
Feb 18, 2014
Messages
2,539
Location
Puyallup, WA
Ok ... going to try and avoid it all together :D

But when I do run it down hill, I'll turn the wire feed down and run a wider and an upside down U pattern.


I'll post more pictures later ....
 
Last edited:

sberry

Banned
Joined
Jun 18, 2005
Messages
35,747
Location
Brethren, Michigan
Turn it down for vert up, set it for 1 thickness of material less and the movement is a Z with a pause on each side. When setting the welder its not a turn wire up or down which is the "heat" by the way but both controls. The wire feed has 2 dials unlike a simple stick which has 1.
Up or down same strength if done correctly.
 

3 Gun Shooter

Well-known member
Joined
Jan 29, 2015
Messages
880
When welding down I pulse the MIG gun trigger, like stick welding in DC- with a rod like 6010.
 

zkling

Well-known member
Joined
Jan 23, 2007
Messages
16,939
Flow the ends of the welds together at the corners to prevent crack forming. Making it one continuous weld around the perimeter of the tube.
 

sberry

Banned
Joined
Jun 18, 2005
Messages
35,747
Location
Brethren, Michigan
As others have said turn down your volt's
Its really turn down the wire speed. I don't know if the last 2 are mine. Looks like it was a bit hi on the last one and it didn't get flattened out.
 

Attachments

  • Hot vert 2.JPG
    Hot vert 2.JPG
    35.4 KB · Views: 101
  • hob hot.JPG
    hob hot.JPG
    39.5 KB · Views: 99
  • hob vert 30a1.JPG
    hob vert 30a1.JPG
    42.2 KB · Views: 104
  • Hob vert wire 1.JPG
    Hob vert wire 1.JPG
    51.9 KB · Views: 98
Last edited:

INSP380

Well-known member
Joined
Dec 17, 2012
Messages
909
Location
Cleveland, Ohio
Reposition your part and weld it horizontal. We position stuff all day long to maintain a horizontal weld. It takes a bit longer, but, depending on the skill level (weldor) you can achieve a better weld. You need to maintain the throat of the weld with proper penetration. Vertical down, for a novice, can be difficult when proper root penetration is required. This looks structural. IMHO, I'd refrain from vertical down for now.

Steve
 

sberry

Banned
Joined
Jun 18, 2005
Messages
35,747
Location
Brethren, Michigan
Neither one of the OP's welds is suffering from a lack of fusion which is the usual problem.
 

Attachments

  • wire weave vert.jpg
    wire weave vert.jpg
    145.3 KB · Views: 84
Last edited:
To avoid these ads, REGISTER NOW!

INSP380

Well-known member
Joined
Dec 17, 2012
Messages
909
Location
Cleveland, Ohio
Neither one of the OP's welds is suffering from a lack of fusion which is the usual problem.

Looks like excessive cap, unequal legs and I'm possibly insufficient penetration at the throat of the weld. What stress level is this joint under??? Yes, most likely would not pass a visual inspection in my weld shop. It's always difficult to tell from pics. I'd cut it and examine the cross section and qualify the procedure to be sure. At the very least, please tie the horizontal and vertical weld together.....Wrap the corner. If it's under stress be safe than sorry.


Steve
 
Last edited:
OP
B

bmxdad

Well-known member
Joined
Feb 18, 2014
Messages
2,539
Location
Puyallup, WA
I'll grind it out a redo it, and start practicing wrapping the corner. This particular joint is just a cross brace so not to much stress.

The uprights might be the most stressed, since they will be carrying the majority of the weight. I'll get some more images up later tonight ... thanks for the help all.

Here is the project: OB Stand

INSP380: What do you mean by "excessive cap, unequal legs"
 
Last edited:

koditten

Well-known member
Joined
Apr 10, 2008
Messages
5,528
Location
Midland, Michigan
What am I missing on wrapping these welds? This is welding thin iron, the parent material is gonna give long before the weld cracks.
 

sberry

Banned
Joined
Jun 18, 2005
Messages
35,747
Location
Brethren, Michigan
I am going to agree, you can fix a few minor defects here but they are nothing that is going to allow this project to come apart. I agree they wouldn't pass highly critical inspection but this joint cant be beat apart with a couple sledge hammers.
 

rswepn

New member
Joined
Apr 1, 2014
Messages
1
What he means by "wrap the corners" is to not stop at the edge but go over and tie it into the next weld.
 

INSP380

Well-known member
Joined
Dec 17, 2012
Messages
909
Location
Cleveland, Ohio
I'll grind it out a redo it, and start practicing wrapping the corner. This particular joint is just a cross brace so not to much stress.

The uprights might be the most stressed, since they will be carrying the majority of the weight. I'll get some more images up later tonight ... thanks for the help all.

Here is the project: OB Stand

INSP380: What do you mean by "excessive cap, unequal legs"


There are a lot of different parts to a "weld" in terms of Weld Inspection. The Basics are , face, toe, root, leg and throat. Each can be measured and is proportionate to the weld size. The weld size can be calculated by the materials and joint that is being used in order to create a suitable weld. Within each of these terms is a criteria that needs to be met in order to conform to a "Visual Inspection". I know what most of you are thinking, blah blah blah blah blah....it is boring and often does not apply to "something I'm welding up" . The reality is, by understanding what you need to see, you can practice laying down a better weld. I get a lot of weldors that have almost zero book time and can't understand why or how there welds don't pass inspection. Most of these are beautiful looking welds, perfect fillets, nice **** joints....TIG included. Lack of Fusion, Lack of Penetration, Undercut , Overlay- rollover, porosity...blah blah blah. A weld joint may fail for any number of reasons, but, the difference can be how it fails. Is it a gradual tear from the base metal with almost no stored energy that gently weeps to the ground? Or is it a catastropic bang that gives someone no time to react and get to safety? Codes help insure our safety. Long winded, but I preach it daily as a Weld Inspector working with Boiler and Pressure Vessel codes (B31.1 &B31.3) structural (D1.1) and spend a lot of time in ASME sec ix & v . Grab a basic book and read a few chapters, you be very thankful you did and will be laying down better welds sooner than you thought.

Steve
 

sberry

Banned
Joined
Jun 18, 2005
Messages
35,747
Location
Brethren, Michigan
I agree looking over a code book is worthwile. Jim Lincoln sold millions of buzzers with a simple instruction manual with about a page or 2 of how to and zero warning about building unsafe contraptions above their skill level. The internet has brought this phenomina to a whole new level.
Almost nothing we see here is extremely critical and shouldn't be especially by the newbie asking general questions. A good share of the worlds welding is about that level, maybe less and covered in slag.
I posted some earlier old world pics in another thread where I discuss failed welding. I really find more joint design or outright missed connections than faulty welds, they look terrible but most manage to stick provided it had some good fundamental design such as most of the weight on a trailer is sitting on top, most of the welding is to keep the pieces from sliding around.
Same for the hitch coupler we see in the other thread, bolts would have worked also, its really a clamped slip fit when its bolted and no one would give it a second thought and rave about grade 8 bolts where the engineer would have used 5.
 

sberry

Banned
Joined
Jun 18, 2005
Messages
35,747
Location
Brethren, Michigan
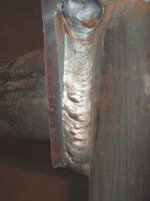
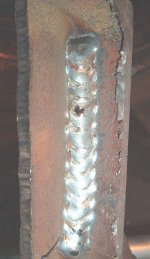
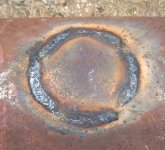
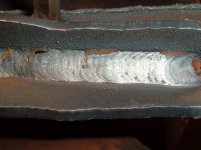
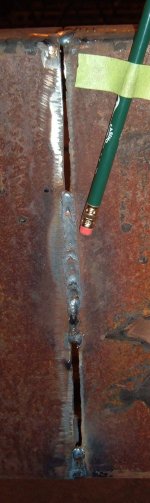
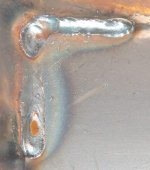
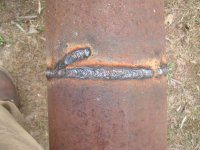
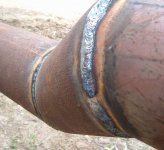
Most of these guys are fairly good fabricators with newbie welding skills. As fabricators they tend to over build which they should on non engineered 1 off pieces. The stand in the pic is not highly stressed, the joints do not need to be 100%, most of them would work with a simple bolt and in a production design like an engine stand the work is often adequate and way less weld used than in the pic, most up to the thickness of the tube but not all.
The internet is good, it also magnifys every issue, yes he should develope better habits and work to improve but nothing about the connections for this job look chronically unsafe. In fact with their faults probably better than a factory version.
We have a lot of career welders with 2 weeks experience over and over and over. You would think after a while they would look at the guy beside them and notice some difference but noooooo, they really never learned.
Most of them don't know what the numbers on an electrode mean and even less about the correct operating characteristics for each one. "I don't remember the numbers you know, but the brown ones you know, they are the best you know" Every once in a while I am surprised but usually I find them sputtering with a 6013 on about 70Amps cause that's where you are sposed to run most things, with the little circle around the number on the dial you know.
 

sberry

Banned
Joined
Jun 18, 2005
Messages
35,747
Location
Brethren, Michigan
Just examples of typical repairs, not all perfect but serviceable. There was mention of wrap. These are mostly in the position they were welded in, look at pic 4, the operator run a little down and came back with the overhead and tied the corner in.
The rusty pipe is torch cut and holder up there fit. No bevel, single pass of old 6010 we found in a box. Roll over welding which is not the same as rolling the pipe with weld but basically reach what we can and roll it over to get the rest.
 

Attachments

  • pipe plug.JPG
    pipe plug.JPG
    86.3 KB · Views: 46
  • tube 2.jpg
    tube 2.jpg
    143.7 KB · Views: 53
  • wire gap pencil.JPG
    wire gap pencil.JPG
    91.1 KB · Views: 55
  • wire corner.JPG
    wire corner.JPG
    69.5 KB · Views: 44
  • pipe 6 inch foot.JPG
    pipe 6 inch foot.JPG
    65.5 KB · Views: 45
  • pipe 6 inch offset..JPG
    pipe 6 inch offset..JPG
    58.8 KB · Views: 45
Last edited:

INSP380

Well-known member
Joined
Dec 17, 2012
Messages
909
Location
Cleveland, Ohio
Your welcome. A great bit of my day as a Inspector can also be teaching. It's difficult to get people to understand the critism is not personal, it's meant to enhance their skill. Thank you for following along.

Steve
 

Evilelroy

Active member
Joined
Jul 18, 2015
Messages
40
Location
Upstate NY
Those welds look ok. Weave and keep wide. The best way to learn is practice. Get some scrap and play with the heat and speed before you go over to the work. I have a lot of hours in but I don't weld every day so I always do a few practice beads before to dial in the machine and myself. Good luck.
 
Last edited:
To avoid these ads, REGISTER NOW!
Top Bottom