To avoid these ads, REGISTER NOW!

west of Philly - barn saving

OP
R

rieferman

Well-known member
Joined
May 18, 2009
Messages
2,586
Location
Collegeville PA (30 min west of Philly)
Very nice! The Breadboard is a nice touch. How do you like your Dewalt planer? Any issues with it?


Thanks! Breadboard ends, when done properly (as I've done), are intended to keep the top flat AND allow for natural wood movement. A far cry from those that try to accomplish the same look by simply pocket screwing a board on the end of a table (which achieves neither of those benefits).


I have the Dewalt 733, which is a nice little planer, but not what I would recommend.

I would instead recommend the Dewalt 734... the main differences are that the 734 has three knives (vs. 733 having only two) and the knives use reference pins to ensure perfect alignment each time you replace them (vs. 733 which has a spring loaded system which can be finnicky to get "just right").

Either way, these little "lunchbox" planers are built to last. I've run mine for a couple hundred hours with little other than new knives and waxing the tables now and again. Many serious woodworkers have one of these in their shop and use them frequently. Typically about $400-500 new (half that for used).

That said... if I was starting from nothing, I'd like the Dewalt 735 which is an entirely different style of machine. A bit beefier, two speeds, and it more easily handles an upgrade to Byrd Shelix cutter head if you were to ever desire that (useful for those that work with a lot of figured woods). I think these are about $500-600 new (and about half that for used). So, not a big jump in price for a big jump in capabilities.

From there, you get into stationary heavier duty planers. If you need lots of extra width, this is an option. Or, if you're milling lumber for a living, this will make sense. But, honestly, there are so many things in a shop I'd upgrade before taking this step (and believe me, I've looked into this a lot). Pricing here starts in the $1500 range and goes up and up and up.

Edit: One thing I didn't mention is that the smaller planers are loud as hell. They still capably handle whatever you throw at them, but hearing protection is a must (then... I consider hearing protection a requirement during all machine use in the shop).

Hope this helps!
 
To avoid these ads, REGISTER NOW!
OP
R

rieferman

Well-known member
Joined
May 18, 2009
Messages
2,586
Location
Collegeville PA (30 min west of Philly)
attachment.php


You too buddy!!! :)
 
OP
R

rieferman

Well-known member
Joined
May 18, 2009
Messages
2,586
Location
Collegeville PA (30 min west of Philly)
I'm building a proper woodworking workbench for me!!!!!!

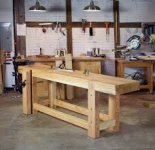
It will be a lot like the one I have pictured here (credit: Chris Schwarz).

I have already begun preparing the top, which will be made from locally sourced Ash and measure 4.5" thick x 24" (or slightly wider) wide x 6' long. There will be two "stripes" of black walnut I think for some visual interest.
Yes, big and heavy.


The base will be built from locally sourced poplar, and will be roughly 4.5" x 4.5" x enough length to bring the table top to about 35". These may also feature stripes of black walnut.

I will be installing this leg vise as well as this tail / wagon vise.

I am planning 3/4" dogs with hold fasts likely from Gramercy Tools.
 

Attachments

  • workbench sample.jpg
    workbench sample.jpg
    9.3 KB · Views: 73
Last edited:

Kev442

Well-known member
Joined
Jan 15, 2009
Messages
5,386
Location
Wi
Wish I could still link to the CL ad for an "antique" woodworking table. It had a long clamp vise and some other niceties, but my eyes had to freeze and go back to the price: $4500. Not $450...
By "antique", they meant used and abused for 70 or 80 years, it was very tired looking.
 
OP
R

rieferman

Well-known member
Joined
May 18, 2009
Messages
2,586
Location
Collegeville PA (30 min west of Philly)
I saw a similar CL post here recently. Perhaps my workbench will be worth something someday:)

LOTS of lumber prep so far. This is the underside of the top after hours of surfacing and three barrels of saw dust.
 

Attachments

  • F059E26F-C6E1-46F5-840C-1862308E9DD9.jpg
    F059E26F-C6E1-46F5-840C-1862308E9DD9.jpg
    98.1 KB · Views: 78
OP
R

rieferman

Well-known member
Joined
May 18, 2009
Messages
2,586
Location
Collegeville PA (30 min west of Philly)
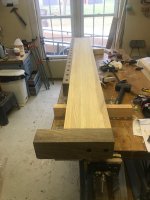
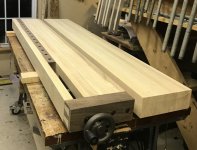
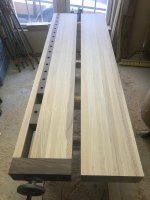
The top "slabs" (one is about 4" thick x 8" wide x 6' long, the other is 4 x 12" wide x 6') are glued up and have been run through the planer (which was a mini project in and of itself.. HEAVY stuff!!)

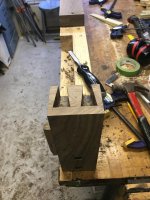
Next, I need to precisely cut a tenon in the front slab. This tenon will join with an "end cap" that allows a very nice vise to operate in that location.

For reference, here's the vise I'm referring to (and this is just one of two vises that will be installed on the bench.. more on the other later). This "wagon vise" is useful for pinching boards between stops so that you have your work piece secured.

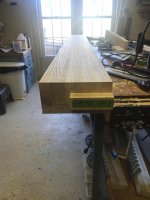
To make the tenon, I had to square my front slab (I used my miter saw which I carefully tuned for this cut) and then I laid out the measurements for the tenon (even marking the "do not cut" zone in green tape just to be sure).

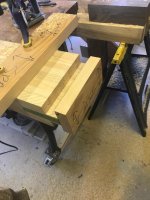
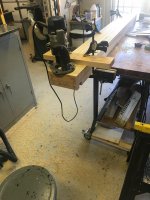
A temporary support block was affixed to the end to support my router, and a temporary fence was added (tape + clamps) to guide the router.

Messy (lots of sawdust) but effective. Just need to dress the tenon with some chisels and hand planes to move onto the next step.
 

Attachments

  • workbench front slab tenon finished.jpg
    workbench front slab tenon finished.jpg
    80 KB · Views: 63
  • workbench front slab tenon almost there.jpg
    workbench front slab tenon almost there.jpg
    96.7 KB · Views: 62
  • workbench front slab tenon setup2.jpg
    workbench front slab tenon setup2.jpg
    113 KB · Views: 63
  • workbench front slab tenon setup.jpg
    workbench front slab tenon setup.jpg
    99 KB · Views: 63

Kev442

Well-known member
Joined
Jan 15, 2009
Messages
5,386
Location
Wi
I think you are going to have far more than the 15 gallons of wood dust I made last month.
Looking good!
 
OP
R

rieferman

Well-known member
Joined
May 18, 2009
Messages
2,586
Location
Collegeville PA (30 min west of Philly)
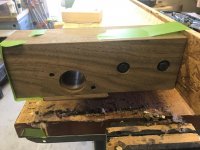
Yesterday's bench progress included attaching the black walnut "dog holes" strip (which turned out exceeding my hopes) and the black walnut end cap (which utilized "barrel nuts" which were super nice to work with).

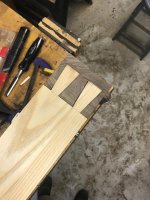
Today, I cut huge dovetails... which will either turn out great and make me very happy, or I'll screw it up and have to throw away my end cap and do yesterday's work for a 2nd time.

Wish me luck!!
 

Attachments

  • workbench dog holes and end cap barrel nuts.jpg
    workbench dog holes and end cap barrel nuts.jpg
    83.4 KB · Views: 48
OP
R

rieferman

Well-known member
Joined
May 18, 2009
Messages
2,586
Location
Collegeville PA (30 min west of Philly)
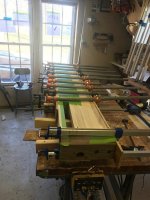
Got the enormous dovetails cut, vise holes drilled, vise dry fit, and the final glue up of the front slab complete.

Next up, build the base (this is the easy part) and then put it all together. Should be done within a couple more weeks.
 

Attachments

  • workbench front slab final glue up.jpg
    workbench front slab final glue up.jpg
    98.2 KB · Views: 52
  • workbench tail vise dry fit.jpg
    workbench tail vise dry fit.jpg
    106.6 KB · Views: 52
  • workbench tail vise holes.jpg
    workbench tail vise holes.jpg
    149 KB · Views: 56
  • workbench condor tails 5.jpg
    workbench condor tails 5.jpg
    92.7 KB · Views: 57
  • workbench condor tails 3.jpg
    workbench condor tails 3.jpg
    102.4 KB · Views: 51
  • worbench condor tails 1.jpg
    worbench condor tails 1.jpg
    78.8 KB · Views: 50
OP
R

rieferman

Well-known member
Joined
May 18, 2009
Messages
2,586
Location
Collegeville PA (30 min west of Philly)
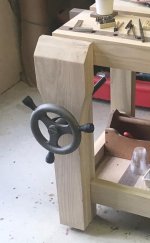
And now, I have the leg vise work figured out too!

Out to do assembly work today and this weekend.. this vise will be disassembled during that, and then reassembled once the bench is together.

Getting close now!!!
 

Attachments

  • workbench leg vise installed.jpg
    workbench leg vise installed.jpg
    77.9 KB · Views: 52

jar944

Well-known member
Joined
Jul 26, 2010
Messages
5,950
Location
Northern VA
Nice bench progress. Ive always wanted to build a roubo but never seem to be willing to give up the space for one.
 
OP
R

rieferman

Well-known member
Joined
May 18, 2009
Messages
2,586
Location
Collegeville PA (30 min west of Philly)
Thanks for dropping in!!! Given that woodworking is my primary hobby (and side hustle) the new workbench was a must-have... basically a tool as important as a cabinet saw or drill press in my case.

Every time I would try to make my multi-purpose table do "woodworking things" I would find it too wobbly, too difficult to clamp to, too tall, too something, and not enough something else.

I'm almost done with my build now and am amazed that I can sit on the cantilevered side without the bench moving. If I hockey check it, no movement. When I clamp down on a part, it stays exactly put.

Wow, what a tool (and I'm not even done yet!!).

Got some cool details and inventions coming to complete this... stay tuned

:3gears:
 

Attachments

  • Workbench right side up.jpg
    Workbench right side up.jpg
    154.2 KB · Views: 57

fergus

Well-known member
Joined
Oct 4, 2009
Messages
1,620
Location
Yolo County CA
Re: west of Philly - barn saving (tours on pages 14, 19, and FINAL tour on 35)

Super nice bench. I hope to build one in the next few years too.


Sent from my iPhone using Tapatalk
 
OP
R

rieferman

Well-known member
Joined
May 18, 2009
Messages
2,586
Location
Collegeville PA (30 min west of Philly)
A beautiful piece.
Don't call me when you need to move it. :)

Here is another well crafted one:
https://sheboygan.craigslist.org/tls/d/cleveland-woodworking-bench/7251929904.html


Thanks Kev!! I'm really happy with how it's turning out, and it is very solid. When you're getting serious into woodworking, having a wobbly bench just steals power and precision from everything you do, so this will be very beneficial to my journey.

(that bench you posted is nice! I hope that guy isn't getting out of the hobby)
 
OP
R

rieferman

Well-known member
Joined
May 18, 2009
Messages
2,586
Location
Collegeville PA (30 min west of Philly)
Re: west of Philly - barn saving (tours on pages 14, 19, and FINAL tour on 35)

Super nice bench. I hope to build one in the next few years too.


Do it sooner... I wish I had... although, I also am unsure if I would have had the required skill set to do it even a year ago.

My biggest piece of advice on this project is... buy 8/4 lumber if at all possible. I bought 4/4, so my lamination work was far more difficult - I had twice as many pieces to mill and glue up.

By the end of this project, I will have 120 gallons of dust/chips generated, 1 full gallon of glue used, and about $1200 invested. Again, I view this bench as a tool of equal importance to any other piece of equipment in the shop, so the expense is well worth it.
 

jar944

Well-known member
Joined
Jul 26, 2010
Messages
5,950
Location
Northern VA
Re: west of Philly - barn saving (tours on pages 14, 19, and FINAL tour on 35)

What are you using for hardware?

I do very little hand work with the cabinetry and millwork I build (actually I dont really do much hand work with my furniture either) so a roubo will stay a "maybe some day" future project.

They do look nice though.
 
To avoid these ads, REGISTER NOW!
OP
R

rieferman

Well-known member
Joined
May 18, 2009
Messages
2,586
Location
Collegeville PA (30 min west of Philly)
Benchcrafted brand vises. For machine based woodworking (which is most of what I do currently) the wagon vise is probably most useful, along with surface dog holes and holdfasts. Basically making stuff stay out where you want it.

Even with machines you need to work the face and edge of boards and need a place to hold things and a method of having a second pair of “hands”. This is that :)
 

jar944

Well-known member
Joined
Jul 26, 2010
Messages
5,950
Location
Northern VA
Benchcrafted brand vises. For machine based woodworking (which is most of what I do currently) the wagon vise is probably most useful, along with surface dog holes and holdfasts. Basically making stuff stay out where you want it.

Even with machines you need to work the face and edge of boards and need a place to hold things and a method of having a second pair of “hands”. This is that :)

Ah, I assume by work the face and edge you mean hand plane? For sure I can see the benefit of a bench if you are hand planning a lot.
 
Last edited:
OP
R

rieferman

Well-known member
Joined
May 18, 2009
Messages
2,586
Location
Collegeville PA (30 min west of Philly)
Any number of things can be done to the face of a board, many of them using machines (and many using hand tools).

Just recently I was using my plunge router to install some dado grooves, or to carve some house numbers, etc... Just a couple examples where having a board stay nicely put is beneficial.

Or, during assembly... Jig saw work... Certain circular saw techniques.. Even measuring and marking...

Over the past many years, I have used quick clamps countless times to make things stay where I want them to stay. It's been "ok" but not great... not it will be great.

And that's just the face of boards...

With the leg vise, edges are also now more easily worked. Cutting dovetails or box joints with a router, cutting an edge profile, assembly, measuring...


Then, as I also start to get into hand tools, all those same benefits from above carry forward... plus, the girth of the bench allows my energy to be transferred through the tool and into the piece that I'm working on (rather than losing some of that energy to wobbles).

My old bench was nice.. 1.5" maple butcher block. It was strong. But it lacked in holding things firmly and accurately, and in being tough enough for anything I can throw at it. This bench doesn't have those problems. :)

All that said... a bench of this style is not everyone's cup of tea (though it is of much value in my case as a hybrid woodworker that will use it for both machine based and hand tool based woodworking and assembly tasks)

-------

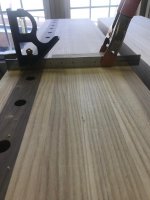
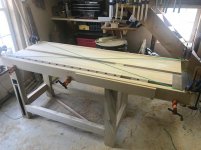
Yesterday, I finished flattening the top with a shop-built router sled. While the top was built to be flat all along, this step is important to ensuring that you are working on a nice reference surface, and that the two slabs are coplanar.

Some punch list items left and this build will be in the rear view mirror.
 

Attachments

  • workbench top flattening finished.jpg
    workbench top flattening finished.jpg
    88.5 KB · Views: 48
  • workbench top flattening very flat yayyyy.jpg
    workbench top flattening very flat yayyyy.jpg
    65.6 KB · Views: 46
  • workbench top flattening like mowing the lawn.jpg
    workbench top flattening like mowing the lawn.jpg
    147.7 KB · Views: 46
  • workbench top flattening ready to begin.jpg
    workbench top flattening ready to begin.jpg
    149.6 KB · Views: 47
  • workbench top flattening bobby ready to make some dust.jpg
    workbench top flattening bobby ready to make some dust.jpg
    84.1 KB · Views: 48
  • workbench top flattening router rails coplanar check.jpg
    workbench top flattening router rails coplanar check.jpg
    149.6 KB · Views: 53

jar944

Well-known member
Joined
Jul 26, 2010
Messages
5,950
Location
Northern VA
That Bench is looking good.

I've personally gone in a different direction regarding woodwork myself. If I can avoid any hand work by using larger or more specialized machinery all the better. Its a vicious cycle of larger and larger equipment, and then more support equipment, but it is fun.

My outfeed table functions as my primary "bench" and also works well as a horizontal junk collection surface.
 
OP
R

rieferman

Well-known member
Joined
May 18, 2009
Messages
2,586
Location
Collegeville PA (30 min west of Philly)
Thanks! Really feeling good about the workbench and appreciate the comments especially from another serious woodworker.

I checked out your impressive links (from your signature) and you remind me a lot of my local woodworking buddy that I swap ideas with a lot. He's an engineer (I'm unsure, but I'd guess you might be too?) has the ability to select the best possible tool for his interests, and can then use his detail oriented brain to figure out the tool and setup and maintenance, and then can crank out production runs like nothing.

I'm more of a "learn long division, then try a calculator, and finally move to Excel" type of thinker. So I do a lot of "using what I have" for awhile until my brain catches up with what I truly want next... then I upgrade.

So, I'm really mostly a machine-based woodworker (with portions of my shop still needing to evolve to the right tool) with some dabbling in hand tools (e.g. sometimes it's just faster to clean up a joint with a chisel). And, due to space limitations in my case, some of my machine based work involves carrying the tool to the piece (such as plunge router).

Since I do sometimes bring machine to wood, I use some hand tools, and another horizontal junk collector is always of value... I figured the workbench would be a good skill builder AND provide me good utility.

That said... this project proved to me that three upgrades are needed in my shop...

1. My crappy router table in the wing of my cabinet saw... it just is terrible in every regard. Probably sell and outright replace this.

2. My old Walker Turner drill press... the table stinks, the mechanism to raise/lower is awful, and the run out is visible. Just not accurate enough. I will research improvements first, but will likely replace this as well.

3. My lunchbox planer is really struggling to keep up with me. It's doing it, and lumber comes out good and true... but it's on my list for future review.
 

jar944

Well-known member
Joined
Jul 26, 2010
Messages
5,950
Location
Northern VA
Thanks! Really feeling good about the workbench and appreciate the comments especially from another serious woodworker.

I checked out your impressive links (from your signature) and you remind me a lot of my local woodworking buddy that I swap ideas with a lot. He's an engineer (I'm unsure, but I'd guess you might be too?) has the ability to select the best possible tool for his interests, and can then use his detail oriented brain to figure out the tool and setup and maintenance, and then can crank out production runs like nothing.

I'm more of a "learn long division, then try a calculator, and finally move to Excel" type of thinker. So I do a lot of "using what I have" for awhile until my brain catches up with what I truly want next... then I upgrade.

So, I'm really mostly a machine-based woodworker (with portions of my shop still needing to evolve to the right tool) with some dabbling in hand tools (e.g. sometimes it's just faster to clean up a joint with a chisel). And, due to space limitations in my case, some of my machine based work involves carrying the tool to the piece (such as plunge router).

Since I do sometimes bring machine to wood, I use some hand tools, and another horizontal junk collector is always of value... I figured the workbench would be a good skill builder AND provide me good utility.

That said... this project proved to me that three upgrades are needed in my shop...

1. My crappy router table in the wing of my cabinet saw... it just is terrible in every regard. Probably sell and outright replace this.

2. My old Walker Turner drill press... the table stinks, the mechanism to raise/lower is awful, and the run out is visible. Just not accurate enough. I will research improvements first, but will likely replace this as well.

3. My lunchbox planer is really struggling to keep up with me. It's doing it, and lumber comes out good and true... but it's on my list for future review.

What router are you using? I had the jessem lift and a pc7518 in the right wing of my last saw. It was decent. A lift deffinatly makes a lot better.

I have a cheap harbor freight floor standing drill press. They seem decent enough. Frankly though it's rarely used.

I'm in the same boat regarding planers. I'm tired of the the 15" grizzly I have. The 4 post planers have some design flaws. I've been looking to upgrade to a 24". I found one locally, and it would work (space issues not withstanding) but its a solid infeed roller and solid chip breaker, which is unusual (and not in a good way) on a machine of that size.
 
OP
R

rieferman

Well-known member
Joined
May 18, 2009
Messages
2,586
Location
Collegeville PA (30 min west of Philly)
What router are you using? I had the jessem lift and a pc7518 in the right wing of my last saw. It was decent. A lift deffinatly makes a lot better.

I have a cheap harbor freight floor standing drill press. They seem decent enough. Frankly though it's rarely used.

I'm in the same boat regarding planers. I'm tired of the the 15" grizzly I have. The 4 post planers have some design flaws. I've been looking to upgrade to a 24". I found one locally, and it would work (space issues not withstanding) but its a solid infeed roller and solid chip breaker, which is unusual (and not in a good way) on a machine of that size.

I have a Bosch 1617 that I use as my plunge router, and another very similar Bosch (forget the exact model right now) permanently in my router table. I think the routers are nice enough machines, it's my table/lack of lift that are the primary issue.

Funny about the drill press... my buddy rarely uses his too, but I find that I use mine a lot, although not as much for furniture work as for my other hobbies, home fixing, making jigs.

Planers... seems like almost all are loved and hated about equally, making it really hard to choose. I'll likely save that decision for awhile since my little lunchbox is doing a nice enough job, and I rarely have need for tons of width so far.
 
OP
R

rieferman

Well-known member
Joined
May 18, 2009
Messages
2,586
Location
Collegeville PA (30 min west of Philly)
Hey Eric! Great to hear from you :) Thank you for the kind comments, and I'm glad my posts are hitting the mark.


------

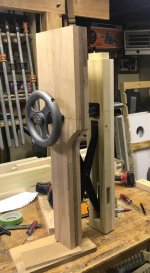
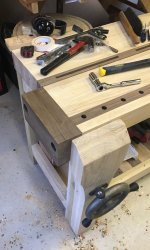
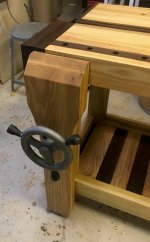
The leg vise "chop" (the big piece of wood that moves as you turn the wheel) that I built originally for the new bench was cobbled together from what I had laying around the shop, including some hickory. Hickory can tend to be a splinter-prone wood, and I was finding it was wanting to crack as I tightened the vise. So, I'm building a replacement.

I went to the sawmill and found a nice thick piece of ash (same as top slabs for this bench) and paid a pretty penny for it... but worth it for a tool that should easily last a lifetime or longer. So, last night I finished the lamination glue up, squaring, and measuring for all the mortises, holes etc. Today I'll crank those out.

I also built a filler for the "split" area between the two slabs. I made it so that when you slide it to the right, small ramped pieces underneath cause the filler to rise above the surface of the table where it can be used as a stop to push boards against. Pushing back to the left, the filler sinks below the surface again. I used black walnut for this.

Today, I'll install a walnut end cap on the left side of the front slab. This will match the walnut end cap that is on the right side (holds the wagon vise hardware) and also allow the leg vise chop to not overhang the edge of my table surface (currently overhangs by about an inch).

And, so that the back slab doesn't look too short, it will receive a black walnut tool tray. Useful for storing tape measures etc. and also visually trueing up that slab to be same length as front slab + new end cap.

Finally, I have some dog holes to drill, the sliding deadman to construct, and then applying Watco danish oil to call this project done. Aiming for end of weekend completion.

Luckily this table is long enough that I can then climb up and take a nap on it.
 
OP
R

rieferman

Well-known member
Joined
May 18, 2009
Messages
2,586
Location
Collegeville PA (30 min west of Philly)
Some bench pics to accompany the previous post. Getting REAL CLOSE to DONE. Holy cow this project has been a beast.

:rocker:
 

Attachments

  • workbench chop take 2.jpg
    workbench chop take 2.jpg
    59.7 KB · Views: 49
  • workbench chop take 2 and end cap.jpg
    workbench chop take 2 and end cap.jpg
    126.8 KB · Views: 51
  • workbench left end cap close up.jpg
    workbench left end cap close up.jpg
    90.3 KB · Views: 53
OP
R

rieferman

Well-known member
Joined
May 18, 2009
Messages
2,586
Location
Collegeville PA (30 min west of Philly)
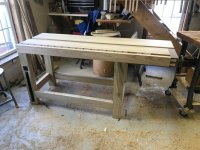
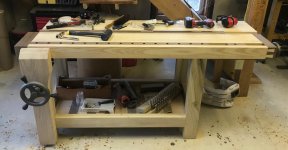
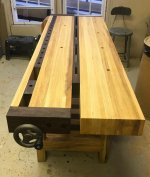
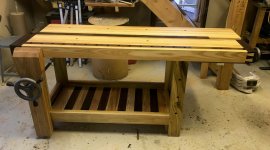
ALL DONE WITH THE BENCH!!!!!!!!!!!

Whew! That was a LOT of work.

Built the tool tray on the left side of bench yesterday. It's the same dimensions as the neighboring end cap, so the bench looks balanced, and it's a nice place to store tape measures etc.

Carefully drilled the additional dog holes, sanded (a little... you actually want a workbench like this to have a little "grip"), and applied Watco danish oil (which was nice/easy to work with and really brings out the character in the wood).

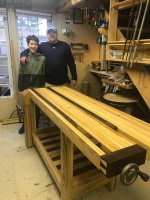
All in, this bench cost me about $1500, and a month's worth of steady work (a couple hours every day, many hours on weekends). I learned new skills, practiced existing skills, and nearly every tool in my shop was used at some point.

A bench like this is sort of a badge of honor for a woodworker I think... at least that how I look at it. Like graduating to another level and setting the stage for even better future results. My kids will fight over who inherits this bench when I'm gone, and I expect their kids will use it someday after that.

:beer:

Some pics, including me and my son who helped me with a bunch of steps in this build.
 

Attachments

  • workbench finished 7.jpg
    workbench finished 7.jpg
    104.3 KB · Views: 89
  • workbench finished 6.jpg
    workbench finished 6.jpg
    85.3 KB · Views: 63
  • workbench finished 5.jpg
    workbench finished 5.jpg
    68.8 KB · Views: 60
  • workbench finished 4.jpg
    workbench finished 4.jpg
    127.5 KB · Views: 60
  • workbench finished 3.jpg
    workbench finished 3.jpg
    148.4 KB · Views: 62
  • workbench finished 2.jpg
    workbench finished 2.jpg
    92.6 KB · Views: 61
  • workbench finished 1.jpg
    workbench finished 1.jpg
    147 KB · Views: 62
OP
R

rieferman

Well-known member
Joined
May 18, 2009
Messages
2,586
Location
Collegeville PA (30 min west of Philly)
Thanks guys!!

Funny thing... I was bored yesterday after a solid month of not having to think of what to work on (the obvious answer was endless workbench tasks)... But, a few cold beverages later and I have a nice list to keep me going again.

Most of that list is fixing things that drove me crazy during this project. More accuracy here, better blade there, added safety feature, better efficiency... stuff like that.

Since our home addition / shop improvements are about to begin (once current series of snow storms pass) this is good timing to take the shop to the next level.
 

Jeff Ivers

Well-known member
Joined
Apr 9, 2010
Messages
2,564
Location
Oklahoma
Personally, I think that work bench is way to pretty to actually use. I am quite sure there is a museum waiting for the donation of that bench so that you can start on another one!
 
OP
R

rieferman

Well-known member
Joined
May 18, 2009
Messages
2,586
Location
Collegeville PA (30 min west of Philly)
The workbench build is like a distant memory already... onto the next mountain to climb.

Well, not a mountain this case, just some minor improvements.

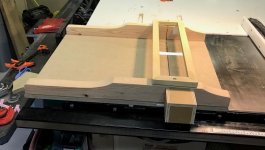
For woodworkers, a nice crosscut sled for use at the table saw is essential. I've long had an effective-yet-rudimentary sled, so it was time to upgrade features and safety.

This new sled is very light and easy to move around, and extremely accurate. The zero clearance insert is removable for replacement. And the plexi guard and blade exit box ensure I won't accidentally get cut.

Today, I'm finishing up a similar sled #2 that will be dedicated to dado cuts. I'll post that later.
 

Attachments

  • table saw sled.jpg
    table saw sled.jpg
    129.9 KB · Views: 36
To avoid these ads, REGISTER NOW!
Top Bottom