To avoid these ads, REGISTER NOW!

west of Philly - barn saving

christopher.layton

Well-known member
Joined
Mar 21, 2014
Messages
107
Location
Hood River, OR
Re: west of Philly - barn saving (tours on pages 14, 19, and FINAL tour on 35)

I love working with black walnut. I am enjoying watching this table come together.


Sent from my iPad using Tapatalk
 
To avoid these ads, REGISTER NOW!
OP
R

rieferman

Well-known member
Joined
May 18, 2009
Messages
2,586
Location
Collegeville PA (30 min west of Philly)
Thanks Chris! I saw in your thread that you just recently moved and are now working with a bigger space. Really looking forward to seeing what you'll do with it!

This is my first experience with black walnut, and it's night and day compared to the various oaks that I've used in earlier projects. Cuts like butter!
 

Craptain

Well-known member
Joined
Apr 18, 2013
Messages
4,032
Location
Tampa Bay FL
I have a really nice piece of Black Walnut that has not yet found a project. Mine is not from my own land though. I am truly envious of that.
 
OP
R

rieferman

Well-known member
Joined
May 18, 2009
Messages
2,586
Location
Collegeville PA (30 min west of Philly)
Thanks for stopping in Captain!

---

Yesterday was a glue up day. I only have two components that require glue up prior to final assembly - the legs and the table top.

For the table top, I selected two consecutive boards from the tree so that the grain is very similar. I was careful to keep the boards sequenced through all of my board prep sets, and was able to achieve a very nice match.

In pic 1, you can see the boards aligned just as I want them - the blue tape is my alignment guide and also indicates where the biscuits are installed. Side note for those wondering: biscuits are a method of ensuring alignment from board to board (not really a strength component). If you want more of an explanation, let me know and I'll post it up.

In pic 2, I have the table top completely glued up. Looks a bit messy now due to squeeze out, but you'd rather have slightly too much glue than have a glue-starved joint. This was a stressful glue up actually. I had my wife as a helper, because joining 5 boards, seating biscuits, and getting clamps in place while the "glue clock" is ticking takes some doing. In the end, we got it done and I am happy with the joints.

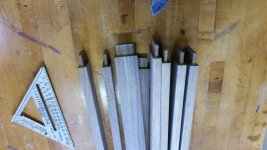
In pics 3, 4, 5, and 6 you can see an example of a "book match" glue up. For the legs of the table, I am aiming for about 1.5" x 1.5" square. The lumber I have is about 3/4" once milled, so that means I have to glue two pieces together to achieve the desired thickness. If you slice 1 board into 2 pieces (pic 3) and "hinge" it on itself (pic 4) the grain will align perfectly (pic 5). Lastly, a big glue up of all the legs (pic 6... they'll be cut to length/width once glue is dry).

Pic 1 = aligned table top
Pic 2 = Glued up table top
Pic 3 = Book match slice board in 2
Pic 4 = Book match - hinge boards
Pic 5 = Book match - grain match
Pic 6 = Glued up legs
 

Attachments

  • aligned top ready for biscuits and glue.jpg
    aligned top ready for biscuits and glue.jpg
    123.5 KB · Views: 117
  • glued up top.jpg
    glued up top.jpg
    120.8 KB · Views: 120
  • bookmatch 1.jpg
    bookmatch 1.jpg
    113 KB · Views: 101
  • bookmatch 2.jpg
    bookmatch 2.jpg
    130.5 KB · Views: 95
  • bookmatch 3.jpg
    bookmatch 3.jpg
    132.7 KB · Views: 87
  • glued up legs.jpg
    glued up legs.jpg
    100.5 KB · Views: 101

Craptain

Well-known member
Joined
Apr 18, 2013
Messages
4,032
Location
Tampa Bay FL
What glue are you using? It looks like Titebond. If so you can acheive a better clean up by wiping the squeeze out off with a wet cloth before it dries. Letting it dry will be easy to remove with a scraper or chisel but with some woods the "soaking" will affect how it takes the finish later on. If it is a good joint the wet cloth will not affect the glue in there.
 
OP
R

rieferman

Well-known member
Joined
May 18, 2009
Messages
2,586
Location
Collegeville PA (30 min west of Philly)
Hello again, thanks for the tip! I think it's all a matter of preference, and either method will work.

I've had instances where using a wet cloth "works the glue into the grain", or causes smears that are more difficult to remove. I'm sure it's user error on my part.

That said, I prefer to use a card scraper to remove dry/brittle chunks of glue squeeze out - they pop right off without any residue left behind. This is how my woodworking instructor taught us, and I've had good results thus far. Then I move right into my sanding schedule.
 
Last edited:
OP
R

rieferman

Well-known member
Joined
May 18, 2009
Messages
2,586
Location
Collegeville PA (30 min west of Philly)
Well, today was a less than awesome day of woodworking.

It's like this... For me, at this stage, woodworking is like this game Perplexus that my kids like to play. These games are like a marble maze of increasing difficulty. Once you get to a certain point in the game, it ***** that much more to make a mistake and have to start over again because it's so hard to make it that far.

Woodworking is like this too. Once you've taken great pains to prepare a good plan, take rough lumber to usable pieces of wood, etc... well, it just would really be a bummer to screw up on the next steps and have to start over.

This project has a fair number of techniques that I'd consider myself "new" at (or at least not yet "advanced" and certainly not "expert"). As such, I tend to practice each step a few times to build confidence before I apply tools to my nicely prepped materials.

Today's adventure was cutting tenons. I have a bunch to do in this project (about 24 of them) so it really makes sense to have an efficient and effective way to cut them. My first thought was to use my miter gauge to nip away at the tenons - however, I discovered that my gauge (although it's a nice one from Incra) sits proud in the miter slot... making the piece that I'm cutting bobble, and resulting in inconsistent tenons.

So, after some deep thought (and cursing... and wishing for a better table saw) I solved the problem by building a simple sled that rides against my nicely tuned fence. It took me two tries to build a sled that was accurate enough for my purposes.

In other words... my 4 hours of woodworking today was basically spent solving a problem, and not actually working any wood. But tomorrow, I'll be able to accomplish the tenons with great precision and results.
 

christopher.layton

Well-known member
Joined
Mar 21, 2014
Messages
107
Location
Hood River, OR
Once you get to a certain point in the game, it ***** that much more to make a mistake and have to start over again because it's so hard to make it that far.

Yes, and not just so hard, but also so expensive. I feel your pain: sometimes it feels like woodworking is more about making jigs and practice cuts than anything.
 
OP
R

rieferman

Well-known member
Joined
May 18, 2009
Messages
2,586
Location
Collegeville PA (30 min west of Philly)
Yes, and not just so hard, but also so expensive.

In this case, less expensive than in most cases since I had lumber from my own property milled at the local sawmill. The sawyer's estimate is that I ended up with about $1500 worth of lumber for $200 worth of milling time. BUT, if I have to buy new lumber to fix a big mistake....


I feel your pain: sometimes it feels like woodworking is more about making jigs and practice cuts than anything.

We should make a t-shirt that says that!
 

BuickFarmer

Well-known member
Joined
Apr 5, 2006
Messages
1,415
Location
Athens, Georgia
In other words... my 4 hours of woodworking today was basically spent solving a problem, and not actually working any wood. But tomorrow, I'll be able to accomplish the tenons with great precision and results.

An old pulpwooder once told me "there is no time lost sharpening". So true in life!
Have enjoyed following your build and all your projects, look forward to another year!
 
OP
R

rieferman

Well-known member
Joined
May 18, 2009
Messages
2,586
Location
Collegeville PA (30 min west of Philly)
An old pulpwooder once told me "there is no time lost sharpening". So true in life!
Have enjoyed following your build and all your projects, look forward to another year!

Another t-shirt-worthy quote! We may have ourselves a nice side business!

Great to hear from you Buick Farmer!

----

Today went much better.

I couldn't sleep last night as my mind worked overtime to figure out how to achieve success today.

For one, the wife and I agreed that a new table saw is in the 1 year plan. While my saw is a beast and can get the job done, the amount of time I spend compensating for its shortcomings makes woodworking more of a chore than it needs to be.

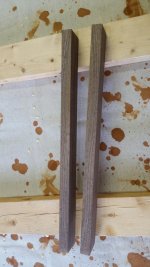
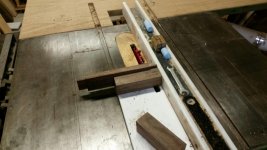
That said, I was able to build a mini-sled for cutting tenons in a repeatable fashion (see pic 1). I used a razor blade (pic 2) to mark my cuts and to help avoid chip out - I will admit that I got lazy on this task as I went through the project... and paid for it with some minor, but unsightly chip out. Sigh. I'll live with it on this project and consider it a lesson learned for next time.

The net was that I cut the couple dozen tenons with relative ease, and good precision. See pic 3.

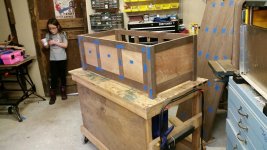
After cutting the tenons, I had some dado and rabbet work to get to. I left the cherry panels of the table thick and sturdy, so I needed to rabbet the edges to allow them to fit into a corresponding dado in the rail pieces. I was able to quickly dry fit the back side of the table... and was thrilled to find that the design worked as intended. Please forgive this mockup as the legs are not yet mortised, and I did not perfectly center the panel dividers. But, you can get the idea.

At this stage, I'm stuck until some items arrive in the mail... so, I'll enjoy this win today, and wish all of you a Happy New Year!!!!!

:thumbup:

:beer:

Pic 1 = tenon sled
Pic 2 = razor blade prep for tenon cutting (which I should have done on ALL parts!!!)
Pic 3 = tenons complete
Pic 4 = dry fit back panel of table
 

Attachments

  • dry fit back of table.jpg
    dry fit back of table.jpg
    114.3 KB · Views: 105
  • tenons complete.jpg
    tenons complete.jpg
    109.1 KB · Views: 98
  • tenon razor blade cuts.jpg
    tenon razor blade cuts.jpg
    123.9 KB · Views: 97
  • tenon sled.jpg
    tenon sled.jpg
    101.6 KB · Views: 105
OP
R

rieferman

Well-known member
Joined
May 18, 2009
Messages
2,586
Location
Collegeville PA (30 min west of Philly)
Happy New Year!

While we were up late last night, we only had a drink or two each because we had a decent drive home. So, I was excited to get out to the shop today and try to get some more work done despite that some items I'm awaiting in the mail have not yet arrived. Productivity the day after New Year's Eve festivities doesn't usually happen, but it was going to happen this time!!!

Or, maybe not.........

Let me start by saying that I HATE (HAAAAAAAAAAAAAAATE) my router table for most tasks. It's a Bosch table that gets decent reviews, but it's such a pain in the **** to use and adjust, I stay away from it whenever possible. Basically, it gets used for adding edge profiles to small pieces when I have many to do, but otherwise, I use the router with a plunge base in my hands for almost everything.

To do the mortises for the table, I ordered an edge guide for my router. I'll find many uses for the edge guide over the course of time, and the demos and web vids showing the technique made a lot of sense to me. But... it's not here yet.

So, determined to overcome my router table hatred, I marched out to the barn and got to work. I really gave it an honest effort. I read instructions, I watched videos, I read articles... and I was still facing frustration at every turn. Things finally ended when I was near to the finish line and the screws that hold the base to the table stripped out the base. So, now the table is basically garbage until I find another way to secure the base. ARGH!

After some extreme shouting and cursing, and very nearly hurling the table across the room, I settled myself down somehow and decided I'd at least get something productive done. I marked out all mortise locations very carefully, I decided on grain direction and placement of all components, and got the shop cleaned up and ready for another day.

I guess beer-o-clock starts a bit earlier than expected today.
 
OP
R

rieferman

Well-known member
Joined
May 18, 2009
Messages
2,586
Location
Collegeville PA (30 min west of Philly)
I'm still waiting for a few things in the mail, so today was a planned "off day" from shop work.

On our way home from the YMCA, we decided to stop into the local Sears, which is having a going out of business sale. I'm not one to wish bad for anyone/anything, but this Sears was horrible. Bad customer service, poor selection, awful store layout etc. When another hardware store opened up recently, I told the owners that it was just a matter of time before they put the other store out of business.... and that's what happened.

But, the upside is that everything in the store is between 25% and 75% off.

I picked up a 5 piece chisel set (USA made!), a forstener bit set, a paddle bit set, a band clamp set, a coping saw and blades, utility gloves, a bunch of paint brushes, a trenching shovel, two matching faux wicker garbage cans and matching storage "toy box" for by the pool, a variety of batteries, and more stuff that I can't even remember now.... Paid $300. Retail was roughly $800.

Came back home and made sure everything found its proper place in the shop, cracked a brew, and enjoyed the moment.
 

BuickFarmer

Well-known member
Joined
Apr 5, 2006
Messages
1,415
Location
Athens, Georgia
I'm still waiting for a few things in the mail, so today was a planned "off day" from shop work.

On our way home from the YMCA, we decided to stop into the local Sears, which is having a going out of business sale. I'm not one to wish bad for anyone/anything, but this Sears was horrible. Bad customer service, poor selection, awful store layout etc. When another hardware store opened up recently, I told the owners that it was just a matter of time before they put the other store out of business.... and that's what happened.

But, the upside is that everything in the store is between 25% and 75% off.

I picked up a 5 piece chisel set (USA made!), a forstener bit set, a paddle bit set, a band clamp set, a coping saw and blades, utility gloves, a bunch of paint brushes, a trenching shovel, two matching faux wicker garbage cans and matching storage "toy box" for by the pool, a variety of batteries, and more stuff that I can't even remember now.... Paid $300. Retail was roughly $800.

Came back home and made sure everything found its proper place in the shop, cracked a brew, and enjoyed the moment.

WOW, sounds like some great deals. CONGRATS!!! In fact, me thinks I'll crack open me a brew and celebrate your great score along with ya. :beer:
 

WhoWhatNow

Well-known member
Joined
Feb 22, 2011
Messages
1,891
Location
Collegeville, PA
Re: west of Philly - barn saving (tours on pages 14, 19, and FINAL tour on 35)

That store was a mess. Never had anything in stock and most of the staff was awful. It does **** that they are all losing their jobs though.
I was hoping that they would have discounts on the hardware but no such luck.
 
OP
R

rieferman

Well-known member
Joined
May 18, 2009
Messages
2,586
Location
Collegeville PA (30 min west of Philly)
I'll crack open me a brew and celebrate your great score along with ya. :beer:

NICE! Belated cheers (from last night)!!


whowhatnow wrote:
That store was a mess. Never had anything in stock and most of the staff was awful. It does **** that they are all losing their jobs though.
I was hoping that they would have discounts on the hardware but no such luck.


Another Collegeville resident on the GJ board? How did I not know this already (or did I know this and forgot it)? PM me if you're ever interested in swapping garage tours!

I was wondering about the hardware section of the store... I didn't see sale signs and wasn't sure what that meant. I bet by end of week those will be on sale too - if so, I'm stocking up for sure.
 
OP
R

rieferman

Well-known member
Joined
May 18, 2009
Messages
2,586
Location
Collegeville PA (30 min west of Philly)
Hey Shopnut!!! Happy New Year to you too!

----

The edge guide for my router - which I was planning to use for all the mortise work on the table build - still hasn’t arrived in the mail... My other option, using the router table, was foiled when I somehow stripped the screws that hold my router to the underside of the table (while I hate the router table, I have no idea how, I didn’t crank down on them at all!??!)….

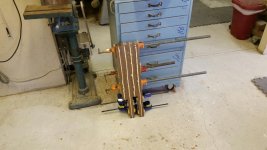
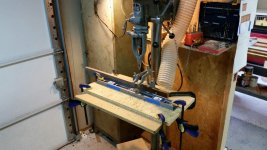
As my Christmas vacation winds down, and with “real life” about to begin again (aka coaching youth basketball in every spare moment, being completely exhausted at all times, having zero free time) there was no time to waste. Instead, I decided to use my drill press mortising attachment to do the mortise work so that I could progress the project. See pic 1.

The results of that effort were both good and bad…

The good is that all the mortises are in the right spot, and the tenons all fit as intended.

The bad is that despite my best efforts the chisel portion of the mortising attachment must have been ever so slightly out of square to the pieces that I was working on, so the mortises aren’t as pretty as I’d like. See pic 2 to see how the edges of the mortises are not as perfectly crisp as I would prefer.

Considering they function perfectly and are all hidden under shoulders of the mating pieces, I’ll let this pass this time… but in future builds, this will be something I want to improve upon.

Another “good result” was with the legs using a technique I hadn’t used before. On the sides of the table, the legs have two deeper mortises to accept the rails, and a long shallow dado to accept the panel. I carefully marked the leg for start and stop of that long cut, and dropped the piece on top of the spinning dado blade. The technique worked really well. Again refer to pic 2 to see the complicated legs (each leg has 4 deep mortises and 1 shallow groove.. all precisely located).

To end yesterday's session, my wife helped me dry fit the entire table to make sure everything goes together as expected. SUCCESS! I love how it's coming together, and think the look of the mixed woods in the table works well. See pics 3 and 4.

Today, I’ll work on the inset cabinet doors now that I’m sure of exactly what the dimensions of their home space are. Pretty soon I'll be sanding/finishing/assembling!!!

Pic 1 = Drill press setup for mortise work
Pic 2 = Complicated legs... 4 deep mortises, 1 shallow dado each
Pic 4 and 5 = dry fit
 

Attachments

  • dry fit 2.jpg
    dry fit 2.jpg
    112.8 KB · Views: 133
  • dry fit 1.jpg
    dry fit 1.jpg
    137.2 KB · Views: 122
  • complicated legs.jpg
    complicated legs.jpg
    114.6 KB · Views: 102
  • drill press mortises.jpg
    drill press mortises.jpg
    117.1 KB · Views: 105
OP
R

rieferman

Well-known member
Joined
May 18, 2009
Messages
2,586
Location
Collegeville PA (30 min west of Philly)
A new (to me) way to mortise!

As I noted above, the drill press w/ mortising attachment process worked fine, but was a bit time consuming to set up perfectly.

Also noted above, the method of using the router table for mortises makes sense to me, but I'm not on speaking terms with my router table at the moment.

BUT, my edge guide finally arrived in the mail!

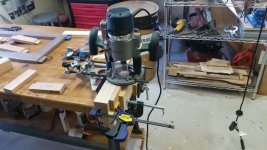
Pic 1 shows the simple L-shaped jig I built to do mortises. The nature of the L-shape is that the top part offers a nice wide flat surface for the router to rest on as I cut the mortises, and the thinner bottom part is easily held in the vice.

The first step is to align the piece that I'm mortising flush with the top / wide part of the L-jig, and clamp it there. To avoid any slippage of the piece during routing, I then put a block under the piece that I'm working on and clamp the whole thing into the vise. See the stop block in Pic 2.

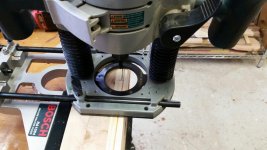
Pic 3 shows a top view of where the mortise will be. I wasn't precise for this test, but you can get the general idea. Then, as seen in Pic 4, I simply line my router bit up with the mortise placement, and lock the edge guide in to hold that position.

In pic 5, I plunge a full depth hole at the start and stop point of the mortise. Then, I take a couple passes starting a shallow plunge and progressing to a full depth plunge to complete the mortise (see pic 6). The resulting mortise is perfect.

This test mortise, including setup, took me about 30 seconds.

:thumbup:


Pic 1 = L-Shaped Jig
Pic 2 = support block
Pic 3 = mortise placement
Pic 4 = lining up the router (fence is set during this step)
Pic 5 = start and stop holes
Pic 6 = completed mortise
 

Attachments

  • mortise jig 3 fully cleaned mortise.jpg
    mortise jig 3 fully cleaned mortise.jpg
    87.5 KB · Views: 73
  • mortise jig 3 start and stop holes.jpg
    mortise jig 3 start and stop holes.jpg
    89.6 KB · Views: 73
  • mortise jig 2 lining up.jpg
    mortise jig 2 lining up.jpg
    105.9 KB · Views: 75
  • mortise jig 2 placement.jpg
    mortise jig 2 placement.jpg
    105.7 KB · Views: 72
  • mortise jig 1 stop block.jpg
    mortise jig 1 stop block.jpg
    127.9 KB · Views: 80
  • mortise jig 1 simple L shape.jpg
    mortise jig 1 simple L shape.jpg
    124.5 KB · Views: 76

padstack

Well-known member
Joined
Feb 25, 2010
Messages
246
enjoying the woodworking portion of this thread! Following this for updates! (not that I didn't like the barn part - just partial to the table you're building!)
 
To avoid these ads, REGISTER NOW!
OP
R

rieferman

Well-known member
Joined
May 18, 2009
Messages
2,586
Location
Collegeville PA (30 min west of Philly)
I was able to fit in some woodworking into a busy weekend of coaching youth basketball and other fatherly/husbandly duties. We're getting really close to assembly time!!!

I got the front face frame glued up so that I could move ahead on building the cabinet doors. I wanted to wait until the face frame was "locked in" to build the cabinet doors so that I could ensure a perfect fit.

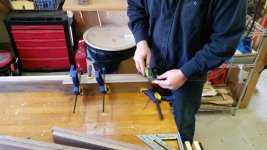
In pic 1, you can see my high tech method of ensuring perfect door spacing. Basically, I decided that 6 business cards created the space I want around the door to enable the door to open without bumping into the frame. Ultimately, I will place 3 business cards on each side of the finished cabinet door to perfectly center it within the space. To get my measurements, I taped some cards in place, held my pieces up to the opening, and marked my cut.

I think I previously explained the new mortising jig I built for use with the router edge guide. Pic 2 shows me using the jig to produce the 8 perfect mortises seen in pic 3.

Finally, pic 4 shows my dry fitting one of the cabinet doors (no panel installed in the door yet). Perfect fit!!!

Lastly, in between tasks, I had a chance to scrape and rough sand the table top. The grain match is pretty darn good if I do say so myself. See pics 5 and 6.

Pic 1 = Cabinet door measurement system with business cards
Pic 2 = Mortising jig applied
Pic 3 = Cabinet door components, perfect tenons and perfect mortises
Pic 4 = Cabinet door dry fit
Pic 5 and 6 = Table top rough finish
 

Attachments

  • wood top after glue scraping 2.jpg
    wood top after glue scraping 2.jpg
    131.3 KB · Views: 95
  • wood top after glue scraping 1.jpg
    wood top after glue scraping 1.jpg
    73.7 KB · Views: 92
  • cabinet door dry fit.jpg
    cabinet door dry fit.jpg
    111.7 KB · Views: 93
  • cabinet door components.jpg
    cabinet door components.jpg
    117.2 KB · Views: 98
  • mortising jig applied.jpg
    mortising jig applied.jpg
    129.5 KB · Views: 99
  • cabinet door measurments.jpg
    cabinet door measurments.jpg
    93.3 KB · Views: 99
OP
R

rieferman

Well-known member
Joined
May 18, 2009
Messages
2,586
Location
Collegeville PA (30 min west of Philly)
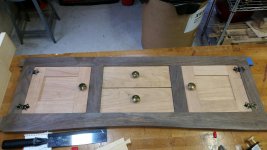
I got the cabinet door panels cut and dry fit yesterday, and also got the drawer faces cut to size. Nice fit on all!!

Next, I will be building the drawer boxes using dovetail joinery at each corner. Wish me luck, it's my first go around with this type of joinery.

Then, onto finishing components and assembly.
 

Attachments

  • cabinet doors - w panels and drawer faces - dry fit.jpg
    cabinet doors - w panels and drawer faces - dry fit.jpg
    144.5 KB · Views: 87

fireberd350

Well-known member
Joined
Jan 5, 2009
Messages
61
Location
West Chester, PA
Another Chester Co resident checking in. Great thread, thanks for sharing. Love the woodworking project details, keep em coming. Seems like a lot of locals on here too, we should setup some sort of side group for local contacts.
 
OP
R

rieferman

Well-known member
Joined
May 18, 2009
Messages
2,586
Location
Collegeville PA (30 min west of Philly)
Hey Steve!

Thanks for dropping in, and glad the woodworking details are of interest!

Love the idea of a local meet up at some point. This board is actually how I've met a few different guys that I still keep in touch with.

Thanks!
 
OP
R

rieferman

Well-known member
Joined
May 18, 2009
Messages
2,586
Location
Collegeville PA (30 min west of Philly)
Got out into the shop yesterday for a few hours to continue the table build.

During a recent trip to the hardware store, I had picked up hardware for the cabinets and drawers. I mocked them up (see pic 1) and decided I want different hardware - we prefer an oiled bronze look, but my local store didn't have anything with that finish. So, it was sort of fun, but ultimately another trip to a different store will be needed.

After that I got the room previously referred to as the "exercise room" setup to be my finishing room for this project (see pic 2). I am using a 3-2-1 finishing technique that will require 4-5 coats.... so having a separate space will be very handy so that I can continue with other tasks.

As a side note.. the finishing approach that I'm taking goes as follows:
- Orbital sand at 100 grit > 120 grit > 220 grit
- Mix 3 parts mineral spirits, 2 parts oil based poly (I used satin as I want a low gloss factor), 1 part boiled linseed oil
- That mixture is generously spread on the surface of the piece, and manually wet sanded with 320 grit and a sanding block - the "slurry" that you are working into the surface fills in minor imperfections for a smooth surface.
- Wipe off everything with a clean rag.
- Let it dry, do it again. 4 coats or 5 coats.


When I was setting up my dust collection system, I left one branch unattached to anything, and outfitted it with a reducer to shop vac hose. This is convenient for connecting up to various tools such as my router table. Or, on this day, my orbital sander. You still get some mess, but much less.

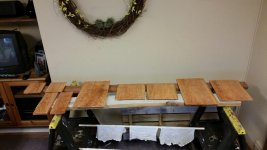
As for finishing, right now I'm only concentrating on the panels because they must be finished before I can assemble any components. The panels float in grooves in this design - if I were to finish the panels as part of an assembly, there's a risk that changes in humidity could cause the panels to shrink and reveal unfinished areas. By pre-finishing, that potential risk is eliminated. Anyways, even after just 1 coat, they're starting to look richer already. See pic 3.

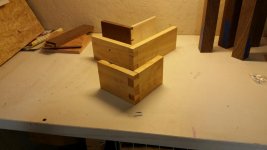
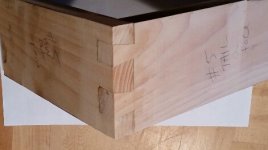
Once I had the panels set to dry, I set to work learning how to create dovetail joints. I'm 3 rounds into my practice so far... the first round was with the help of a very skilled friend/teacher (and even that one wasn't that great). The second round was on my own (that one was pretty bad). The third one shows promise and is pretty nice and tight. See pic 4. I plan another 3-4 practice rounds before I try it for real on my drawer boxes.


Pic 1 = dry fit with hardware (which I'm returning)
Pic 2 = finish room setup
Pic 3 - panels after 1 coat of 3-2-1 finish
Pic 4 = dovetail practice rounds 1, 2, and 3
 

Attachments

  • dry fit with hardware.jpg
    dry fit with hardware.jpg
    107 KB · Views: 112
  • finish room setup.jpg
    finish room setup.jpg
    126 KB · Views: 91
  • panels after first coat.jpg
    panels after first coat.jpg
    87.6 KB · Views: 91
  • dovetail practice.jpg
    dovetail practice.jpg
    70.3 KB · Views: 106
OP
R

rieferman

Well-known member
Joined
May 18, 2009
Messages
2,586
Location
Collegeville PA (30 min west of Philly)
Two posts in one day!

I have the day off for MLK Day, so I got out into the shop for a bit.

I got a second coat on the panels.

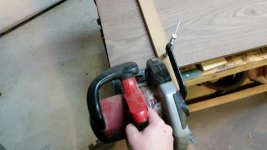
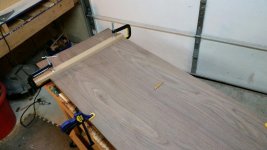
And then decided that with the time available, I could get the table top sized to its final dimensions. I carefully (very very carefully) measured and marked my cut, and then clamped a straight edge in place for my circular saw to follow. See pics 1 and 2.

After making the cut at both ends of the board and checking my work (perfectly square all the way around!) I added a 45 degree chamfer to the bottom portion of the perimeter of the table.

Then I sanded both sides and the edges of the table, and added the first coat of finish. The richness of the wood really pops right out now. I can see a couple of very minor flaws in the top surface but am generally very pleased with the results (and will be sure NOT to point out the flaws to others that look). See pic 3.

Pic 1 = setting up for the stressful cut
Pic 2 = ready to cut
Pic 3 = after 1 coat of finish
 

Attachments

  • top after 1 coat.jpg
    top after 1 coat.jpg
    140.4 KB · Views: 84
  • cut setup 2.jpg
    cut setup 2.jpg
    89.2 KB · Views: 71
  • cut setup 1.jpg
    cut setup 1.jpg
    97.2 KB · Views: 70

christopher.layton

Well-known member
Joined
Mar 21, 2014
Messages
107
Location
Hood River, OR
Got out into the shop yesterday for a few hours to continue the table build.

During a recent trip to the hardware store, I had picked up hardware for the cabinets and drawers. I mocked them up (see pic 1) and decided I want different hardware - we prefer an oiled bronze look, but my local store didn't have anything with that finish. So, it was sort of fun, but ultimately another trip to a different store will be needed.

After that I got the room previously referred to as the "exercise room" setup to be my finishing room for this project (see pic 2). I am using a 3-2-1 finishing technique that will require 4-5 coats.... so having a separate space will be very handy so that I can continue with other tasks.

As a side note.. the finishing approach that I'm taking goes as follows:
- Orbital sand at 100 grit > 120 grit > 220 grit
- Mix 3 parts mineral spirits, 2 parts oil based poly (I used satin as I want a low gloss factor), 1 part boiled linseed oil
- That mixture is generously spread on the surface of the piece, and manually wet sanded with 320 grit and a sanding block - the "slurry" that you are working into the surface fills in minor imperfections for a smooth surface.
- Wipe off everything with a clean rag.
- Let it dry, do it again. 4 coats or 5 coats.


When I was setting up my dust collection system, I left one branch unattached to anything, and outfitted it with a reducer to shop vac hose. This is convenient for connecting up to various tools such as my router table. Or, on this day, my orbital sander. You still get some mess, but much less.

As for finishing, right now I'm only concentrating on the panels because they must be finished before I can assemble any components. The panels float in grooves in this design - if I were to finish the panels as part of an assembly, there's a risk that changes in humidity could cause the panels to shrink and reveal unfinished areas. By pre-finishing, that potential risk is eliminated. Anyways, even after just 1 coat, they're starting to look richer already. See pic 3.

Once I had the panels set to dry, I set to work learning how to create dovetail joints. I'm 3 rounds into my practice so far... the first round was with the help of a very skilled friend/teacher (and even that one wasn't that great). The second round was on my own (that one was pretty bad). The third one shows promise and is pretty nice and tight. See pic 4. I plan another 3-4 practice rounds before I try it for real on my drawer boxes.


Pic 1 = dry fit with hardware (which I'm returning)
Pic 2 = finish room setup
Pic 3 - panels after 1 coat of 3-2-1 finish
Pic 4 = dovetail practice rounds 1, 2, and 3

Those dovetails are looking good! Are you using a jig?
For what it's worth, I have found that it is best to have the pins stand a little (1/32) proud of the drawer sides, and plan to sand them down later.
I am enjoying seeing this project come together, you have a good sense for proportion.
 
OP
R

rieferman

Well-known member
Joined
May 18, 2009
Messages
2,586
Location
Collegeville PA (30 min west of Philly)
Those dovetails are looking good! Are you using a jig?
For what it's worth, I have found that it is best to have the pins stand a little (1/32) proud of the drawer sides, and plan to sand them down later.
I am enjoying seeing this project come together, you have a good sense for proportion.

Hey Chris,
Thanks for stopping in!

I'm using the Veritas dovetail jig like this one..

The instructions that come with the jig are pretty good, but took some trial and error to figure out how to apply them in reality.

As you note, they also recommend leaving things a bit long and sanding back to final dimension - I did this in attempt # 3 and was much happier with the results.

Hopefully my next couple of practice rounds enable me to achieve consistently good quality joints, so that I can try it for real on the drawer components.
 
OP
R

rieferman

Well-known member
Joined
May 18, 2009
Messages
2,586
Location
Collegeville PA (30 min west of Philly)
Weird setback yesterday on the table project. Despite a nice looking table top after the first 2 coats of finish, the 3rd coat revealed some ghost glue drips. I had no choice but to strip it back down to bare wood, sand a little deeper, and go through all the steps again. Fingers crossed that this doesn't happen again.

As this project has gone on, I've used more and more painter's tape as a means of keeping glue off of surfaces where it is unwanted. For my next project, I will take that even further - for example I'll mask both sides of every table top joint.

I'll also follow the advice offered a page or two ago by a forum member to wipe the glue off immediately. Combined with the painter's tape approach, I think this will produce less frustration in the end, even if it makes setup a bit more time consuming.

Other than that, I got all other components sanded and prepped for finishing and final assembly.

For some items, such as cabinet door frames, I dry fit the assembly (since the panels are still on the drying rack) and sanded them as a component to ensure smooth joints. Then, I disassembled and started applying finish.

Since I'm finishing everything individually, the painter's tape approach will again be used during final assembly to minimize any mess cleanup.

Current state is panels are on their 5th and final coat. Everything else is on their 2nd coat. I have a bunch of time to dedicate to the project today, so I'll get a couple more coats on, and get the drawer boxes built.
 

Attachments

  • finishing time.jpg
    finishing time.jpg
    118.4 KB · Views: 79

wasfast

Well-known member
Joined
Apr 10, 2014
Messages
874
Location
San Diego CA
Step 1 in not having glue issues is to not go nuts with quantity. Obviously you want to have 100% coverage but if your edges are joined and very flat, the amount of glue left is pretty small. I'd recommend that you use a small brush, like a plummers flux brush, to spread the glue evenly. Fingers don't spread all that even in this application:)

The tape recommendation is helpful. You want to make sure you don't leave adhesive behind.

If the squeeze out is minimal, you can wash it off with a rag and water. Just be careful that the rag is fully rung out so you don't spread diluted glue around.

My own preference is to remove the squeeze out with a very sharp chisel. Timing is important as the glue should be starting to be rubbery. Not liquid, not hardened. You just skim the surface with the angled edge on the bottom.

Scrapers are also your friend. From removing glue residue (fairly large turned lip) to finishing the top surface, they leave an amazing depth and finish to the wood that sanding will never match.
 
OP
R

rieferman

Well-known member
Joined
May 18, 2009
Messages
2,586
Location
Collegeville PA (30 min west of Philly)
Great stuff wasfast, I'll definitely apply those tips on my next project!

Snow day for the kids today, so I'm working from home. Probably tomorrow too. If I'm productive enough, I plan to try to get out to the shop before dinner and give dovetails another couple tries. I really want to achieve success on that task... "I think I can, I think I can..."
 
OP
R

rieferman

Well-known member
Joined
May 18, 2009
Messages
2,586
Location
Collegeville PA (30 min west of Philly)
Dovetail practice # 5 went a bit better. Still some small gaps visible, but overall, I'm pretty happy with the progress compared to previous attempts. I think I have at least 2 more tries before I truly go for it.

Edit: This attempt also incorporated a dado groove on the inside of the drawer to mimic how the real drawer will be built. The dado will hold the plywood drawer bottom. So, I had to plan for that groove during this attempt.... The dado stops short of the end of the Pin board so that it is not visible in the dovetail joint.
 

Attachments

  • dovetail number 5.jpg
    dovetail number 5.jpg
    38.8 KB · Views: 88
OP
R

rieferman

Well-known member
Joined
May 18, 2009
Messages
2,586
Location
Collegeville PA (30 min west of Philly)
Assembly has begun!

While I will do one last finish touch up and steel wool "sanding" once all is assembled, I am "done" with applying finish to the point where I can begin assembling.

I only have a small number of clamps, so I have to do this in steps.

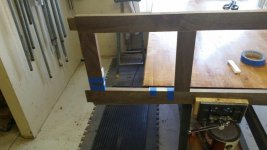
Today, I glued up the back of the table, as well as the cabinet doors. I had previously glued up the front of the table.

Later this week, I'll put together the sides, which are held together by the legs.

Then, I can put the side and front/back together, and like ten other steps to be "done".
 

Attachments

  • assembly has begun.jpg
    assembly has begun.jpg
    124.4 KB · Views: 85
OP
R

rieferman

Well-known member
Joined
May 18, 2009
Messages
2,586
Location
Collegeville PA (30 min west of Philly)
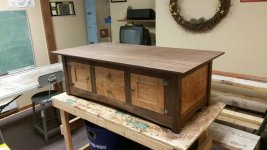
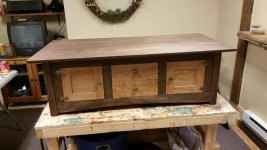
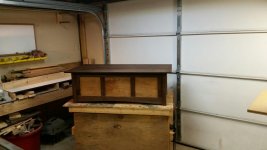
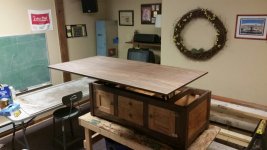
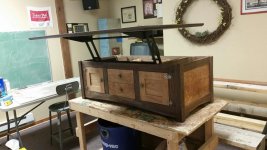
Whew! DONE with the table.

I am SOOOO glad to be done. That was a LOT of work.

This table isn't perfect (although I aimed for perfection), but I'm pretty proud of the result considering this is my first try at something this complex.

I'm going to take a little break from woodworking to build up some energy for a deck build that I'm starting in March.

Please leave me a comment if you think I did ok

:beer:
 

Attachments

  • 48 - done 1.jpg
    48 - done 1.jpg
    114.2 KB · Views: 164
  • 48 - done 2.jpg
    48 - done 2.jpg
    110.9 KB · Views: 153
  • 48 - done 3.jpg
    48 - done 3.jpg
    84.4 KB · Views: 130
  • 48 - done 4.jpg
    48 - done 4.jpg
    100.4 KB · Views: 135
  • 48 - done 5.jpg
    48 - done 5.jpg
    120.8 KB · Views: 160

Peter Mc Mahon

Well-known member
Joined
Jul 20, 2014
Messages
62
If you want some really good dovetail techniques that anybody can do, google Rob Cosman. Buy his dovetail video, it is fantastic! I took a 4 hour class with Rob, and walked away being completely comfortable doing dovetails. Keep up the practice.
 

wasfast

Well-known member
Joined
Apr 10, 2014
Messages
874
Location
San Diego CA
You did just fine. Woodworking, like many things, is a constantly increasing skills activity. You should always strive to do your best but also realize there is nearly always another project after that one. The basics for cabinets, furniture etc aren't complicated but really doing them well involves lots of practice and acquired knowledge. Keep it up!
 
To avoid these ads, REGISTER NOW!
Top Bottom