To avoid these ads, REGISTER NOW!

west of Philly - barn saving

OP
R

rieferman

Well-known member
Joined
May 18, 2009
Messages
2,586
Location
Collegeville PA (30 min west of Philly)
hardware - I still need to make it out to your store sometime. One of these days, one of these days :)

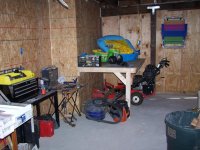
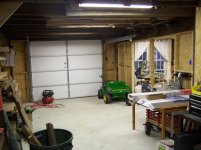
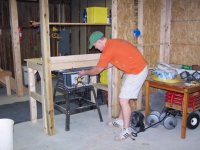
thomas - you're right about the r&r. I've been so pissy lately, and making stupid mistakes, that I had to stop myself from working all week (ok, well, I did make a mini-loft to park my mower underneath so I can store kids stuff on top, but that barely counts). I was sure that I was spacey enough to cut a finger off or something stupid. ha ha

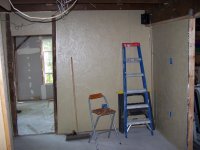
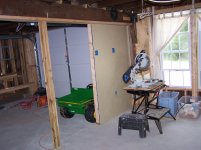
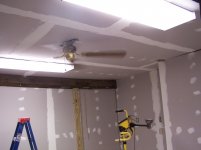
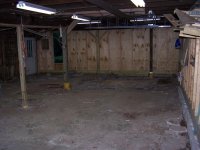
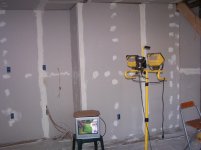
well, the handyman guy that we've used for a couple things over the years came over to take a crack at bidding for the mudding/taping. $550 he quoted me... and that's not even with flat taping up to the exposed old wood - he'd want me to use thin trim in all those areas (like lattice or similar) and just paint it same color as the wall. I mean, that might look ok, and I might go that route in the end if needed, but $550? That seems really high.

Hopefully have 2 other guys that are going to give me a price. I'm paying cash and will do the finish sanding, and any small touch up that shows after primer coat... I dunno, was expecting $350 pricing or so. *****.

I got $5 that says I end up mudding and taping myself.
 
To avoid these ads, REGISTER NOW!
OP
R

rieferman

Well-known member
Joined
May 18, 2009
Messages
2,586
Location
Collegeville PA (30 min west of Philly)
I wrote:
I got $5 that says I end up mudding and taping myself.

well, I won $5 from myself. The other bids were very close, and all 3 guys suggested the same approach (thin trim painted to wall color) without me leading them there on my own. So, there's no effing way I'm paying over $500 for a process that is mainly just time consuming and tedious (i.e. this ain't like paying someone to hook up the electric properly where safety is a possible concern).

Anyhow, finished the last couple small/intricate pieces of drywall installation last night. Meanwhile, the wife primed the workshop OSB walls. Brightens it right up instantly. The rest of the garage will remain unpainted, I just don't care to be honest.

Will be mudding and taping for the next while. Then prime and paint and start filling it all back up.

Oh, and I came up with a new design for how I'm going to fit my table saw into the mix.. It's pretty cool, I'll show you later
 

Bull

Super Moderator
Joined
Dec 12, 2005
Messages
16,189
Location
MA
I can't blame you for not wanting to drop $500 to pay someone to do what is essentially monkey work. As much as I HATE HATE drywall, I'd not pay someone to do it, either.

Maybe see if you can get your wife involved. My wife does a much better job at drywall than me (most times) and hates it less.
 
OP
R

rieferman

Well-known member
Joined
May 18, 2009
Messages
2,586
Location
Collegeville PA (30 min west of Philly)
ha ha, you're totally on the same page as me about the wife thing.. I've gotten her more and more involved as I get to more finesse work. She's a great painter, and I think she'll have far more patience for working with mud than me. I already told her to be prepared to learn how to tape seams, mud screw dimples, and apply thinned down top coats.

I'll bet another $5 that she's better at it than me by the time we're done
 
OP
R

rieferman

Well-known member
Joined
May 18, 2009
Messages
2,586
Location
Collegeville PA (30 min west of Philly)
well well well... It turns out that I like mudding/taping. I had hated the task in previous instances, but I bought nice knives this time, came prepared with lessons learned in years gone by, and I guess that in comparison to so many of the other really horrible tasks I've done, this just isn't that bad.

(edit on 12/2/13 - oh my god it is cracking me up to read this post. My mud job in that room is soooooo terrible, and the room is sooooo small. As you'll see eventually, I now have much more mudding experience than I did then, and have improved a lot. One thing I can say for sure is that I HATE HATE HATE mudding.)

So I just got taping done this weekend. I'll do top coating this week. Yesterday, I banged it all out with the PGA championship playing in the background. You can see Tiger lining up a putt in the one picture. It was relaxing, nice work. Had a few beers while working. Kids/wife were at a birthday party. A couple stop by's from neighbors. Really, it was one of the first fun days of work I can remember in the past year.

Also, my little quickie contraption to hold the tape roll and my scissors worked great. It's just a foam covered wire tie down that you can get at Lowes, made a little spot to hold the scissors there too (btw, I love these things, I use them for everything from keeping the garden hose aimed in a particular direction, to keeping a cooler in place in the back of the truck, to attaching stuff to the stroller when we go to a park, to tape holding thingies)
 

Attachments

  • mudding with tiger.jpg
    mudding with tiger.jpg
    135.4 KB · Views: 866
  • taping contraption.jpg
    taping contraption.jpg
    132.8 KB · Views: 948
Last edited:

steven083008

Well-known member
Joined
Jul 21, 2009
Messages
225
Location
Raleigh, NC
Awesome build thread! Great project, and a great job doing it.

You look like me when mudding... completely covered in it! LOL
 

Mikea57

Well-known member
Joined
May 28, 2008
Messages
262
Location
Olive Branch, MS
How did I miss this??? I haven't been out here as much since around June as I was before then but it just got by me. This is absolutely fabulous! You've done a great job and you should be very, very proud.

I've got an old 12' X 16' lawn shed that I'm wanting to move from the back of my yard up closer to my detached workshop and I was wondering how to stabilize it as I move it. I think I'm going to use the same method you used with steel cables and a come along. 2 sets of those in a "X" pattern to the corners of the shed should keep it from twisting as I lift it and roll it along on PVC pipe.

One thing I don't remember seeing in your thread is about the roof. Are you going to have to reroof it? I couldn't tell anything definite from the pix.

You might also check out the "The ASYLUM - Happy 40th Birthday To Me" thread for ideas on how to use every single inch of space. That place is incredible.

Keep up the good work!
 
OP
R

rieferman

Well-known member
Joined
May 18, 2009
Messages
2,586
Location
Collegeville PA (30 min west of Philly)
Hey Steven and Mike - thanks so much for the replies, I'll take all the encouragement I can get! :beer:


edit: forgot to answer the roof question... The gabled roof is fine, was shingled about 10 years ago by previous owner (among the only things that he did well in this place!!). Decent shingles and good ventilation underneath, so I have another 10 years min to go there. The back flat roof is rolls of asphalt shingle material, also installed by previous owner about 10 years ago. Flat roofs are more prone to breaking down, so that'll be a sooner project for me. But I have time, no leaks yet. Biggest issue with the roof is the gutter system. Needs a "gutter topper" on both sides, and the back side is completely missing the gutter (causes splash back against all the wood.. causing rot etc.). I'll Tyvek a little to protect that side until I can afford to do more. Goal is to try to use vertical metal siding next year (or so), and at the same time do the roof in the same material. Then I'll truly be good to go until I'm long dead.


Mike, for stabilization in the application you're mentioning, I'd go with long 2 x 4's screwed into the framing on an angle in all the directions you're concerned with. Use screws or you'll hate yourself afterwards when it comes time to remove them.

But, if you decide come alongs is the way to go, here's my advice: HD or Lowes sell 2 ton and 4 ton come alongs. 2 ton is more than enough for almost anything you'd ever want to do, and it's cheaper. 2 ton come along can be handled by 1/2 thick eyebolts. 4 ton come along requires 3/4 inch eyebolts (else you'll unbend the eye bolt).

Chain is very very expensive, so I would not recommend that. Cable is cheaper, but still pricey. HD and Lowes generally carry nice long towing/tie down straps (the 2 inch wide yellow straps with ratchet mechanism). Mine are 30 feet long, 10,000 pound break strength. They cost $13 per set. And now that the project is done, I have amazing straps for use in the pickup truck! :)

Last piece of advice: Call your local shed company. Most of them that I know of are willing to have their "shed movers" come out and just move the building for you for a fee. They'll take care of it in like 10 minutes.
 
Last edited:
OP
R

rieferman

Well-known member
Joined
May 18, 2009
Messages
2,586
Location
Collegeville PA (30 min west of Philly)
wow, that's so cool, that totally made my day.. I wonder if I should go clean up all the "f bombs" I've dropped along the way! ha ha ;-) Thanks for the heads up Kevin!!

In other news, today is my 8th wedding anniversary, so I don't think I'll be applying that top coat tonight (if I hope to see my 9th)

:beer:
 

wrigh003

Well-known member
Joined
Mar 27, 2006
Messages
783
Location
Birmingham, AL
well, I failed sort of. The goal this past weekend was to do whatever it takes to "finish" (finish except painting basically) the barn.

I worked
- 5 hours Thursday night
- 15 hours Friday
- 12 hours Saturday
- 10 hours on Sunday (was slowly losing steam)

:eek:
Dude, you are a machine. Good work. :thumbup:
 

DrRidge

Member
Joined
May 27, 2009
Messages
11
Location
Louisiana
Man, this is an awesome project! I am one of those poor saps that doesn't have a TREASURE like yours, but I am currently designing my own garage/shop. You have given me some great ideas. Keep up the great work and thanks for the fantastic thread. Congratulations on the COVER!!! (and on the anniversary - I know how hard that is, too!)
 
OP
R

rieferman

Well-known member
Joined
May 18, 2009
Messages
2,586
Location
Collegeville PA (30 min west of Philly)
wrigh wrote
Dude, you are a machine.

I like to call it "obsessed with being done with the hardest work I've ever done". My wife just calls it "stupid" (kidding, she's actually really supportive... but also really really looking forward to me being "done")

:lol_hitti

DrRidge - thanks for your kind comments :) I was thinking last night "Damn, I really gotta step it up now!". I feel like my place is **** compared to all the pro-level builders on here. But I guess building skill is hard to compare when you're dealing with a 105 year old building vs. new construction. Maybe in the end, I'll have picked up skills that I would never have gotten if I tore down and started from scratch.
 
OP
R

rieferman

Well-known member
Joined
May 18, 2009
Messages
2,586
Location
Collegeville PA (30 min west of Philly)
Hey Enloe, thanks a ton for stopping in :)

punkabilly wrote:
holy ****!!! so how close are you to being 100% DONE...

Hmmmm... deadlines always stretch out, so I'll try to be extremely realistic in these time estimates:
- 1st top coat of mud tonight
- Final top coat of mud this weekend
- final electrical hookups this weekend as well
- sanding, touch up, primer, paint, bring in the furniture/stereo/TV/window AC unit by end of next weekend

That's what we're considering "Done" because we'll be able to comfortably use all of the spaces for their intended purpose by then.

full well knowing that nothing is ever completely "done" lol.

Right, totally. But, the work I have after the above stuff is fun. For example, I designed a work bench and table saw stand where the table saw stores (it's on casters) under a portion of the bench so it doesn't use space all the time. When I push it out for use, it will have leaves that flip up to support whatever I'm cutting.

And of course, I have all sorts of shelving and efficiency things to build.

All that stuff will wait til it gets cold out. I enjoy doing "hot work" when it's cold outside.

Further down the road, maybe a year away or so, I have to put siding on the building. Since I'll be using vertical metal siding (like galvalume) I may do the roof at the same time to avoid 2 delivery charges.

In the 5 year plan, there's a storage shed addition and a small deck that needs to go on the front side of the building. Shed for kids toys, deck for me.

And, someplace in the 10 year plan, I'd like to turn the 2nd story into a wide open finished "studio" type of space. A place to show furniture that I'll be building. Maybe some rec room area too for a ping pong table or something.

So, "done" definitely doesn't really mean "done" here at my place :lol_hitti
 
OP
R

rieferman

Well-known member
Joined
May 18, 2009
Messages
2,586
Location
Collegeville PA (30 min west of Philly)
8 a.m. - 3 p.m. - easy shift compared to weekends past :) Some play time with the kids, and then taking my neighbor (the one that constantly helps me) out to treat him and his wife to dinner.

anyhow, some pics.. had to prep for electrician tomorrow

- got the 2 gauge wire "dry fitted" in the basement
- got all my temporary work stuff broken down in the workshop so I can build the real thing once I have lights/electricity.
- created a system for hanging my lights between the joists so they take up less space.
- oh, and here's the mower garage/mini loft I mentioned before.

have a great weekend guys

pics 1 and 2 are the emptied and painted workshop
pic 3 is the light between the joists now (time consuming!!!!)
4 and 5 are the mower garage/mini loft
last pic is that wham-o banner covering the window thingy that I described a page ago.. so cheap, but effective
 

Attachments

  • barn and xpn aug 09 009.jpg
    barn and xpn aug 09 009.jpg
    133.8 KB · Views: 855
  • barn and xpn aug 09 005.jpg
    barn and xpn aug 09 005.jpg
    144.1 KB · Views: 792
  • barn and xpn aug 09 004.jpg
    barn and xpn aug 09 004.jpg
    142.9 KB · Views: 837
  • barn and xpn aug 09 003.jpg
    barn and xpn aug 09 003.jpg
    134.2 KB · Views: 831
  • barn and xpn aug 09 002.jpg
    barn and xpn aug 09 002.jpg
    138.7 KB · Views: 848
  • barn and xpn aug 09 001.jpg
    barn and xpn aug 09 001.jpg
    139.1 KB · Views: 842
OP
R

rieferman

Well-known member
Joined
May 18, 2009
Messages
2,586
Location
Collegeville PA (30 min west of Philly)
electric is in... so tired, but also very happy. I learned a TON and did a TON. Electrician friend is a machine, worked his **** off in the heat and totally under-charged me - was also very patient in explaining, showing techniques etc.. Neighbor buddy had a hoagie and attached fan blades - ha ha, he gets a free pass because of all the kazilion times he's helped me out.. I wired all the recepticals and the lights while electrician wired the panels. Some minor stuff left to do, but we'll wait til the fall because it's 99% done and I have more pressing work to do.

the lighting is so bright now!

3 way switches rule

ceiling fan in exercise room, what a difference!
 

limeranger

Active member
Joined
Nov 8, 2008
Messages
42
Location
Bayswater NB, Canada
This is easily one of my favorite threads, I really like that your saving that old barn. It will truly be an amazing building when "done" (they never really are). And is already something to be tremendously proud of. Thank you for taking the time to share.
 

rustyfords

Active member
Joined
Jun 1, 2009
Messages
34
Location
Houston area
I've been silently following your build, but I did want to chime in, here at the end and congratulate you on a super nice project.
 
To avoid these ads, REGISTER NOW!
OP
R

rieferman

Well-known member
Joined
May 18, 2009
Messages
2,586
Location
Collegeville PA (30 min west of Philly)
hardware - thanks for stopping in again! your comment cracked me up because we're talking apples and oranges here.. the scale of your project is HUGE (really looking great too by the way). But thank you very much :)

rustyfords and limeranger - thanks a ton for dropping by and commenting. Getting there little by little! :thumbup:

I was telling the wife that the top two "oh wow, that's soooo much nicer" types of moments in this project have been: concrete floor, and now this electrical work being done correctly, safely, intelligently (cough cough, overkill).

OK, these pics are a little boring because you've seen this all before.. the difference is, look how BRIGHT it is!!! :shocking:

edit: Oh, and the ceiling fan in the exercise room makes such a difference in the temperature in there. So worth it. When we remodeled our house, my son's room had to lose the ceiling fan. Kept it instead of tossing it. Works great still!

(note: please ignore the copious amount of sanding I will have to do to get my seams to look nice... hopefully the top top coat will get me a little closer.. sigh)
 

Attachments

  • electric aug 2009 010.jpg
    electric aug 2009 010.jpg
    137.9 KB · Views: 989
  • electric aug 2009 011.jpg
    electric aug 2009 011.jpg
    137.8 KB · Views: 931
  • electric aug 2009 013.jpg
    electric aug 2009 013.jpg
    130.7 KB · Views: 958
  • electric aug 2009 012.jpg
    electric aug 2009 012.jpg
    137.8 KB · Views: 862
Last edited:

Woogeroo

Well-known member
Joined
Jun 2, 2007
Messages
96
Location
Seeing the USA in my Chevrolet!
This is a very interesting thread.

kudos on saving the old barn.

-W

08/20/2009 Update: I checked my local library system... they have that barn book you referenced, so I checked it out, interesting stuff.
 
Last edited:
OP
R

rieferman

Well-known member
Joined
May 18, 2009
Messages
2,586
Location
Collegeville PA (30 min west of Philly)
Enloe, believe me that no one here wants me to go anywhere near anything mechanical... As quickly as I learn building skills, I'm the opposite when it comes to understanding engines etc. It's really strange. Luckily, my neighbor is the total opposite (grease monkey, but clueless on wood working) so we help each other out.

Although.... I do want to learn! :) We'll start with learning how to do an oil change or something.

W - thanks for the kudos!!! :)

---

I'm sooo pumped to get off work tonight. I'm all set to primer the exercise room!! Oh man, that's a big deal to be to the "ready to paint" stage!!!! YEEEEE HAAAAAA. Wife will be painting trim while I prime the room. Tomorrow night, she'll be putting the first coat on while I cut the trim to size. Friday night, final coat and trim installation. This weekend, fill up the room!!!!!!!!!!!!!!

Then of course, next week I can begin fun stuff like building my workshop counters/shelves etc. Oh man will that be fun fun fun

edit: AND, I have the entire week of Labor Day off from work. Just relaxing and enjoying the new space, and then a little trip to the shore. Well deserved R&R!!!
 
OP
R

rieferman

Well-known member
Joined
May 18, 2009
Messages
2,586
Location
Collegeville PA (30 min west of Philly)
Got my workbench design figured out yesterday. Ran to depot after work yesterday, got all my materials. Went home did family stuff, and then when kids went to bed, wife and I started painting. I primed the room while she worked on trim.

At one point, it was obvious that I'd need her to help me prime or I'd be up until 2 in the morning. We got it done quickly enough. And I'm happy to report that I can no longer find about 85% of my seams now that it's primed white. The other 15% where I can see flaws in my mudding fall into two categories: I don't care, and I care even less. :lol_hitti Ha ha, therefore, it's a big success!

My 4 year old son wants to help me paint. He likes being my little helper. So tonight, the wife will whisk the 2 year old daughter out of the house so that me and the boy can mess up the walls a little. He'll love it, I will too.

2nd coat tomorrow night, trim and workbench building, and organizing/filling the space still on schedule for the weekend.
 
OP
R

rieferman

Well-known member
Joined
May 18, 2009
Messages
2,586
Location
Collegeville PA (30 min west of Philly)
ugh... burning the candle at both ends... work, kids, wife, barn... repeat. dragging, getting demotivated.

still on track. 2nd coat tonight as planned.

let's hear it guys! :) I just need a couple "go get em tiger", "it'll all be worth it", "just a few more days and you're there" pep me ups.
 

heffneil

Well-known member
Joined
Apr 12, 2009
Messages
722
Location
Naples FL
Can we get some updated pics :)

You are doing a great job. You are a real mule. I haven't seen someone work so hard on something in long long time. Nice to see (especially a young guy) with a work ethic like yours!

Neil
 

Boosted1

Well-known member
Joined
Nov 25, 2007
Messages
1,679
Location
Georgetown, KY
Wow. Just went through your whole thread. Congratulations on your progress.
The place looks fantastic with a very unique character.
And your right about the hacky sack. Never seen anyone that good.
 

Bull

Super Moderator
Joined
Dec 12, 2005
Messages
16,189
Location
MA
Wow...just watched all four of your videos on Youtube. You look like a spider with that sack! With those energy levels, it's no wonder how you've gotten so much done on this barn project in such a relatively short time. Sounds like you're in the home stretch now, man. Git 'r done.
 
OP
R

rieferman

Well-known member
Joined
May 18, 2009
Messages
2,586
Location
Collegeville PA (30 min west of Philly)
nice, some hacky sack fans.. just wait til you see me after I use the exercise room for awhile (btw, I'm "done")

HELLZ yeah!!!!!!! Let me say that again... I'm DONE. DONE DONE DONE DONE DONE. Sure, there's all sorts of enhancements planned... But I can use my space to do those thing.. whenever I want.. Or not. DONE

anyhow, too tired and late to give the blow by blow for each pic right now, so I'll just post, and then come back later and do that.

Please let me know what you think (btw, keep an eye out for the "before" pic that I randomly threw in to remind you of how far we've come... and then, remember that the before pic I showed is after 5 months of the hardest labor I've ever done)

Thanks fellas, you've all given me great advice and tons of encouragement. It's more appreciated that you'll know

edit:
Picture descriptions
- old ratty window closed over, outhouse gone, new windows.. will eventually be re-sided
- trim trim trim, and more trim
- curtains are a little too low and need ironed.. all in good time. also, first project in my new workshop will be to build some nice adirondak chairs to replace these plastic ones.
- original barn door back where it belongs (that was NOT easy to hang)
- entertainment center. MINI FRIDGE. speakers are hanging using 2 opposing pieces of angle iron. There two more speakers on the workshop side too.
 

Attachments

  • done barn 006.jpg
    done barn 006.jpg
    138.4 KB · Views: 1,212
  • done barn 005.jpg
    done barn 005.jpg
    132.4 KB · Views: 1,176
  • done barn 004.jpg
    done barn 004.jpg
    133.8 KB · Views: 1,268
  • done barn 003.jpg
    done barn 003.jpg
    134.6 KB · Views: 1,154
  • done barn 001.jpg
    done barn 001.jpg
    147.5 KB · Views: 1,212
Last edited:

heffneil

Well-known member
Joined
Apr 12, 2009
Messages
722
Location
Naples FL
While I am so happy for you being completed I have to say I am sad not to receive updates on this project! It was a real enjoyable project and while my hands didn't get dirty I felt like I was there with you the entire time!

Congrats again!

Neil
 
OP
R

rieferman

Well-known member
Joined
May 18, 2009
Messages
2,586
Location
Collegeville PA (30 min west of Philly)
more pics of the barn

edit:
Pictures descriptions
- Metal peg board for my small parts bins. Grateful Dead tapestry finally has a home after all these years. Original door from the workshop point of view.
- Original door close up. You can't buy character like this.
- Happy (TIRED) Bob at his new workbench. Btw, I had the entire thing built and stocked with my stuff, and THEN decided it was too tall.... unpacked it, flipped it on it's back, cut each leg shorter. Can you say "pain in the ****"? Project motto = "nothing's easy" (in a similar tone to the Staples "that was easy" commercials)
- Bob illustrating how the secondary mini-shelf on the workbench acts as a support for the long end of whatever you're cutting on the chop saw. I did this because I found that always having to clear off the workbench surface to make a cut was a pain in the neck. Now, the work surface never needs to be disturbed when I need to make a cut.
 

Attachments

  • done barn 007.jpg
    done barn 007.jpg
    140.9 KB · Views: 999
  • done barn 008.jpg
    done barn 008.jpg
    137 KB · Views: 1,035
  • done barn 009.jpg
    done barn 009.jpg
    138.7 KB · Views: 1,569
  • done barn 010.jpg
    done barn 010.jpg
    136.8 KB · Views: 1,137
Last edited:
OP
R

rieferman

Well-known member
Joined
May 18, 2009
Messages
2,586
Location
Collegeville PA (30 min west of Philly)
and even more pics of the barn

edit:
Pictures descriptions
- Bob showing how the table saw will exit it's "cave". There will be locking swivel casters, and fold out leaves, on the table saw eventually. When I need to use it, just wheel it into the garage bay, flip the leaves out for support, plug into any one of a kazillion plugs (that I wired, and wired.. and wired).
- a little out of order, but whatever.. entertainment center looking from the other direction
- Workbench storage
- Workbench top surface and shelf
- More of the shelf. Need to beef up the supports, those little brackets were struggling when I put heavier items up there. All in time.
 

Attachments

  • done barn 015.jpg
    done barn 015.jpg
    140.1 KB · Views: 702
  • done barn 014.jpg
    done barn 014.jpg
    143.6 KB · Views: 726
  • done barn 013.jpg
    done barn 013.jpg
    145.4 KB · Views: 697
  • done barn 012.jpg
    done barn 012.jpg
    133.5 KB · Views: 695
  • done barn 011.jpg
    done barn 011.jpg
    134.8 KB · Views: 748
Last edited:
OP
R

rieferman

Well-known member
Joined
May 18, 2009
Messages
2,586
Location
Collegeville PA (30 min west of Philly)
there can't be more pics can there? sure there can


edit:
Pictures descriptions
- this bottle opener has been hanging here for at least 50 years I'd guess. I saw no reason to improve the design, I've opened way too many bottles with it already too! ha ha
- got a great deal on this 8x12 carpet. Makes it a lot nicer to stretch out, do pushups etc. And the kids are much happier on this than on concrete.
- paying tribute to the barn by buring a 10 x 10 inch thick piece of post that couldn't be saved and re-used.
- My little helper
- Just to put it all in perspective, this is what it used to look like... and this was after 5 months of ridiculous amounts of work.
 

Attachments

  • done barn 016.jpg
    done barn 016.jpg
    141.8 KB · Views: 875
  • done barn 017.jpg
    done barn 017.jpg
    130.2 KB · Views: 827
  • done barn 019.jpg
    done barn 019.jpg
    122.6 KB · Views: 784
  • done barn 020.jpg
    done barn 020.jpg
    131.9 KB · Views: 941
  • done barn 018.jpg
    done barn 018.jpg
    139.8 KB · Views: 1,069
Last edited:

thomask

Well-known member
Joined
May 28, 2009
Messages
354
Location
Sunshine State
rieferman,

I told you it would pay of in the end. Just think how your future projects will go now with a great shop area to work out of.:)

You have stuck in there and we all see what persistence did for you.:thumbup:

Always cherish the time you can spend with your wife and kids in your project. They are all a part of your success.:cool:

Remember the really smart folks never miss a chance to learn a new skill. My best to you.:hellobye:
 
Last edited:
To avoid these ads, REGISTER NOW!
Top Bottom