
You are using an out of date browser. It may not display this or other websites correctly.
You should upgrade or use an alternative browser.
You should upgrade or use an alternative browser.
west of Philly - barn saving
- Thread starter rieferman
- Start date


Our website is up, and we have had a couple of orders now!
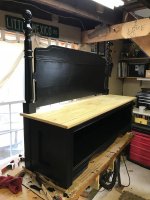
Here's a custom request we just finished.
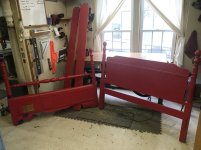
The client's wife had a lot of sentimental attachment to the bed she slept on as a child - I believe someone in her family built it originally. They asked me to turn it into an entry bench for their new house.
This ended up being really challenging as the bed was in tough condition, but I think things turned out nicely. They will put baskets inside for storing sneakers and gear etc.
And here's a link to our website. Still working out some kinks (e.g. mobile optimization), and we'll add more content over time:
RER BarnWorks
Thanks!
Bob R.
Here's a custom request we just finished.
The client's wife had a lot of sentimental attachment to the bed she slept on as a child - I believe someone in her family built it originally. They asked me to turn it into an entry bench for their new house.
This ended up being really challenging as the bed was in tough condition, but I think things turned out nicely. They will put baskets inside for storing sneakers and gear etc.
And here's a link to our website. Still working out some kinks (e.g. mobile optimization), and we'll add more content over time:
RER BarnWorks
Thanks!
Bob R.
Attachments
Kevkx125
Well-known member
Glad to see you are back BOB!! How is that fire pit chimney that Doug built you doing?
Glad to see you are back BOB!! How is that fire pit chimney that Doug built you doing?
Hey!! Good to hear from you!
That fire pit is still going strong, and everyone loves it. I think I'm going to put it up on our new website too - but I want to call Doug first and make sure he'd be cool with making more / splitting profits etc. He'd mentioned before that he'd be open to that, so it could be a neat way to stretch the business model a bit.
kjdhawkhill
Well-known member
That's a wonderful looking conversion project. I wish I had your abilities and time. That said, I also wish you were a little closer to my house, but I haven't lived West OF Philly ever, just in West Philly and that was quite a while ago.
That's a wonderful looking conversion project. I wish I had your abilities and time. That said, I also wish you were a little closer to my house, but I haven't lived West OF Philly ever, just in West Philly and that was quite a while ago.
The solution to the "not enough time" problem is to simply run yourself into the ground for a couple decades.
(that's horrible advice that I'm jokingly giving... but it seems to be the method that works for me)
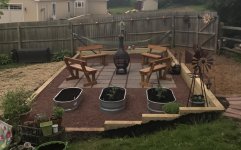
Built a patio over the last few days. Drainage system underneath since it's always wet there.
Section by fence will be hammock zone.
Middle will be chimenea zone for the kids and their friends.
Right side will have three galvanized raised garden beds.
Section by fence will be hammock zone.
Middle will be chimenea zone for the kids and their friends.
Right side will have three galvanized raised garden beds.
Attachments

Last edited:
Farmall450
Well-known member
Wow, neat thread! Now time for me to try and find enough time to catch up in the last decade (!) of it.
Wow, neat thread! Now time for me to try and find enough time to catch up in the last decade (!) of it.
Wow, a decade, you're right... it's truly been that long.
Just 10 short years ago I was much thinner and much less sore........
But my "to do" list was also wayyyyyyyy longer

BajaScout
Well-known member
Got that patio project finished in time for the holiday weekend!
Nice patio. I like the planters.
Sent from my iPhone using The Garage Journal mobile app
Nice patio. I like the planters.
Thanks! They're galvanized horse troughs (made in the USA even!) with a couple drainage holes drilled in the bottom.
We've found that moles/voles/rabbits have a difficult time raiding the vegetable garden when using this style of raised beds, and they last forever.
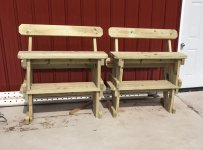
The benches seen in the patio picture above actually "belong" to the picnic pong area of our yard. I had moved them up to the new patio for a party that we were having, but planned all along to build a new set of four benches so that each space has dedicated seating.
This weekend was beautiful out, and a great day to work in the shop with windows and doors open. Taking regular breaks to coach my son during his basketball workout behind the barn, refill my coffee cup, and talk with neighbors as they stopped by, I was able to crank these out in 3.5 hours. Simple, sturdy, comfy.
This weekend was beautiful out, and a great day to work in the shop with windows and doors open. Taking regular breaks to coach my son during his basketball workout behind the barn, refill my coffee cup, and talk with neighbors as they stopped by, I was able to crank these out in 3.5 hours. Simple, sturdy, comfy.
Attachments

While I love designing and building, I hate finishing (i.e. stain, paint, poly etc.).
As such, I'm going to cut my teeth on spray finishing with a nice system that's a bit above entry level. I'm going with the Earlex HV5500 system which is very well regarded by woodworkers, and a comfortable place to begin the learning process at $300 price tag.
All the systems have pros and cons, and this one does too. But I learn best by trying, and general consensus is that I can get quality results during the learning curve with this option.
To go along with this, I need to figure out some sort of "paint booth" setup for my shop. I'll only be spraying water-based finishes. I'm thinking some sort of simple curtain system suspended from the ceiling, cardboard or drop cloths for the floor, and some sort of box fan with furnace filter type of setup. I'll be wearing a 3M respirator as well. Open to suggestions and ideas.
Thanks!
Bob R.
As such, I'm going to cut my teeth on spray finishing with a nice system that's a bit above entry level. I'm going with the Earlex HV5500 system which is very well regarded by woodworkers, and a comfortable place to begin the learning process at $300 price tag.
All the systems have pros and cons, and this one does too. But I learn best by trying, and general consensus is that I can get quality results during the learning curve with this option.
To go along with this, I need to figure out some sort of "paint booth" setup for my shop. I'll only be spraying water-based finishes. I'm thinking some sort of simple curtain system suspended from the ceiling, cardboard or drop cloths for the floor, and some sort of box fan with furnace filter type of setup. I'll be wearing a 3M respirator as well. Open to suggestions and ideas.
Thanks!
Bob R.
Spray booth design idea # 1....
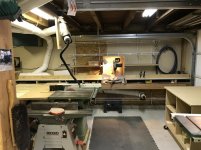
In front of my table saw and miter saw, I have an intentionally open area as well as an overhead garage door. The intent of this setup is that I have plenty of room to unload materials from my trailer into the shop, and then plenty of room to work those materials on the table saw / miter saw.
This area also tends to become an assembly area for larger projects, and I think it would double nicely as a paint booth.
For the sides of the booth, each garage door track could hold a utility tarp (or similar) that I would attach a piece of PVC pipe to the lower end - this would weigh the tarp down when the booth is setup, and would allow me to roll the tarp up when booth is not needed.
For the back of the booth, I could magnet or clamp a third tarp directly to the overhead garage door.
Floor would be covered with tarp/drop cloth. Moving dollies could be used to rotate pieces as needed during spraying.
I don' t know that the ceiling needs to be covered at all... thinking I'll skip that. I can hang items directly from the ceiling when it is helpful to do so for finishing certain parts.
For ventilation, I would center a box fan (with furnace filter affixed) in the overhead garage door opening - the door closed gently onto the fan to hold it in place. To either side of the box fan, rigid foam would be used to fill in the space under the garage door.
For lighting, I think some plug in LED lights of some sort would suffice.
I think a system like this could be setup or broken down in about 5 minutes.
Thoughts?
edit: added a picture of the space in question to give you an idea... you can see the garage door tracks and overhead door here. The space used by the cart in this picture would instead be used for the piece being finished to sit on dollies or saw horses etc.
edit 2: alternatively, google now tells me that prefab "tent style" booths are an option... i could just modify one like this to include the box fan on the back... link to prefab booth
In front of my table saw and miter saw, I have an intentionally open area as well as an overhead garage door. The intent of this setup is that I have plenty of room to unload materials from my trailer into the shop, and then plenty of room to work those materials on the table saw / miter saw.
This area also tends to become an assembly area for larger projects, and I think it would double nicely as a paint booth.
For the sides of the booth, each garage door track could hold a utility tarp (or similar) that I would attach a piece of PVC pipe to the lower end - this would weigh the tarp down when the booth is setup, and would allow me to roll the tarp up when booth is not needed.
For the back of the booth, I could magnet or clamp a third tarp directly to the overhead garage door.
Floor would be covered with tarp/drop cloth. Moving dollies could be used to rotate pieces as needed during spraying.
I don' t know that the ceiling needs to be covered at all... thinking I'll skip that. I can hang items directly from the ceiling when it is helpful to do so for finishing certain parts.
For ventilation, I would center a box fan (with furnace filter affixed) in the overhead garage door opening - the door closed gently onto the fan to hold it in place. To either side of the box fan, rigid foam would be used to fill in the space under the garage door.
For lighting, I think some plug in LED lights of some sort would suffice.
I think a system like this could be setup or broken down in about 5 minutes.
Thoughts?
edit: added a picture of the space in question to give you an idea... you can see the garage door tracks and overhead door here. The space used by the cart in this picture would instead be used for the piece being finished to sit on dollies or saw horses etc.
edit 2: alternatively, google now tells me that prefab "tent style" booths are an option... i could just modify one like this to include the box fan on the back... link to prefab booth
Attachments
Last edited:
RickP
Well-known member
I like the idea of the prefab booth, as long as you don't need 4 sides.
My wife is encouraging me to think in a different direction...
If I use the original brainstorm (near overhead garage door) I am working in an area prone to saw dust contamination, and while the booth is setup I would be unable to woodwork...
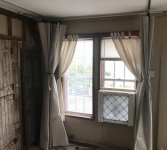
If I instead use the entry room of our barn (kind of a multi-purpose room) which is separated from the workshop, and is heated in winter, the dust factor is greatly reduced and wood shop can stay in business without disruption.
This room has windows and good lighting too... perhaps a curtain system suspended from ceiling tracks so it's easy to setup/take down...
If I use the original brainstorm (near overhead garage door) I am working in an area prone to saw dust contamination, and while the booth is setup I would be unable to woodwork...
If I instead use the entry room of our barn (kind of a multi-purpose room) which is separated from the workshop, and is heated in winter, the dust factor is greatly reduced and wood shop can stay in business without disruption.
This room has windows and good lighting too... perhaps a curtain system suspended from ceiling tracks so it's easy to setup/take down...
We're going with the idea directly above...
I found a nice online resource for the "curtains" (canvas drop cloths) and ceiling track.
www.tarpsnow.com
The back of the "3-sided booth" will be 8 feet wide, and the sides will each be 6 feet long. The window is centered on the 8 foot side.
More soon when construction begins.
PS - reminder that I will be spraying water based products. The main goals of the booth are:
- protect my barn from overspray
- exhaust spray before it can land and create a rough finish on my projects
- spray in a relatively clean environment so that woodshop can still operate when I'm in "spray mode"
(I'll also be wearing a respirator rated for this type of work)
I found a nice online resource for the "curtains" (canvas drop cloths) and ceiling track.
www.tarpsnow.com
The back of the "3-sided booth" will be 8 feet wide, and the sides will each be 6 feet long. The window is centered on the 8 foot side.
More soon when construction begins.
PS - reminder that I will be spraying water based products. The main goals of the booth are:
- protect my barn from overspray
- exhaust spray before it can land and create a rough finish on my projects
- spray in a relatively clean environment so that woodshop can still operate when I'm in "spray mode"
(I'll also be wearing a respirator rated for this type of work)
Last edited:
Well, the resource link above seemed cool until I got their shipping cost for my order. No good.
But, this has led me to start finally trying to learn about Unistrut.... holy cow, I never even knew all that can be done with this product. It's like adult Legos. I'm sure you're already aware of that, but this was news to me.
Please, if you have advice on Unistrut (or similar... seems like there are some off brands too) I'm all ears.
edit: I'm falling so far down this thread...
But, this has led me to start finally trying to learn about Unistrut.... holy cow, I never even knew all that can be done with this product. It's like adult Legos. I'm sure you're already aware of that, but this was news to me.
Please, if you have advice on Unistrut (or similar... seems like there are some off brands too) I'm all ears.
edit: I'm falling so far down this thread...
Last edited:
The Earlex paint sprayer arrived as my Father's Day present yesterday from my kids. Yay!!!! This week I have to watch the instructional DVD and do some test spraying, and work on setting up my spray booth.
I frequently get requests to build ******** boards which are fun/easy project. With the sprayer, I'm thinking that I can build a system that would allow me to slide stencils in to quickly customize each set. This might be a good way to get through the early learning curve (as opposed to spraying fine woodworking as a first step).
I frequently get requests to build ******** boards which are fun/easy project. With the sprayer, I'm thinking that I can build a system that would allow me to slide stencils in to quickly customize each set. This might be a good way to get through the early learning curve (as opposed to spraying fine woodworking as a first step).
Despite my new found love for the possibilities of Unistrut.... For the spray booth ceiling track, we ended up selecting this item from Amazon. The dimensional shipping cost of other options (and the sheer price of all other options) just didn't make sense compared to this (free shipping with Prime) considering the light load of the curtains.
The track has hooks on rollers that will be affixed to "tarp clips" which will hold typical canvas drop cloths as the curtains. The drop cloths I selected are treated on one side to make them a bit water proof.
The booth will be three sided "U-shape" like this |_|
The curtain on the back of the U-shape will have a cut out that fits around exhaust fan/filter set up in the window.
The side curtains will be clipped / joined to the back curtain.
Only water-based finishes will be sprayed, and the HVLP sprayer that I have produces low/predictable amounts of overspray, so I think this setup will serve me very well.
All materials are on hand now, so I'm hoping to be able to construct and share pics soon.
The track has hooks on rollers that will be affixed to "tarp clips" which will hold typical canvas drop cloths as the curtains. The drop cloths I selected are treated on one side to make them a bit water proof.
The booth will be three sided "U-shape" like this |_|
The curtain on the back of the U-shape will have a cut out that fits around exhaust fan/filter set up in the window.
The side curtains will be clipped / joined to the back curtain.
Only water-based finishes will be sprayed, and the HVLP sprayer that I have produces low/predictable amounts of overspray, so I think this setup will serve me very well.
All materials are on hand now, so I'm hoping to be able to construct and share pics soon.
OK, so here's where we ended up.
First, in my typical recycling fashion, my kids old bunk beds became the parts for the window box. The goal here was functional rather than pretty as I'm sure I'll learn and want a version 2 in the future.
Anyways, the window box will hold any near-standard box fan, and is sealed with pieces of air conditioner black foam. Two screws hold the fan in place, so it is both secure and easily replaced in the future.
The window box does not interfere with the opening/closing of the window.
The front edge of the window box has a rabbet cut so that the furnace filter can be easily removed/replaced.
The tarps hang from tarp clips on the ceiling tracks to create a 6' x 6' space. The back wall tarp is cut to fit around the window box, and secured with a bungee.
Setup and take down of the booth take about 20 seconds each.
This week my goal is to test out the sprayer inside the booth. I'll report back.
PS - Can't remember if I mentioned that this room is the front / multi-purpose room of our barn.
First, in my typical recycling fashion, my kids old bunk beds became the parts for the window box. The goal here was functional rather than pretty as I'm sure I'll learn and want a version 2 in the future.
Anyways, the window box will hold any near-standard box fan, and is sealed with pieces of air conditioner black foam. Two screws hold the fan in place, so it is both secure and easily replaced in the future.
The window box does not interfere with the opening/closing of the window.
The front edge of the window box has a rabbet cut so that the furnace filter can be easily removed/replaced.
The tarps hang from tarp clips on the ceiling tracks to create a 6' x 6' space. The back wall tarp is cut to fit around the window box, and secured with a bungee.
Setup and take down of the booth take about 20 seconds each.
This week my goal is to test out the sprayer inside the booth. I'll report back.
PS - Can't remember if I mentioned that this room is the front / multi-purpose room of our barn.
Attachments

Last edited:
Kevkx125
Well-known member
I am still reading bob enjoying seeing your updates.
Seagoon
Well-known member
I'm reading but the site only just sent notification of new entries on the thread so I am a week behind.
Don't worry your thread is one of the most interesting on here even if I don't respond very often.
Vaughan
Don't worry your thread is one of the most interesting on here even if I don't respond very often.
Vaughan
PLOWJEEP
Well-known member
This is one of the first threads that I read when I joined Garage Journal.
cortina64
Well-known member
I am still reading and following along.
Warren
Warren
Awesome, thanks guys. I didn't want to force this ongoing record to stay here if it no longer belonged (being past the initial garage build phase etc.) but am happy to stay
---
So the "lazy susan cart" that I'm putting together for the paint booth is pretty basic, but I think it will get me where I need to be for now.
Basically, I am building two identical boxes framed with 2x4's and topped on one side with OSB. They are 2' x 2'.
The bottom box is equipped with swivel casters. The the other box is the "top" where I will set my projects when spraying.
Both the bottom and top box will accept interchangeable 2x4 legs so that I can make the cart taller when painting smaller items, and shorter when painting bigger items. Or I can use the bottom box alone if desired.
And, I am devising an extension wing system that allows me to make the surfaces wider as well.
So, this setup will enable me to work on tall or small, and wide footprint items. In all cases, I can rotate the piece by swiveling the cart.
Edit: The other idea I may pursue is having 4 mini-moving-dollies. If working on (say) a table, I could put one mini under each leg.
---
So the "lazy susan cart" that I'm putting together for the paint booth is pretty basic, but I think it will get me where I need to be for now.
Basically, I am building two identical boxes framed with 2x4's and topped on one side with OSB. They are 2' x 2'.
The bottom box is equipped with swivel casters. The the other box is the "top" where I will set my projects when spraying.
Both the bottom and top box will accept interchangeable 2x4 legs so that I can make the cart taller when painting smaller items, and shorter when painting bigger items. Or I can use the bottom box alone if desired.
And, I am devising an extension wing system that allows me to make the surfaces wider as well.
So, this setup will enable me to work on tall or small, and wide footprint items. In all cases, I can rotate the piece by swiveling the cart.
Edit: The other idea I may pursue is having 4 mini-moving-dollies. If working on (say) a table, I could put one mini under each leg.
Last edited:
Part one of the build is complete. Interchangeable legs takes about 30 seconds to adjust taller or shorter. Rotates nicely. Very stable.
It may not look like much but I think this is perfectly fit for purpose.
Bunk bed parts continue to live on!!! Lol
Next up, the extension wings.
It may not look like much but I think this is perfectly fit for purpose.
Bunk bed parts continue to live on!!! Lol
Next up, the extension wings.
Attachments

In parallel with this project, I am working on figuring out a totally self-contained sink/drain system. I'd like some input and help please.
I cannot connect to the house plumbing for water or sewer (VERY cost prohibitive, and triggers some insurance changes that I want to avoid).
I cannot drain to outside (township could very easily nail me).
So, what I want to do is install a water container (size TBD) high enough that I can gravity feed to a shop utility sink.
The drain of the sink would feed to another container which I would manually empty in a township approved manner.
I don't want to risk ever forgetting to empty the catch basin, so I need a fail-proof method to prevent that.
I want to trap smells and ward off bugs/mosquitoes.
I don't want to run out of water too frequently (plan is to refill by garden hose).
The sink will be inside a room in the barn where it can't freeze.
I want emptying the catch basins to be easy/efficient.
I have a utility sink on hand to use.
I have some brainstorms on the solution, but don't want to spoil the creativity. What are your ideas?
I cannot connect to the house plumbing for water or sewer (VERY cost prohibitive, and triggers some insurance changes that I want to avoid).
I cannot drain to outside (township could very easily nail me).
So, what I want to do is install a water container (size TBD) high enough that I can gravity feed to a shop utility sink.
The drain of the sink would feed to another container which I would manually empty in a township approved manner.
I don't want to risk ever forgetting to empty the catch basin, so I need a fail-proof method to prevent that.
I want to trap smells and ward off bugs/mosquitoes.
I don't want to run out of water too frequently (plan is to refill by garden hose).
The sink will be inside a room in the barn where it can't freeze.
I want emptying the catch basins to be easy/efficient.
I have a utility sink on hand to use.
I have some brainstorms on the solution, but don't want to spoil the creativity. What are your ideas?
Seagoon
Well-known member
Can't help much on the outflow but I would suggest an IBC for the storage tank if you have room.
If you haven't seen one it is a cube shaped plastic tank in a metal cage with a screw cap on top for filling and a tap with hose spigot at one side on the bottom for emptying. You would probably have to come up with some sort of breather system to allow air in as the water empties but just leaving the filler cap loose would probably be enough.
I have linked to one seller on this side of the pond just to give you some detail
https://www.deltacontainers.com/100...UeXefBa6ekZ0hRVbFavgXvzNtkfktEyxoCkIoQAvD_BwE
If you haven't seen one it is a cube shaped plastic tank in a metal cage with a screw cap on top for filling and a tap with hose spigot at one side on the bottom for emptying. You would probably have to come up with some sort of breather system to allow air in as the water empties but just leaving the filler cap loose would probably be enough.
I have linked to one seller on this side of the pond just to give you some detail
https://www.deltacontainers.com/100...UeXefBa6ekZ0hRVbFavgXvzNtkfktEyxoCkIoQAvD_BwE
Thank you Seagoon!
I was looking at something like this for the water source... similar benefit of being able to hose fill on top and feed the sink from the bottom. At 55 gallons, it would weigh between 400-500 pounds when full, and the footprint of this item is small enough to fit in the space that I have.
What I've learned so far is that height is what I need to create water pressure. That is, water source higher than outlet is good for water pressure. So, my plan would be to build a stand for the 55 gallon tank - very sturdy stand, 4x4 construction and lagged to the wall for top-heavy-tip prevention.
The creation of the stand will create a "dead space" underneath which is where I'll have my drain catch basins...
For catch basins, I'm thinking a series of three buckets:
- first bucket = 1 gallon will not be removed often, and has a main purpose of catching any sediment that may wash down the sink (e.g. paint)
- 2nd bucket = 5 gallons, and is the one I'll empty in a township approved manner
- 3rd bucket = 1 gallon... this is my "oops I forgot to empty the 5 gallon bucket" fail safe. Perhaps I'll make this a 5 gallon as well, and just have to empty less frequently
I think each of the buckets will have at least a loose-fitting lid on them, and I'll affix a plexi window so I can keep an eye on the contents of the buckets.
Sound reasonable?
I've also started to learn that there are treatment pellets available that will keep the source water from going "bad"... I need to read more about that though.
I was looking at something like this for the water source... similar benefit of being able to hose fill on top and feed the sink from the bottom. At 55 gallons, it would weigh between 400-500 pounds when full, and the footprint of this item is small enough to fit in the space that I have.
What I've learned so far is that height is what I need to create water pressure. That is, water source higher than outlet is good for water pressure. So, my plan would be to build a stand for the 55 gallon tank - very sturdy stand, 4x4 construction and lagged to the wall for top-heavy-tip prevention.
The creation of the stand will create a "dead space" underneath which is where I'll have my drain catch basins...
For catch basins, I'm thinking a series of three buckets:
- first bucket = 1 gallon will not be removed often, and has a main purpose of catching any sediment that may wash down the sink (e.g. paint)
- 2nd bucket = 5 gallons, and is the one I'll empty in a township approved manner
- 3rd bucket = 1 gallon... this is my "oops I forgot to empty the 5 gallon bucket" fail safe. Perhaps I'll make this a 5 gallon as well, and just have to empty less frequently
I think each of the buckets will have at least a loose-fitting lid on them, and I'll affix a plexi window so I can keep an eye on the contents of the buckets.
Sound reasonable?
I've also started to learn that there are treatment pellets available that will keep the source water from going "bad"... I need to read more about that though.
Attachments

Last edited:
In addition to, or perhaps instead of, the 1 gallon oops bucket install a water leak alarm. Amazon has lots of inexpensive battery powered ones that can just sit on the floor. Here’s an example:
https://www.amazon.com/dp/B008380HW2/?tag=atomicindus08-20
https://www.amazon.com/dp/B008380HW2/?tag=atomicindus08-20
In addition to, or perhaps instead of, the 1 gallon oops bucket install a water leak alarm. Amazon has lots of inexpensive battery powered ones that can just sit on the floor. Here’s an example:
https://www.amazon.com/dp/B008380HW2/?tag=atomicindus08-20
YESSSSSSSSSSS, I was just thinking about this, and I think this would be a great option! THANK YOU!!!!
In another thread recently, I talked about being nearly finished with our 14-year, entire-house, entire-property, and entire-barn renovation.
Unfortunately, I used a misleading title for that thread (I used the term "honey-do" list which isn't actually accurate for the work I'm talking about) and was subsequently endlessly teased about that sort of list never being truly finished (duhhhh, I know, I know) rather than getting to talk about what I really had on my mind...
Which is that there's sort of a mixture of pride at the job completed, relief that the job is no longer hanging over my every-waking-thought, and melancholy that this constant presence (almost a friend at this point) has moved on.
In any case, by the time I get home from work today, our parking spaces will be in the process of being paved, and the renovation dream/goal/plan will be essentially fully accomplished.
Here's the basic run down as best as I can recall:
- Porch repair / railing install
- Split rail fence
- Paint entire interior of house
- Re-paint kitchen cabinets
- Central HVAC install
- Lawn drainage/swamp remediation
- attic to guest room conversion
- New roof / gutters on house
- Kitchen gut / complete re-do
- Basketball court #1 install
- Wife garden #1 install
- Barn structural repairs phase 1
- Barn concrete floor
- Bedroom split up to accommodate another child
- Barn electrical
- Barn insulation, garage doors, windows and creation of workshop
- Barn second story rec room conversion
- Barn HVAC
- Property grading project
- Pool install
- Shed install
- Pool patio install
- Built pool deck
- Barn steel siding
- Basketball court #2 install
- Bball court fence build
- Dog pen build
- House siding and windows
- Porch to sunroom conversion
- Front porch railing re-do
- Whole property landscaping/hardscaping
- Patio / wife garden # 2
- Whole house new flooring
- Bedrooms renovation
- Both bathrooms renovated
- ******** court installation
- Sidewalk installation
- Driveway paving
- Furniture for property (Adirondack chairs, lifeguard chairs, multiple benches, bar, kitchen island, multiple tables, ping pong table, coffee table)
- Countless workshop fixtures/features (carts, tables, storage, counter tops, dust collection etc. etc.)
Whew! I'm sure I'm missing a bunch, but you get the idea.
This past weekend, we hosted a 3 vs. 3 basketball clinic at our place, and had a chance to use the entire property. It was so fun to have games to play, places to sit, functional and pleasing surroundings. We felt really good about it.
Tonight when I go home, I will oversee a few details of the paving project, replace a couple light bulbs that burn out recently, coach my son in basketball, finally get back to weight lifting and exercising for myself (at least 60 pounds to lose!!!), jump in the pool, go to bed early.
Unfortunately, I used a misleading title for that thread (I used the term "honey-do" list which isn't actually accurate for the work I'm talking about) and was subsequently endlessly teased about that sort of list never being truly finished (duhhhh, I know, I know) rather than getting to talk about what I really had on my mind...
Which is that there's sort of a mixture of pride at the job completed, relief that the job is no longer hanging over my every-waking-thought, and melancholy that this constant presence (almost a friend at this point) has moved on.
In any case, by the time I get home from work today, our parking spaces will be in the process of being paved, and the renovation dream/goal/plan will be essentially fully accomplished.
Here's the basic run down as best as I can recall:
- Porch repair / railing install
- Split rail fence
- Paint entire interior of house
- Re-paint kitchen cabinets
- Central HVAC install
- Lawn drainage/swamp remediation
- attic to guest room conversion
- New roof / gutters on house
- Kitchen gut / complete re-do
- Basketball court #1 install
- Wife garden #1 install
- Barn structural repairs phase 1
- Barn concrete floor
- Bedroom split up to accommodate another child
- Barn electrical
- Barn insulation, garage doors, windows and creation of workshop
- Barn second story rec room conversion
- Barn HVAC
- Property grading project
- Pool install
- Shed install
- Pool patio install
- Built pool deck
- Barn steel siding
- Basketball court #2 install
- Bball court fence build
- Dog pen build
- House siding and windows
- Porch to sunroom conversion
- Front porch railing re-do
- Whole property landscaping/hardscaping
- Patio / wife garden # 2
- Whole house new flooring
- Bedrooms renovation
- Both bathrooms renovated
- ******** court installation
- Sidewalk installation
- Driveway paving
- Furniture for property (Adirondack chairs, lifeguard chairs, multiple benches, bar, kitchen island, multiple tables, ping pong table, coffee table)
- Countless workshop fixtures/features (carts, tables, storage, counter tops, dust collection etc. etc.)
Whew! I'm sure I'm missing a bunch, but you get the idea.
This past weekend, we hosted a 3 vs. 3 basketball clinic at our place, and had a chance to use the entire property. It was so fun to have games to play, places to sit, functional and pleasing surroundings. We felt really good about it.
Tonight when I go home, I will oversee a few details of the paving project, replace a couple light bulbs that burn out recently, coach my son in basketball, finally get back to weight lifting and exercising for myself (at least 60 pounds to lose!!!), jump in the pool, go to bed early.
Last edited:
Here’s how the kids rooms turned out. Their rooms are tiny, but we really tried to make the most of the spaces. New flooring, redone walls, updated furniture and lighting.
Our kids don't gripe about the small size of their rooms one bit, and love their new "teenager appropriate" spaces (they're 13 and 12 years old respectively)
Our kids don't gripe about the small size of their rooms one bit, and love their new "teenager appropriate" spaces (they're 13 and 12 years old respectively)
Attachments
-
 5B62C653-9DBC-4F1A-9136-A4DF6F9607E1.jpg80.9 KB · Views: 103
 -
 6A6296FD-6FC7-442B-8262-B1E271BC2355.jpg93.9 KB · Views: 104
 -
 FA15CBB6-6746-433B-959C-4DEECEF56832.jpg98.2 KB · Views: 101
 -
 1CE7F6D8-4F79-4EA8-A80E-EE93F04CED24.jpg74.6 KB · Views: 100
 -
 0107DFAA-7F47-4B8D-85CA-4E14CF070D54.jpg70.8 KB · Views: 93
Last edited:
Kevkx125
Well-known member
Here’s how the kids rooms turned out. Their rooms are tiny, but we really tried to make the most of the spaces. New flooring, redone walls, updated furniture and lighting.
Our kids don't gripe about the small size of their rooms one bit, and love their new "teenager appropriate" spaces (they're 13 and 12 years old respectively)
Nice work BOB rooms look good.