I see you have a little buddy that hangs with you. Job well done Jason. Where did you find that vise? That vise must have spent the last 20 years outside either on the back of a Utility truck, outside on a workbench, or at some time, was caught up in flood water. Yours was about as bad as it gets. I might have jaws for it.

You are using an out of date browser. It may not display this or other websites correctly.
You should upgrade or use an alternative browser.
You should upgrade or use an alternative browser.
Wilton C2 vise resto
- Thread starter v7guy
- Start date
asp
Well-known member
Cute dog
Dang, that's a lot of rust. Here's what I think is going to happen when you use the impact driver: The screw heads are so soft and rusty that the impact is going to just shear the rust off and you'll be left with a cone-shaped hole. I'm regretfully predicting that you'll have to drill those screws out. The good news is that after the screw heads are drilled, you'll probably be able to unscrew them with vise grips or a small pipe wrench.
Dang, that's a lot of rust. Here's what I think is going to happen when you use the impact driver: The screw heads are so soft and rusty that the impact is going to just shear the rust off and you'll be left with a cone-shaped hole. I'm regretfully predicting that you'll have to drill those screws out. The good news is that after the screw heads are drilled, you'll probably be able to unscrew them with vise grips or a small pipe wrench.
Last edited:
I picked the vise up from a guy in upstate NY, he and his family did a lot of logging, but beyond that I have no idea concerning the history. When I got there it was laying in the corner of a warehouse type building beside a wet bar made of logs.
asp-I think your right, but once in a great while some luck shines my way and maybe it'll all work out without drilling. I could probably use a hand impact driver... never heard of em before this thread.
asp-I think your right, but once in a great while some luck shines my way and maybe it'll all work out without drilling. I could probably use a hand impact driver... never heard of em before this thread.
racer756
Member
v7guy,
thank you for this thread. you are an inspiration to patience and perseverance.
It only gets easier from here..
thank you for this thread. you are an inspiration to patience and perseverance.
It only gets easier from here..
v7guy,
thank you for this thread. you are an inspiration to patience and perseverance.
It only gets easier from here..
Thank you, and I hope so. Mostly I hope this helps out someone in the future.
I went to harbor freight tonight... the first one in lower ny!
Picked up a screw driver set, an impact driver and a 1.5 lb dead blow. I also grabbed a spare vise grip plier but it looks pretty sloppy. I'm skeptical that it will do anything good.
I started using the impact driver with the dead blow to no avail. Then I strayed using it with my 16oz ball peen. I ended up twisting one of the phillips heads. Then I drilled one of the screws to an 1/8" and tried to use the impact again. Absolutely no budging at all. I ran a sharpie across the screw to verify any movement. These results ****.


I gave up trying to use the impact and just drilled the screws out. I ended up using a 5/16s tap to clean the threads up. The center locating pin for the jaws came out with the vise jaw... I'm going to need to remove it with some punches... don't suppose I can use some LN2 to fit it back into the dynamic jaw lol
I broke a couple drill bits last night getting to this point and it was a learning experience.


I broke a couple drill bits last night getting to this point and it was a learning experience.
Spent a couple days removing the other jaw from the vise.it didn't come off near as easy and required some heat and lots of pounding. The center pin came out with the jaw just like the other side.
Because nothing can go easy with this vise the last screw, even thought it is drilled clear through and the others spun out with no problem, absolutely refuses to come out. I started to use the jaw as a locating jig to get more of the screw out with a 1/4"drill bit. I'm trying not to resort to using a threaded insert... But I'm starting to loose confidence that I will have any other option.
Because nothing can go easy with this vise the last screw, even thought it is drilled clear through and the others spun out with no problem, absolutely refuses to come out. I started to use the jaw as a locating jig to get more of the screw out with a 1/4"drill bit. I'm trying not to resort to using a threaded insert... But I'm starting to loose confidence that I will have any other option.
bczygan
Well-known member
Spent a couple days removing the other jaw from the vise.it didn't come off near as easy and required some heat and lots of pounding. The center pin came out with the jaw just like the other side.
Because nothing can go easy with this vise the last screw, even thought it is drilled clear through and the others spun out with no problem, absolutely refuses to come out. I started to use the jaw as a locating jig to get more of the screw out with a 1/4"drill bit. I'm trying not to resort to using a threaded insert... But I'm starting to loose confidence that I will have any other option.
Jason,
Don't lose hope now. You've been up and down so many times on this project and you always persevere and succeed. You're my hero. When I get the gumption to rehab my C2, I will print out and follow your odyssey step by step. PS: I like the idea of an industrial epoxy finish with filler, but a more honest approach is either something close to original or a minimalist finish.
Bill C.
Wilton 3 1/2"
Wilton 450
Wilton C2
Various Parker, Reed etc.
I spent some more time working tonight/this morning. I think the black and decker electric drill gods are angry. I've flexed the housing on the thing a few times these last few days and last night I was worried it might catch fire... it was that hot... it's also gotten pretty noisy/wobbly.
Let me start off by saying that I did eventually get most of the last screw out. I ended up using the dremel and a small grinding stone to work away at the remaining metal of the screw. After I started seeing the "swirl" of the threads that were left in the iron I started the tap.
I kinda buggered it up a bit because I used a drill bit slightly too large at the top of the hole to take threads from the proper size tap, the first 1/8-1/4 inch has no threads . I then got into the area I used the dremel in and it seemed to run the tap down alright.
After an inch or so I hit a part of the bolt that I couldn't turn the tap into anymore(the hole narrowed), it was towards the bottom and I just stopped. I figured since I had a good half dozen threads engaged it wasn't worth it to keep pushing my luck... plus I had totally ate up my grinding bit on the dremel. I may get a hair up my *** and push more with a new grinding stone to get more threads engaged. I really don't believe it's necessary from a functional perspective as the screw really just holds the jaw in place. I don't imagine they take much of any loading from clamping an object.
Also of note is that the 5/8" carriage bolts fit rather sloppily in the hole for the swivel hold downs. They really look like they would be ideally 11/16" or a bit bigger. Obviously I can't find anything like this and I'm sure the holes are probably bigger because of rust eating away the metal.
Of further interest, several of the punch pins seem to be splined on one end and not the other and I really buggered up one. It also appears that the splines are on the outside of the hole they are driven into. So you can't just drive in the pins from the outside.
How are these splined shafts driven in? I can't drive them in from inside the vise.
can you get replacements anywhere?
should I just say to hell with the splines and drive some appropriately sized pins in?
I picked up a knotted wire wheel for my 4.5" grinder and I plan on beating the rust and remaining paint down with that. then I'll start dunking the parts back in the washing soda bath. After a lot more thought, I figure I'll just prime and paint with some rattle can or maybe some appliance paint.
I could use some epoxy or I could get everything powder coated. But in the end the vise is going to see heat and hammers and something that is easily repaired is more appealing from a practical standpoint.
Ideally I'd like to leave it bare and just use some grease, but when heating metal it would make an awful smoky mess in the garage.
I'll post up drill/thread/tap/bolt sizes in the next couple replies to hopefully set others on the right path if "god forbid" they ever run across a similar situation.
here's some pics from everything I've mentioned in this thread... hopefully they clarify what I couldn't describe well. I apologize for not breaking it down per paragraph but I'm pretty worn out.
demographic
Well-known member
I think someone already mentioned it. He's right. Its next to an impossible task without another vise to hold your work. How can you hold that 50 lb body while trying to even center punch a stud ?
Two or three sandbags?
well... A strong and persistent forearm goes a long way lol
I'm not a big guy, I'm 5'10", 210lbs, I'm not a fat ***, but I wouldn't say I'm "fit" either.
In many cases I used less than conventional means. A second vise would have been VERY helpful.
as many times as autopts said it was next to impossible he also encouraged all the posts. he's been very helpful and motivating.
I appreciate all the input I've gotten.
I don't reckon anyone has any suggestions/thoughts to my previous post?
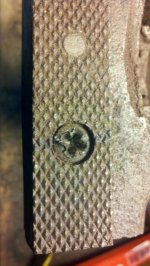
Based on the photo, it looks like the screw was being tightened. Impact drivers have a reverse mode that needs to be engaged to ensure that you are backing the screw out. I've seen this a few times now. Not saying thats the case but the wear points on the phillips screw looks like it.
Attachments
Also of note is that the 5/8" carriage bolts fit rather sloppily in the hole for the swivel hold downs. They really look like they would be ideally 11/16" or a bit bigger. Obviously I can't find anything like this and I'm sure the holes are probably bigger because of rust eating away the metal.
Of further interest, several of the punch pins seem to be splined on one end and not the other and I really buggered up one. It also appears that the splines are on the outside of the hole they are driven into. So you can't just drive in the pins from the outside.
How are these splined shafts driven in? I can't drive them in from inside the vise.
can you get replacements anywhere?
should I just say to hell with the splines and drive some appropriately sized pins in?
Hi Jason.
I gave you some bum info. I forgot the C-2 has 5/8" carriage bolts. They should be alright keeping your vise tight as long as they can't spin freely in that square hole. Sa far as the pins go, I just use 5/16" steel rod. I cut it to size and hit one ends with the hammer. Put the end you hit into the back of the jaw, Then you can slide the jaw back on with the new centering pin in it. Or, use your old ones, the spline side usually went into the jaw. I use 5/16" allen cap screws to hold on my jaws and dip them in a Anti-Sieze type compound before installing. Try to wire wheel every surface of the jaw, front and back. You don't want any burs and you want it to sit nicely on the jaw supports. Have you thought of a color yet. PLEASE! Don't make it glossey Red!
Based on the photo, it looks like the screw was being tightened. Impact drivers have a reverse mode that needs to be engaged to ensure that you are backing the screw out. I've seen this a few times now. Not saying thats the case but the wear points on the phillips screw looks like it.
I actually had some issues where I would hit the impact driver with enough force that it would reverse... The harbor freight impact driver needs pushed in and rotated to change directions. So it was driven clockwise on more than one occasion. The first screw it happened to significantly more than the other three... it took me a bit to realize what was going on
Also of note is that the 5/8" carriage bolts fit rather sloppily in the hole for the swivel hold downs. They really look like they would be ideally 11/16" or a bit bigger. Obviously I can't find anything like this and I'm sure the holes are probably bigger because of rust eating away the metal.
Of further interest, several of the punch pins seem to be splined on one end and not the other and I really buggered up one. It also appears that the splines are on the outside of the hole they are driven into. So you can't just drive in the pins from the outside.
How are these splined shafts driven in? I can't drive them in from inside the vise.
can you get replacements anywhere?
should I just say to hell with the splines and drive some appropriately sized pins in?
Hi Jason.
I gave you some bum info. I forgot the C-2 has 5/8" carriage bolts. They should be alright keeping your vise tight as long as they can't spin freely in that square hole. Sa far as the pins go, I just use 5/16" steel rod. I cut it to size and hit one ends with the hammer. Put the end you hit into the back of the jaw, Then you can slide the jaw back on with the new centering pin in it. Or, use your old ones, the spline side usually went into the jaw. I use 5/16" allen cap screws to hold on my jaws and dip them in a Anti-Sieze type compound before installing. Try to wire wheel every surface of the jaw, front and back. You don't want any burs and you want it to sit nicely on the jaw supports. Have you thought of a color yet. PLEASE! Don't make it glossey Red!
I was kinda considering a dark grey, like a graphite color. I've also read that light grey was a common production color...so I've bren considering that too. Not really into the bright "look at me" colors.
I was kinda considering a dark grey, like a graphite color. I've also read that light grey was a common production color...so I've bren considering that too. Not really into the bright "look at me" colors.
That color would look awesum!! On that impact driver, I have the same problems so I marked that socket with a green line from a marker just to watch and make sure it was moving in the right direction.


asp
Well-known member
I picked a good few days to step away from the internet. (I was busy with projects of my own all weekend).
Great job on what you've got done since I last checked in.
Maybe I missed it, but what exactly do those splined-on-one-end pins hold in? Are they the ones that go through the jaw insert and into the jaw?
Also, call me crazy, but I think I see a weld repair between the base and the body in the 2nd to last picture. I hope for your sake I'm wrong.
FWIW, I like the dark graphite color idea too.
old salvage
Well-known member
What a job. Now the fun/relaxing part. Painting, lube and assembly.
Motown 454
Well-known member
- Joined
- Sep 25, 2008
- Messages
- 1,359
Nice work.
I've been meaning to pickup a piece of sheet metal from home depot to serve as the anode but I haven't got the chance. The winter has treated me well for a change. The lack of moisture in the air has kept the metal as it was after work with the knotted wire wheel.
Just to clarify, the following pics show the previously questioned area that may have been welded. It I isn't but I like to present things as they are.

When I mount this to the bench I assume I should put the broken mount at the front of the vise.
Just to clarify, the following pics show the previously questioned area that may have been welded. It I isn't but I like to present things as they are.
When I mount this to the bench I assume I should put the broken mount at the front of the vise.
When I mount this to the bench I assume I should put the broken mount at the front of the vise.
You don't want any mounting ear of the base to be in the very front. You want the front of the vise's main body to be at the edge of the workbench so you can hold long vertical stock and have it clear the edge of the bench.
I always mount my vises on a steel plate and then mount the steel plate to the workbench but that's personal preferance.
I'd probably position the base so that the broken ear is at approx. the 122 degree position as viewed top down.
(Ex of steel mounting plates. The little guy is not attached to the bench.)

Last edited:
asp
Well-known member
I've been meaning to pickup a piece of sheet metal from home depot to serve as the anode but I haven't got the chance. The winter has treated me well for a change. The lack of moisture in the air has kept the metal as it was after work with the knotted wire wheel.
Just to clarify, the following pics show the previously questioned area that may have been welded. It I isn't but I like to present things as they are.
(picture removed)
When I mount this to the bench I assume I should put the broken mount at the front of the vise.
Much better picture. Definitely not welded.Sheet metal at Home Depot is super expensive. Try dropping by your local HVAC, auto body, or welding shop and asking for some scraps. They'll probably give it to you free or dirt cheap.
I'd put the broken mount as one of the corners. Or, If you're feeling bold, fasion a piece to complete the mount and have said local welding shop burn it in for you.
"Also, call me crazy, but I think I see a weld repair between the base and the body in the 2nd to last picture. I hope for your sake I'm wrong."
That was the beauty of the Wilton vise Tony. Up until the 80's, no 2 casting were identical. That spot where the body meets the base was a normal touchup they had to do with most Wiltons. I believe they had to grind slag residue that would form in the cravice. Almost all the pre 80 wiltons that came my way looked similiar.
That was the beauty of the Wilton vise Tony. Up until the 80's, no 2 casting were identical. That spot where the body meets the base was a normal touchup they had to do with most Wiltons. I believe they had to grind slag residue that would form in the cravice. Almost all the pre 80 wiltons that came my way looked similiar.
Well, tonight I got the vise back in the bath. There's a reasonable amount of fizzing, when I pull it out I'll prime and paint and dunk the next part. I don't suspect there'll be updates for the next few days since most of this is just giving it some time and there are quite a few parts.

I've considered just cutting this handle off and getting some bar stock... maybe some stainless. I'm really not sure it's worth straightening out.

I did finally get the body primed, picked up some Rust-oleum "professional" high performance metal primer and put it to work.

I did finally get the body primed, picked up some Rust-oleum "professional" high performance metal primer and put it to work.
asp
Well-known member
That handle would be hard to straighten given a your current arsenal. I can't fathom how to do it without another vise or oxygen acetylene torches. If you can figure out a way, do it.I've considered just cutting this handle off and getting some bar stock... maybe some stainless. I'm really not sure it's worth straightening out.
(pic removed)
I did finally get the body primed, picked up some Rust-oleum "professional" high performance metal primer and put it to work.
(pic removed
You've done so much work to try to retain the vises original equipment already. Would fighting to fix one more thing be too much?
On the other hand, I've never seen a bench vise with a stainless handle. That could look really cool, but I'd beware of it getting dented as SS is usually a fair bit softer than regular steel and a lot softer than tool steel.
Looks pretty good painted
Dave- those are some mighty fine vises... don't think I mentioned it earlier.
Tony- I hadn't really considered that stainless would be softer, that makes it a no go... it would look nifty though. I'll give straightening the handle a shot... I've got a couple ideas.
Just painted the vise, had trouble finding a color I liked ended up getting "smoke grey", it's about the color of my floor, that wouldn't do. So I picked up a can of black and mixed up almost a quart of of a dark grey. It looks pretty alright, I'm waiting for it to dry up before I post up pics.
For future reference...
swivel hold down bolts 5/8" carriage bolts
screw collar 10/32"x1" socket cap (i used stainless)
pipe jaw set screw (i believe they were originally) 5/16" 18 1" set screws
Jaw screws on dynamic and base 5/16"-18x1 fillister head (originally) I've used some socket heads that I've ground down an 1/16 on the head
Retaining pin for the take down screw 1/4" rod
center locating pin for jaws 5/16" rod
dynamic jaw key pins 1/8" roll pin (i may regret removing these)
Too bad that handle is bent. Its got the factory original rubber finger saver still on it which I find amazing considering the condition you got that vise. You know someone thats uses an anvil? A smith can take that handle on to an anvil, and with a lead hammer and heat, straighten it out 98%.
I've been working on this still.
I got the swivel hold down handles straightened, just heat and hammering. Probably shouldn't have done it on my wood workbench but it's what I had. After I burnt the bench good I hung around for a couple hours to make sure things didn't go up in flames.
I've been battling the handle...trying to straighten it out for a good bit now. It's rusted to the screw and it didn't budge at all despite lots of wailing on it. I've bathed it in heat a few times now and managed to toast the rubber finger saver real well... pretty disappointed in that.
I also realized that I never tapped the hole for the pipe jaw insert. I've been having no luck with that. The hole is drilled at 5/16 but it seems to be to small to tap at 3/8... I don't have a drill bit in between.
A buddy offered to let me use his OA torch for a couple minutes to straighten the handle. Probably going to take him up on the offer in the next week or so.
Still need to do some paint touch up on the lettering.
I thought this would go quicker, but you know... mice and men and those best laid plans.
Next post for some pics


asp
Well-known member
Pretty sweet how much heat those things throw, huh? I sometimes wonder how I ever fabricated anything before I got mine.(pics removed)
Got an acquaintance to help me out. 5 minutes with an OA torch while the take down screw was clamped in a bench vise let it get strraightened out. I need an OA setup.
A couple days... I'll post finished pics.
Lookin pretty sweet. It's almost time for you to be able to use it
and in keeping with the theme of this thread, lots of pictures


v7guy, question 4u on the primer that u used, is it painted on or sprayed on ?
spongerich
Well-known member
All I can say is WOW!
I haven't been back to this thread for a while. That's some nice work there. Your patience is nothing short of amazing. I hope you're young enough to get MANY years of enjoyment out of that thing. I'm sure every time you use it you'll think back to the hours you spent and smile.
I haven't been back to this thread for a while. That's some nice work there. Your patience is nothing short of amazing. I hope you're young enough to get MANY years of enjoyment out of that thing. I'm sure every time you use it you'll think back to the hours you spent and smile.