To avoid these ads, REGISTER NOW!

Wood Chisel Set

Vvmvbb

Well-known member
Joined
Aug 5, 2011
Messages
746
Location
CT
not well enough to do any kind of a decent job implementing your suggestion, I'm afraid. But thank you for the suggestion just the same.

Thank you for the knowledgeable insights. That number system I'll need to look into it more thoroughly. At first glance I believe my brain began to twitch. I'll also need to do some researching to see what's out there in the case dept.

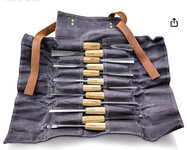
I wonder if I could turn the chisels around and store them with the handle end in the pouches. Is there any issue with that idea I should be aware of?
They show it like this on Amazon:

IMG_0005.jpeg
 
To avoid these ads, REGISTER NOW!

RTM

Well-known member
Joined
May 13, 2019
Messages
13,225
Location
SF Bay Area
They show it like this on Amazon:

IMG_0005.jpeg
I'm afraid of that cutting the hell out of the flaps when you flip it closed. And one less layer between you and bleeding.

One of my rolls won't hold some of my chisel, some the tip is too wide, others the handle is too large. Dead either way without a custom made holder.
 

Tynee

Well-known member
Joined
Sep 19, 2016
Messages
997
Location
In the Heart of the Bluegrass
OP, if you're still looking for straight chisels too, I'd consider Narex an excellent value. Caveat: I'm the furthest thing there is from a woodworker, but my father-in-law bought my kids a set of Narex and I've been impressed with them. Some good deals on small sets of Narex are available:
Lighter wood handle
Stained Beech handles at Lee Valley
Set of 7
With a storage case
Premium set

I agree with all of the other advice above about sharpening. I'm learning to get very nice results with a bench stone from DMT:

I may try one of these types of jigs and see if it's a gimmick: https://taytools.com/products/self-centering-sharpening-jig?variant=31428832264279
 

Ohio Andy

Well-known member
Joined
Jul 31, 2024
Messages
2,336
Location
Columbus, Ohio
OP, if you're still looking for straight chisels too, I'd consider Narex an excellent value. Caveat: I'm the furthest thing there is from a woodworker, but my father-in-law bought my kids a set of Narex and I've been impressed with them. Some good deals on small sets of Narex are available:
Lighter wood handle
Stained Beech handles at Lee Valley
Set of 7
With a storage case
Premium set

I agree with all of the other advice above about sharpening. I'm learning to get very nice results with a bench stone from DMT:

I may try one of these types of jigs and see if it's a gimmick: https://taytools.com/products/self-centering-sharpening-jig?variant=31428832264279
Narex chisels are a great value and work well. There are better chisels but cost much more.

The narex Richter series are more expensive but better Steele.

I like the lee valley chisels, prefer pmv11.

The cheap angle guide should work well. I prefer something like this

Veritas Mk.II Standard Honing Guide - Lee Valley Tools https://search.app/7BPdizd7LNuSYD6e6

Because it provides easy angle setting. But costs more. A luxury purchase.
 

AEAdam

Well-known member
Joined
May 27, 2023
Messages
2,784
Location
SE PA
I may try one of these types of jigs and see if it's a gimmick: https://taytools.com/products/self-centering-sharpening-jig?variant=31428832264279
It’s not a gimmick. I know lots of woodworkers who use them. I never have.

For straight chisels and some plane irons, I guess they are ok. But not for carving tools. You actually want the cross section of the edge to be football shaped. So it’s better to just do it by hand.

With carving tools, I think my sharpening advice would be kinda the opposite of sharpening all other tools. I would start with a strop charged with green chromium oxide. The strop could be the sole of a shoe aka shoe leather). We typically carve a sharp point in one side for the inside of veiners, and round the other side for fine U gouges. Use that strop until the factory edge is like a mirror and keep using it. Then buy Arkansas slips. India is really too coarse. And work your way down to coarser grits over time.
 

Ohio Andy

Well-known member
Joined
Jul 31, 2024
Messages
2,336
Location
Columbus, Ohio
It’s not a gimmick. I know lots of woodworkers who use them. I never have.

For straight chisels and some plane irons, I guess they are ok. But not for carving tools. You actually want the cross section of the edge to be football shaped. So it’s better to just do it by hand.

With carving tools, I think my sharpening advice would be kinda the opposite of sharpening all other tools. I would start with a strop charged with green chromium oxide. The strop could be the sole of a shoe aka shoe leather). We typically carve a sharp point in one side for the inside of veiners, and round the other side for fine U gouges. Use that strop until the factory edge is like a mirror and keep using it. Then buy Arkansas slips. India is really too coarse. And work your way down to coarser grits over time.
You can also get a ceramic ultra fine sharpening stone to keep the tools sharp. I have used that or a strop while carving.
 

AEAdam

Well-known member
Joined
May 27, 2023
Messages
2,784
Location
SE PA
You can also get a ceramic ultra fine sharpening stone to keep the tools sharp. I have used that or a strop while carving.
Right. I have spyderco slips as well. I use a spyderco uF as my finishing stone (after a diasharp EE) in my barn. The ceramic is VERY fine, almost too fine and not available in the range of shapes you can get in natural stones.

For anyone else reading along, interested in carving tools, carvers typically shape edges with double bevels as I’ve been saying. So where a chisel may have a 25-30degree primary bevel, a carving gouge may be 5-10 on one side and 20 on the other. It takes time to shape edges this way. So there’s an advantage to buying used carving tools, used by experienced carvers, who have already done this work for you.

Pfeil may be some of the best made new carving tools. But I don’t care for the metric sizes and numbering, I find Henry Taylor to be good quality Sheffield pattern tools. I like the handles better than Pfeil. If looking for used, Henry Taylor, or any really old tools can be really good. Addis are probably the pinnacle of carving tools. I may have 50 of them with original boxwood handles. You can find deals if you are patient. Generally, these are pro grade tools and come sharpened/shaped correctly.
 

RTM

Well-known member
Joined
May 13, 2019
Messages
13,225
Location
SF Bay Area
I may try one of these types of jigs and see if it's a gimmick: https://taytools.com/products/self-centering-sharpening-jig?variant=31428832264279
I have a handful of these from different makers, and as @AEAdam says, not a gimmick, but only made for straight edges.

The Taytools is hopefully better made than the cheap imports. I have trouble getting some of my chisels to lock in well on the lower jaws, especially square edged, on the cheapies. Plane irons up to 2+ inches work well also.
 

ricleh

Well-known member
Joined
Nov 2, 2007
Messages
1,447
Location
Sacramento, CA
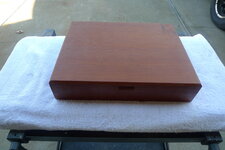
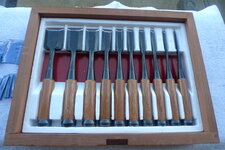
A set of Japanese wood chisels I bought 42 years ago. I made a redwood box to store the chisels. Best chisels I have ever used. Made from laminated Japanese steel. Easy to sharpen and hold their edge well.
 

Attachments

  • L1020759.JPG
    L1020759.JPG
    625.2 KB · Views: 19
  • L1020760.JPG
    L1020760.JPG
    618.8 KB · Views: 19
  • L1020761.JPG
    L1020761.JPG
    657.4 KB · Views: 26

Ohio Andy

Well-known member
Joined
Jul 31, 2024
Messages
2,336
Location
Columbus, Ohio
I have a handful of these from different makers, and as @AEAdam says, not a gimmick, but only made for straight edges.

The Taytools is hopefully better made than the cheap imports. I have trouble getting some of my chisels to lock in well on the lower jaws, especially square edged, on the cheapies. Plane irons up to 2+ inches work well also.
I usually put a hollow grind using my Tormek which makes it easier to freehand maintenance sharpening.
 

Boogerman

Well-known member
Joined
Jan 28, 2021
Messages
833
Location
aspen cove hill
You're being given some quality advice. From some that are probably master craftsman. Enough to drown you. I respect AE Adam and his opinion, and I think he's spot on. Save his advice, and look at it again and again, as you learn enough to make use of it. In the interest of where you are at, and how to learn, I'm going to give you some not as good, but I think more applicable advice for your level. Remember the principle of how we learned as a baby: Crawl, Walk, Run. Learn to crawl, then walk, and then apply the nuances of the experts.

I have no woodworking pedigree. I'm a hack, a guy that can do some specific wood carving, enough to be well respected for it. I am not a fine woodworker, not a wood carver, not an expert. But, I think I can speak to the level of someone that is starting out and wants to learn.

You've got some appropriate chisels. That's a good start, and light years ahead of where many start with a couple of old nail dented, grinder sharpened carpenters chisels. Now your tasks should be to learn to use them, and learn to sharpen them.

For general learning purposes, I'm going to put in a plug for a book. Yes, an old fashioned, paper book. This guy address how blades cut, how to sharpen them, etc. Not just for chisels, but for everything, it's an incredible learning experience that will help you sharpen AND use blades.

1737176631686.png

For the purpose of wood chisels, sharpening can be as simple or as complex as you want to make it. Fine woodworkers argue and share techniques all the time, how to hone, strop, polish, multi bevel, shape, grind, etc. Great advice if you need it; you'll know when you need it, but that won't be at first. At first, concentrate on getting a consistent bevel and a good edge. Personally, I've never moved beyond that. I just sharpen the chisels and use them. No fancy honing, stropping, multiple stones, etc. I have japanese stones, india stones, multiple arkansas grades, carborundum, machinist slip stones, a belt grinder, a wet sharpener system, a planer and chisel sharpener, etc. I typically use a total of 4 diamond hones, and could get by with 1.

I use a jig similar to the one you referenced earlier, a Veritas system one from Lee Valley. It's great for putting on the initial correct bevel, and for correcting poorly sharpened chisels you pick up used. I normally sharpen by hand after the first setup, and rarely go back to the jig unless I damage an edge. For severely damaged tools, I use the belt grinder, wet grinder and planer blade sharpener to shape them to rudimentary form.

When you start out, use the jig to shape (if needed) the edge of the flat chisels, and to sharpen it. Use a medium diamond or other stone, and then touch up the edge and the back flat of the straight chisels with a fine diamond or stone. Now, go and use that to do some cuts. If you bought the book, use his advice on shearing, rocking, etc cuts to test different techniques so you can learn how the blades work. Test different angles with the blade, and try bevel up or down to see how that affects the cut. Resharpen the edge or touch it up as needed. See how the sharpening and different cut techniques work and affect the cut. Try for some really thin cuts, thin enough to see through the curl you bring up. You're just learning how the tool cuts, and how the factors affect it. If the chisel won't cut well enough, try some resharpening and honing, and see how it affects the cut.

Once you get the feel for the flat chisels, try one of the rounded gouges. You'll have to sharpen by hand for those, the experience on the flat ones should help you there. Then, try them on the wood like you did the flat. You're in the CRAWL stage of learning here.

Once you get a feel for the work, you're into the WALK stage of learning. Pick a project to do that has some relatively simple, but varied elements to it. Slowly and carefully apply the principles you learned in the first stage to try to execute a project. The project forces you to do certain things to accomplish objectives, so it makes you learn things you otherwise might not easily do. It also shows you limitations in your tools and your sharpening and use of them, and makes you solve the problems. Now's the time to start looking at some of the more expert advice, as you'll know enough to utilize it.

The thing I would advise most is to just sharpen one or more of your chisels and use them. Don't get inundated and drown in too much good advice, until you know enough to apply it. As you learn to use the tools, you'll find the deficiencies quickly, and then can solve them. It's hard to apply the advice before you know even the basics.

Too long a post, I know already. But, get out there and use the tools you have, and learn. You'll do great.
 
Last edited:

Boogerman

Well-known member
Joined
Jan 28, 2021
Messages
833
Location
aspen cove hill
As an addendum to my overlong post, I'm going to post some photos. Just my stuff, not a recommendation.
My carpentry type chisels. Not the type you're looking at, but useful for installing door hinges, strikes, cutting mortises in woodwork, removing dried glue runs, scraping paint off of things, etc. Just don't use them to pry or open paint cans. That's what Craftsman screwdrivers are for. Nice to have an assortment of styles and sizes; they get used a lot.

View attachment 2260640
View attachment 2260641
View attachment 2260642

My carving type chisels, and how I rack them on my bench for use. I use mostly the Dasta, but also have Henkels and some old antique english chisels I use. The millers falls mini chisels and palm chisels I use occasionally for specific things.

View attachment 2260643
View attachment 2260644
View attachment 2260645

I use a medium and a fine hone for shaping and beveling chisels, using the veritas guide. The two fine and extra fine diamond hones sit on the benchtop to touch up the edges as I use them.

View attachment 2260646
View attachment 2260647
View attachment 2260648

Two of the three chisels that do 95% of my work. They're sitting on the bench because I've got a project in progress at the moment. The third one is racked, and is a larger radius gouge.

View attachment 2260649
 

Max

ALLIANCE MEMBER
Joined
Jun 16, 2018
Messages
3,346
Location
Georgia
I suppose that I am the outlier of the group. I looked at buying a Tormak wheel etc. years ago but didn’t due to the cost. Instead I chose the “scary sharp” system and it has worked very well for me. Instead of stones, wheels, etc. this system uses graduated sandpaper on a flat surface. There is more detail here:

If you have access to “Fine Woodworking” magazine they also covered it here: https://www.finewoodworking.com/project-guides/hand-tools/sharpening-the-scary-sharp-method. It’s behind a paywall but I expect that your local library will have the issue…
 

Eric Brown

ALLIANCE MEMBER
Joined
Jun 14, 2024
Messages
678
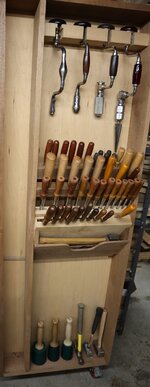
I have a upright cabinet for many of my woodworking tools. My chisels are on the right side door. Made angled holders to keep them organized and easily accessible. Here are pictures of my bench with cabinet behind it. Then the left door. The top middle. The bottom middle. Finally the top right door. Still working on hammer/mallet and drill storage at the bottom of the doors.
 

Attachments

  • Cabinet 2-11-25 5.jpg
    Cabinet 2-11-25 5.jpg
    260.5 KB · Views: 20
  • Cabinet 2-11-25 4.jpg
    Cabinet 2-11-25 4.jpg
    196.9 KB · Views: 19
  • Cabinet 2-11-25 3.jpg
    Cabinet 2-11-25 3.jpg
    357.9 KB · Views: 17
  • Cabinet 2-11-25 2.jpg
    Cabinet 2-11-25 2.jpg
    337.6 KB · Views: 18
  • Cabinet 2-11-25 1.jpg
    Cabinet 2-11-25 1.jpg
    246.5 KB · Views: 18
To avoid these ads, REGISTER NOW!

ararat

Well-known member
Joined
Dec 27, 2018
Messages
597
Location
Ararat NC
I have a upright cabinet for many of my woodworking tools. My chisels are on the right side door. Made angled holders to keep them organized and easily accessible. Here are pictures of my bench with cabinet behind it. Then the left door. The top middle. The bottom middle. Finally the top right door. Still working on hammer/mallet and drill storage at the bottom of the doors.
Nice setup. I need to get organized lol.

That's quite the brace collection. Looks like you have some old pattern maker's chisels in there. Possibly "pig stickers" in there as well.
 

Eric Brown

ALLIANCE MEMBER
Joined
Jun 14, 2024
Messages
678
Nice setup. I need to get organized lol.

That's quite the brace collection. Looks like you have some old pattern maker's chisels in there. Possibly "pig stickers" in there as well.
Standard C.E. Jennings chisels. Ray Isles mortice and dovetail chisels. Buck gouges. Some smaller dovetail chisels. Couple of Lie-Nielsen fishtail chisels. Some swan neck chisels. Couple of drawbore pins. Crank neck chisel. No carving chisels.

As for braces, the ones on the door I use the most. The rest are being sold or given away. There are more you can't see in these pictures. Probably just under 100 total braces.
 

AEAdam

Well-known member
Joined
May 27, 2023
Messages
2,784
Location
SE PA
I suppose that I am the outlier of the group. I looked at buying a Tormak wheel etc. years ago but didn’t due to the cost. Instead I chose the “scary sharp” system and it has worked very well for me. Instead of stones, wheels, etc. this system uses graduated sandpaper on a flat surface. There is more detail here:

If you have access to “Fine Woodworking” magazine they also covered it here: https://www.finewoodworking.com/project-guides/hand-tools/sharpening-the-scary-sharp-method. It’s behind a paywall but I expect that your local library will have the issue…
I started that way. It’s so cheap and gets great results.

One thing I almost never hear discussed on ww forums (unless I posted it):

The best choice in sharpening media must be linked to the edge shape. For curved tools, like carving tools, the pressure applied to the abrasive can be really high. So high, that you end up ripping paper or digging holes in water stone. When doing the long hard labor of flattening the back of a plane iron or chisel, water stones really shine.

Exception are the Mylar backed abrasive sheets that can be stuck to shaped backings.

The other disadvantage involving sand paper on glass is the typical side honing most of us use with scary sharp. That’s really the wrong direction for edges. The scratch pattern is better front to back. That said, I did it for years as a pro furniture maker and did absolutely fine.
 
  • Like
Reactions: Max

Max

ALLIANCE MEMBER
Joined
Jun 16, 2018
Messages
3,346
Location
Georgia
I started that way. It’s so cheap and gets great results.

One thing I almost never hear discussed on ww forums (unless I posted it):

The best choice in sharpening media must be linked to the edge shape. For curved tools, like carving tools, the pressure applied to the abrasive can be really high. So high, that you end up ripping paper or digging holes in water stone. When doing the long hard labor of flattening the back of a plane iron or chisel, water stones really shine.

Exception are the Mylar backed abrasive sheets that can be stuck to shaped backings.

The other disadvantage involving sand paper on glass is the typical side honing most of us use with scary sharp. That’s really the wrong direction for edges. The scratch pattern is better front to back. That said, I did it for years as a pro furniture maker and did absolutely fine.
I agree with you. I’ll note though that stones get dished in use, so you have to be able to flatten them with (generally) diamond stones as well. It’s a lot of extra work and equipment vs. scary sharp.
 

AEAdam

Well-known member
Joined
May 27, 2023
Messages
2,784
Location
SE PA
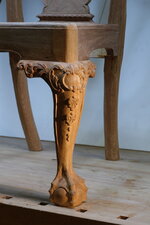
Since this thread was really about carving tools, thought I'd add some pics of carving work just to provide a sense for what it might look like fresh off the gouge. This is a mixture of sculptural work (ball and claw and cabriole leg) and low relief carving (knee). These are 2 very different sets of skills and tools.

First piece of advice- figure out which you'd like to start with first. There's no wrong answer. But I'd buy the books and seek the advice from folks who do one sort or the other or distinguish between them.

IMG_7620.jpeg
The original intention of work like this was for there to be a differentiation between polished surfaces, and a more textured matte looking ground surface. If you look closely, you can see almost facets down the front of that leg.

This is less than one days work. Ball and claw is about an hour. The knee takes longer, but if you do enough of them, you can get this down to a few hours work. When these chairs were originally built, the person carving the leg and the person carving the knee would have been different people. (see Advice above)

Every shape from the size of the ball, every curve of the leaves on the knee is defined by a specific gouge. So selection of tools is pretty important. I probably have around 35 chisels and gouges and do everything I need to with just those.

Advice number 2: I'd be pretty deliberate about what gouges you buy. Sets of any tools almost always contain tools you won't need. Many decent carving tools are more than $20 per, so even 2 gouges you may not need can be significant. And this isn't a tool you want to buy "full" sets of with no skips.

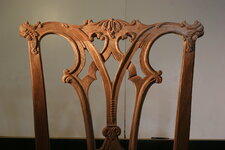
The crest rail looks like this:

IMG_7631.JPG
Crest rails are tricky carvings due to the changes in grain orientation. The designs were optimized for the specific species of wood and its grain orientation. You can't just do whatever you want here. The idea was for this not to look like blocks of wood and instead, appear to be more organic.

Looking at these pics again, all I see are mistakes and things I'd like to do over again. Not easy sharing this with you, but I hope it helps someone focus on the linkage between the end product and the tools/skills needed to get there.
 
Last edited:

Eric Brown

ALLIANCE MEMBER
Joined
Jun 14, 2024
Messages
678
Anybody ever use a checkering tool commonly used on gun stocks on other projects? Never used them but it looks fairly straightforward.
 

RonnieC

Well-known member
Joined
Aug 7, 2013
Messages
808
Location
Orlando, FL
Since this thread was really about carving tools, thought I'd add some pics of carving work just to provide a sense for what it might look like fresh off the gouge. This is a mixture of sculptural work (ball and claw and cabriole leg) and low relief carving (knee). These are 2 very different sets of skills and tools.

First piece of advice- figure out which you'd like to start with first. There's no wrong answer. But I'd buy the books and seek the advice from folks who do one sort or the other or distinguish between them.

IMG_7620.jpeg
The original intention of work like this was for there to be a differentiation between polished surfaces, and a more textured matte looking ground surface. If you look closely, you can see almost facets down the front of that leg.

This is less than one days work. Ball and claw is about an hour. The knee takes longer, but if you do enough of them, you can get this down to a few hours work. When these chairs were originally built, the person carving the leg and the person carving the knee would have been different people. (see Advice above)

Every shape from the size of the ball, every curve of the leaves on the knee is defined by a specific gouge. So selection of tools is pretty important. I probably have around 35 chisels and gouges and do everything I need to with just those.

Advice number 2: I'd be pretty deliberate about what gouges you buy. Sets of any tools almost always contain tools you won't need. Many decent carving tools are more than $20 per, so even 2 gouges you may not need can be significant. And this isn't a tool you want to buy "full" sets of with no skips.

The crest rail looks like this:

IMG_7631.JPG
Crest rails are tricky carvings due to the changes in grain orientation. The designs were optimized for the specific species of wood and its grain orientation. You can't just do whatever you want here. The idea was for this not to look like blocks of wood and instead, appear to be more organic.

Looking at these pics again, all I see are mistakes and things I'd like to do over again. Not easy sharing this with you, but I hope it helps someone focus on the linkage between the end product and the tools/skills needed to get there.
Ball and claw about an hour? Holy smokes!
 

ararat

Well-known member
Joined
Dec 27, 2018
Messages
597
Location
Ararat NC
Since this thread was really about carving tools, thought I'd add some pics of carving work just to provide a sense for what it might look like fresh off the gouge. This is a mixture of sculptural work (ball and claw and cabriole leg) and low relief carving (knee). These are 2 very different sets of skills and tools.

First piece of advice- figure out which you'd like to start with first. There's no wrong answer. But I'd buy the books and seek the advice from folks who do one sort or the other or distinguish between them.

IMG_7620.jpeg
The original intention of work like this was for there to be a differentiation between polished surfaces, and a more textured matte looking ground surface. If you look closely, you can see almost facets down the front of that leg.

This is less than one days work. Ball and claw is about an hour. The knee takes longer, but if you do enough of them, you can get this down to a few hours work. When these chairs were originally built, the person carving the leg and the person carving the knee would have been different people. (see Advice above)

Every shape from the size of the ball, every curve of the leaves on the knee is defined by a specific gouge. So selection of tools is pretty important. I probably have around 35 chisels and gouges and do everything I need to with just those.

Advice number 2: I'd be pretty deliberate about what gouges you buy. Sets of any tools almost always contain tools you won't need. Many decent carving tools are more than $20 per, so even 2 gouges you may not need can be significant. And this isn't a tool you want to buy "full" sets of with no skips.

The crest rail looks like this:

IMG_7631.JPG
Crest rails are tricky carvings due to the changes in grain orientation. The designs were optimized for the specific species of wood and its grain orientation. You can't just do whatever you want here. The idea was for this not to look like blocks of wood and instead, appear to be more organic.

Looking at these pics again, all I see are mistakes and things I'd like to do over again. Not easy sharing this with you, but I hope it helps someone focus on the linkage between the end product and the tools/skills needed to get there.
That's awesome. Thanks for sharing
 

Tynee

Well-known member
Joined
Sep 19, 2016
Messages
997
Location
In the Heart of the Bluegrass
Since this thread was really about carving tools, thought I'd add some pics of carving work just to provide a sense for what it might look like fresh off the gouge. This is a mixture of sculptural work (ball and claw and cabriole leg) and low relief carving (knee). These are 2 very different sets of skills and tools.

First piece of advice- figure out which you'd like to start with first. There's no wrong answer. But I'd buy the books and seek the advice from folks who do one sort or the other or distinguish between them.

IMG_7620.jpeg
The original intention of work like this was for there to be a differentiation between polished surfaces, and a more textured matte looking ground surface. If you look closely, you can see almost facets down the front of that leg.

This is less than one days work. Ball and claw is about an hour. The knee takes longer, but if you do enough of them, you can get this down to a few hours work. When these chairs were originally built, the person carving the leg and the person carving the knee would have been different people. (see Advice above)

Every shape from the size of the ball, every curve of the leaves on the knee is defined by a specific gouge. So selection of tools is pretty important. I probably have around 35 chisels and gouges and do everything I need to with just those.

Advice number 2: I'd be pretty deliberate about what gouges you buy. Sets of any tools almost always contain tools you won't need. Many decent carving tools are more than $20 per, so even 2 gouges you may not need can be significant. And this isn't a tool you want to buy "full" sets of with no skips.

The crest rail looks like this:

IMG_7631.JPG
Crest rails are tricky carvings due to the changes in grain orientation. The designs were optimized for the specific species of wood and its grain orientation. You can't just do whatever you want here. The idea was for this not to look like blocks of wood and instead, appear to be more organic.

Looking at these pics again, all I see are mistakes and things I'd like to do over again. Not easy sharing this with you, but I hope it helps someone focus on the linkage between the end product and the tools/skills needed to get there.
That's beautiful work. If you didn't see the imperfections, you wouldn't be a craftsman, but I believe the imperfections give it character that a machine-created piece of pressed-board from Ikea will never be able to duplicate.
 

ararat

Well-known member
Joined
Dec 27, 2018
Messages
597
Location
Ararat NC
I bought a box of carving chisels from a guy that had bought them from someone who got them in Grand Rapids from a furniture maker that closed. The guy I bought them from put the box in his closet in the 1970s and never did anything with them. I think I paid $250.

There are around 150 of them and they are all mid to late 1800's premium makers: Addis, Herring, Maiers, etc. I've cleaned and sharpened most of them. Replaced a few broken handles. Most were still sharp and mainly dirty and thankfully not much rust.

Almost no two are the same. Different widths, sweeps, styles. I have them in my CE Jennings machinist box and overflowing on top and around the box and on a shelf above the box.

I need to start using them now, but just haven't found the time yet.
 

AEAdam

Well-known member
Joined
May 27, 2023
Messages
2,784
Location
SE PA
Some pics of the hoard 20250213_090434.jpg
That's not even all of them.
You officially ****.

Those 19th c Sheffield gouges, Addis particularly, have near mystical properties. The steel is extremely fine grained due to hand forging. The blade shapes are awesome. $250 would be a steal for 10 of them.
 

ararat

Well-known member
Joined
Dec 27, 2018
Messages
597
Location
Ararat NC
You officially ****.

Those 19th c Sheffield gouges, Addis particularly, have near mystical properties. The steel is extremely fine grained due to hand forging. The blade shapes are awesome. $250 would be a steal for 10 of them.

I have some W. Butcher firmer chisels and carpenters gouges from Sheffield that I use a lot and they get so sharp. They are different than modern chisels for sure.

These carvers get super sharp as well. A lot of the SJ Addis and JB Addis and Joseph Addis are from London before they moved to Sheffield.

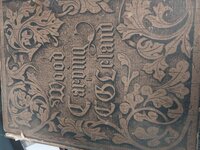
I have carved a few leaves into some scrap pieces of wood. I have spent way more time cleaning and sharpening than trying to carve. How did you get started? What books do you recommend? I've watched some Peter Follansbee videos on YouTube that seem helpful. I started a book by Leland but haven't gotten very far yet.
 

Attachments

  • 20250213_133050.jpg
    20250213_133050.jpg
    745.5 KB · Views: 4
  • 20250213_133109.jpg
    20250213_133109.jpg
    810.3 KB · Views: 4
Last edited:
To avoid these ads, REGISTER NOW!
Top Bottom