
You are using an out of date browser. It may not display this or other websites correctly.
You should upgrade or use an alternative browser.
You should upgrade or use an alternative browser.
Woodworking 101--Tools and Tips
- Thread starter jimreed2160
- Start date
ScottsGT
Well-known member
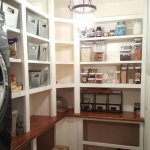
Scotts--Good that you are thinking ahead on the toy storage that can morph into storage for clothing. Just make sure that you make it safe. Those lids can be tough on little paws. Personally I like the idea of using transparent and stackable plastic storage bins for kid toys. Nut I also like the idea of making a traditional blanket chest.
Hey, if you're gonna be stupid, you better be tough!

When Dad built the kids boxes he used some quality hardware and closers that keep lids up until put down. Going to seek out the same hardware.
turbowoodworker
Well-known member
It is about smashed fingers but toddlers face a strangulation hazard as well with a heavy lid on the neck. That is why so many chests faced safety recall a number of years ago.
ScottsGT
Well-known member
This is similar to what Dad used.
https://www.rockler.com/box-lid-sup...xJA4la-iz09W8RNF7yzqN7XALEog6A1waAryMEALw_wcB
https://www.rockler.com/box-lid-sup...xJA4la-iz09W8RNF7yzqN7XALEog6A1waAryMEALw_wcB
acer66
Well-known member
Does anyone have some experience in making your own butcher block style kitchen countertop and its longevity?
Thank you
Thank you
jar944
Well-known member
Working on some filing cabinet sides in white oak
Attachments


OP
jimreed2160
Well-known member
Ace--Done correctly and treated well, a butcher block countertop should last a lifetime. But you should still use a cutting board. As for making it yourself, HD and others probably have something closeby that is already made and costs less than the raw wood you would have to purchase. Getting it flat is the issue and can be very hard without specialized equipment. Tell us more about your project.
jar944
Well-known member
Does anyone have some experience in making your own butcher block style kitchen countertop and its longevity?
Thank you
Do you actually mean end grain butcher block, or just wooden countertops?
Here is a wood countertop I did out of quartered sapele
Attachments

derosa
Well-known member
Only did a small (2x2ish), end grain counter which is what I think of when I think butcher block style. I wouldn't go much bigger than this as the movement across that size isn't bad but the movement across an 8' run wouldn't be fun, neither would gluing it or flattening it. If you mean the style like Jar944 shows than I've had them, didn't make it and they've held up just fine. Lumber liquidators had the best price when I was looking for a remodel for oak or maple.Does anyone have some experience in making your own butcher block style kitchen countertop and its longevity?
Thank you
acer66
Well-known member
Do you actually mean end grain butcher block, or just wooden countertops?
Here is a wood countertop I did out of quartered sapele
End grain butcher block is what I am after and that looks great.
What does the tape on your saw do?
acer66
Well-known member
Only did a small (2x2ish), end grain counter which is what I think of when I think butcher block style. I wouldn't go much bigger than this as the movement across that size isn't bad but the movement across an 8' run wouldn't be fun, neither would gluing it or flattening it. If you mean the style like Jar944 shows than I've had them, didn't make it and they've held up just fine. Lumber liquidators had the best price when I was looking for a remodel for oak or maple.
I was looking at lumber liquidators and they sell all sorts of butcher block counter tops but they are pricey
but you are right it seems quite an undertaking to make one.
The biggest I need is around 10’x2’1”.
OP
jimreed2160
Well-known member
Jar--That file cabinet is gonna look super.
Craptain
Well-known member
Check out IKEA. You will often be surprised by their prices.I was looking at lumber liquidators and they sell all sorts of butcher block counter tops but they are pricey
but you are right it seems quite an undertaking to make one.
The biggest I need is around 10’x2’1”.
Sent from my SM-G930T using Tapatalk
acer66
Well-known member
Check out IKEA. You will often be surprised by their prices.
Sent from my SM-G930T using Tapatalk
That is a great tip, thank you.
jar944
Well-known member
End grain butcher block is what I am after and that looks great.
What does the tape on your saw do?
Thanks, the tape helps with dust extraction.
I was looking at lumber liquidators and they sell all sorts of butcher block counter tops but they are pricey
but you are right it seems quite an undertaking to make one.
The biggest I need is around 10’x2’1”.
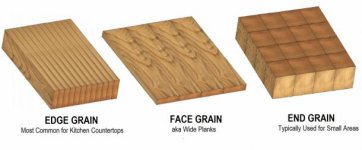
Lumber liquidators, ikea and 99% of the rest of places selling "butcher block counters" do not have end grain countertops.
Frankly I don't understand why they even call them butcher block (they are not.) At best they are wooden strip counters. Be that strip or wide plank (wide planks are more $) they are both functionally the same as a dining table top.
Real butcher block is all end grain, and in countertop form more fragile from a structure standpoint, not to mention more expensive and or labor intensive to produce. Total Stock needed is significantly higher from all the waste turning to sawdust. It's about double granite.
24x120 x 1.5 $1400 in pine ($70 sqft)
https://www.hardwood-lumber.com/countertops/end-grain-butcher-block-countertops/
Attachments

Last edited:
rlitman
Well-known member
...Lumber liquidators, ikea and 99% of the rest of places selling "butcher block counters" do not have end grain countertops.
Frankly I don't understand why they even call them butcher block (they are not.) At best they are wooden strip counters. Be that strip or wide plank (wide planks are more $) they are both functionally the same as a dining table top.
Real butcher block is all end grain, and in countertop form more fragile from a structure standpoint, not to mention more expensive and or labor intensive to produce. Total Stock needed is significantly higher from all the waste turning to sawdust. It's about double granite.
24x120 x 1.5 $1400 in pine ($70 sqft)
https://www.hardwood-lumber.com/countertops/end-grain-butcher-block-countertops/
Real end-grain butcherblock isn't 2" thick. And when it is more than a few times wider than thick, it has a nasty habit of splitting. You'd have to be nuts to use that around a sink, unless you start with something like acrylic stabilized wood, and then you're really just making a corian like solid surface that has a wood end-grain appearance at an astronomical cost.
jar944
Well-known member
Real end-grain butcherblock isn't 2" thick. And when it is more than a few times wider than thick, it has a nasty habit of splitting. You'd have to be nuts to use that around a sink, unless you start with something like acrylic stabilized wood, and then you're really just making a corian like solid surface that has a wood end-grain appearance at an astronomical cost.
I agree on all counts.
acer66
Well-known member
Real end-grain butcherblock isn't 2" thick. And when it is more than a few times wider than thick, it has a nasty habit of splitting. You'd have to be nuts to use that around a sink, unless you start with something like acrylic stabilized wood, and then you're really just making a corian like solid surface that has a wood end-grain appearance at an astronomical cost.
I think you just sank my battleship.
A friend of mine had an old very worn proper butcher block incorperated in his kitchen countertop which I really liked which give me the idea.
BMR24
Well-known member
I haven’t had much time for woodworking lately, but I think this counts as wood WORKING

OP
jimreed2160
Well-known member
BMR--That's a big pile. I guess it is one time when you are happy to see your ww projects go up in smoke.
OP
jimreed2160
Well-known member
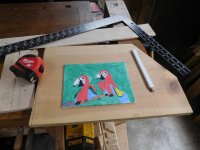
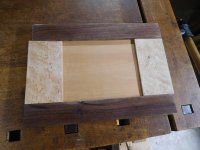
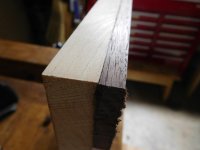
Frame project
My hand has finally recovered enough for some ww. A while back my granddaughter sent me some artwork. She likes to draw and paint pictures of animals and a recent trip to Hawaii inspired her.
Framing is a little challenging because it is acrylic on artists canvas board. I finally decided to use a capture frame with brass retaining pins. A trip to the scrap pile yielded some nice birdseye maple. I paired it with walnut. My plan is to glue the thick veneers on a board and then hang the board.
The maple was about 3/16 and uniform but the walnut was 5/4. I squared the edge on the bandsaw and then sliced off a 1/4 piece. With sticks in hand I moved everything around until it looked pleasing. Then I squared up the board and trimmed the pieces. Final trimming will be done after glue up.
Attachments


OP
jimreed2160
Well-known member
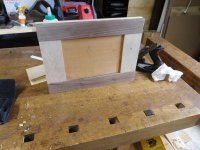
Frame
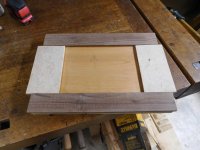
Everything was sanded down to 220 and the trial fit looked nice. It took a few clamps to glue everything down. I will remove the clamps tonight and then trim the board after it rests overnight.
It is great to be back in the workshop making sawdust.
Everything was sanded down to 220 and the trial fit looked nice. It took a few clamps to glue everything down. I will remove the clamps tonight and then trim the board after it rests overnight.
It is great to be back in the workshop making sawdust.
Attachments


OP
jimreed2160
Well-known member
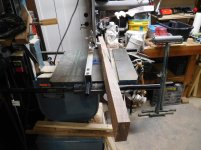
Frame trimming
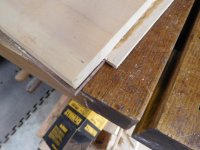
The football game today was not very interesting so I went out to trim the frame. So much for letting the glue dry overnight!
The sides were long grained birdseye maple but crossgrained pine and I trimmed them with the bandsaw. My blade does not have a heavy set and I was able to just kiss the end grain of the pine while trimming the maple. The top and bottom grain lined up so I used my #4 plane.
Attachments

OP
jimreed2160
Well-known member


OP
jimreed2160
Well-known member
Frame
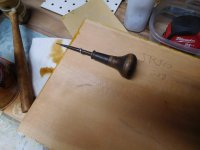
Well the poly comes later because I want to get this thing hung. First up is to attach the screw eyes. I use an awl to make a pilot and then use the awl as a lever to screw in the eye. My dad taught me that trick when we were hanging gates. He drilled a pilot in the post, threaded the hinge pin into it, and then used a closed end wrench as a lever. I was only ten at the time but I thought it was way cool.
So then I attached the wire to the eyelets. Next came a 5/16 hole provided by one of my Milwaukee diamond drill bits. I installed a screw and hung the picture in the kitchen under the work of another artist. Beth Darling was probably in her 40s when she painted the Fiestaware and Kaitlyn is 7. The pictures seem to go together.
So now I have one more project on the books. I did some cleaning and organizing in the shop. My bench is almost cleared and it sits ready for the next inspiration.
Attachments


OP
jimreed2160
Well-known member
ScottsGT
Well-known member
I picked up a very low time Jet bandsaw a couple weeks back. Finally got it tuned up and running right. Amazing how the previous owner had no idea how to set this thing up. Had to change out the tires as well. Some of you might have seen my thread.
Started making some of the bandsaw boxes for Christmas gifts for the wife and daughters. It's a pretty complex design, and large. I might have bit off more than I can chew, but it is one hell of a learning curve.
Paused long enough Saturday morning to make up a cross cut jig and a jig I can set the depth on and either cut the box backs off or a log. I was having a hard time getting my 1/8 blade to track properly, so I just now ordered a Carter blade guide for the small blades.
Finding a few other projects I must build as well. I think it's time to start looking for a good floor model drill press and a mortise attachment. Guy in the upstate has a big Delta with the attachment for $450. Tough call though, quite a long drive and not sure about condition.
madison069
Well-known member
Yea with the cooler weather I hope to get in the shop more often. I need to go through the furnace and make sure there's nothing to keep it from not working as I've never fired it up since I bought the place. Was planning to have the gas meter at the garage turned on soon so I better get at it!!
But on a wood project related question, what would you use to seal a live edge coffee table? I got several slabs of Norway Maple and they look nice, so I was going to turn them into a coffee table and maybe a doorway stand/table.
But on a wood project related question, what would you use to seal a live edge coffee table? I got several slabs of Norway Maple and they look nice, so I was going to turn them into a coffee table and maybe a doorway stand/table.
Bill Ramsey
Well-known member
I installed a screw and hung the picture in the kitchen under the work of another artist. Beth Darling was probably in her 40s when she painted the Fiestaware and Kaitlyn is 7. The pictures seem to go together.
Beautifully done. The maple adds a nice organic accent to the subject matter. Question: how did you attach the artwork to the frame? I don't see any visible fasteners on the edges.
OP
jimreed2160
Well-known member
Scott--Glad to see you are enjoying your new BS. Good luck on the DP.
Madison--I would pick off as much bark as possible from the live edge. It will eventually drop off anyway. Then I would coat with poly.
Bill--Thanks for your kind words. Mounting these canvas boards is problematic because almost everything covers up some of the edge of the painting. Stretched canvas on frame is easier because you can attach something to the wood frame in the rear. Anyway, this one is held in place by friction. The board is a little over 1/8 thick and the veneers on the front are about 1/4 thick. My intent was to drop the picture in the recess and pin it in place with small brass pins placed in front. At glue up time, I adjusted the pieces and made them as tight as I dared. Once the glue was dry and I did a test fit, the picture went in and held tight. No need for the pins. Sometimes you just get lucky.
ScottsGT
Well-known member
Looking at new drill presses currently, Northern has a 17" on sale for $600 right now. The quill measurement is 80mm.
One of the reasons I want to get this is to do mortise cuts. Problem is, I cannot find a jig that fits on a quill this large.
Any ideas or brands?
One of the reasons I want to get this is to do mortise cuts. Problem is, I cannot find a jig that fits on a quill this large.
Any ideas or brands?
OP
jimreed2160
Well-known member
I think the secret to good mortises is the quality of the chisel sets. Early on I sprung for a good set and honed them. Then almost any machine would seem to get the job done. I have had the Delta mortiser for years and really like it. There are lots of clones around for a little over $200. Any reason why you are so attached to using the DP?
ScottsGT
Well-known member
Actually reading up and watching videos on different meathods right now. Router and chisels looks like another good option
ez-duzit
Well-known member
How about a hollow chisel mortiser?
ScottsGT
Well-known member
How about a hollow chisel mortiser?
I think that what the drill press attachment is. Got a link to what you're referring to?
Craptain
Well-known member
https://www.acmetools.com/shop/tool...ageView:grid&minPrice:&maxPrice:&pageSize:24&I think that what the drill press attachment is. Got a link to what you're referring to?
There's less expensive ones available but this should give you an idea.
Sent from my SM-G930T using Tapatalk
ScottsGT
Well-known member
Ah, the complete machine. Little pricy for as few joints I think I'll be making.
OP
jimreed2160
Well-known member
HD has the little Wen. It looks like a clone of my Delta.
https://www.homedepot.com/p/WEN-5-Amp-Cast-Iron-Bench-Mortiser-with-Chisel-Bit-Set-43012/305967582
https://www.homedepot.com/p/WEN-5-Amp-Cast-Iron-Bench-Mortiser-with-Chisel-Bit-Set-43012/305967582
ez-duzit
Well-known member
I'd pass on the Wen.