To avoid these ads, REGISTER NOW!

Woodworking 101--Tools and Tips

topcok88

Well-known member
Joined
Jun 3, 2013
Messages
660
Finally got time in the shop!
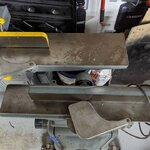
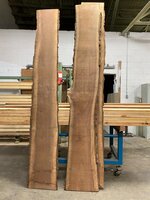
And turned these beautiful walnut slabs into boards for a mantle and floating shelves to go on either side of the fire place.

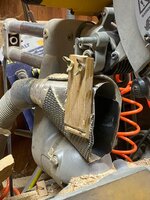
Cut the slabs down to manageable sizes to face joint (capacity is 12” wide) and boy was it a work out. Used my TS55 and a FS1400 and FS2700 track.

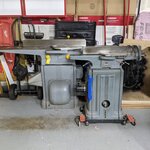
After face jointing I planed them down on the 24” planer to 7/8” thickness. And then onto the 36” wide belt sander to finish them out to 13/16” thick.

The picture isn’t all the slabs I used to all in I used about 57 board feet of material.

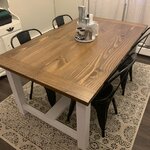
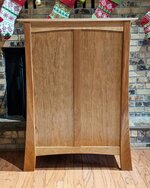
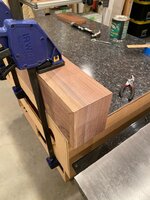
And then back to the basement where I cut the boards down to size for the mantle, threw some loose tenons in there and got the mantle into glue up. Still have to make four floating shelves and built ins with counter tops.

And I need a bigger shop. I’m running out of space down here.


b64b75202031999abb7420bd2745dde0.jpg
76167e9dd6402d7f3da1bab1eb3589f8.jpg
e1f0ebf602a9fc4c283235d5bdd0e6c0.jpg
7fbc6590226debebf978a8695e3f0e32.jpg


Sent from my iPhone using Tapatalk
 

Attachments

  • 76167e9dd6402d7f3da1bab1eb3589f8.jpg
    76167e9dd6402d7f3da1bab1eb3589f8.jpg
    144.6 KB · Views: 1
  • e1f0ebf602a9fc4c283235d5bdd0e6c0.jpg
    e1f0ebf602a9fc4c283235d5bdd0e6c0.jpg
    123.7 KB · Views: 1
  • 7fbc6590226debebf978a8695e3f0e32.jpg
    7fbc6590226debebf978a8695e3f0e32.jpg
    117.4 KB · Views: 1
  • b64b75202031999abb7420bd2745dde0.jpg
    b64b75202031999abb7420bd2745dde0.jpg
    130.9 KB · Views: 6
To avoid these ads, REGISTER NOW!

jonshonda

Well-known member
Joined
Jul 17, 2017
Messages
4,736
Location
Wisconsin
I was making some really simple card holders for our kids for playing UNO! I noted that the wood on my biesemeyer fence swelled up at the end and is causing some issues. I am thinking about replacing it with some 80/20 extrusion so I have some T track to play with.

Thinking that while 80/20 isn't cheap, the ability to attach a variety of things will pay dividends in the long run.
 

rlitman

Well-known member
Joined
Oct 18, 2010
Messages
24,596
Location
Long Island
I was making some really simple card holders for our kids for playing UNO! I noted that the wood on my biesemeyer fence swelled up at the end and is causing some issues. I am thinking about replacing it with some 80/20 extrusion so I have some T track to play with.

Thinking that while 80/20 isn't cheap, the ability to attach a variety of things will pay dividends in the long run.


I’ve seen fence kits made from aluminum extrusion. It looks great.
 

Ray-CA

Well-known member
Joined
Jan 6, 2007
Messages
3,451
Location
San Diego CA
I've started turning pens and know that I can turn wood blanks at high speeds. But what about acrylic blanks? And, should I drop the rpm's when sanding/polishing?

Thanks,

Ray
 

rlitman

Well-known member
Joined
Oct 18, 2010
Messages
24,596
Location
Long Island
Acrylic can be more brittle than wood, and anything that produces heat (sanding) can melt it. It’s a little weird to work with.
 

Dave455

Well-known member
Joined
Mar 19, 2013
Messages
5,805
Location
Sussex, England
I've started turning pens and know that I can turn wood blanks at high speeds. But what about acrylic blanks? And, should I drop the rpm's when sanding/polishing?

Thanks,

Ray

Yes, I would drop the speed right down.

The biggest problem is overheating, so start with a steel tool bit (doesn’t even need to be HSS) and get it really sharp.

I have tool bits that I use just for acrylic and nothing else.

Keep the speeds low and the feeds relatively high. If you get it wrong you will see it start to melt and you will know!

I’ve never sanded acrylic or Perspex. Get the best finish you can and then just polish. You can polish much faster but normally I don’t!
 

Lumpy102

Well-known member
Joined
Aug 26, 2012
Messages
207
Location
Ontario Canada
I turned a batch of pens from Corian countertop material, at likely 2000rpm, sanded to 1200 and a good rub with polishing compound, and they gleam really nicely
 

Ray-CA

Well-known member
Joined
Jan 6, 2007
Messages
3,451
Location
San Diego CA
Thanks for info. I've been using my carbide tools on it at about 2000-rpm, and they worked really well. Didn't think about heat etc. and finished the first acrylic pen by sanding, starting at 320 and stepping up until I was using 5000 wet. Then polished with Turtle Wax. Came out fine, but I'm new at synthetic work and looking for ideas....

Ray
 

Ray-CA

Well-known member
Joined
Jan 6, 2007
Messages
3,451
Location
San Diego CA
A little bit of what I've just starting doing about 10-days ago......

The ebony one has flutes on the top to mimic a thistle.
 

Attachments

  • pens.jpg
    pens.jpg
    100.1 KB · Views: 128

pkpk

Well-known member
Joined
Aug 29, 2020
Messages
64
Location
Midwest
I'm too new to post in the Deals forum so I thought I'd share this here, a pretty nice Black Friday sale still going on.

DEWALT 13-Inch Thickness Planer - Three Knife, Two speed, DW735X model
https://www.amazon.com/dp/B003OX9KME/?tag=atomicindus08-20

$499 plus free delivery if you have Prime. I signed up for an Amazon credit card to get another $100 off. Can't wait to have my own planer! Now to look for a jointer, or see how a jointer sled for the planer might work...
 

ez-duzit

Well-known member
Joined
Jun 24, 2013
Messages
5,099
Location
Marina del Rey
Adding a hatch to a sailboat for ventilation and illumination requires fabricating a flat boss, outside, on which to mount the hatch, as well as trim to create a finished look on the inside.

Here is one I made from teak. The inner vertical frame is carefully fitted to match the shape of the hatch. And the lower, horizontal frame carefully matches the crown of the overhead. If you look closely you can see how the joints have been reinforced with teak slip feathers.


ez-duzit

Well-known member
Joined
Jun 24, 2013
Messages
5,099
Location
Marina del Rey
Teak is a dream to work with. Though its slivers must be removed without delay. :)
It is extremely stable through seasonal changes. I use WEST epoxy exclusively for gluing.
 

jonshonda

Well-known member
Joined
Jul 17, 2017
Messages
4,736
Location
Wisconsin
I'm going to have some free time soon and will be working in the garage making some projects from pallets I tore apart a few years ago. I am concerned about dust collection from my old CM miter saw. Guessing that most miter saws throw off a lot of dust regardless, but wondering if any of the newer saws have better dust collection vs. just building a box behind the saw to collect dust.

I would prefer to not cut outside as it's cold out, but if that is the best option I could make it work.
 

PugetDude

ALLIANCE MEMBER
Joined
Mar 13, 2013
Messages
22,377
Location
Superstition Mountains, AZ
I'm going to have some free time soon and will be working in the garage making some projects from pallets I tore apart a few years ago. I am concerned about dust collection from my old CM miter saw. Guessing that most miter saws throw off a lot of dust regardless, but wondering if any of the newer saws have better dust collection vs. just building a box behind the saw to collect dust.

I would prefer to not cut outside as it's cold out, but if that is the best option I could make it work.

I've had limited success with removing the useless dust bag and hooking a shop vac directly up to the dust port. Cut slow and you'll catch a lot (but not all) of the sawdust.

If you're cutting MDF all bets are off. Nothing will contain the dust from that stuff. Festool and NASA working together would give up in frustration.
 

rlitman

Well-known member
Joined
Oct 18, 2010
Messages
24,596
Location
Long Island
I've had limited success with removing the useless dust bag and hooking a shop vac directly up to the dust port. Cut slow and you'll catch a lot (but not all) of the sawdust.

If you're cutting MDF all bets are off. Nothing will contain the dust from that stuff. Festool and NASA working together would give up in frustration.


Similar experiences here.

On my old DeWalt sliding saw, the dust port had a small 1.25” vacuum connector. Plugging in a shop vac to that only marginally reduced the dust output beyond what the bag was doing (which was hardly anything). Still, it’s better than bag alone, which clogs to the point of doing nothing after 3 cuts. The vacuum keeps the path clear.

What I’ve done to improve the matter is make my own over-sized dust chute to fit my industrial size hose. That gets probably 90% of the dust or more. But yeah, I don’t really cut MDF.

The metal is from a junk thermos that I found fit my hose cuff perfectly. Then I added some scrap treadmill belting.

877ad1df7a72e3548217e718dc0f0d5e.jpg
 

Attachments

  • 877ad1df7a72e3548217e718dc0f0d5e.jpg
    877ad1df7a72e3548217e718dc0f0d5e.jpg
    144 KB · Views: 5

mfg0772

Well-known member
Joined
Aug 8, 2018
Messages
146
Location
Northeast CT
My garage is both for my workshop and parking cars and misc. storage. I once made the mistake of ripping MDF on the table saw in there. I was the middle of winter and I didn't want to roll the saw into the driveway. I will never make that mistake again. Any time I cut MDF now, either on table saw or miter saw, I set up outside.
 

rrich1

Well-known member
Joined
Oct 7, 2015
Messages
793
Nice hatch ez.

It's been slow going on my chest of drawers build. I got the top cut and hand planed a chamfer on the underside to lighten it up. Also got all of the drawers made and and still getting them fitted. Not super happy with them so far. I just feel like these drawers haven't cooperated as much as my other chest of drawers I've made. Im the end they will be fine but not the fit and finish I would like. Reinforced the half dovetail joints with dowels.

Also upgraded my jointer. I have/had a short bed cast iron base delta. Selling it to a friend and got an 8" long bed pot belly delta jointer. Excited is an understatement as the short bed total length is the length of either bed of the 8". I am switch out the three phase motor for a single phase and will be doing a complete tear down this winter. My next project is cabinets after the chest of drawers so it seems like a good time to multi task and do the jointer.

Also made a farm house table for my sister for Thanksgiving. Simple enough project but makes me never want to work with box store pine again. b11c64e85ca3ac24f73ce711dfc6685e.jpg1a28de0a397750bbe8b273a92eaf3bcc.jpgf215e9071c6fb54f31cde32e94b94bb7.jpgd3a65fcece873cd548dd676a2b2541e8.jpg9aa932f0f22a429b99f9913b4b925a12.jpg72dd50d4f7180c25dd14fe2656cd533a.jpg

Sent from my Pixel 3 XL using Tapatalk
 

Attachments

  • d3a65fcece873cd548dd676a2b2541e8.jpg
    d3a65fcece873cd548dd676a2b2541e8.jpg
    119.1 KB · Views: 0
  • 9aa932f0f22a429b99f9913b4b925a12.jpg
    9aa932f0f22a429b99f9913b4b925a12.jpg
    353.6 KB · Views: 0
  • 72dd50d4f7180c25dd14fe2656cd533a.jpg
    72dd50d4f7180c25dd14fe2656cd533a.jpg
    336.4 KB · Views: 0
  • f215e9071c6fb54f31cde32e94b94bb7.jpg
    f215e9071c6fb54f31cde32e94b94bb7.jpg
    456.9 KB · Views: 0
  • 1a28de0a397750bbe8b273a92eaf3bcc.jpg
    1a28de0a397750bbe8b273a92eaf3bcc.jpg
    531.2 KB · Views: 0
  • b11c64e85ca3ac24f73ce711dfc6685e.jpg
    b11c64e85ca3ac24f73ce711dfc6685e.jpg
    567.2 KB · Views: 5
To avoid these ads, REGISTER NOW!

cgv69

Well-known member
Joined
Jan 11, 2012
Messages
1,033
Location
Boone Co., KY
Nice hatch ez.
Also upgraded my jointer. I have/had a short bed cast iron base delta. Selling it to a friend and got an 8" long bed pot belly delta jointer. Excited is an understatement as the short bed total length is the length of either bed of the 8". I am switch out the three phase motor for a single phase and will be doing a complete tear down this winter. My next project is cabinets after the chest of drawers so it seems like a good time to multi task and do the jointer.
Nice! I have the later version of that jointer (37-315 with the sheet metal base) that I restored years ago (same thing.. took it apart, converted it from 3-phase to single, refinished it, made a mobile base for it). Getting ready to convert it to helical style head soon.
 

rrich1

Well-known member
Joined
Oct 7, 2015
Messages
793
Nice! I have the later version of that jointer (37-315 with the sheet metal base) that I restored years ago (same thing.. took it apart, converted it from 3-phase to single, refinished it, made a mobile base for it). Getting ready to convert it to helical style head soon.
Nice. Don't suppose you have any extra handwheels lying around? [emoji1]

Sent from my Pixel 3 XL using Tapatalk
 

Notgrownup

Well-known member
Joined
May 5, 2014
Messages
5,886
Location
Snow Hill NC
My garage is both for my workshop and parking cars and misc. storage. I once made the mistake of ripping MDF on the table saw in there. I was the middle of winter and I didn't want to roll the saw into the driveway. I will never make that mistake again. Any time I cut MDF now, either on table saw or miter saw, I set up outside.

That stuff goes into everything everywhere every time... lol
 

cgv69

Well-known member
Joined
Jan 11, 2012
Messages
1,033
Location
Boone Co., KY

jonshonda

Well-known member
Joined
Jul 17, 2017
Messages
4,736
Location
Wisconsin
Dialing my CM 113.xxxx table saw setup a little more today. The on/off button I installed should be MANDITORY on any table saw. Being able to shut the saw off with a bump from your thigh is a really nice feature when handling larger sheet goods.

8" casters are due to my storage requirements for the saw. It lives in the shed in my back yard, so transporting it is difficult with smaller casters.

20201209_175134 by Jon S, on Flickr
 

Bigblockyeti

Banned
Joined
Feb 1, 2018
Messages
2,550
Location
Upstate, SC
Dialing my CM 113.xxxx table saw setup a little more today. The on/off button I installed should be MANDITORY on any table saw. Being able to shut the saw off with a bump from your thigh is a really nice feature when handling larger sheet goods.

8" casters are due to my storage requirements for the saw. It lives in the shed in my back yard, so transporting it is difficult with smaller casters.

20201209_175134 by Jon S, on Flickr

Looks nice and from my experience, those cast iron wings are much better than the stamped ones my grandpa had on his C-man tablesaw. I do like the off button but I completely disagree with you that they should be mandatory, I would like to see them as an option but I'm already under siege from enough folks earning their paycheck from my taxes mandating what I must have, driving the cost up and up every time.
 

mfg0772

Well-known member
Joined
Aug 8, 2018
Messages
146
Location
Northeast CT
Dialing my CM 113.xxxx table saw setup a little more today. The on/off button I installed should be MANDITORY on any table saw. Being able to shut the saw off with a bump from your thigh is a really nice feature when handling larger sheet goods.

8" casters are due to my storage requirements for the saw. It lives in the shed in my back yard, so transporting it is difficult with smaller casters.

20201209_175134 by Jon S, on Flickr

Did you make that fence yourself? If so, mind sharing your plans? I'm particularly interested in how it works on the outfeed side.
 

jonshonda

Well-known member
Joined
Jul 17, 2017
Messages
4,736
Location
Wisconsin
JonsHonda, Your tall fence is AWESOME too. :bowdown::drool::bowdown::drool:

Thanks!

Looks nice and from my experience, those cast iron wings are much better than the stamped ones my grandpa had on his C-man tablesaw. I do like the off button but I completely disagree with you that they should be mandatory

The cast iron wings are nice, but the only issue I have found is that the fence I have slides along the surface of the table, and can get hung up on the wings sometimes.

With regards to my mandatory statement, the saw is so much more safe to use with a switch like that. Mostly due to its location, but also that large stop button is really really nice and use. When I was younger I worked for a car stereo shop, and processed hundreds of 4x8' sheets of mdf with a CM 113.*** saw (we really should have had a big powermatic with big off feed tables, but the owner was cheap). I can tell you that the placement and style of the switch I have on mine now is SOOOO much more convenient and safe then what came on that saw, it is easily worth 4x what I paid for the piece of mind alone.

Did you make that fence yourself? If so, mind sharing your plans? I'm particularly interested in how it works on the outfeed side.

Well, it is a hybrid of sorts. It started life as a Beisemeyer fence setup that was on another CM 113.*** saw I bought. But I really didn't like how flimsy the guide rails were on it, so I scrapped everything except for the actual fence itself. I work at a place that has a large inventory of steel on hand, so I went through what we had and made this setup. It is all very 8ga or thicker angle iron and rectangular tubing. The original fence from Beisemeyer is 14ga or thinner tubing sandwiched between 1/2 ply, with laminate. It must have gotten wet at some point, and was swelling up causing some obvious issues. So I replaced it with some 3/4" plywood from menards. I plan to put some T-track in it for featherboards, and for now I have left the outfeed side of the fence stock.
 

jonshonda

Well-known member
Joined
Jul 17, 2017
Messages
4,736
Location
Wisconsin
I put the table saw to work today. A few months ago I built a folding workbench from 3/4 plywood. I didn't have the time to put wood edges around it until today. I'm sure it's not good practice, but 2x4's are all I had.

I ripped the 2x4 in half, then put the dado's to work routing out a 3/4 x 3/4" dado. That seemed to be close to the limit of what the old girl could handle.

20201211_175544 by Jon S, on Flickr

This picture should tug at a few GJ heartstrings! All of the tools in the pic were purchased based on GJ discussion and leads. The curly strips on the floor are from a Stanley spoke shave.

20201211_183522 by Jon S, on Flickr
 

CRSINMICH

Well-known member
Joined
Aug 15, 2015
Messages
2,397
Location
Southeastern Michigan
Health issues and family concerns kept me away from the shop for some time. When I finally could do some work I decided to make this English style tool chest as a Christmas present for my 5 year old grand-nephew. It's a kid-sized version of the plywood chest that Chris Schwarz made. It was fun trying to scale things down. I enjoyed the build and the practice on hand tool techniques. The only power tool involved was a table saw to cut the 1/2" Baltic birch parts to rough size. The molding was done by hand using 1/2" poplar. I also made some tools to go in the chest. The joiner's mallet is a scaled down version of Paul Seller's mallet. The Try-square really is square. The 6" rule and the sanding block were reproductions of the first two projects I did in 7th grade wood shop - in 1963.
 

Attachments

  • Finished chest (3).jpg
    Finished chest (3).jpg
    104.6 KB · Views: 79
  • Finished chest (1).jpg
    Finished chest (1).jpg
    147.1 KB · Views: 78
  • Hand made tools.jpg
    Hand made tools.jpg
    120.1 KB · Views: 82
Last edited:

1Garageman

Well-known member
Joined
May 12, 2009
Messages
4,417
Location
Columbus, Ohio
I made a picture frame for one of our daughters pictures my wife and I wanted on the wall. I think I did a good job, and I proud of it.:rocker:

I am not sure though if it also needs some Polyurethane, or something else on it??


Screen Shot 2020-12-21 at 8.15.13 AM.jpg

Screen Shot 2020-12-21 at 8.14.52 AM.jpg

Screen Shot 2020-12-21 at 8.17.31 AM.jpg

Info: Sorry, I just wasn't comfortable show the picture of our three year old daughter, so her face is covered.
 

CRSINMICH

Well-known member
Joined
Aug 15, 2015
Messages
2,397
Location
Southeastern Michigan
I made a picture frame for one of our daughters pictures my wife and I wanted on the wall. I think I did a good job, and I proud of it.:rocker:

I am not sure though if it also needs some Polyurethane, or something else on it??


Info: Sorry, I just wasn't comfortable show the picture of our three year old daughter, so her face is covered.

What finish do you have on it now? You should be proud of your work. Those mitered corners look pretty good. That's hard to do.

You did the right thing by covering your daughter's photo. There is a lot of **** out there in cyberland.
 

rrich1

Well-known member
Joined
Oct 7, 2015
Messages
793
Finished the chest of drawers this week. Happy with how it turned out. Finished it with arm r seal and buffed it out. 99294915477bb0efefbfe4cbf70c1013.jpgb6a24f5869408ac250d024943d002664.jpg202884bb33e70f6751bc6ab844c12421.jpg35ce94f7a8483f760f6a54d4f6135040.jpg

Sent from my Pixel 3 XL using Tapatalk
 

Attachments

  • 99294915477bb0efefbfe4cbf70c1013.jpg
    99294915477bb0efefbfe4cbf70c1013.jpg
    492.5 KB · Views: 4
  • 202884bb33e70f6751bc6ab844c12421.jpg
    202884bb33e70f6751bc6ab844c12421.jpg
    534 KB · Views: 3
  • b6a24f5869408ac250d024943d002664.jpg
    b6a24f5869408ac250d024943d002664.jpg
    471.3 KB · Views: 2
  • 35ce94f7a8483f760f6a54d4f6135040.jpg
    35ce94f7a8483f760f6a54d4f6135040.jpg
    232.2 KB · Views: 2

CRSINMICH

Well-known member
Joined
Aug 15, 2015
Messages
2,397
Location
Southeastern Michigan
Lee: I'm sure your mother liked the spoon cabinet. That was a nice present. I've never built anything with bubinga. How is it to work with?

I have to admit to being a bit puzzled by spoon collections but I'm sure your mother would be puzzled by my vise collection.
 

LeeG

Well-known member
Joined
Nov 29, 2012
Messages
1,525
Location
Phoenix, AZ
Lee: I've never built anything with bubinga. How is it to work with?

It machines well, but is very hard. Make sure you have a recently sharpened blade in you saw. Here are some wood hardness's (Janka) for comparison:

1450 Hard Maple
1820 Hickory
2410 Bubinga
2520 Purpleheart
2760 Osage Orange

Lee: I have to admit to being a bit puzzled by spoon collections but I'm sure your mother would be puzzled by my vise collection.

I'm with you on that.
 
To avoid these ads, REGISTER NOW!
Top Bottom