
OP
jimreed2160
Well-known member
My favorite handplane
Well, it's 49 freekin' degrees in the workshop so production has slowed down substantially. Time for some tool talk where I will introduce my favorite handplane. It was one of my first rehab projects and it turned into one of my favorites.

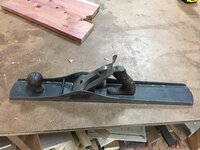
I think this is a #4 size Type 11 Stanley Bailey bench plane that was made around the time of WWI. It arrived as a rusty mess with a sewing spool as a front knob. I knocked the rust off of it, paying special attention to the corrugated sole. I reglued the cracked tote and made a new knob from some scrap walnut. It has one of my first bench plane blades in it and I later replaced the lever cap with a user made brass one. My friend the engraver added a little bling to brass lever cap.


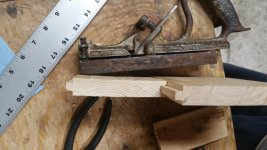
Original Stanley blades range from 1/16" to 5/64" thick. I make mine 6/64" so they are a little stiffer. It is a compromise thickness that does not require opening the mouth or fiddling with the adjuster.


The difference in thickness is hard to see at first, but it does make a difference to me. Thicker blades just work better because they do not vibrate and cause chatter. The problem is that Stanley Bailey planes are made specifically for thin blades. Some aftermarket blades are 7/64" or even 1/8" and require opening the mouth of the plane with a file. An additional problem is that the thicker blade sometimes keeps the adjuster yoke from engaging the chipbreaker. The solution, of course, is a custom chipbreaker. If you purchase an aftermarket blade, be sure to also purchase the chipbreaker with it.
But back to my plane. I like it because it works so well.

Who would not like shavings like that???
Do you have a favorite handplane?
Well, it's 49 freekin' degrees in the workshop so production has slowed down substantially. Time for some tool talk where I will introduce my favorite handplane. It was one of my first rehab projects and it turned into one of my favorites.
I think this is a #4 size Type 11 Stanley Bailey bench plane that was made around the time of WWI. It arrived as a rusty mess with a sewing spool as a front knob. I knocked the rust off of it, paying special attention to the corrugated sole. I reglued the cracked tote and made a new knob from some scrap walnut. It has one of my first bench plane blades in it and I later replaced the lever cap with a user made brass one. My friend the engraver added a little bling to brass lever cap.
Original Stanley blades range from 1/16" to 5/64" thick. I make mine 6/64" so they are a little stiffer. It is a compromise thickness that does not require opening the mouth or fiddling with the adjuster.
The difference in thickness is hard to see at first, but it does make a difference to me. Thicker blades just work better because they do not vibrate and cause chatter. The problem is that Stanley Bailey planes are made specifically for thin blades. Some aftermarket blades are 7/64" or even 1/8" and require opening the mouth of the plane with a file. An additional problem is that the thicker blade sometimes keeps the adjuster yoke from engaging the chipbreaker. The solution, of course, is a custom chipbreaker. If you purchase an aftermarket blade, be sure to also purchase the chipbreaker with it.
But back to my plane. I like it because it works so well.
Who would not like shavings like that???
Do you have a favorite handplane?


")


