
You are using an out of date browser. It may not display this or other websites correctly.
You should upgrade or use an alternative browser.
You should upgrade or use an alternative browser.
Woodworking 101--Tools and Tips
- Thread starter jimreed2160
- Start date


OP
jimreed2160
Well-known member
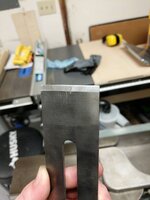
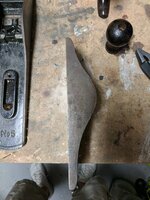
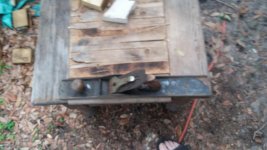
rrich--The blade looks good. But now I have so many questions. How did you do it. The guide looks wet. Did you use a waterstone or is that a diamond plate in the fuzzy background?
??? ???
???
???
???lostmymanual
Well-known member
I could use a Veritas Jig. I got sucked into the Worksharp bandwagon. Problem is that they spin too fast to keep the heat down unlike hand sharpening. The only good thing about them is that they keep cheap stainless blades in decent shape.
My brother in law borrowed my chisels. Evidently he decided to use a framing hammer and pry things apart with them. When he brought them back, the edges looked like hacksaw blades. Every one of them over 1" needs to be taken down to a new edge. Evidently the small ones didn't look like good enough pry bars for him to bother with, so I've been making due with them until I get around to fixing the chisels he jacked up. At least they were only Craftsman. I would have been really mad if he would have brought back my mortise chisels looking like hack saws. There could have been a death in the family...
I chalk it up to a lesson learned. I now know better than to assume someone who took wood shop classes back when it was mandatory would know how to use a chisel for its intended purpose.
My brother in law borrowed my chisels. Evidently he decided to use a framing hammer and pry things apart with them. When he brought them back, the edges looked like hacksaw blades.
Every one of them over 1" needs to be taken down to a new edge. Evidently the small ones didn't look like good enough pry bars for him to bother with, so I've been making due with them until I get around to fixing the chisels he jacked up. At least they were only Craftsman. I would have been really mad if he would have brought back my mortise chisels looking like hack saws. There could have been a death in the family...I chalk it up to a lesson learned. I now know better than to assume someone who took wood shop classes back when it was mandatory would know how to use a chisel for its intended purpose.
Last edited:
I used diamond stones and a piece of 100 grit sandpaper. I only have coarse and extra fine diamond stones and the coarse was taking forever. Switched to the sandpaper and it went a lot faster. I just placed a large sheet on the diamond stone for flatness and it worked fine. Yes it is wet. I use water on the stones.rrich--The blade looks good. But now I have so many questions. How did you do it. The guide looks wet. Did you use a waterstone or is that a diamond plate in the fuzzy background?
???
Sent from my Pixel XL using Tapatalk
OP
jimreed2160
Well-known member
Lost--Grrrr. I feel your pain about the chisels. I keep beater tools around for lending. With those, I don't even care if they come back. As for the other stuff--**** on it. They are staying in my mitts.
rrich--Thanks for the details on sharpening. I am a sandpaper guy myself. No guilt when it gets loaded and tossed.
As for my woodworking today, I missed out on a cool day running errands for the Queen. But I did manage to get by Lowes while I was out. I needed to dip a plane sole and it seems that the 3" pipe that is great for flat sided Bedrocks is just a touch too small for a common #5. So it is time to kick up to a 4" pipe. They had 6 ft pieces only.

The largest plane, a #8, is 24" long so I cut the pipe at 26". The Disston D-8 made the cut in less than a minute. But it did smell funny. I glued the end cap on it but forgot to get a coupler for the other end. Well, that means another trip tomorrow. BUT I have to cut grass tomorrow.
Life is seriously getting in the way of my shop time.
rrich--Thanks for the details on sharpening. I am a sandpaper guy myself. No guilt when it gets loaded and tossed.
As for my woodworking today, I missed out on a cool day running errands for the Queen. But I did manage to get by Lowes while I was out. I needed to dip a plane sole and it seems that the 3" pipe that is great for flat sided Bedrocks is just a touch too small for a common #5. So it is time to kick up to a 4" pipe. They had 6 ft pieces only.
The largest plane, a #8, is 24" long so I cut the pipe at 26". The Disston D-8 made the cut in less than a minute. But it did smell funny. I glued the end cap on it but forgot to get a coupler for the other end. Well, that means another trip tomorrow. BUT I have to cut grass tomorrow.
Life is seriously getting in the way of my shop time.
shortykorte
Well-known member
With the rain better get the grass cut or you'll be knee deep.
Sent from my iPhone using Tapatalk
Sent from my iPhone using Tapatalk
OP
jimreed2160
Well-known member
With the rain better get the grass cut or you'll be knee deep.
I was hoping the flash flood would wash it away but it just made it grow. I can sit by the window and watch it grow. My bamboo is loving the water.
drivesitfar
Well-known member
LMM: your brother in law sounds like mine and i haven't loaned him any of my tools in years now. when he comes up here i actually have a second rate set of tools he has access to if he's helping me. he's very handy and has a GET R DONE attitude and he does nice work, but more than once i've seen his table or miter saw sitting in the back of his pick up in the rain.
i like your french cleat tool hangers and your shop and looking forward to seeing some of your projects.
Jim: rain and sunshine make the grass grow like a weed if you ask me cause i hand mow my yard now 3 times a week. we set a record for rainfall here in the PNW from September to May that broke all the total rainfall records since they started recording them. i know there weren't many days in February, March and April that it didn't rain and half of May too.
I thank you for posting up all those knobs cause i know i've picked up a few at sales and weren't exactly sure what they were for.
Teen: thanks for the 411 on the cool wood clock finish and yes your right about the fact that we are all going to die some day, but let's have some fun and learn something in the meantime. WELL DONE on your projects and is your little 11 year old brother still liking using the lathe and woodworking too?
ALL: if nobody wants to start and maybe host a thread on just WOOD 101 i will or i'd love it if one of you that knows a lot more would. my gramps was a logger and he'd haul home and mill old growth cedar, fir, pine and all sorts of cool wood, but he retired and sold off most of his stuff before i bought my home 30 years ago so i don't have much if any of it now. i was thinking there is enough information about how to choose different types of wood along with stains and so on that it might deserve it's own thread. thoughts?
Attachments


not mine, but I found this pretty neato
https://imgur.com/r/DIY/rpv2z
https://imgur.com/r/DIY/rpv2z
Teenager with old tools
Well-known member
Teen: thanks for the 411 on the cool wood clock finish and yes your right about the fact that we are all going to die some day, but let's have some fun and learn something in the meantime. WELL DONE on your projects and is your little 11 year old brother still liking using the lathe and woodworking too?
Yeah he's still lovin it he's made a few pens himself on it and helped with the three rolling pins I've made. Made two maple ones 18" long that are one piece, one went to stepmom one to my great aunt and great grandma who visited for my graduation and then we made mom one out of laminated poplar and red oak drilled hold through for brass rod and put maple handles on it. Hole isn't quite straight because the tailstock on my machining lathe isn't quite accurate but it's more accurate than the chuck adapter that's currently on my wood lathe.
 that blue pen he made out of acrylic, we were in rockler walking around and he found the blank broken in three pieces so naturally he goes up to employee and asks if he can have it because he found it broken, guy goes to back room and few minutes later came out and handed it to my brother. So when we got home we used epoxy to glue it together then cut and drilled holes for a pen. The other one is just black walnut that I had ordered he made.
  here's moms rolling pin that we made her for Mother's Day. I'm working on making a pair of candlesticks now
 Sent from my iPhone using Tapatalk
Attachments


OP
jimreed2160
Well-known member
Teen--You and your brother are turning out some good stuff. Keep it up.
OP
jimreed2160
Well-known member
My day was taken up with grass cutting and errands. I did have time to visit the shop. It was not pretty.
Remember when I said that I thought any idiot could glue PVC pipe? Well, I still think that. And I also think that it takes a SPECIAL idiot to glue up a weepy joint. In my haste to slap on the bottom cap, I did not use enough dope or did not clean enough and ended up with a weeper. In all, I lost only a few drops but it does mean that I have to do it all over. I guess the first pipe will find its way into shop storage. Looks like a nice place to keep rods.
I did swing by HD to pick up another rolling tool box. Slapped the wheels on it in the blistering sun. Good for me that I had my PC driver--zip-zop and all 18 bolts went in tight. I think it took about two minutes. Pictures later.
Tomorrow is the big run to Georgia to pick up the rescue sister kitties. At just under 600 miles, it looks like a really long day. Holding my fingers crossed and hoping all goes well.
@jimreed good luck on the drive.
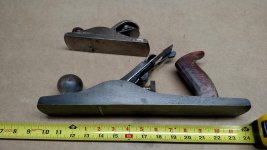
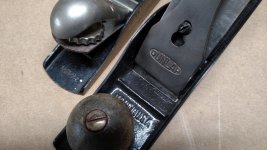
I got a Stanley sweetheart #4 plane 1925-1928 to restore for a father in law gift. I had a wardsmaster #5 I'm going to pair it with as well for him. I'll keep the Sargent I just redid along with the newer record for my use. The wards was already in great shape. Just cleaning it up a little and getting the blade done right. The Stanley is a little worse off but should clean up well.


Sent from my Pixel XL using Tapatalk
I got a Stanley sweetheart #4 plane 1925-1928 to restore for a father in law gift. I had a wardsmaster #5 I'm going to pair it with as well for him. I'll keep the Sargent I just redid along with the newer record for my use. The wards was already in great shape. Just cleaning it up a little and getting the blade done right. The Stanley is a little worse off but should clean up well.
Sent from my Pixel XL using Tapatalk
Attachments
-
 821f5dd873c5b8a9327138ef7a3391a4.jpg41.3 KB · Views: 0
 -
 8ef3ae716b61ae7cb2ac6a56df4f2552.jpg30.1 KB · Views: 0
 -
 2261b1832fec5f2fe26f47e1c7e8ced0.jpg37 KB · Views: 0
 -
 06830530fe4b18de149673376c5b90aa.jpg148.8 KB · Views: 0
 -
 4ee52a7b2610d38486bf759e2077f9f8.jpg115.6 KB · Views: 0
 -
 b72fdeef7e179c04f0608451b38c39a9.jpg113.9 KB · Views: 0
 -
 b9852a28d25c5ba28aa05832146afae7.jpg129.8 KB · Views: 0
 -
 4b117cac56899586e2d1c2a7c088ebfd.jpg87.5 KB · Views: 1
Last edited:
OP
jimreed2160
Well-known member
rrich--Nice looking planes and GREAT restorations. I love those low knob #4s. Everything fits well and they pull nice shavings.
Teenager with old tools
Well-known member
Teen--You and your brother are turning out some good stuff. Keep it up.
Thanks
 he's makin a bowl slowly but surely. Started with 4x4x2 pieces of wood cut them in fourths and are gluing them together. Once the glue dries on big section plane top and bottom then glue them together and then it'll be time to start turning his bowl.
  made this letter opener for my grandpa earlier.
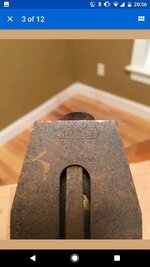
  found this for a buck no name says tool steel made in USA hardened and ground would anyone here have any idea when these were made and by who? I love the look of it it's gonna get some use.
 In next few weeks stepdad is gonna help me help my dad make a workbench. Top will be laminated cherry 1x1s so that will be posted up here through the process
Sent from my iPhone using Tapatalk
Attachments


OP
jimreed2160
Well-known member
Teen--Can't wait to see your bench build. Maybe it will inspire others to begin. WW is very difficult without a good bench. As for your chisel--bad news is that it looks like 1950s vintage when handtools were out of favor and hence not very high quality. But you never know. Clean it up and sharpen it. Sometimes these old tools have surprises.
Can anyone here identify this hand plane?
http://www.ksl.com/classifieds/listing/44589747
I'm still new to hand planes, so I can't identify a maker or whether it's even complete or not.
http://www.ksl.com/classifieds/listing/44589747
I'm still new to hand planes, so I can't identify a maker or whether it's even complete or not.
Guess I'll just jump in and catch up when I can.
I'm just getting back into woodworking after being away from it for years.
As a young boy I grew up around woodworking in various forms, from cutting down trees, building the odd building or functional wood creation, and working on the old Victorian house I grew up in with my Grandmother believe it or not.
Not to say its hard to believe I grew up in a house with my Grandmother, but she was the one doing the work - and in her late 60s early 70s to boot.
We were moderately poor and back in those days it was still common to tear old houses down piece by piece and we did that on several occasions, saving all the wood and bringing it home.
If you have never torn a house down and saved all the wood, I can tell you its a lot of work. Quite an experience really looking back at it, didn't seem unusual at the time though.
Later I worked remodeling and construction for a couple years. L
Somewhat later I worked building some basic functional furniture in a shop, jigs, tools and what have you.
Later still I worked building and later designing custom cabinets - really semi-custom I guess. We built them from scratch to fit, with a few options like arched panels, painted or finished, and had upgrades available, lazy susans, appliance garages, chefs pantries, entertainment centers, pull outs, that kind of thing.
In between these times I worked as a mechanic and eventually went to that completely.
Now, flash forward 20 or better years later I'm getting back into it, partially because I have to, partially because I want to.
I recently bought my first house after a largely misspent youth.
Its a pier and beam wood frame built in 1955, in Florida. Pretty much sitting on sand. Not sure why it hasn't fallen down yet, but it hasn't.
It needs quite a bit of work, and I was planning on paying somebody to do a lot of it, as I haven't done this kind of thing in a long time, didn't have the tools and not a lot of free time besides.
Well, the recommended guy I hired to level and fix part of my foundation basically lied and ripped me off more or less. Didn't do what he said he was going to, and what he did do, he did badly.
I was able to find an old friend who owns a small construction business and he was able to fix what the last guy did and level up another section for me for a really reasonable price. Oh, and cut off the huge branch hanging over the house - that baby would have destroyed the place if it ever fell.
One room that was a porch that was later enclosed still need to be leveled and has some rotten beams. I had to slap a quick 3/4 subfloor over the existing wooden board floor before I could really move in and use it - the way closing and moving went, I had 2 days to do that and also put another 3/4" layer in the poorly built shed out back.
After some consideration I decided with what I paid between those two, I could have bought the tools and done it myself and still been way ahead.
Probably would still have had somebody else do the main part of the jacking like I did though, not quite an emergency situation, but definitely something that needed done sooner rather than later.
The enclosed porch, which we use as a laundry room I will have to do myself. Its on the low side of the house and no way to get under it from outside without digging some access holes. Doesn't seem like a good idea given all the piers are on sand.
So given the shape of the floor anyway, I will eventually pull it up and fix the foundation from inside, then refloor.
Along with this the house has wooden siding (novelty, 105, shiplap, whatever you want to call it, seems to depend on where you are and who you are asking.) in rough shape.
Several windows need replaced, and a couple doors, some other soft spots in the floor, but not too bad, those can wait, plus the house has no built in storage at all, and it needs some badly - @ 1200 sqft btw.
So I've decided to gear up and do this myself as I get time now that I don't have anything I feel like is in need of desperate repair.
So I started buying tools, I had a few woodworking tools, but not many. I also started buying some materials.
The shed I mentioned earlier is about 10x18 and is packed with my home tool boxes for mechanical, and lawn equipment and what not, no room there. Extra space in the laundry room filled fast, and now I have a miter saw and its stand and a full size window sitting in the dining room, plus other odds and ends. The wife is pleased.
Became clear I need some kind of a shop, or at least a reasonable storage area. There is also a carport, 20' x 20' I thought I could close in fairly cheaply, that would work. But its a dirt floor, well sand floor with what they call asphalt millings on it.
So I figured I'd have a 20 x 40 slab poured, enclose the carport make it a shop and still have somewhere to park, then later get another 20x20 port and double the size of the shop.
I've done a little concrete work, helped on a couple of big pours even, enough to know I'm not going to try to pour a 20x40 by myself, (plus no concrete tools either) so I called around, $4800 is the best I could find, and that's too much to spend on a slab right now, plus given my previous experience with florida contractors I'm a little leery anyway.
Though the guy I had patch the roof did a good job, and was decently priced.
Anyway, that shed I mentioned has a lean to attached to it. Roughly 16x16. Meet the new shop.
It too was packed full of jun..., um stuff I have accumulated, metal benches and more odds and ends, plus the riding mower.
But... behind that is one of those portable greenhouse things. Was planning on just taking it down and giving or throwing it away, glad I didn't.
Packed all the lean to junk in there and went to work.
Honestly, even as a lean to it leaves something to be desired as a structure. Its too low, fairly crooked and out of plumb, square and most any thing else you can think of, complete with an roof out of used metal and joists, (sort of anyway) that are overspanned lengthwise. Only leaks from a couple of nail holes and one spot where they didn't meet the shed roof correctly.
Pretty humble but I think it will work.
I should probably have just torn it down and started over, same with the shed, but don't really have the money for that, and not practical to do by myself in my spare time either.
So a small woodshop it will be, warts and all.
Thus far I have it pretty much framed in, correcting what I can, added more posts set in concrete, and put down a paver/step stone floor. For some reason I figured it would be cheaper to use the 12x12 cheap concrete pavers from Home depot rather than trying to pour a concrete floor. Plus I figured it would be easier and more practical since I was working by myself.
Price actually came out about the same if you don't count labor, but man its a lot of labor. If I had it to do again I would figure out a way to get a concrete floor poured, whatever it took within reason or even a little unreasonable.
I wasn't really able to do the base like you should, I was afraid if I dug down very far the whole thing would collapse, so I basically framed it in with treated 2x4s and leveled it more or less. Then packed in by hand about 1 1/2 to 2 inches of crushed concrete, and then used some fine bagged sand to make finish leveling the block a little easier.
I do not recommend this method either, I'm getting old and it damn near killed my back to get about 2 rows in. I broke down and hired the 19 year old kid from work to help me. I gave him $100, helped him where I could and we slapped them down in a day.
He did pretty good at first, but it was slow. Later I got less picky and let him go more or less, only making him redo the worst few as they went down. Not perfect, not even good really, but acceptable - I got a floor now anyway.
Pretty much all this has been a long winded background - hopefully shop oriented guys will find it mildly interesting.
I bought the basic stuff I need new, Skill saw, compressor, nailgun, miter saw and rolling stand, etc....
The bigger machines I am searching for on Craigslist.
So far I have bought an old Grizzly z series table saw, the upgraded model with the angle rails and shop fox fence. Has extensions wings and router insert. Have to replace the fence face soon, and tune it up later, but was an ok deal for $400. Came with a router and some bits and a sliding tennon jig that's pretty heavy duty.
I also found a really old Ryobi 10" planer for $75. Came with an extra set of blades, if I remember right these were the first portable planer available. So its pretty old, but looks like it hasn't seen a lot of use, sounds fine running, but I haven't planned anything yet.
Will have to make a jig to set the blades, this planer uses a kind of odd system and the factory jig is missing. Shouldn't be too hard once I'm set up.
Right now I am looking for a good deal on a drill press, but if I don't find one before I actually need a press (and have somewhere to put it other than the dining room) I will probably get the 17" harbor freight press for $400 with the 25% off coupon. Seems to get ok reviews.
I really want to build Matthias Wandel's wooden band saw, and will make it one of my first big projects in the shop, but will probably pick up a cheap small one to use in the meantime.
If you haven't checked out Wandel's u-tube channel, its pretty cool.
Anybody here built one of his saws?
Only had a few minutes before the kids joint bday party today and then now work. Took the Stanley plane parts out of the PB blaster and rinsed them off. Took about 2 minutes of cleaning on the bench grinder to clean up the entire blade. Just did one side of the cap to show the difference. Will work on them more this week. 


Sent from my Pixel XL using Tapatalk
Sent from my Pixel XL using Tapatalk
Attachments


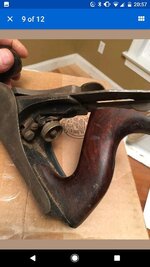
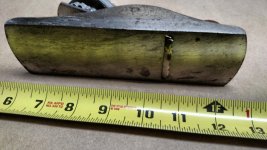
I recently picked up a Dunalp (#5-1/2 equivalent?) and what was sold as a Stanley 110 (although I see no Stanley on it). Both plane blades as shown in the photos seem to be set for taking quite a lot of material, 1/16 at least. I left them that way to ask; is it common for planes of many different sizes to be used for that much removal at a time? I would somewhat expect it out of the bigger jack but the 110 is more intended for smoothing after most of the planing is done by bigger planes right?
So my several questions;
on the Dunlap tote, I prefer to fill the gouges then sand it smooth and follow your earlier posts for tote finishing, rather than sanding it down smooth and refinishing. It has a really good feeling and I feel like it won't be as good thinner.
Should I care about the little hole on the Dunlap sole?
Is this a Stanley 110, some other Stanley, some other 110, or what? It looks like it could be a 102 but I would have expected to see Stanley somewhere on the body. For $10 shipped, I don't care that much so long as it works.
bevel up vs bevel down? Different for different manufacturers, types of planes, or user preference? If one of these is supposed to be bevel up or down, please let me know I'd rather follow how you'd do it than trust they were used properly before.
Thanks in advance.
Attachments

shortykorte
Well-known member
Welcome bdelmar2. The house is still standing because it's not full of hurricane straps and nails. Lol.
Also, a wood shop full of warts is better than no shop. I'll be looking out for the wood bandsaw build.
Sent from my iPhone using Tapatalk
Also, a wood shop full of warts is better than no shop. I'll be looking out for the wood bandsaw build.
Sent from my iPhone using Tapatalk
OP
jimreed2160
Well-known member
Can anyone here identify this hand plane?
http://www.ksl.com/classifieds/listing/44589747
I'm still new to hand planes, so I can't identify a maker or whether it's even complete or not.
That looks like a Stanley low knob (early and good) #6 fore plane. Well worth the asking price if it has no damage. It has a lateral so it had to be made after 1885. But is has a low knob and that dates it before the 1930s.
OP
jimreed2160
Well-known member
bdelmar--Interesting write up on your new house. Remember that we love pictures. Building a bandsaw would be an interesting project. Good luck with that.
rrich--Nice clean up on the plane. That could be a laminated blade--notice how the cutting end looks. There is a square end piece that was affected differently by the rust. You can scratch it with a scribe or file to see if it is harder than the other metal. Those laminated blades made during the SW period were da bomb. They take a good edge and keep it.
rrich--Nice clean up on the plane. That could be a laminated blade--notice how the cutting end looks. There is a square end piece that was affected differently by the rust. You can scratch it with a scribe or file to see if it is harder than the other metal. Those laminated blades made during the SW period were da bomb. They take a good edge and keep it.
OP
jimreed2160
Well-known member
cheechi--Nice planes. I like your plan on the tote. Removing tote wood is not good. I use light sandpaper (200 grit and above) if at all. As for the block plane, it was abused and that is why the blade is where it is. There is no way to use it correctly as a plane that way.
As for blade angle, if the bedding is 45 degrees, then the bevel goes down. If the bedding angle is greater than 45, the bevel goes up. Oh, you don't have a protractor to check? No problem. Take a square sheet of paper (must be exactly a square) and fold it diagonally. There's your 45.
As for blade angle, if the bedding is 45 degrees, then the bevel goes down. If the bedding angle is greater than 45, the bevel goes up. Oh, you don't have a protractor to check? No problem. Take a square sheet of paper (must be exactly a square) and fold it diagonally. There's your 45.
OP
jimreed2160
Well-known member
Shop kitties?
Well I was in the truck from 5am until 430pm and driving most of the time on my rescue mission. It was blistering hot on I-75 but the kitties were saved by the ac. I was fueled by a mixture of Pop Tarts, McD cheeseburgers, and Diet Coke. Here are the girls:


They are a pair of 2 year old rescue Birman sisters. Both of them have warmed up and are showing their Birman trait of being "annoying affectionate." The tie in to woodworking is that the previous kitty residence took after the door casings and I still have woodwork to repair. My job today is to make a scratching post.
Well I was in the truck from 5am until 430pm and driving most of the time on my rescue mission. It was blistering hot on I-75 but the kitties were saved by the ac. I was fueled by a mixture of Pop Tarts, McD cheeseburgers, and Diet Coke. Here are the girls:
They are a pair of 2 year old rescue Birman sisters. Both of them have warmed up and are showing their Birman trait of being "annoying affectionate." The tie in to woodworking is that the previous kitty residence took after the door casings and I still have woodwork to repair. My job today is to make a scratching post.
Cats are pretty cool, I used to have several calicos, some of which were free range shop cats.
They did on occasion seem genuinely interested in what was going on.
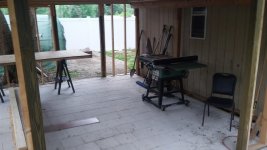
I did take a couple of pics to share. Please ignore the overgrown lawn. The guys who dumped the crushed concrete got it nice and close to the back door of the someday shop, which was nice, but unfortunately it also blocked off the temp green house thing where my lawn mower currently is.
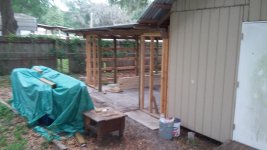
First one is approaching shed from house.
Second one is walking around front of shed.
This will be where the front doors are, almost 8' wide, initially I was just going to have the center section of the floor in front of the doors jutting out like a stoop, (they are also pitched out a little), so I could back my truck tailgate over them if necessary. But I had the odd pavers left over and they just about fill the two side areas. Still need some adjusting.
This will help me hide another wart from the original structure. They got their beam off center, at the front where you can see it here its out past the shed by 4 inches or so, and its set in that much or so in the back.
I'm going to bump out two storage areas on either side over where I have the pavers sitting now and put short metal roofing over them. Should let me seal everything up and not look quite so hideous, plus will give me some extra storage.
I was thinking about putting a dust collector in the nearest section, but its just too busy right there, plus I don't have a collector yet. Think I'll put it in the back later.
Third Photo:
Inside the shop (sort of). You can see the back door, its about 4' wide. The plan is to have the saw sit so I can rip a 16 footer if I have to, starting out the front door and ending out the back. The wider doors in front should let me rip a full sheet if I have to also.
You can see where he (my hired helper) did pretty good following the string lines starting out, but kind of drifted off and started following the ground later on because he started relying more on the previously laid stones instead of the line.
I saw it happening, and knew what it was going to do, but I let it go except where it got too bad. Otherwise we weren't going to get it done in one day and I really needed to see some progress. Plus his back was hurting him by this time, since he is only 19 I didn't feel so bad about how mine felt.
Can also see the Grizzly saw, I shouldn't have it sitting out like that I know, but I don't really have any other good place to put it, and I had him help me move it out of the shed before he left. Its pretty heavy for one person, I put it in the shed by myself which was no fun, so I took advantage of the help I had handy.
It was already a little rusty from sitting, and its been out there a couple weeks now and doesn't look any worse than it did, so I think I'm ok there.
The fence is faced with some cheap melamine faced particle board, which we used in the cabinet shop also, but its not good for Florida humidity. The end closest to the operator has swollen and pushed out. I just broke that section off with my fingers for now. I have a piece of fairly straight grained soft maple I may put on it to get by. Later when I start switching more from construction to cabinetry I will upgrade the fence or maybe get a new saw.
Oh, in the second photo you can see some of that new, or fairly new celluar pvc board. I'm going to run that around the outside bottom of the shop after cutting a bevel on the top. There is a lot of the t1-11 kind of stuff around here in florida and I always see it rotting where it comes close to, or meets the ground. My hope is the Pvc will form a moisture barrier that keeps water from wicking up and rotting the plywood.
You can see the headroom is pretty close in there, kind of an issue as I'm 6'2" almost 6'3". Definitely had an impact on how I went about the floor - that and you can see the front edge of the floor is just about at ground level, slightly over. Ground level is about 5 inches lower in the back corner, so had to build up there some.
Tight fit, but I can walk all around inside and not hit my head. I believe I can also get duct work in for a collector and lights. But first walls and electric.
I am currently running an extension cord out there, which I finally got lazy enough to just leave laying. I was rolling it out and back up every time I managed to get out there for some work. A 10 gauge 100 footer is pretty heavy at the end of a day though.
Good thing about this land is that it seems to drain really well. The last place I lived would flood with any amount of rain to speak of, and wouldn't drain for weeks - fairly common around here. I have yet to see any standing water here and nothing has gotten on my shop floor by running in from the front, but the rainy season is just starting so we will see.
Once I get some walls up and electric ran things will progress faster. I work a full time job so by the end of the day I don't have a lot of energy or time, or even on a lot of weekends. Right now by the time I get everything set up to do anything its basically time to start putting it all away.
The last picture is an old Stanley I have been hauling around for years. Its seized up now and needs work, but basically in good shape.
They did on occasion seem genuinely interested in what was going on.
I did take a couple of pics to share. Please ignore the overgrown lawn. The guys who dumped the crushed concrete got it nice and close to the back door of the someday shop, which was nice, but unfortunately it also blocked off the temp green house thing where my lawn mower currently is.
First one is approaching shed from house.
Second one is walking around front of shed.
This will be where the front doors are, almost 8' wide, initially I was just going to have the center section of the floor in front of the doors jutting out like a stoop, (they are also pitched out a little), so I could back my truck tailgate over them if necessary. But I had the odd pavers left over and they just about fill the two side areas. Still need some adjusting.
This will help me hide another wart from the original structure. They got their beam off center, at the front where you can see it here its out past the shed by 4 inches or so, and its set in that much or so in the back.
I'm going to bump out two storage areas on either side over where I have the pavers sitting now and put short metal roofing over them. Should let me seal everything up and not look quite so hideous, plus will give me some extra storage.
I was thinking about putting a dust collector in the nearest section, but its just too busy right there, plus I don't have a collector yet. Think I'll put it in the back later.
Third Photo:
Inside the shop (sort of). You can see the back door, its about 4' wide. The plan is to have the saw sit so I can rip a 16 footer if I have to, starting out the front door and ending out the back. The wider doors in front should let me rip a full sheet if I have to also.
You can see where he (my hired helper) did pretty good following the string lines starting out, but kind of drifted off and started following the ground later on because he started relying more on the previously laid stones instead of the line.
I saw it happening, and knew what it was going to do, but I let it go except where it got too bad. Otherwise we weren't going to get it done in one day and I really needed to see some progress. Plus his back was hurting him by this time, since he is only 19 I didn't feel so bad about how mine felt.
Can also see the Grizzly saw, I shouldn't have it sitting out like that I know, but I don't really have any other good place to put it, and I had him help me move it out of the shed before he left. Its pretty heavy for one person, I put it in the shed by myself which was no fun, so I took advantage of the help I had handy.
It was already a little rusty from sitting, and its been out there a couple weeks now and doesn't look any worse than it did, so I think I'm ok there.
The fence is faced with some cheap melamine faced particle board, which we used in the cabinet shop also, but its not good for Florida humidity. The end closest to the operator has swollen and pushed out. I just broke that section off with my fingers for now. I have a piece of fairly straight grained soft maple I may put on it to get by. Later when I start switching more from construction to cabinetry I will upgrade the fence or maybe get a new saw.
Oh, in the second photo you can see some of that new, or fairly new celluar pvc board. I'm going to run that around the outside bottom of the shop after cutting a bevel on the top. There is a lot of the t1-11 kind of stuff around here in florida and I always see it rotting where it comes close to, or meets the ground. My hope is the Pvc will form a moisture barrier that keeps water from wicking up and rotting the plywood.
You can see the headroom is pretty close in there, kind of an issue as I'm 6'2" almost 6'3". Definitely had an impact on how I went about the floor - that and you can see the front edge of the floor is just about at ground level, slightly over. Ground level is about 5 inches lower in the back corner, so had to build up there some.
Tight fit, but I can walk all around inside and not hit my head. I believe I can also get duct work in for a collector and lights. But first walls and electric.
I am currently running an extension cord out there, which I finally got lazy enough to just leave laying. I was rolling it out and back up every time I managed to get out there for some work. A 10 gauge 100 footer is pretty heavy at the end of a day though.
Good thing about this land is that it seems to drain really well. The last place I lived would flood with any amount of rain to speak of, and wouldn't drain for weeks - fairly common around here. I have yet to see any standing water here and nothing has gotten on my shop floor by running in from the front, but the rainy season is just starting so we will see.
Once I get some walls up and electric ran things will progress faster. I work a full time job so by the end of the day I don't have a lot of energy or time, or even on a lot of weekends. Right now by the time I get everything set up to do anything its basically time to start putting it all away.
The last picture is an old Stanley I have been hauling around for years. Its seized up now and needs work, but basically in good shape.
Attachments

@jimreed I'll check the blade later. I didn't know there were laminated blades.
Speaking of cats we are kitty sitting this week for my wife's co-worker. My kids are enjoying having it so far.
@bdelmar congrats on the new space.
I cleaned up the rest of the pieces last night after work. Will post a few pics later. Just need to sharpen the blade which is going to take a while just like the Sargent plane did.
Sent from my Pixel XL using Tapatalk
OP
jimreed2160
Well-known member
bd--Thanks for the pictures. I am liking the old cut off table beside the green tarp. Also really like your #7(?) plane. Time to get it unseized and put it back to work.
drivesitfar
Well-known member
RR: did you say you had your Stanley's blade in PB blaster? not sure i've heard of that being used to remove rust. interesting.
also when you say you used your bench grinder on it to shine it up i'm guessing you are saying you used a wire wheel and what type do you have if you don't mind snapping a picture? some guys use the loose wires that throw wires everywhere, knotted wires that don't throw as many wires, but take off a lot of material and brass wire wheels. do tell?
Jim: looks like you and the QUEEN have a couple new roommates. while you are making a scratching post are you going to make a tree or some carpeted shelves for the shop so they can hang out and watch you while you are teaching us and ORGANIZING?
they look scared and happy.
OP
jimreed2160
Well-known member
While the new arrivals are settling in, I need to get out to the shop. My mobile cart has been waiting. The plan is to free up the workmate.
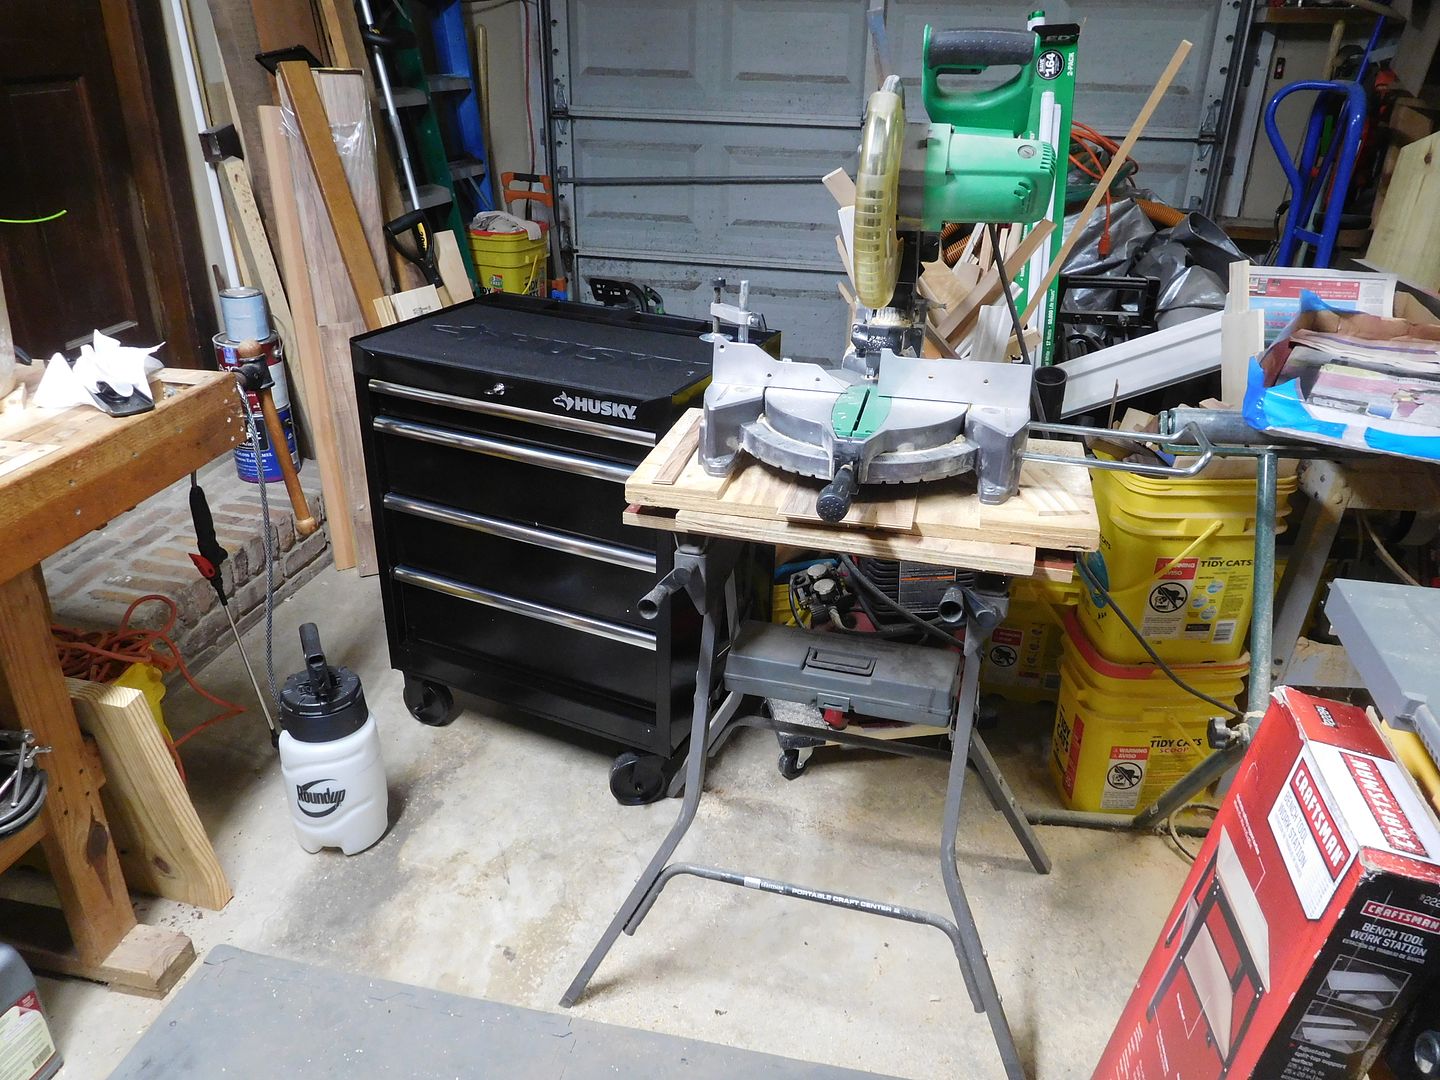
But first I need to protect the foam on the top surface. This is why I keep some of the large boxes--they make nice large panels that can be cut down for use.

I mark two dots--one near each end--and connect the dots with a large straightedge. Use the straightedge as a guide for the first cut. Then I just keep working until I break through. The point is to get a clean cut but not put marks on the good bench.

And here we go.
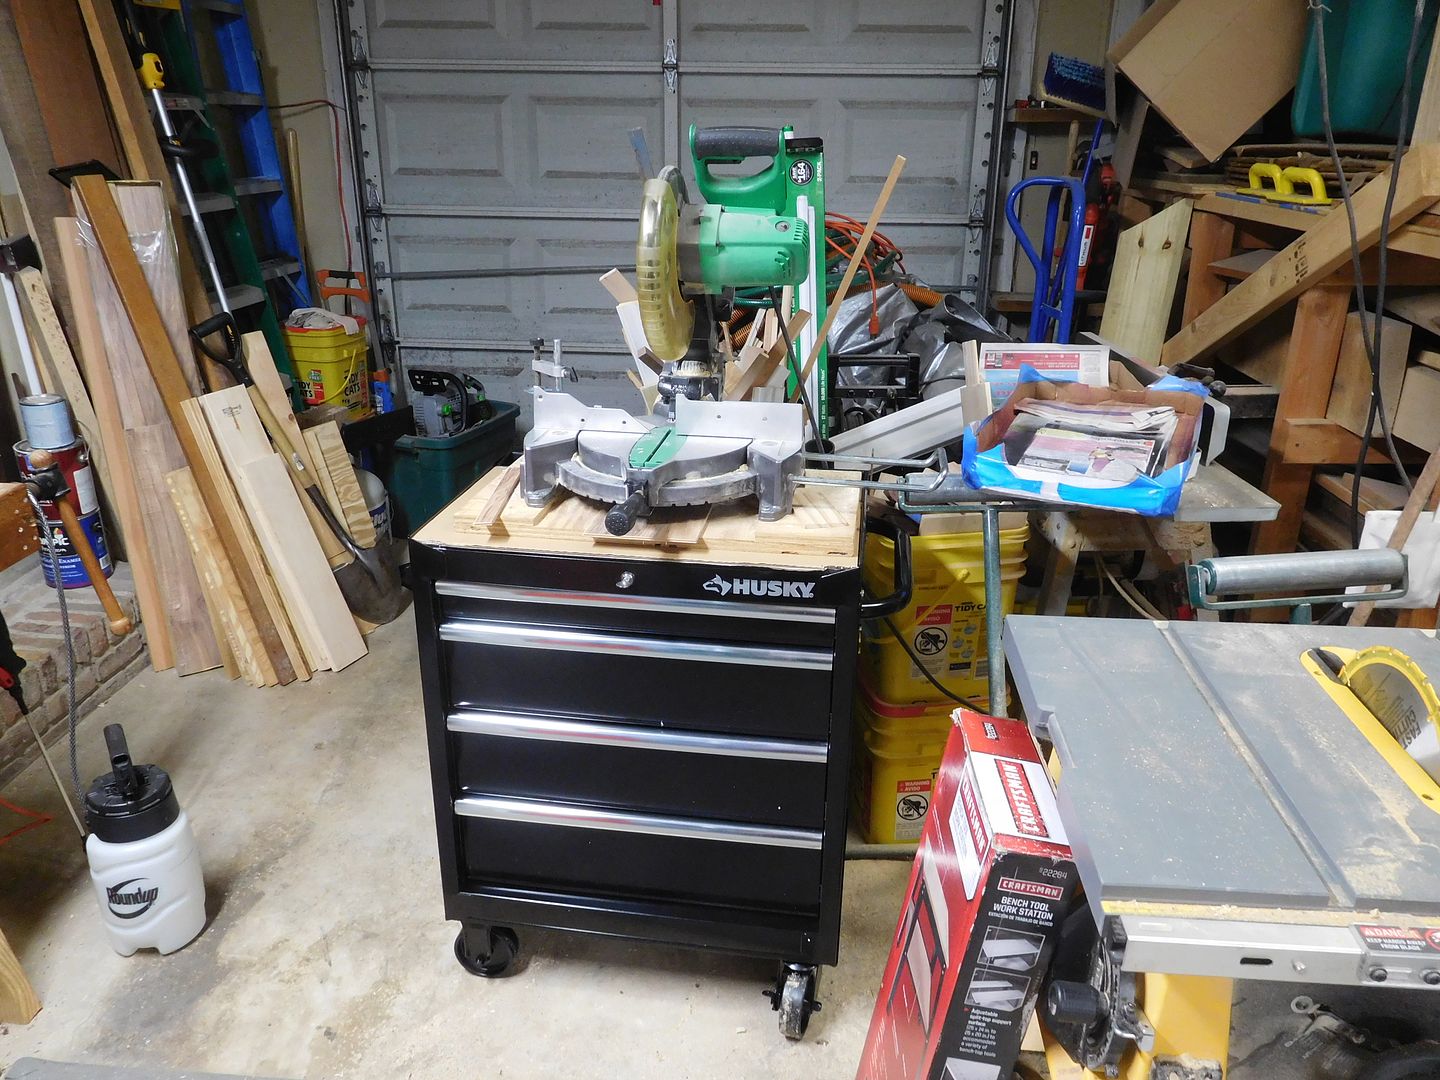
I might add some supports after I use it a bit. The chop saw gets frequent use but mostly for small stuff.
It is a bit unfortunate but the pegboard will have to stay where it is.

But this cart also came with a magnetic paper towel holder and I really need that.

Stick them on a box this way and now you have a dually!

Me like.
One of the cats has been scratching my jeans today. I am taking it as a project hint.
But first I need to protect the foam on the top surface. This is why I keep some of the large boxes--they make nice large panels that can be cut down for use.
I mark two dots--one near each end--and connect the dots with a large straightedge. Use the straightedge as a guide for the first cut. Then I just keep working until I break through. The point is to get a clean cut but not put marks on the good bench.
And here we go.
I might add some supports after I use it a bit. The chop saw gets frequent use but mostly for small stuff.
It is a bit unfortunate but the pegboard will have to stay where it is.
But this cart also came with a magnetic paper towel holder and I really need that.
Stick them on a box this way and now you have a dually!
Me like.
One of the cats has been scratching my jeans today. I am taking it as a project hint.
@drivesitfar: I do use itnto soak items in. Not sure how well it works but I think it works some. I also degrease them as well.
As for the wire wheel I use a loose wire wheel. With the different bolts and smaller pieces it flexes more to get I to the smaller areas of the pieces. I have a Craftsman block grinder I restored earlier this year (thread in the vintage tool section). It works great and makes like a lot easier to clean parts up with. I attached it to a flip top stand with my planer on the other side. No issues with locking castors.


Sent from my Pixel XL using Tapatalk
As for the wire wheel I use a loose wire wheel. With the different bolts and smaller pieces it flexes more to get I to the smaller areas of the pieces. I have a Craftsman block grinder I restored earlier this year (thread in the vintage tool section). It works great and makes like a lot easier to clean parts up with. I attached it to a flip top stand with my planer on the other side. No issues with locking castors.
Sent from my Pixel XL using Tapatalk
Attachments


Autonomous
Well-known member
- Joined
- Dec 26, 2015
- Messages
- 66
I really want to build Matthias Wandel's wooden band saw, and will make it one of my first big projects in the shop, but will probably pick up a cheap small one to use in the meantime.
If you haven't checked out Wandel's u-tube channel, its pretty cool.
Anybody here built one of his saws?
I somehow missed this past of your post and was going to recommend Matthias' page and his bandsaws when Jim said building one would be interesting.
Matthias is great at building very functional and interesting things. He doesn't go for heirloom quality furniture, but his engineering is amazing.
When I get too much free time I want to build a large bandsaw as well. Best of luck and take lots of pictures!
Sent from my Pixel XL using Tapatalk
Locker537
Well-known member
I had some success at garage sales this weekend. Most notable is an Stanley No 7 plane, a wood sole plane, a no-name No 4 look-alike plane, and a Stanley No 220 block plane.
Also a nice old Craftsman Commercial toolbox and a Park toolbox. Lots of odds and ends in the boxes.
Lastly a small Reed 3.5 inch utility vise.
Also a nice old Craftsman Commercial toolbox and a Park toolbox. Lots of odds and ends in the boxes.
Lastly a small Reed 3.5 inch utility vise.
OP
jimreed2160
Well-known member
locker--great luck. I really like the size of a #7. We all really love pictures also. What condition were your planes in?
ez-duzit
Well-known member
2--that's quite a story.
JimReed, that table is another thing I've been hauling around for years, not sure why though.
Don't remember where I got it originally even, but it used to look decent and was in the house. Then it got relegated to the garage for a few years, and this move it ended up outside. Won't last much longer now, but I'm ready to let it go.
Tool box makes a quick handy miter saw stand I see, complete with storage. Mine is on one of those Bosch cart/stand things. Its actually really handy if you work outside with the saw. I got mine new in the box for half price on Craigslist.
Honestly though if you were a contractor, or even have to work outside and store the saw in your house I think it would be worth full price (@$300).
Not so handy for in the shop, but I'll be using it outside mostly for some time yet.
Autonomous:
Matthias is good for my motivation also. Not really fancy furniture or anything no, but he whips out fairly complicated jigs and machines in a well edited manner. Fun to watch.
Also learned of Sketchup from him. Have just been playing with it so far, but looks like it would be a good way to draw up plans. Easier than by hand one a person gets the hang of it I think.
Well, back to work this morning. Didn't get anything done this weekend between the rain and an infected tooth. Hopefully won't rain so much next weekend.
OP
jimreed2160
Well-known member
BD--"..store the saw inside"
Don't laugh but its been done. A buddy of mine went through a divorce and ended up with his clothes and tools, including the table saw. She got the house and he lived in an apt with lawn chair furniture and a TS dining room table. Just make a top, lower the blade, and use a table cloth. It worked for him until he got back on his feet.
Moral of the story--you can find another woman but a good tablesaw is a keeper.
Locker537
Well-known member
locker--great luck. I really like the size of a #7. We all really love pictures also. What condition were your planes in?
I need to take some better pictures! Overall, I'd say most items are in pretty good shape. I've already got the No 7 and the no-marking No 4 in a vinegar bath.
I'll get some pictures together and make sure to update this thread.
OP
jimreed2160
Well-known member
While we wait for those plane pictures, we can do some woodworking. The kitties are doing well on day #2. Just this morning they got the run of the house. But they really like the office where I hang out. One of them is pulling pills on my tee shirt and making biscuits on my jeans--sure signs that those little claws are itchy. The last crew we had in here shredded some door trim and I would like to avoid that.
So off to the shop I go, packing a carpet remnant I found in the closet.

Last Christmas I posted a series of photos of the tree stand build. Imagine my surprise when I put the decorations up and found the original stand in one of the boxes. But a ww never throws away a good project and the stand was just collecting dust. I will top it with a 2x4 sandwich.

And now the post is in clamps.

The glue needs a few hours to set before I continue. In the meantime, my new buddies are settling in well.

Wee need a scratching post. Can you make it now?! And quit eyeballing me while I am bathing.
So off to the shop I go, packing a carpet remnant I found in the closet.
Last Christmas I posted a series of photos of the tree stand build. Imagine my surprise when I put the decorations up and found the original stand in one of the boxes. But a ww never throws away a good project and the stand was just collecting dust. I will top it with a 2x4 sandwich.
And now the post is in clamps.
The glue needs a few hours to set before I continue. In the meantime, my new buddies are settling in well.
Wee need a scratching post. Can you make it now?! And quit eyeballing me while I am bathing.