To avoid these ads, REGISTER NOW!

Woodworking 101--Tools and Tips

R_einan

Well-known member
Joined
Aug 29, 2016
Messages
461
Location
Eastern WA
Not much shop time tonight after work, but I managed to get the walnut dimensioned for the outside of the center panel. Not sure if I want to glue up the panel and then machine it for the breadboard ends, or machine it for the breadboard ends and then use the breadboard ends to help straighten the panel when I glue it. Leaning towards glueing up the panel before machining after making some clamping cauls to hold it flat when I glue.
 

Attachments

  • 600DCF2C-0ED7-4A7D-B6AC-29081F1B4FBD.jpg
    600DCF2C-0ED7-4A7D-B6AC-29081F1B4FBD.jpg
    13.2 KB · Views: 44
To avoid these ads, REGISTER NOW!

Craptain

Well-known member
Joined
Apr 18, 2013
Messages
4,028
Location
Tampa Bay FL
Glue first, then machine. In spite of best intentions the parts never line up perfectly.
Ask me how I know.

Sent from my SM-G900T using Tapatalk
 
OP
J

jimreed2160

Well-known member
Joined
Aug 7, 2016
Messages
3,589
Location
Tallahassee FL
Drawer work

So The Queen and I got our hi-test flu shots yesterday and now mine is kicking my ****. I did manage to clear out a dozen kitty litter pails last night when my buddy came by. The new flock has a consumption rate of one per month, so I will have a dozen more for him this time next year.

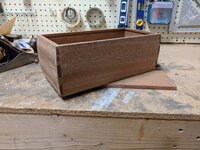
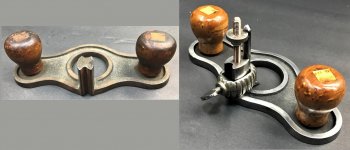
I need to work on the drawers of the desk. First task up is an unfinished one. When this desk was acquired forty years ago, I replaced the brasses. Some previous owner drilled the top drawer for bail pulls and I did not like the look. I replaced them with period knobs. There were many nasty holes that I did not get time to repair. Now that it is temporarily back in my possession, I will fix that open punch list item.

DSCN4127.jpg


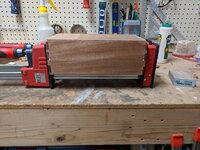
Here is the left hand side.

DSCN4128.jpg


So the first order of business is to clamp it in the vise.

DSCN4129.jpg


Here is a shot of what we need to fix.

DSCN4130.jpg


Then we need to enlarge the holes and square them up.

DSCN4131.jpg


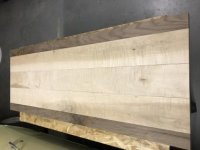
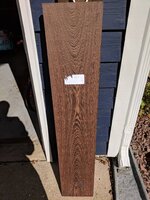
I only need a tiny nibblet of wood, so I looked for the nastiest stick of walnut in the scrap pile.

DSCN4132.jpg


The technique is furniture repair 101. Square up the hole, cut an oversized patch, make the patch a wedge, drive it in for a tight fit, and cut off the excess. When you match the grain and stain well, these patches are hard to see--especially from a distance.

My trial fit looks pretty good.

DSCN4133.jpg


So I glued them in loosely and gave the glue a few minutes to soak in. Then I tapped them home with a wooden mallet.

DSCN4134.jpg


Once the glue dries I can carve off the excess, sand it smooth, stain and finish. Then it is rinse and repeat for the other side. Meanwhile, I will nap the afternoon away with my kitty friends. Maybe this shot reaction will subside.
 
Last edited:

ez-duzit

Well-known member
Joined
Jun 24, 2013
Messages
5,095
Location
Marina del Rey
For repairing holes it is a simple matter to use a Fuller bit to open the hole cleanly to the nearest standard size plug. When there are multiple holes that are close together, sometimes it is necessary to first glue in a plug before drilling for the next hole. This method assures the neatest repair with removal of the least amount of material and often the most easily hidden repair.

Fuller bit and plug cutter.

System-Diagram3.jpg
 

Craptain

Well-known member
Joined
Apr 18, 2013
Messages
4,028
Location
Tampa Bay FL
From my background in wooden boats and ships, I have used both methods for repairing holes or worse in wood. Generally plugs are used to hide fasteners, but can and are used for repairs. Square or oblong plugs for larger repairs. Often scarfed in when it is structural.

Sent from my SM-G900T using Tapatalk
 

Bob Heine

ALLIANCE MEMBER
Joined
Oct 24, 2009
Messages
10,705
Location
Boca Raton, Florida
So The Queen and I got our hi-test flu shots yesterday and now mine is kicking my ****.

Meanwhile, I will nap the afternoon away with my kitty friends. Maybe this shot reaction will subside.
Jim, I also had a reaction to the flu shot. Mine was on September 25 and I felt achy all over for a couple of days. For the first week I couldn't raise my left arm (stump) without significant pain. The pain has diminished over time but it isn't back to normal yet. From some of the comments on flu shot sites it may take a few months.

I will continue to get the flu shots because one good bout with the flu can really knock you down for a long time.
 
OP
J

jimreed2160

Well-known member
Joined
Aug 7, 2016
Messages
3,589
Location
Tallahassee FL
Jim, I also had a reaction to the flu shot. Mine was on September 25 and I felt achy all over for a couple of days. For the first week I couldn't raise my left arm (stump) without significant pain. The pain has diminished over time but it isn't back to normal yet. From some of the comments on flu shot sites it may take a few months.

I will continue to get the flu shots because one good bout with the flu can really knock you down for a long time.

Sorry to hear about your reaction. I usually feel puny a few days but this time I also have a shot site reaction with swelling and heat. It's the price of health I guess. Geezers like me need to take care of themselves. I just hate to miss the shop time.
 

Teenager with old tools

Well-known member
Joined
Jun 3, 2015
Messages
595
Location
riverside california
A really big thanks to you Jim for your generosity. We got home and I saw the package and had him open it. First thing he did was go and plane a piece of pine we had. He really likes it. So a big thanks to you and your generosity. He was really excited when he saw it. He's really goin to enjoy it. Thanks to everyone here for being so kind as well.
So the place we got that slab from for the table had 8 or ten foot long 1 foot wide slabs bout inch and a half thick he wants to make a bookshelf from when we finish the coffee table. I'm gonna have to show him this forum so when he does get to make it you all can see.88882b9c858e8990217d93f8cf8603e6.jpg

Sent from my P027 using Tapatalk
 

Attachments

  • 88882b9c858e8990217d93f8cf8603e6.jpg
    88882b9c858e8990217d93f8cf8603e6.jpg
    90.9 KB · Views: 0

drivesitfar

Well-known member
Joined
Oct 23, 2013
Messages
36,007
Location
Pacific Northwest
TEEN: thanks for posting the story and the picture of your brother with a grin from ear to ear. :bowdown:

I hope he does ok while you are out making your way in the world and keep him with good friends and that will help while you are away.

JIM: very nice gesture. :thumbup:

ALL: good stuff on the wood repairs.
 
OP
J

jimreed2160

Well-known member
Joined
Aug 7, 2016
Messages
3,589
Location
Tallahassee FL
Drawer repair

I appreciate all the tips on how to fix the holes. It just shows the allure of ww where there are many roads to the same destination. I continued with my project and felt good enough to follow up yesterday afternoon.

DSCN4136.jpg


One down and one more to go on this side.

DSCN4137.jpg


Trimmed, shaped and sanded.

DSCN4139.jpg


And now stained. I used Red Mahogany Minwax stain. Old walnut has a deep reddish tint.

DSCN4140.jpg


Once I let the stain dry and add a little finish, I think it will be a big improvement.

DSCN4141.jpg


It took a few more tools than I thought.

DSCN4142.jpg


Now it is time for more napping with the kitties. Maybe I can get to the other side later.
 

ScottsGT

Well-known member
Joined
Jan 1, 2014
Messages
4,883
Location
Lake Wateree, SC
Wife is a CRNA. She refuses to take a flu shot because she has had two patients already with Guillain-Barre syndrome. Google it. Nasty stuff from a shot that only protects from something like 1/10 of the flu strains out there.
 

rrich1

Well-known member
Joined
Oct 7, 2015
Messages
793
Some late night planing. I got the rest of the documents tails cut last night along with the grooves for the top and bottom of the birthday box. The sides of the box are "barrelled". Not greatly but they are lol. Tomorrow I will trim the edges of the dovetails and get it glued up. I think I made a mess [emoji16] also picked up a nice piece of wenge for "cheap" not sure what to do with it yet though. 7969d1d807c4a3c48adde311236d82fd.jpg42ddf3b04fb43f5ca17be6dec9ae2529.jpg18287a5b9e05a7a8ea357f5f9062b728.jpg9173354c163cc43fd1ad991e2c7dcd9a.jpgea57881fda57112426bff09a44a149d1.jpg3a4b4ff173c49974f3081f12abcae5bb.jpgfab2512363905acf1d92e3565c30223d.jpg4acc6fb71e3975a4a2485d64072fbef5.jpgc81706f9251e74f746268807b9706497.jpg

Sent from my Pixel XL using Tapatalk
 

Attachments

  • 18287a5b9e05a7a8ea357f5f9062b728.jpg
    18287a5b9e05a7a8ea357f5f9062b728.jpg
    118.3 KB · Views: 0
  • 7969d1d807c4a3c48adde311236d82fd.jpg
    7969d1d807c4a3c48adde311236d82fd.jpg
    109.7 KB · Views: 0
  • 42ddf3b04fb43f5ca17be6dec9ae2529.jpg
    42ddf3b04fb43f5ca17be6dec9ae2529.jpg
    119.5 KB · Views: 0
  • 9173354c163cc43fd1ad991e2c7dcd9a.jpg
    9173354c163cc43fd1ad991e2c7dcd9a.jpg
    107.8 KB · Views: 0
  • ea57881fda57112426bff09a44a149d1.jpg
    ea57881fda57112426bff09a44a149d1.jpg
    109.3 KB · Views: 0
  • 3a4b4ff173c49974f3081f12abcae5bb.jpg
    3a4b4ff173c49974f3081f12abcae5bb.jpg
    101 KB · Views: 0
  • fab2512363905acf1d92e3565c30223d.jpg
    fab2512363905acf1d92e3565c30223d.jpg
    115.4 KB · Views: 0
  • 4acc6fb71e3975a4a2485d64072fbef5.jpg
    4acc6fb71e3975a4a2485d64072fbef5.jpg
    129.1 KB · Views: 0
  • c81706f9251e74f746268807b9706497.jpg
    c81706f9251e74f746268807b9706497.jpg
    145 KB · Views: 0

madison069

Well-known member
Joined
Nov 5, 2010
Messages
4,150
Location
Monroeville, PA
Currently trying to get a hold of a guy on craigslist that is cutting a black walnut tree down this weekend. I would love to get the trunk section and bring it to the garage! Once it dries some I'll take it to my kiln guy and have him mill it and dry it for me.
 

Craptain

Well-known member
Joined
Apr 18, 2013
Messages
4,028
Location
Tampa Bay FL
Currently trying to get a hold of a guy on craigslist that is cutting a black walnut tree down this weekend. I would love to get the trunk section and bring it to the garage! Once it dries some I'll take it to my kiln guy and have him mill it and dry it for me.
I know right where you are coming from. One of the up sides to a hurricane is the amount of good trees lying by the roadside. Downside is nowhere to store it.

Sent from my SM-G930T using Tapatalk
 

rrich1

Well-known member
Joined
Oct 7, 2015
Messages
793
I shaved the excess wood from the dovetails off and got it glued up. The veritas apron plane with the pmv-11 blade is already my favorite hand tool!

Trying to decide between the bandsaw or the table saw to cut the box apart since the sides are somewhat rounded and not flat.
df0b37753843abbc1a09843631f1ac37.jpgb76718a34f230f80493feb53424a83d7.jpgdf3a70c1efef9ae97c50ca8d4e31639c.jpg

Sent from my Pixel XL using Tapatalk
 

Attachments

  • df3a70c1efef9ae97c50ca8d4e31639c.jpg
    df3a70c1efef9ae97c50ca8d4e31639c.jpg
    116.8 KB · Views: 0
  • b76718a34f230f80493feb53424a83d7.jpg
    b76718a34f230f80493feb53424a83d7.jpg
    120 KB · Views: 0
  • df0b37753843abbc1a09843631f1ac37.jpg
    df0b37753843abbc1a09843631f1ac37.jpg
    125.8 KB · Views: 2

BobLon

ALLIANCE MEMBER
Joined
Apr 19, 2017
Messages
141
Location
Florida
Ok JimReed, this is PLANE ridiculous, I don't currently even have a shop set up (just a bare steel shed at the moment) and here I am buying a old beat up PLANE :dunno:

Seriously, your affection for planes seems to be contagious. I've chuckled as others have popped up with 'new-old' purchases and now look at me.

THANKS :beer:

I don't have the ability to do much with it right now, but it should make a good user plane (I hope).

I might have paid a little much for it as it was in an antique store, but it just tickled my fancy. Other that the tote I don't see any major damage, all ajustments work in it's present state and the sole looks really good, no cracks or splits.

Anyhow, its a Stanley No. 29. Paid 26 dollars for it.

Looking forward to playing with it, (but it will be a while). :thumbup::bounce:

BobL.
 

Attachments

  • IMG_0798.JPG
    IMG_0798.JPG
    126.8 KB · Views: 30
  • IMG_0799.jpg
    IMG_0799.jpg
    45 KB · Views: 27
  • IMG_0800.JPG
    IMG_0800.JPG
    127.2 KB · Views: 25
  • IMG_0795.JPG
    IMG_0795.JPG
    115.1 KB · Views: 32
  • IMG_0797.JPG
    IMG_0797.JPG
    131.1 KB · Views: 31
  • IMG_0796.JPG
    IMG_0796.JPG
    133.7 KB · Views: 32
To avoid these ads, REGISTER NOW!

R_einan

Well-known member
Joined
Aug 29, 2016
Messages
461
Location
Eastern WA
I shaved the excess wood from the dovetails off and got it glued up. The veritas apron plane with the pmv-11 blade is already my favorite hand tool!

Trying to decide between the bandsaw or the table saw to cut the box apart since the sides are somewhat rounded and not flat.
df0b37753843abbc1a09843631f1ac37.jpgb76718a34f230f80493feb53424a83d7.jpgdf3a70c1efef9ae97c50ca8d4e31639c.jpg

Sent from my Pixel XL using Tapatalk

I kind of like the rounded sides, it’s an interesting detail that adds some character to it...
 

Attachments

  • df0b37753843abbc1a09843631f1ac37.jpg
    df0b37753843abbc1a09843631f1ac37.jpg
    122.5 KB · Views: 0
  • b76718a34f230f80493feb53424a83d7.jpg
    b76718a34f230f80493feb53424a83d7.jpg
    116.8 KB · Views: 0
  • df3a70c1efef9ae97c50ca8d4e31639c.jpg
    df3a70c1efef9ae97c50ca8d4e31639c.jpg
    113.5 KB · Views: 1

CRSINMICH

Well-known member
Joined
Aug 15, 2015
Messages
2,397
Location
Southeastern Michigan
Bob: Transitional planes (wood bottom with metal top) don't get much respect. I really like the looks of them and have wanted to try one out for myself. I know that solid wood planes work every bit as well as metal ones so I don't see why transitionals wouldn't be good too. Give it a try and let us know how it works. I'm afraid that you did overpay a bit. According to this 1898 catalog, it should only have cost $1.85
 

Attachments

  • !898 Stanley No 29.jpg
    !898 Stanley No 29.jpg
    134.2 KB · Views: 29

BobLon

ALLIANCE MEMBER
Joined
Apr 19, 2017
Messages
141
Location
Florida
Bob: Transitional planes (wood bottom with metal top) don't get much respect. I really like the looks of them and have wanted to try one out for myself. I know that solid wood planes work every bit as well as metal ones so I don't see why transitionals wouldn't be good too. Give it a try and let us know how it works. I'm afraid that you did overpay a bit. According to this 1898 catalog, it should only have cost $1.85

Yep, that's me, Buy HIGH sell LOW.
Folks at work liked when I would sell stuff because I would talk ME down after they made an offer.

:lol_hitti

BobL.
 

CRSINMICH

Well-known member
Joined
Aug 15, 2015
Messages
2,397
Location
Southeastern Michigan
ORPHAN ROUTER PLANE​
I found this at a garage sale one block away from my house. I recognized it as the beginnings of a router plane and I wondered about the fact that there were no numbers or markings cast into it. I dug through the box looking for any of the missing parts but there were none. At that point, I noticed that the post had not been drilled and tapped for the height adjustment mechanism. I thought it might have been a blank for a school shop project until I looked closely at the grungy knobs and saw that they were made of birds-eye maple. It's not likely that a school would have used such expensive wood especially with tiger maple inlays on the top. What the heck was this thing? It had piqued my curiosity so I bought it and it became yet another shop project.

The first thing I did was compare it to my Stanley No. 71 1/2. The base of The Orphan was a bit smaller but the post was exactly the same size. I looked on Ebay and found the missing parts that had come from a Stanley. Since The Orphan was smaller, I got a 1/4" cutter for it. The 17 1/2 has a 1/2" cutter and I'll leave both routers set up that way.

The only part that was not available was the threaded rod that screws into the post. I tried the knurled thumb nut from Ebay on the threaded rod of the 71 1/2 and it worked so I measured the rod at 1/4-24. I couldn't find 1/4-24 threaded rod so I bought some 1/4" bronze rod, a 1/4-24 die, and 1/4-24 taps.

The Orphan works as good as it looks. I'm glad I paid the $1 asking price at the garage sale. I didn't even haggle.
 

Attachments

  • Orphan router B & A.jpg
    Orphan router B & A.jpg
    149.1 KB · Views: 64

rrich1

Well-known member
Joined
Oct 7, 2015
Messages
793
R_einan and Crsinmich thanks. The plans for the box are from Paul Seller's masterclass woodworking series. I think i figured out my issue when i did the sides. I think I should have started at a slight chamfer and it would have produced better results. Oh well. Wife will still like it. To date these are my finest dovetails since they are my only ones. lol
 

BobLon

ALLIANCE MEMBER
Joined
Apr 19, 2017
Messages
141
Location
Florida
Some late night planing. I got the rest of the documents tails cut last night along with the grooves for the top and bottom of the birthday box. The sides of the box are "barrelled". Not greatly but they are lol. Tomorrow I will trim the edges of the dovetails and get it glued up. I think I made a mess [emoji16] also picked up a nice piece of wenge for "cheap" not sure what to do with it yet though.

Sent from my Pixel XL using Tapatalk

Rich, that box is coming along real nice. I do like Sapele. Did you say that was your first set of handcut dovetails? Nice job. Haven't done that myself, only used a jig, but then I still consider myself a novice.

Can't wait to see how you finish it off.
BobL.
 

rrich1

Well-known member
Joined
Oct 7, 2015
Messages
793
BobLon Thanks. Yes they were the first dovetails ive ever done and I wasn't able to use a jig. The sides of the box had the dovetails cut at an angle so that didn't help any. The sapele flaked off as well leaving me some gaps. Ill try and use some wedges to fill any significant gaps.
 
OP
J

jimreed2160

Well-known member
Joined
Aug 7, 2016
Messages
3,589
Location
Tallahassee FL
Fall is in the air and it looks like shoptime is picking up for everyone.

BobL--Welcome and too bad you got infected with the plane thing. There is no cure but getting more planes will keep your spirits up. Your transitional looks like it is in good shape. I have one that I need to rehab. They work exceptionally well and yours should make a nice jointer.

rrich--I would build another box of construction lumber around your box and wedge it into place. Then you will have flat surfaces to cut on. Good luck.

CRS--That looks like a homemade router. It was common for machinists to cast their own. Some are unique like yours and some are just copy castings of Stanleys. They are even a subgroup of plane collecting. Yours is a nice example, especially with your mods. Good work.

I am sloooowly working on the drawer. Nothing much to photograph.
 

R_einan

Well-known member
Joined
Aug 29, 2016
Messages
461
Location
Eastern WA
As promised, here are the Yost parallels in action. Glued up the panel today, after making some homemade clamping cauls from some Doug Fir deck scraps. Used a little block plane, my only plane, to put a slight convex face on the cauls to equalize the pressure and flatten out the panel. Really struggled with the plane after spending an hour sharpening the blade. Not sure if it was set too deeply or if it was a technique issue. They worked pretty well at straightening out some bowed boards, thought I still have quite a bit of sanding to get everything flat and flush. I also dimensioned the aprons and breadboard ends while the panel was clamped. Maybe tomorrow my friend will have the rough cut piece of walnut I tracked down blanked into something I can work with. Not having a jointer or a planer makes material choices slim at times. Legs are going to be a 2 side taper from 3”x3” walnut with the aprons set with a through bridle joint.
 

Attachments

  • 42A60449-CE15-4535-BF41-7D1A120AD94E.jpg
    42A60449-CE15-4535-BF41-7D1A120AD94E.jpg
    20.4 KB · Views: 62

CRSINMICH

Well-known member
Joined
Aug 15, 2015
Messages
2,397
Location
Southeastern Michigan
INFORMATION PLEASE​
Does anyone have any information about this no name and no number spokeshave? It came from an estate sale and I bought it because, like The Orphan router plane, it was curiously different. The most obvious difference is the blade adjustment mechanism. It's a little crude. A less obvious difference is the handles. They are solid. Most other metal spokeshaves are convex on top and concave on the bottom. I did find a picture of an early Stanley that had the same type of handles but nothing else about this one is anything like a Stanley. What have I got here, another home made tool?

I also bought two other spokeshaves. One is a solid bronze Cincinnati Tool Co. with a seriously convex sole and the other is an unremarkable Stanley 51. I got it because it was the only Made in Canada shave I have ever seen. Oh ****! I think I've fallen into yet another collecting rabbit hole.
 

Attachments

  • No Name front and back.jpg
    No Name front and back.jpg
    154.6 KB · Views: 38
OP
J

jimreed2160

Well-known member
Joined
Aug 7, 2016
Messages
3,589
Location
Tallahassee FL
CRS--Nice find on the spokeshave. The three screws give it an unusual look. Most factory made spokeshaves have some sort of lever cap. Maybe this one is user made. But then there were dozens of spokeshaves patented in the late 19th century.
 
OP
J

jimreed2160

Well-known member
Joined
Aug 7, 2016
Messages
3,589
Location
Tallahassee FL
More drawer rehab

Here are the plugs on the left hand side of the drawer front.

DSCN4143.jpg


As with the other side, it takes lots of tools.

DSCN4144.jpg


Turns out the small LN shoulder plane is the way to go.

DSCN4146.jpg


After the plane.

DSCN4147.jpg


It is a little out of focus--sorry. Here it is after cleanup with a chisel and sandpaper.

DSCN4148.jpg


I quickly finished the rectangular plug and applied stain. Now it is time to move on to the drawer slides. Two of them are very worn. I will glue in strips of hardwood. Time to go to the scrap pile.

DSCN4149.jpg


Here is a shot of the rut and the patch.

DSCN4150.jpg


And the patch in place.

DSCN4151.jpg


Glue and clamps.

DSCN4152.jpg


Rinse and repeat for the next one.

DSCN4153.jpg


All done.

DSCN4154.jpg


I have said it many times but it bears repeating--a woodworker cannot have too many clamps. These spring clamps are handy for odd jobs like this. An added bonus is that they are inexpensive and that makes pairs of them GREAT gift ideas for the holidays. They make great stocking stuffers--send hints to your spouse.

Once the glue dries I will attack these cherry strips with shoulder planes. It will be a hateful place to work and I will not enjoy it very much. I guess I will wear my knee pads and get out a variety of planes. I am sure one will beat the others. And then I will hack away until the slides are level.

My goal is to get this thing out of the way and deliver it before Thanksgiving. Must hustle to meet that deadline.
 

drivesitfar

Well-known member
Joined
Oct 23, 2013
Messages
36,007
Location
Pacific Northwest
CRS: cool finds and if you'd like another place to show them off we had an old SHOW YOUR PLANES thread over in Vintage section i'm sure you'll like so post them up and get that thread moving again if you have some time. a few of the other guys here used to post over there before Jim started WW 101 thread and some others have some collections that are even more amazing than we see here.

https://www.garagejournal.com/forum/showthread.php?t=277733&highlight=planes

Jim: nice tips on the drawer repairs and i bet you want to get that big dresser out of the middle of your shop. it's coming along nicely on the repairs so keep up the good work.

R: nice looking glue up job and looks like you picked a good pattern for the pieces.

RR: if the cup holders bother you and you run in to them maybe you can use the guides for some sort of other holders or stops. your table and box are looking great and keep up the good work.
 
OP
J

jimreed2160

Well-known member
Joined
Aug 7, 2016
Messages
3,589
Location
Tallahassee FL
So the mailman left a prize in my box today. It is over 130+ years old!

DSCN4155.jpg


DSCN4156.jpg


DSCN4157.jpg


Yes, it is a Stanley #71 router plane, type 1. It is missing the blade and collar but is in otherwise great shape. The early ones had a japan finish. Early knobs had a ring at the base.

This one is too nice to throw in the boneyard router box. I will keep it out and look for a collar. Just cannot pass on these sweet looking ones.
 
To avoid these ads, REGISTER NOW!
Top Bottom