To avoid these ads, REGISTER NOW!

Woodworking 101--Tools and Tips

OP
J

jimreed2160

Well-known member
Joined
Aug 7, 2016
Messages
3,589
Location
Tallahassee FL
New project--benchtop refresh

I acquired this ww bench years ago from a ww who was moving. It was his dad's bench and he reluctantly gave it up. I bought it from him just so he would not have to tear it up and sell the bench screw online.

It is a nice bench. I feel a kinship with his dad because we seem to have similar ideas of function over form. This bench works great but lacks in the visual appeal department. The top is some sort of cheap Masonite and quite frankly, is FUGLY.

DSCN2867.jpg


Here is a close up.

DSCN2868.jpg


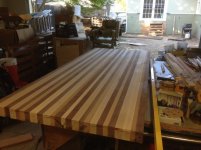
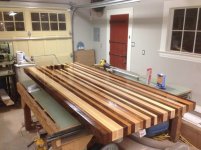
I was at HD yesterday and found this pecan flooring for only $19.09.

DSCN2870.jpg


It has a nice look to it.

DSCN2869.jpg


So, for the price of burger night, I will take the plunge. I think this will be a simple drop in but we shall see. Other GJ posters have done this to benchtops and seem to be pleased with the result. As far as I am concerned, anything would be better than what I have right now.
 
To avoid these ads, REGISTER NOW!

ez-duzit

Well-known member
Joined
Jun 24, 2013
Messages
5,095
Location
Marina del Rey
CM--you will want to start out with at least the low angle block, jack and rabbet/shoulder planes. Look for deals on quality tools that are in excellent condition and that can be put to work with just a good sharpening.
 

Coolerman

Well-known member
Joined
May 2, 2012
Messages
133
Location
Paint Lick, KY
This will be a slow path for me...

I work two jobs.

My full time day job: I am the half owner of a software/hardware company that does work in the asphalt and aggregate industries. I am the hardware designer/installer and software tester. I have to daily drive 42 miles one way for this job.

My evening job I refurbish and build new wiring harnesses for Toyota FJ40/45 Land Cruisers.
A typical day for me is this: I am up at 5:00AM, drive an hour to work, work 8 hours, off at 3:00PM if I'm lucky, and I'm not traveling. Eat a snack (I'm a Type 1 diabetic) workout if it's Monday, Wednesday or Friday, do my chores, THEN get to start harness work. I work until 8:00PM, eat, and I'm in bed by 9:30PM.

So... wood working has to take place on the weekends I don't have a harness to build or a honey do item to do. Retirement, though still 10 years away, will be when I get to work with wood more.

So you guys have 10 years to teach me the basics!:bounce:
 

derosa

Well-known member
Joined
Oct 19, 2010
Messages
1,078
Location
Oceanside, NY
Hi Mark,

It looks like you have a good start on the power tools.

My recommendation on the top 5 planes to start with are:
1) Block plane (No. 9-1/2 standard angle or No. 60-1/2 low angle)
2) Jack/fore plane (No. 5 is the standard and can be used as a jointer or smoother if needed)
3) Shoulder/rabbet plane (lots of variation, but I like my old No. 93)
4) Jointer plane (No. 7 or No. 8 if you can handle the extra weight)
5) Smoothing plane (No. 4 or No. 3 if you work on smaller pieces)

Take my list with a grain of salt, as I'm just a beginner to planes. However, eagerly learning as much possible about them :beer:

Good options and a solid recommendation imo.
Only things to add is that in my experience the stanley 220 shows up more then a 9 1/2 or 60 1/2 and will do just as well so don't hesitate to grab it if you see one.
I've also never seen an #8 jointer in the wild that wasn't already rehabbed, so you'll have an easier time finding a 7. Either way I agree fully with this list.
Critical to planes is sharpening, Paul Sellers has a nice video on sharpening that uses the scary sharp method with sandpaper. It is a great way to go.
 

ScottsGT

Well-known member
Joined
Jan 1, 2014
Messages
4,883
Location
Lake Wateree, SC
I too am just learning about the world of wood planes. I always knew about them and thought their only use was to make a door of old window fit a frame better. In the past week I have bought a HF POS to modify as a scrub plane, had a friend give me his late fathers Millers Falls 140C and I just picked up a Stanley #4 off eBay. Paid way too much for that one.
I cleaned up the Millers Falls and put it to use last weekend to put an angled front on a 1X4 for a display case I'm building.
Started on the #4 last night. It had many years of use on it. the back left edge of it were worn down a little. Flattened it out and now ordered a new screw kit. Looking for a really nice oversize tote and knob since I have large hands.
Here's the Miller Falls I got from my friend. His Dad was very close to me too. This tool means a lot to me since he was like a second father to me and like a grandpa to my kids.
A0E2BC92-5FDF-4539-9204-CB9FFB296884_zpsvz4h1vp8.jpg
 
OP
J

jimreed2160

Well-known member
Joined
Aug 7, 2016
Messages
3,589
Location
Tallahassee FL
Cooler--Whew! What a schedule! That ten year stretch before your retirement will just zoom by--the older we get, the faster time goes. You are wise to get a head start on getting the shop ready.
 

ScottsGT

Well-known member
Joined
Jan 1, 2014
Messages
4,883
Location
Lake Wateree, SC
Scotts--Love the fluffy shavings! :thumbup:

3 days before it was a rusty hulk of metal that came from the bottom of the tool pile. Overnight soak in evaporust and some sandpaper cleaned it up. I took this "staged" photo to send to my buddy that gave it to me.
He just called me tonight and told me he called his sister to tell her he wants to get "the short one" back from her to give to me so the set stays together. :thumbup:
 

cheechi

Well-known member
Joined
Feb 29, 2012
Messages
4,384
Location
Triad, NC
Which HF POS? the #33 or the #4 that comes with the little one?

If it's the #4 I'm interested in your process as the reviews are not kind to it but I want it to be a potential user.
 

drivesitfar

Well-known member
Joined
Oct 23, 2013
Messages
36,006
Location
Pacific Northwest
ALL: i was going through my DAD'S workbench and he had these in a drawer. the quality of them was so nice i had to save them and wondering if any of you use something like these? i'm guessing for chair or stool legs and do you just hammer them in or pre drill first?

Cool: WOW you've got an impressive schedule. if you'd like to help some of us over on our GET HEALTHY thread with choices for good snacks and exercise i'm sure we'd all benefit. the link is in my sig line in case you have a minute to post over there too.

keep your eye on the prize and always remember to smell the roses along the way.!
 

Attachments

  • WP_20170416_022[30311].jpg
    WP_20170416_022[30311].jpg
    157.7 KB · Views: 87
OP
J

jimreed2160

Well-known member
Joined
Aug 7, 2016
Messages
3,589
Location
Tallahassee FL
ALL: i was going through my DAD'S workbench and he had these in a drawer. the quality of them was so nice i had to save them and wondering if any of you use something like these? i'm guessing for chair or stool legs and do you just hammer them in or pre drill first?

QUOTE]

I would certainly drill a pilot hole about the same size or just ever so slightly smaller. Then Mr Mallet could send them scurrying home.
 

ScottsGT

Well-known member
Joined
Jan 1, 2014
Messages
4,883
Location
Lake Wateree, SC
Which HF POS? the #33 or the #4 that comes with the little one?

If it's the #4 I'm interested in your process as the reviews are not kind to it but I want it to be a potential user.

It's the #33 Here you go:

I'm heading back to HF today to look at the other ones in stock. Be careful and open the box and look closely at the two adjusters. Mine has one that doesn't even fit into the slots on one side of the blade. Pull the blade and make sure the pads are machined down far enough for the blade to sit all the way down into so the adjusters work.
I can post photos later of what I'm talking about.
 

Coolerman

Well-known member
Joined
May 2, 2012
Messages
133
Location
Paint Lick, KY
ALL: i was going through my DAD'S workbench and he had these in a drawer. the quality of them was so nice i had to save them and wondering if any of you use something like these? i'm guessing for chair or stool legs and do you just hammer them in or pre drill first?

Cool: WOW you've got an impressive schedule. if you'd like to help some of us over on our GET HEALTHY thread with choices for good snacks and exercise i'm sure we'd all benefit. the link is in my sig line in case you have a minute to post over there too.

keep your eye on the prize and always remember to smell the roses along the way.!

Yeah, my schedule, (self imposed I must add) is tight. I do the evening job out of love for the old Land Cruisers, and it is the only way I have "spending" money for tools and things. All my other income goes to trying to pay off the house before retirement. It will be close!

I did post over in your get healthy thread. :thumbup:
 

Coolerman

Well-known member
Joined
May 2, 2012
Messages
133
Location
Paint Lick, KY
OK so I have been working on the idea of building a work bench along the lines of the Peter Sellers bench. He used 6 2x4's on edge glued together to make half of his top. He used a bunch of clamps to do this. Researching clamps of the style he had is giving me a head ache!
It seems the better clamps that don't bow when tightened can run almost $50.00 each for a 3 footer! Yes there are cheaper clamps out there but are they really a better buy?

Since this is a tools tip thread, how about educating me on what YOU guys have clamp wise and KNOW works! I have maybe a dozen mixed clamps from Harbor Freight and Sears. The HF bar clamps are pretty good in the short lengths but, the 4' ones I have bow badly if you tighten them even a little. I also have a set of HF 3/4" pipe clamps. They don't bow at all but they won't hold either if tightened up hard, ie they slip.
Open to all knowledge about clamps or point me to a clamp thread!
 

ez-duzit

Well-known member
Joined
Jun 24, 2013
Messages
5,095
Location
Marina del Rey
CM--you don't actually need clamps to glue up a bunch of 2x's. You can screw some blocks to the assembly table and drive wedges in where necessary.

But my favorite clamps are Jorgenson Pony's, some of which you can see hanging on the wall.

shop-7_zpsugsm9fca.jpg
 

hunterguy86

Well-known member
Joined
Jan 22, 2012
Messages
168
Location
Central Texas
OK so I have been working on the idea of building a work bench along the lines of the Peter Sellers bench. He used 6 2x4's on edge glued together to make half of his top. He used a bunch of clamps to do this. Researching clamps of the style he had is giving me a head ache!
It seems the better clamps that don't bow when tightened can run almost $50.00 each for a 3 footer! Yes there are cheaper clamps out there but are they really a better buy?

Since this is a tools tip thread, how about educating me on what YOU guys have clamp wise and KNOW works! I have maybe a dozen mixed clamps from Harbor Freight and Sears. The HF bar clamps are pretty good in the short lengths but, the 4' ones I have bow badly if you tighten them even a little. I also have a set of HF 3/4" pipe clamps. They don't bow at all but they won't hold either if tightened up hard, ie they slip.
Open to all knowledge about clamps or point me to a clamp thread!


I also want to build a Paul Sellers bench and have the same clamp problem. What if you glued the 2x's in groups of three?


Sent from my iPhone using Tapatalk
 

drivesitfar

Well-known member
Joined
Oct 23, 2013
Messages
36,006
Location
Pacific Northwest

Attachments

  • IMG_1141.jpg
    IMG_1141.jpg
    93.2 KB · Views: 93
  • IMG_1108.jpg
    IMG_1108.jpg
    82.7 KB · Views: 86
  • IMG_1078.jpg
    IMG_1078.jpg
    96.2 KB · Views: 86
  • IMG_1077.jpg
    IMG_1077.jpg
    77.7 KB · Views: 79
  • IMG_1076.jpg
    IMG_1076.jpg
    99.3 KB · Views: 86
  • IMG_1070.jpg
    IMG_1070.jpg
    97.8 KB · Views: 90
  • 010_Kitchen.jpg
    010_Kitchen.jpg
    74.4 KB · Views: 101

drivesitfar

Well-known member
Joined
Oct 23, 2013
Messages
36,006
Location
Pacific Northwest
ALL: more pictures of Nitro's kitchen island top. Enjoy!!
 

Attachments

  • IMG_1437.jpg
    IMG_1437.jpg
    100.9 KB · Views: 73
  • IMG_1158.jpg
    IMG_1158.jpg
    104.3 KB · Views: 68
  • IMG_1156.jpg
    IMG_1156.jpg
    80.6 KB · Views: 67
  • IMG_1153.jpg
    IMG_1153.jpg
    142 KB · Views: 67
  • IMG_1151.jpg
    IMG_1151.jpg
    120.9 KB · Views: 62
  • IMG_1149.jpg
    IMG_1149.jpg
    103.7 KB · Views: 62
  • IMG_1148.jpg
    IMG_1148.jpg
    79.5 KB · Views: 62
To avoid these ads, REGISTER NOW!

Craptain

Well-known member
Joined
Apr 18, 2013
Messages
4,028
Location
Tampa Bay FL
OK so I have been working on the idea of building a work bench along the lines of the Peter Sellers bench. He used 6 2x4's on edge glued together to make half of his top. He used a bunch of clamps to do this. Researching clamps of the style he had is giving me a head ache!
It seems the better clamps that don't bow when tightened can run almost $50.00 each for a 3 footer! Yes there are cheaper clamps out there but are they really a better buy?

Since this is a tools tip thread, how about educating me on what YOU guys have clamp wise and KNOW works! I have maybe a dozen mixed clamps from Harbor Freight and Sears. The HF bar clamps are pretty good in the short lengths but, the 4' ones I have bow badly if you tighten them even a little. I also have a set of HF 3/4" pipe clamps. They don't bow at all but they won't hold either if tightened up hard, ie they slip.
Open to all knowledge about clamps or point me to a clamp thread!

I have a whole mixed bunch of clamps of many vintages but no pictures right now.

But even cheap clamps can be made to work better. When you do a glue up start by laying some clamps. Then lay up the wood and glue on the clamps, then set another set of clamps on top, interspaced between the lower set. This will give you a good clamping pressure and the 2 sets of clamps will tend to even out the forces. In any case the pressure does not need to be extreme if your prep is good. All you are looking for is a nice even squeeze out. Sorry I am home, not in the shop so I can't demonstrate. Good luck
 
OP
J

jimreed2160

Well-known member
Joined
Aug 7, 2016
Messages
3,589
Location
Tallahassee FL
HF #33

I thought I posted something about this neat plane earlier in the thread. If so, some of this might be repetition. But here it goes.

The HF #33 is quite a bargain. I bought a few when they were $9. Now I see that they are up to $14.99. Still a bargain. Use one of the 20% off coupons for more savings.

DSCN2871.jpg


As said, this is only a so-so bench plane. BUT it makes a great scrub plane. Here is the original blade along with the two that I made. One is for bench use and the other is a scrub. The HF blade is a puny 5/64 thick. I made my bench blade 7/64 and my scrub blade 8/64. By comparison, the Lie Nielsen scrub blade is 11/64 thick.

DSCN2872.jpg


So how does it work? Pretty good. Here is the bench blade (my version) in action.

DSCN2875.jpg


Nice wide, and thin, shavings.

DSCN2876.jpg


And it leaves a smooth surface.

DSCN2877.jpg


When I went to scrub, the mouth clogged with a big chip.

DSCN2878.jpg


So I filed it open just a bit. Then it went to town.

DSCN2879.jpg


It is a little wider than the LN.

DSCN2880.jpg


And it is certainly not as aggressive as the LN. BUT--and this is a Kardashian BUT---the LN is TEN TIMES THE COST.

For what it is, and what it costs, this little plane is a bargain. Even the original blade, when ground to a radius, works well in scrub mode.

:3gears:
 
Last edited:

derosa

Well-known member
Joined
Oct 19, 2010
Messages
1,078
Location
Oceanside, NY
OK so I have been working on the idea of building a work bench along the lines of the Peter Sellers bench. He used 6 2x4's on edge glued together to make half of his top. He used a bunch of clamps to do this. Researching clamps of the style he had is giving me a head ache!
It seems the better clamps that don't bow when tightened can run almost $50.00 each for a 3 footer! Yes there are cheaper clamps out there but are they really a better buy?
I'm not certain what to buy anymore, used to buy everything jorgensen but they're down the tubes now. For wider glue ups I always prefer the HD clamps. Although I have a pair of 36" and a 30" in the regular duty I find they bow too much for general use, everything has to be jointed just right to make them work at anything close to their full size. Really for 24" and above the Jorgy HD clamps are what I prefer to work with and in cases where there are a lot of boards because of all the minor twisting and warping that can creep in after jointing and planing I would reach for their I-beam clamps. I currently have a 24", 30" and 3 36", really wish I'd gotten the 4 48" I really wanted before they all evaporated, these ones were expensive but with 7k lbs of clamping force they would be what I would prefer with 2x4s that really like to move just from sitting around.
Working with a budget I'd go with HD clamps, you can get 3 for the price of an I beam and I'd buy a range of sizes from 24"-36" for a better future range of sizes, and put them about every 8" to make sure the surface was clamped well.
If I was really on a budget I'd buy threaded rod and an extra board, Cut the board into sections so you can drill a hole that will show above and below the bench and run the rods through the bottom holes with washers and nuts. Make the bottom hole 1.5" high and the rod can sit on chunks of 2x4 so the bench top won't sag/bow while clamping down. once the boards are edge glued and on top of the bottom rods you run the top rods with washers and nuts and tighten the rods equally top and bottom. I do something similar to this for drying boards, can get a lot of clamping force/pressure with threaded rod.

I did just receive an ad that Bessey has just introduced a new line of I-beam clamps that look like a dead ringer for the jorgensen, if they're made somewhere other then china I'll probably pick up what I need.
 
OP
J

jimreed2160

Well-known member
Joined
Aug 7, 2016
Messages
3,589
Location
Tallahassee FL
Clamps for Sellers bench

If I were making a PS bench with laminated 2x4s, I would glue them up with my Jorgenson I bar 48" clamps. To me, that is the top of the line. I purchased four of them many years ago and have used them ever since for all of the big jobs. They were one of my favorite tool purchases.

Middle ground would be Bessey K clamps (50 inchers). They are good clamps but I think they are best when they work under 36"

If $$$ is an issue, my next move would be to purchase sufficient pairs of 3/4" pipe clamps. Yes they can be slippy, depending on your pipe. Blow it out and get 5 or 6 ft end threaded pipe. Use C clamps on the end if they want to slip. But use care and do not tighten too much and starve the glue joint.

I like to clamp boards at about 18" intervals, so four clamps should be OK for a 5-6 ft workbench.

Clamps need a flat surface. So you really need a flat workbench if you are building a workbench. What to do? :dunno:

I would use a solid core door on sawhorses or even a flat garage floor. Check your glue up and shim it if necessary.
 
OP
J

jimreed2160

Well-known member
Joined
Aug 7, 2016
Messages
3,589
Location
Tallahassee FL
I did just receive an ad that Bessey has just introduced a new line of I-beam clamps that look like a dead ringer for the jorgensen, if they're made somewhere other then china I'll probably pick up what I need.

BINGO! At least someone is keeping up on new stuff. Highland Hardware has the new Bessey I beams. A pack of 2 is $98 and a bargain at that if they are even half as good as the Jorgies. Others also carry them so the secret is to buy local and save freight.
 

derosa

Well-known member
Joined
Oct 19, 2010
Messages
1,078
Location
Oceanside, NY
BINGO! At least someone is keeping up on new stuff. Highland Hardware has the new Bessey I beams. A pack of 2 is $98 and a bargain at that if they are even half as good as the Jorgies. Others also carry them so the secret is to buy local and save freight.
woodworkingshop.com has them as well for less until shipping, they're where I bought my jorgy I-beam clamps when they had a shipping deal. Based on the closeup pic the site shows they are a dead ringer for the jorgensens in every way. Probably a coincidence they came out so soon after Jorgensen went under :lol_hitti.
 
OP
J

jimreed2160

Well-known member
Joined
Aug 7, 2016
Messages
3,589
Location
Tallahassee FL
Who needs clamps when you have this vise?

I started working on my workbench resurfacing project tonight. Part of the prep was to remove the patternmakers vise dynamic. It just kept coming so I had to get out the tape measure.

DSCN2889.jpg


Of all the vises in my shop, I think this one wins the race.
 

cheechi

Well-known member
Joined
Feb 29, 2012
Messages
4,384
Location
Triad, NC
I thought about getting a second #33 and trying to make it with the stock blade into a scrub plane. I don't have any radius gages or anything like that usually I take a hole saw and a sharpie and maybe a ruler if it actually needs to be centered. do you have any advice since you made your own scrub blade for it, in modifying the stock blade?
 
OP
J

jimreed2160

Well-known member
Joined
Aug 7, 2016
Messages
3,589
Location
Tallahassee FL
I thought about getting a second #33 and trying to make it with the stock blade into a scrub plane. I don't have any radius gages or anything like that usually I take a hole saw and a sharpie and maybe a ruler if it actually needs to be centered. do you have any advice since you made your own scrub blade for it, in modifying the stock blade?

I like Diet Coke. Use the top of the can as a guide. If that is too curvy, try a can of beans or upgrade to a can of tuna. The exact radius exists somewhere in your pantry. Once you find it, use a sharpie on the flat side to trace the radius. Then grind away. Be sure to dunk frequently. The steel begins to temper at around 400 degrees. Water boils at 220--use that as your safety point. If you dunk and hear a sizzle or if you see steam, then the steel is too hot and you should dunk more frequently.

1. Trace radius with sharpie
2. Grind to radius at 90 degrees
3. Restore bevel
4. Hone.

I prefer to grind to 90 and then work the bevel because it heats up the thin edge the least. Steel at the tip heats differently during grinding--the thin steel gets hotter. You can maintain temper on the thick steel and draw the temper from the thin edge. Not good. Work from thick to thin and quench more frequently when you get a thin edge.
 

My Old Tools

Well-known member
Joined
Jun 4, 2014
Messages
5,434
Location
Hamrick Lake, TX
BINGO! At least someone is keeping up on new stuff. Highland Hardware has the new Bessey I beams. A pack of 2 is $98 and a bargain at that if they are even half as good as the Jorgies. Others also carry them so the secret is to buy local and save freight.

Or just find a pile of real Jorgy I-beams....that's about a 1000#s worth there.
 

Attachments

  • clamps.jpg
    clamps.jpg
    130.9 KB · Views: 98
Last edited:

mefast

Well-known member
Joined
Sep 1, 2015
Messages
99
Location
Southwestern, Ontario
I like Diet Coke. Use the top of the can as a guide. If that is too curvy, try a can of beans or upgrade to a can of tuna. The exact radius exists somewhere in your pantry.

Wow! That's a brilliant idea. I was trying to figure out a way to make the 8" radius on my jack plane. I think one of the wide cans of tomatoes or maybe a glass Pyrex container should fit the bill. Thanks Jim!
 
OP
J

jimreed2160

Well-known member
Joined
Aug 7, 2016
Messages
3,589
Location
Tallahassee FL
No shop time today as I am going to visit my daughter. She requested that I bring glue to repair some sort of coffeetable "incident". That may be interesting.

In the meantime, here is a photo for today's eye candy. I used one of the HD totes to corral some free range woodies in the boneyard.

DSCN2885.jpg


It is a mixture of sash planes (double and single), T&G planes, and a few hollows and rounds. All of them have good bodies. Some just need cleaning and a few need blades. Now that they are boxed, they are closer to the project table.

My plan this weekend is to finish up the benchtop resurfacing. I have laid one strip so far and I really like the look.
 

R_einan

Well-known member
Joined
Aug 29, 2016
Messages
461
Location
Eastern WA
In the planning stages of a workbench for my father in laws new shop. I've decided to conserve space for beneath the work top, and also to keep a flat face for drawers and cabinet doors to mount to, I am going to use a half lap on the end of the 2x4 leg which will join with a cross lap in the 2x4 top support. Not really a new design, just a modification to an existing design that we both have used. Anyway, with 12 legs to cut half laps in I thought a dado stack was finally in order but figured I would ask for some recommendations.
 
OP
J

jimreed2160

Well-known member
Joined
Aug 7, 2016
Messages
3,589
Location
Tallahassee FL
R--Ditto on the Freud blades. Underbench storage is a great idea. I suggest you mock up the bench with cardboard boxes to check the overhang and make sure you have enough clearance for your knees. And extra inch or two could make a big difference.

I dropped off a few things with my daughter and did some ww repair while I was there. Seems that the coffee table I built during the 1990s had an accident. It is a simple frame with square taper legs and M&T skirt. The top is a 5' x 2' walnut glue up. It is pretty sturdy and we rested our feet on the top. Apparently my daughter's family is a little rambunctious and they managed to knock two of the legs off.

Lucky for me that my M&T joints were shallow and not very tight. Only the glue broke. I slathered much glue about and used newspaper to shim the M&T tight again. Hope this works for another 25 years. Otherwise, I might need to bring it into the shop for a little rework.

After I returned from my trip, I found a box at the door.

DSCN2892.jpg


It is a vintage rosewood mallet. My kitchen scale says it weighs 3 lbs and 1.2 ozs.

DSCN2894.jpg


I just wish I had been around 150 years ago when the boss told his crew to

"fetch that 16/4 rosewood stick and whip up a couple of mallets."

Those ww of yore really had some nice wood to work with.
 

Craptain

Well-known member
Joined
Apr 18, 2013
Messages
4,028
Location
Tampa Bay FL
I just wish I had been around 150 years ago when the boss told his crew to

"fetch that 16/4 rosewood stick and whip up a couple of mallets."

Those ww of yore really had some nice wood to work with.

Stands back in shock :shocking:

You mean in all that wood you don't?

Easy for me to say, my shop landlord is a lumber yard who specializes in Hardwoods. And yes, I do get special pricing.
http://andersonlumberstpete.com/

Oh and I do happen to have a chunk big enough to make at least one mallet, though I doubt that is it's fate.
 
To avoid these ads, REGISTER NOW!
Top Bottom