OP
jimreed2160
Well-known member
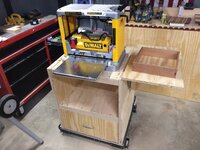
Auto--Ask and ye shall receive. Here are some photos of my router table. Like everything else in my shop, it comes with stories. The first is its origin. I once worked with a fellow woodworker named Barry. Like so many of us, Barry found his ww time cut short once his family grew. One day he needed some money and sold his shop contents to me for about $150. I followed him home that day and loaded up my pickup. One of the items was this little router table with said router. I had the exact CM router and burned one of them up. I think this one is his.


Years later, I was able to attend a Saturday shaper class at Highland Woodworking in Atlanta. My dad had given me a CM shaper and I was anxious to learn how to use it. Even though the table was cast iron, the shaper vibrated and made alot of noise. I hoped the class would help me tame it.
It was a day well spent. The instructor had worked his summers as a teen at the Charleston Naval Shipyard. Some of the crusty old WWII vets were still around and took him under their wing. His dad had a shaper and he wanted to know how to use the fence. The shop guys told him to bring it in and they would show him on another piece of equipment. So he did. The old salt grabbed the shaper fence and threw it in the trash. "There you go. That's how you use it."
They went on to explain how the shaper worked and why their shopmade fences were superior in function AND in safety. It really made sense to me.

I made this one from wide furring strips.

The beauty is that this shopmade fence covers most of the cutter and protects the operator. In fact, you can make a zero clearance face for it by attaching thin plywood and gently nudging the fence over the cutter.

I highly recommend this type of fence on a table router or on a shaper. As for my previous shaper, I named it the "Widowmaker" and sold it. The new owner was amused that I was afraid of it. I hope he got it tuned and turned into a good tool.
Years later, I was able to attend a Saturday shaper class at Highland Woodworking in Atlanta. My dad had given me a CM shaper and I was anxious to learn how to use it. Even though the table was cast iron, the shaper vibrated and made alot of noise. I hoped the class would help me tame it.
It was a day well spent. The instructor had worked his summers as a teen at the Charleston Naval Shipyard. Some of the crusty old WWII vets were still around and took him under their wing. His dad had a shaper and he wanted to know how to use the fence. The shop guys told him to bring it in and they would show him on another piece of equipment. So he did. The old salt grabbed the shaper fence and threw it in the trash. "There you go. That's how you use it."
They went on to explain how the shaper worked and why their shopmade fences were superior in function AND in safety. It really made sense to me.
I made this one from wide furring strips.
The beauty is that this shopmade fence covers most of the cutter and protects the operator. In fact, you can make a zero clearance face for it by attaching thin plywood and gently nudging the fence over the cutter.
I highly recommend this type of fence on a table router or on a shaper. As for my previous shaper, I named it the "Widowmaker" and sold it. The new owner was amused that I was afraid of it. I hope he got it tuned and turned into a good tool.