
You are using an out of date browser. It may not display this or other websites correctly.
You should upgrade or use an alternative browser.
You should upgrade or use an alternative browser.
Woodworking 101--Tools and Tips
- Thread starter jimreed2160
- Start date

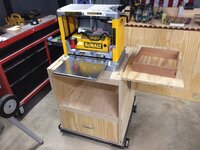
Kind of. I will be making it a cart to not have to lift it, but my design is going to replace the 'wings' for infeed & outfeed and instead have that built onto the top of the cart as a permanent infeed/outfeed surface.
My WEN is less 'big' than your Dewalt, I imagine I get 20-50% more snipe than yours for a given board. It's manageable but I am exploring ways to reduce it anyway.
My WEN is less 'big' than your Dewalt, I imagine I get 20-50% more snipe than yours for a given board. It's manageable but I am exploring ways to reduce it anyway.
OP
jimreed2160
Well-known member
R--Congrats on your dado blade. Don't forget to post pictures of your new upgraded projects.
Wrench--Love the scroll saw. Somebody spent quite a few weekends on that thing. The early (1930s, 1940s) Pop Mechanics and other mags started by running articles on how to make your own machinery like that. Some places even sold some of the parts. But that has to be the most elaborate home made machine I have seen.
Cheechi--I think the real limits on your infeed/outfeed tables is the amount of space that you can give up. Lumberyard planers and jointers have runway sized tables. Longer tables are easier to deal with.
Unusual vintage pedal powered scroll saw i came up with few years back. Any u guys seen 1 like it? It uses flat leather belt with spaced holes. I estimate the cast iron flywheel weighs 30lbs. Seat and or stool assembly missing. I believe it has bronze bushings for bearings with oil holes being plugged by whittled twigs. thanks 4 looking.
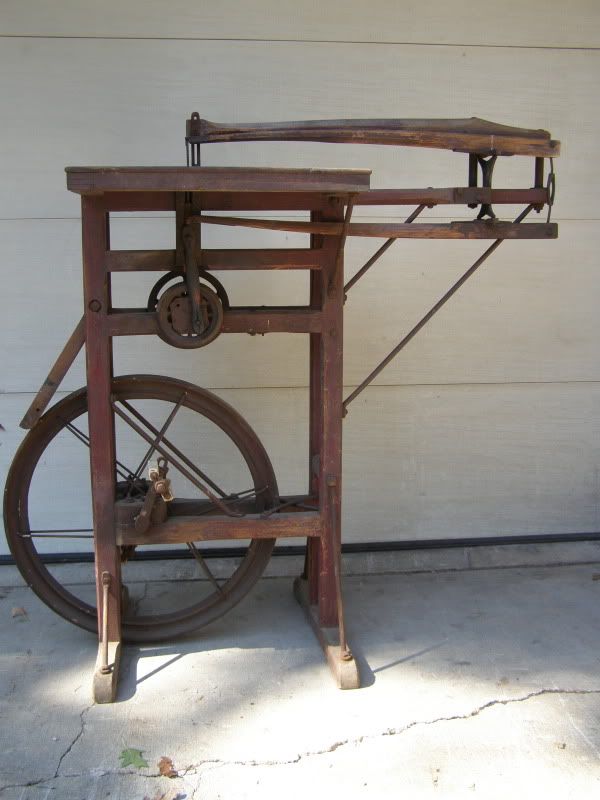

Looks commercially made.
Well designed metal bracing and red paint.
I think you're right about that Jim. My thought is a 4ft mdf shelf with melamine as one continuous piece from infeed to outfeed with now seams to trip on and snipe, might or might not be enough. Basically a 'built in planer sled'

but without moving the sled. The main issue is this granite piece is really nice and I don't want to cover it up with anything if I can get the same results by cutting the shelf in half and replacing the fold down tables with permanently mounted runway.
I'm going to keep on with other projects in the shop and come back to this when I have some time to think about it. Hanging dust collection pipe for the foreseeable future.
Craptain
Well-known member
Cheechi, I use a melamine shelf on my planer and it really does help reduce snipe. However I do use it in one continuous length as I have no granite to display.
Sent from my SM-G900T using Tapatalk
Sent from my SM-G900T using Tapatalk


Cheech: I believe rocking h woodshop on YouTube made a nice planer sled a few years ago but it does go all the way through. If you want it to work the best you will most likely have to cover up the granite. I have mine on a flip top stand. As long as I support the pieces as they come out I don't get any snipe. That includes the big pieces of my work bench.
Sent from my Pixel XL using Tapatalk
Sent from my Pixel XL using Tapatalk
PugetDude
ALLIANCE MEMBER
I've been able to almost completely eliminate snipe with a planer sled and a very light finish pass (or two) It also helps to use a short piece of scrap as a follower when planing long boards, so the cutterhead deflection occurs on the scrap rather than the $15/bd ft piece of walnut...
Zach: perfect thanks!
Craptain: good point. it's not meant to be a polished tool, thanks for the reminder.
rrich & puget: I will probably make a sled anyway out of some scrap mdf once I get other projects finished. Working on one now the planer would have been a huge help if I had it before I started.
Craptain: good point. it's not meant to be a polished tool, thanks for the reminder.
rrich & puget: I will probably make a sled anyway out of some scrap mdf once I get other projects finished. Working on one now the planer would have been a huge help if I had it before I started.
ez-duzit
Well-known member
My 13" Delta thickness plane has fold-down infeed and outfeed tables that must be about 20" long IIRC. And I get no snipe.
After work tonight I 75% restored a Sargent 414 plane. I still want to redo the handles and it needs sharpened. Otherwise it is all done. 


Sent from my Pixel XL using Tapatalk
Sent from my Pixel XL using Tapatalk
Attachments


Looks commercially made.
Well designed metal bracing and red paint.
See reply by Carla of same saw on the Vintage page.
OP
jimreed2160
Well-known member
rrich--Good job on the plane. Now it is time to sharpen that blade and put it to work.
ScottsGT
Well-known member
Finally did it. Bought a band saw. Years ago I passed on Dad's old Craftsman bandsaw that stood about 6 1/2' tall. It was just way too big for my work area. Many times I could have used one. Now looking at all the wood working projects where it will come in handy, I decided to get a smaller bench top model I could store away easier.
Almost pulled the trigger on the Grizzly 9" at $200 until I watched some YouTube reviews. One commenter mentioned WEN has the same one. Low and behold, $140 including tax and shipped to my door.
I think my first project will be to make some more tools with it.
Almost pulled the trigger on the Grizzly 9" at $200 until I watched some YouTube reviews. One commenter mentioned WEN has the same one. Low and behold, $140 including tax and shipped to my door.
I think my first project will be to make some more tools with it.
ez-duzit
Well-known member
GT--good luck with that. i have found the small band saws to be all but unusable, and useless for re-sawing. The smallest I could recommend is the 14", like the early Delta.
OP
jimreed2160
Well-known member
Scotts--Congrats on your new saw. I started out with a bandsaw many years ago. It's true that your first love is your greatest. I cut everything from firewood to ham bones (for knife handles) with that saw. Eventually I outgrew it but it remains in the shop as a mascot.
OP
jimreed2160
Well-known member
New project
After my week of the big itch, I was able to resume shop time today. Here is the latest project.

I managed to accumulate a set of #1, #2 and #3 Basa hammers by Green and Tweed. The #2 has olive drab rubberized faces (military origin?) and the other two are denuded and faceless. My plan is to clean them up, paint them green to match, and replace the missing faces.
After my week of the big itch, I was able to resume shop time today. Here is the latest project.
I managed to accumulate a set of #1, #2 and #3 Basa hammers by Green and Tweed. The #2 has olive drab rubberized faces (military origin?) and the other two are denuded and faceless. My plan is to clean them up, paint them green to match, and replace the missing faces.
ScottsGT
Well-known member
As much as I would love to have a big band saw like that, it just won't fit my work area. Unfortunately I'm stuck with either a bench top or nothing at all.
Scotts
You can make the bench top work to do a lot. Just need quality blades and have to go slower. You can resaw you just have to go very slow and probably plane the rough cutting more so.
Sent from my iPhone using Tapatalk
You can make the bench top work to do a lot. Just need quality blades and have to go slower. You can resaw you just have to go very slow and probably plane the rough cutting more so.
Sent from my iPhone using Tapatalk
OP
jimreed2160
Well-known member
New project--Spool desk
I like these furniture rehabs because many of the tasks are simple. Before I tackle making the replacement top for this spool desk, I need to fix the broken drawer. I am very lucky because the previous owner saved the broken piece.

The bottom of the drawer is warped. My guess is that it shrunk and bowed out of the rabbet. Then someone hamfisted it closed and snapped off the bottom.

My forensic analysis shows five short brads and one long brad. All of the other drawer bottoms have five brads. My guess is that the drawer developed a problem and the PO added a brad. This guess lends credence to the theory that much trouble sprouted from the warped bottom.

But I got ahead of myself. First order of business was to remove the knobs.

They are pretty standard fare for ca 1890. They look like polished gutta percha with a steel threaded bolt and a brass front.

The next task is to remove the brads holding the drawer bottom in place.

I used a screwdriver to pry it up.

The brads stayed in place and the bottom came off. I removed the brads with pliers.

It took a bit of teasing, but I finally managed to remove the bottom.

By the way, this thing has 100 years of black dust on it. Cleaning is coming next. But not before glue up.

I used wood scraps to elevate the rear of the frame.

Clamps, clamps, clamps. A ww cannot have too many clamps.

I need to rework the drawer bottom after the glue dries. A better fitting bottom will help this drawer make it another 100 years.
And I was able to finish another project today. Here is a shot of the Parker vise I have been restoring.

I like these furniture rehabs because many of the tasks are simple. Before I tackle making the replacement top for this spool desk, I need to fix the broken drawer. I am very lucky because the previous owner saved the broken piece.
The bottom of the drawer is warped. My guess is that it shrunk and bowed out of the rabbet. Then someone hamfisted it closed and snapped off the bottom.
My forensic analysis shows five short brads and one long brad. All of the other drawer bottoms have five brads. My guess is that the drawer developed a problem and the PO added a brad. This guess lends credence to the theory that much trouble sprouted from the warped bottom.
But I got ahead of myself. First order of business was to remove the knobs.
They are pretty standard fare for ca 1890. They look like polished gutta percha with a steel threaded bolt and a brass front.
The next task is to remove the brads holding the drawer bottom in place.
I used a screwdriver to pry it up.
The brads stayed in place and the bottom came off. I removed the brads with pliers.
It took a bit of teasing, but I finally managed to remove the bottom.
By the way, this thing has 100 years of black dust on it. Cleaning is coming next. But not before glue up.
I used wood scraps to elevate the rear of the frame.
Clamps, clamps, clamps. A ww cannot have too many clamps.
I need to rework the drawer bottom after the glue dries. A better fitting bottom will help this drawer make it another 100 years.
And I was able to finish another project today. Here is a shot of the Parker vise I have been restoring.
ez-duzit
Well-known member
...The bottom of the drawer is warped. My guess is that it shrunk and bowed out of the rabbet. Then someone hamfisted it closed and snapped off the bottom.
...My guess is that the drawer developed a problem and the PO added a brad. This guess lends credence to the theory that much trouble sprouted from the warped bottom...
My guess is that the drawer was simply overloaded.
OP
jimreed2160
Well-known member
Found tool
When I was cleaning out the spool chest, I found this little tool in one of the drawers. It is a leather punch stamped with a "7" on the end. The business end must have been dropped because about a third of the diameter is chipped off. The remaining piece is sharp but this thing must leave a real shaggy hole. I measured it at 1/4" so I guess the 7 stands for 7/32.

Most antiques come with a few surprises and this one is no exception.
When I was cleaning out the spool chest, I found this little tool in one of the drawers. It is a leather punch stamped with a "7" on the end. The business end must have been dropped because about a third of the diameter is chipped off. The remaining piece is sharp but this thing must leave a real shaggy hole. I measured it at 1/4" so I guess the 7 stands for 7/32.
Most antiques come with a few surprises and this one is no exception.
OP
jimreed2160
Well-known member
Drawer bottom
So Ez thinks the drawer was overloaded and I thought it might have just warped. Who knows? Either way, the bottom needs to have some memory work. Sometimes warped bottoms can be coaxed to return to normal. I will start with force and a few cauls.


It can stay this way overnight. I will check it tomorrow and see if the treatment helped.
So Ez thinks the drawer was overloaded and I thought it might have just warped. Who knows? Either way, the bottom needs to have some memory work. Sometimes warped bottoms can be coaxed to return to normal. I will start with force and a few cauls.
It can stay this way overnight. I will check it tomorrow and see if the treatment helped.
lostmymanual
Well-known member
Sheet good and lumber mobile cart.
Fairly new to the forum but I've got plenty of projects that I keep photos of. Lots of DIY stuff that I tinker with from welding to woodwork and lots of others that don't apply to this site (firearms, truck and motorcycle related). Since I balance all this, I need to keep things mobile. I don't like horizontal lumber racks for my application because I have extra tall ceilings that I can take advantage of. When I intro'd myself, I posted up a couple pics of this and someone mentioned putting the project here in the 101 thread.
Anyway, here's the basic plan I came up with one night while traveling. I couldn't remember exactly what I had on hand for materials. Some things have changed like the 2x4 joists under the skid turned into 2x6 joists in reality because the plan was rough by necessity. I wanted as little space as possible under the skid in case a caster(s) were to fail. Same kinda safety principle as keeping lifts as low as possible. The easiest way to keep something from falling is to keep it on the ground (and all that). This will keep it from hurting someone if I have a few of these casters fail at once or I somehow manage to tip this beast.

I also decided to shift the A frame off center to give me more room for dimensional lumber vs sheet goods. A few sheet goods go a long way so I don't need 30+ sheets of plywood at one time collecting dust whereas, I might have 30+ sticks of dimensional lumber easily most of the time. I decided against the drawer on the bottom. I decided I like having the larger bay for larger scraps in the bottom of the A frame. Also it is worth noting that I can easily screw some leafs down to the base if I need to extend the size of the skid to stack more lumber.

Here's some progression pics of how it went together. Keep in mind that I am a one man show, so my methods are a little counter intuitive. I build from the perspective of being able to do it 100% by myself. I am a bit of a hermit with no neighbors and no one locally that I trust to help. I have friends and acquaintences but they are not really inclined for fabrication.
Normally, it would be quicker for someone to rough out the A frames with ply and then lean then them in place. I was afraid I'd drop one so I built the base first, each A frame individually (using the first as a jig) and them mounted them with temporary braces, cleated them, built the inside shelves and then skinned the frames with 23/32 face sanded ply that was handy.
The base starts with (1) 8 ft sheet of 23/32 ply face glued together. I used cut up coffee can plastic on the corners to keep them sqaure during gluing after cutting them with the track saw. Glue doesn't stick to nylon so I thought it would be a good idea. I had used the weight of various tools and equipment around the shop to press them together and let them dry for 2 days after skim coating both sides with Titebond 3 that I use for most projects. I later cleaned up the plastic corners and kept them as handy chip guards.
I planed, glued and screwed the 2x6 skid joists and utilized 5/16 bolts with washers and T-Nuts for a flush finish. I then added a piece of 15" lumber in the center for the A frame feet to mate with.
 [/URL]


At this point I was not sure what the weight rating would be it was easy to figure out the 2 ply pieces but then throwing in the 2x6's and fasteners into the mix... I have no idea other than "alot". I stress tested the base by laying my tractor bucket on it and raising the tractor with negative lift. I've done this before to test welds for cracking so it was the first thing I thought of. I measured less than 1/4" droop and drove the tractor forward/backward with the back wheels and caster base. No problems, no cracks and no sag. Ready to roll~
Built up the a-frames. I would have preferred normal short side butting but would have no space for cutoffs. Since that was the case, I ran 4 studs 12" OC rather than 3 studs 16" on center. This was part of the original plan. The braces between in the bottom pic were temporary.

I skinned one side and decided to build in the shelves while one side was still open studs.

Then it was just a matter of skinning the other side with ply, drilling 1-1/2" holes with a Forstener bit for the removable pegs, adding the aluminum angle iron stops at the base, hardware pulls and eye bolts for the straps to secure the lumber for moving the cart.
I took a pile of wood and buried ply/OSB that went from this:

And voila!

It is now very easy to index through my ply and slide out a sheet versus having to scatter everything and restack every time. Time well spent for me.
After that, I started clearing the clutter off my benches by putting up a 6ft x 4ft french cleat wall area for ready tools that I most commonly use on the wood side. I have most of that done and some pics to go with it including a cordless tool charging station slightly slightly improved from other generic charging stations I see all over the net. I have some documented pics of levered caster bases for my tool stands as well. I can post that stuff up later if interested. I also have quite a few welding projects like tractor bucket forks, a modular welding bench, adjustable 3rd hand and others if interested.
I hope you enjoyed this.
Fairly new to the forum but I've got plenty of projects that I keep photos of. Lots of DIY stuff that I tinker with from welding to woodwork and lots of others that don't apply to this site (firearms, truck and motorcycle related). Since I balance all this, I need to keep things mobile. I don't like horizontal lumber racks for my application because I have extra tall ceilings that I can take advantage of. When I intro'd myself, I posted up a couple pics of this and someone mentioned putting the project here in the 101 thread.
Anyway, here's the basic plan I came up with one night while traveling. I couldn't remember exactly what I had on hand for materials. Some things have changed like the 2x4 joists under the skid turned into 2x6 joists in reality because the plan was rough by necessity. I wanted as little space as possible under the skid in case a caster(s) were to fail. Same kinda safety principle as keeping lifts as low as possible. The easiest way to keep something from falling is to keep it on the ground (and all that). This will keep it from hurting someone if I have a few of these casters fail at once or I somehow manage to tip this beast.
I also decided to shift the A frame off center to give me more room for dimensional lumber vs sheet goods. A few sheet goods go a long way so I don't need 30+ sheets of plywood at one time collecting dust whereas, I might have 30+ sticks of dimensional lumber easily most of the time. I decided against the drawer on the bottom. I decided I like having the larger bay for larger scraps in the bottom of the A frame. Also it is worth noting that I can easily screw some leafs down to the base if I need to extend the size of the skid to stack more lumber.
Here's some progression pics of how it went together. Keep in mind that I am a one man show, so my methods are a little counter intuitive. I build from the perspective of being able to do it 100% by myself. I am a bit of a hermit with no neighbors and no one locally that I trust to help. I have friends and acquaintences but they are not really inclined for fabrication.
Normally, it would be quicker for someone to rough out the A frames with ply and then lean then them in place. I was afraid I'd drop one so I built the base first, each A frame individually (using the first as a jig) and them mounted them with temporary braces, cleated them, built the inside shelves and then skinned the frames with 23/32 face sanded ply that was handy.
The base starts with (1) 8 ft sheet of 23/32 ply face glued together. I used cut up coffee can plastic on the corners to keep them sqaure during gluing after cutting them with the track saw. Glue doesn't stick to nylon so I thought it would be a good idea. I had used the weight of various tools and equipment around the shop to press them together and let them dry for 2 days after skim coating both sides with Titebond 3 that I use for most projects. I later cleaned up the plastic corners and kept them as handy chip guards.
I planed, glued and screwed the 2x6 skid joists and utilized 5/16 bolts with washers and T-Nuts for a flush finish. I then added a piece of 15" lumber in the center for the A frame feet to mate with.
At this point I was not sure what the weight rating would be it was easy to figure out the 2 ply pieces but then throwing in the 2x6's and fasteners into the mix... I have no idea other than "alot". I stress tested the base by laying my tractor bucket on it and raising the tractor with negative lift. I've done this before to test welds for cracking so it was the first thing I thought of. I measured less than 1/4" droop and drove the tractor forward/backward with the back wheels and caster base. No problems, no cracks and no sag. Ready to roll~
Built up the a-frames. I would have preferred normal short side butting but would have no space for cutoffs. Since that was the case, I ran 4 studs 12" OC rather than 3 studs 16" on center. This was part of the original plan. The braces between in the bottom pic were temporary.
I skinned one side and decided to build in the shelves while one side was still open studs.
Then it was just a matter of skinning the other side with ply, drilling 1-1/2" holes with a Forstener bit for the removable pegs, adding the aluminum angle iron stops at the base, hardware pulls and eye bolts for the straps to secure the lumber for moving the cart.
I took a pile of wood and buried ply/OSB that went from this:
And voila!
It is now very easy to index through my ply and slide out a sheet versus having to scatter everything and restack every time. Time well spent for me.
After that, I started clearing the clutter off my benches by putting up a 6ft x 4ft french cleat wall area for ready tools that I most commonly use on the wood side. I have most of that done and some pics to go with it including a cordless tool charging station slightly slightly improved from other generic charging stations I see all over the net. I have some documented pics of levered caster bases for my tool stands as well. I can post that stuff up later if interested. I also have quite a few welding projects like tractor bucket forks, a modular welding bench, adjustable 3rd hand and others if interested.
I hope you enjoyed this.
Last edited:
OP
jimreed2160
Well-known member
Lost--That is a great lumber rack. You musta had a really big fever dream while traveling. It must be nice to have your stock organized but right at your fingertips. Thanks for the photos. Please share more.
OP
jimreed2160
Well-known member
How do you like those K body Besseys? I got a few recently still getting used to the handle lever mechanism.
I like to use my Bessie K bodies because they stand up and really do work well. BUT I do not think they are intuitive to use--at least for me. I seem to spend more time than necessary just fiddling and jiggling to get them adjusted.

It is the same with quick release vises--too much behind the scenes mechanics. I like the simple stuff.

OP
jimreed2160
Well-known member
More in the drawer
When we left, the drawer was in a press. I was hoping that it would revert to its old flat self. Here is what I found this morning.

Pretty good for a few days. The next thing to do is to make some room so the bottom slides in its groove. It needs to "get its groove back on." For this operation I need the Stanley #98/99 rabbet planes.

But first I needed to clean the glue out of the front rabbet. I got out the Japanese chisel.

But it was too thick. I had to get the 1/8" chisel that I made.

It was just right. And BTW, the bevel is up only for the photo. I cleaned with the bevel down.
Now for the sides. I clamped the drawer frame on the bench.

And then used the planes to widen the groove just a tad.

I love these planes. When they are working correctly, they leave a straight shaving inside the groove.

Loooong shavings are the best!


Then I needed to remove some stock from the drawer bottom. My LN #62 is perfect for this job.

As you can see, the 100 yo bottom is pretty gnarly.

I made a few light passes.


Here is the bottom with three sides relieved.

And now the bottom slides pretty freely in the grooves as it should. Time to replace it. A few taps with the mallet sent it home.

I used a framing square to square up the drawer and then put three of the old tacks back in at the rear.

Done. Fits.

Here is a preview of the next task--the writing surface.


This stick is all that remains of the top. I need to make one and match the moulding. Stay tuned.
When we left, the drawer was in a press. I was hoping that it would revert to its old flat self. Here is what I found this morning.
Pretty good for a few days. The next thing to do is to make some room so the bottom slides in its groove. It needs to "get its groove back on." For this operation I need the Stanley #98/99 rabbet planes.
But first I needed to clean the glue out of the front rabbet. I got out the Japanese chisel.
But it was too thick. I had to get the 1/8" chisel that I made.
It was just right. And BTW, the bevel is up only for the photo. I cleaned with the bevel down.
Now for the sides. I clamped the drawer frame on the bench.
And then used the planes to widen the groove just a tad.
I love these planes. When they are working correctly, they leave a straight shaving inside the groove.
Loooong shavings are the best!
Then I needed to remove some stock from the drawer bottom. My LN #62 is perfect for this job.
As you can see, the 100 yo bottom is pretty gnarly.
I made a few light passes.
Here is the bottom with three sides relieved.
And now the bottom slides pretty freely in the grooves as it should. Time to replace it. A few taps with the mallet sent it home.
I used a framing square to square up the drawer and then put three of the old tacks back in at the rear.
Done. Fits.
Here is a preview of the next task--the writing surface.
This stick is all that remains of the top. I need to make one and match the moulding. Stay tuned.
Last edited:
drivesitfar
Well-known member
Jim: i love all your plane work and your little old wood cabinets are pretty darn cool too. keep it up.
LMM: thank you very much for that AWESOME POST of your wood holder and plans of how to make one. i know i'll be doing something similar once i build or buy a big shop or i might do it sooner. also again welcome to the forum and if you'd like to host a thread on DIY or any subject just start one up and keep posting information and pictures and i'm sure members will find you and i'll help if i can.
cheers
ScottsGT
Well-known member
Good stuff guys, keep it coming!
I like that lumber rack. I'm planning to make one but I have a fun challenge; ~7ft ceiling with lots of plumbing elbows effectively making my max height ~6ft in some spots. so my cart is going to have to have sheets laying long ways.
lucky I also have storage on the wall so my cart will mostly be for sheets and very large pieces.
lucky I also have storage on the wall so my cart will mostly be for sheets and very large pieces.
shortykorte
Well-known member
Lostmymanual, very nice storage rack and welcome to GJ.
Jim, I'm enjoying the restoration.
Sent from my iPhone using Tapatalk
Jim, I'm enjoying the restoration.
Sent from my iPhone using Tapatalk
OP
jimreed2160
Well-known member
Shorty--Thanks for looking. Here is some more of the same.
Today's mission was to clean the spool desk and remove the remaining hardware. That was a snap until the LAST ONE! It was a stubborn little devil.

But I won in the end. It seems that they installed these knobs and then cut the threaded end with snips or bolt cutters.


I will repair the thread damage when I clean the knobs. Good news is that previous owner tried to remove them and gave up. That means all of the nuts are present--good victory. Most of the case goods from this era are missing a nut or two. They need attention periodically but most are neglected and the nut finally works it way off and gets lost in the drawer.
The bottoms of the drawers and the top of the desk were covered with black soot. I guess this thing was in a room with a kerosene heater or something like that. I got rid of most of it.

Normally I like to clean with mineral spirits to get rid of grease but it is a little harsher than I wanted for this piece. I am trying to save the patina so I used turps. It came out pretty well. At least I am not covered with black soot everytime I touch it now.

It needs another light cleaning and I need to get started on the lid. Stay tuned.
Today's mission was to clean the spool desk and remove the remaining hardware. That was a snap until the LAST ONE! It was a stubborn little devil.
But I won in the end. It seems that they installed these knobs and then cut the threaded end with snips or bolt cutters.
I will repair the thread damage when I clean the knobs. Good news is that previous owner tried to remove them and gave up. That means all of the nuts are present--good victory. Most of the case goods from this era are missing a nut or two. They need attention periodically but most are neglected and the nut finally works it way off and gets lost in the drawer.
The bottoms of the drawers and the top of the desk were covered with black soot. I guess this thing was in a room with a kerosene heater or something like that. I got rid of most of it.
Normally I like to clean with mineral spirits to get rid of grease but it is a little harsher than I wanted for this piece. I am trying to save the patina so I used turps. It came out pretty well. At least I am not covered with black soot everytime I touch it now.
It needs another light cleaning and I need to get started on the lid. Stay tuned.
OP
jimreed2160
Well-known member
Vise mounting
Here is another ww project I just wrapped up. I made a wooden base for the Parker vise I am restoring for a ww buddy. It is a sandwich of really old SYP and 2x construction lumber.

This is a lightweight vise and I will urge him to be gentle with it. But it is attached pretty well and is ready for benchtop mounting. There are two bolts on the side and a large bolt in the center.

We worked together for many years and he just retired this year. He works on his cars and also is a good woodworker. BUT he is vise-less. This should be a welcome addition to his shop.
Here is another ww project I just wrapped up. I made a wooden base for the Parker vise I am restoring for a ww buddy. It is a sandwich of really old SYP and 2x construction lumber.
This is a lightweight vise and I will urge him to be gentle with it. But it is attached pretty well and is ready for benchtop mounting. There are two bolts on the side and a large bolt in the center.
We worked together for many years and he just retired this year. He works on his cars and also is a good woodworker. BUT he is vise-less. This should be a welcome addition to his shop.
ckadams00
Well-known member
Just finished an adirondack as a present for my wife for our anniversary tomorrow!


ALLFAST
Well-known member
That chair is fantastic. Happy Anniversary to you.
Shawn .
Shawn .
ez-duzit
Well-known member
00--that looks very attractive and comfortable.
Hello all,
Not a woodworker per se, however I like to work with wood and I am doing a few jobs around the house and on my dad's boat.
I am now considering to buy a "joiner plane" for some small jobs here and there and I am torn between the No6 and No7.
What would you recommend to get for not much use or small projects?
I own a 4 1/2 Stanley for small adjustments.
Thanks
ez-duzit
Well-known member
I'd suggest that there are other possibly more useful planes you might want to consider first, such as: low angle block plane, rabbet/shoulder plane, etc.