ScottsGT
Well-known member
You are both correct
LOL! I didn't even notice the Camaro in the other photo.
 Damn, I want an early Camaro to go with my Mustang too!
 So, mullet or no mullet?


You are both correct
Damn, I want an early Camaro to go with my Mustang too! Definitely no mullet, though the Harley is in the other garage...

")


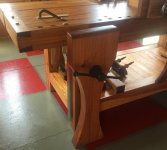
Glued it up with my morning coffee...
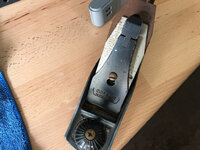
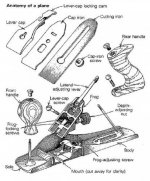
I bought this plane at a garage sale this week end. Any info on the plane or tips on the process are appreciated.
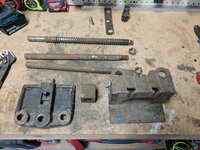
Jimreed: thanks for the sanding pics. Can you get a better pic of the vice handle? I see yours is a pipe. I don't have the piece where your pipe goes through. Is that original? Can you get me a pic of that piece?


Ross - I have to ask.... How many vises do you own now too? Me from two to six-ish.
That is a thing of beauty right there. Really nice work.
How did you cut the decorative curves? Bandsaw? I know if I tried to cut a curve like that in 4" stock I'd be seeing blade deflection all over the cut.
Ainsley: great looking HONEY DO project for your wife (and you) with that cool trellis.
Ai--you'll need something to keep the trellis from wracking.
Correct, I set the legs about 30" into concrete. Stone at the bottom and then just dry pack.Looks to me like he's got the legs set in concrete.
Ainsley--Good projects. Thanks for the pictures.
Ainsley--Cute router. My big routers are screaming and intimidating. It does seem that the junior model would be easier to handle.
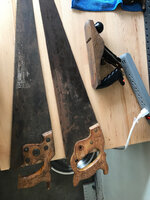
madison: Those are some nice tools you got. That plane looks like NOS. There's hardly a scratch on it. I can't read very much of what is stamped into the top of that backsaw. I can read enough to say that it's probably a Disston. They used that peculiar shortening of Philadelphia. I can see an H and probably an E above that. Keep reading. It probably says Henry Disston & Sons but it might say Son. If it only says Son you've got a great old saw that can be dated to within a few years. Henry brought his first son into the business immediately after the Civil War. The rest followed soon after that. I recently found one with no Sons or no Son - Just Henry Disston. Great score on both tools.
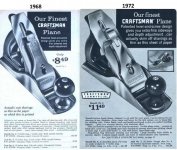
Here is a catalog page from 1972 showing a Craftsman plane like yours.
This was what I was thinking. Did you cut a piece of pipe for that or buy it like that?Here is my start with plumbing fittings. I think it will turn out OK.
I will post pictures as I progress.
This was what I was thinking. Did you cut a piece of pipe for that or buy it like that?