turbowoodworker
Well-known member
Hey Jim, that's the one I talked about metal shavings on the drill bit from the **** bushings in a previous post. Good luck there.

That looks pretty sweet. Did you do much inside...like a kitchen, bench, etc?
Nice playhouse Madison
Madison--Great playhouse. Lucky kids.
Hey Jim, that's the one I talked about metal shavings on the drill bit from the **** bushings in a previous post. Good luck there.
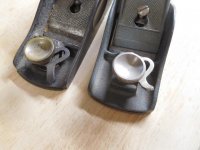
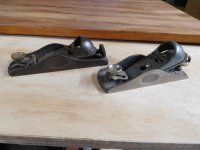
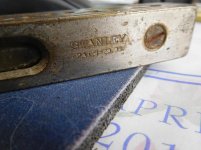
Stanley #62
Well the low temps in the shop did not shut down the Evaporust as it did a pretty good job overnight. I cleaned up the plane, reground the bevel and sharpened the blade. Now this plane really rocks.
Excuse my ignorance, I tried searching the net but could not find any pics or info... What exactly does that cam lever you made in the front do???? I've never seen that on a hand plane before.
Excuse my ignorance, I tried searching the net but could not find any pics or info... What exactly does that cam lever you made in the front do???? I've never seen that on a hand plane before.
")
...I like the adjustable mouth feature on planes but rarely change it once I find a setting I like. But every woodworker has different styles and sometimes even the wood at hand requires something different. Too tight and the mouth clogs--too open and it is hard to get a wispy shaving. Get it right and leave it alone is my motto.
Just what Duker said.
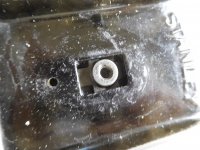
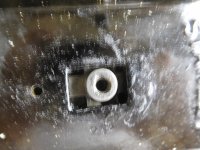
Stanley was granted a patent on Feb 20, 1894 for moveable plane mouth that was controlled by an eccentric lever. The mech was used on their block planes and on the much larger #62. The lever piece I reproduced is held in place by a pivot pin and the slot is engaged by a casting boss on the bottom of the front knob. The knob is attached to a casting boss on the movable front sole of the plane and lateral action of the lever is translated to up and back action on the front piece. It allows the mouth to be adjusted open or tight.
There are many forces of physics and geometry that explain how and why the plane blade cuts like it does in certain cases but the quick answer is that a slight blade setting and a tight mouth will result in a very fine shaving. So the jack plane can have a large mouth and do its job well. But a low angle plane needs a tight mouth to take a wispy shaving. Also, smoothing planes and shoulder planes need a tight mouth to do their best work.
I like the adjustable mouth feature on planes but rarely change it once I find a setting I like. But every woodworker has different styles and sometimes even the wood at hand requires something different. Too tight and the mouth clogs--too open and it is hard to get a wispy shaving. Get it right and leave it alone is my motto.
Note to self..... never answer a question for Jim as he is much more descriptive and eloquent than I am ...lol
Whenever you get a chance, could you take some pics of the moving part(s)? I feel like there is something on the bottom side I can't see that would really put a visual aid to your explanation.
Of course. Here are pictures of the #62 and its sliding front sole.
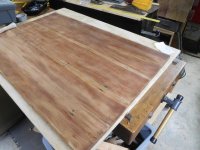
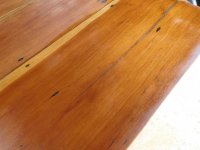
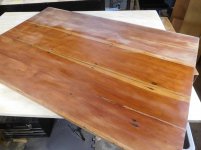
looks Great!Table top
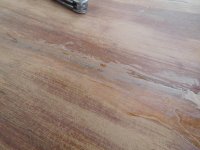
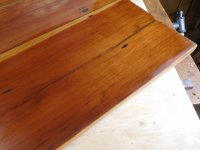
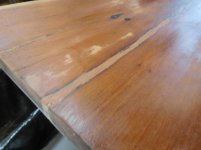
I finished working with the burn in knife but never posted the pictures. While working in the front, I found that the knife and filler worked well on the cracks because it hardened quickly. But the largest gap up top was not much larger than 1/8". The story on the bottom, however, was much different. both of them were large open cracks from the edge to the patch. I inserted the patch a little over an inch from the end and left a crack on the edge. On the underside, these cracks were deep. Going solid would take a whole stick and I was afraid that would act like a wedge to split the end open if the wood wanted to move.
To solve this dilemma, I cut some soft pine blocks and stuck them into the voids. It took very little filler to make things right. And the best part is that there is at least a little room for movement.
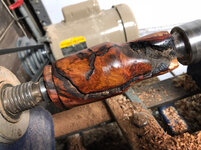
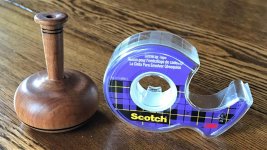
chrislehr: Very nice job on that vase. I like the inclusions. What kind of finish did you use? My brother (a non-posting GJ member) uses small scraps and odd pieces to turn what I call Weed Vases (pronounced vah-zes). The contrast between a dried sprig of something and the elegant shape is striking. Unfortunately, I don't have a picture of a vase with a dried weed but here is one of just the vase. The tape dispenser is only for scale. It wasn't intended as a pairing.
. That insert needs to be painted a dark color imo but yea the inclusions came out beyond my actual abilities to plan these sort of things!
Chris--It may be out of plumb but it looks good to me! Oh, wait, PLUM. My bad.
That is an outstanding piece of work. I'll bet you get a special thrill watching what emerges from the blank. One more reason that ww is fun.
Wife should be impressed.
She was pretty happy. Less than when I told her at 1:30am that I made it than this morning, but still.
Better yet, I can show her the stump where the tree was - this is stuff a dragged home about a year ago. You rarely see a plum tree get 80+ years old - most are orchard fodder and once the main production years cease they are usually replaced. Portland has some amazing trees so when has fallen and its a nice looking wood, I try to snag some.
Here's one of the cookies still too wet to do anything with (old pic, was VERY wet here)
https://imgur.com/FGEurQC
Urban forestry is cool. I was able to snag some dogwood a few years ago and made a table for my friend. Your plum was a good find.
Makes whatever you make with it feel more important.chris: Anyone who could turn a weed vase out of that section of plum must have other examples of his work. Pictures please?

I didn't think this warranted it's own thread, but I have a question about saw blades.
I bought a Freud thin kerf ripping blade for my new SawStop table saw. I bought it primarily for ripping 1x4 pine boards.
I also need to cut out pieces of 5mm underlayment . Should I switch the blade for cutting the underlaymemt or will that make a significant difference in blade life?
The time it took to post that question you could have just swapped out the blade...