To avoid these ads, REGISTER NOW!

Woodworking 101--Tools and Tips

OP
J

jimreed2160

Well-known member
Joined
Aug 7, 2016
Messages
3,589
Location
Tallahassee FL
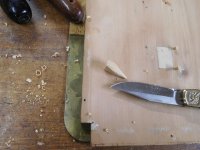
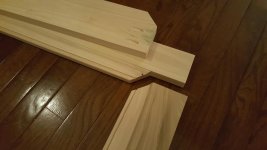
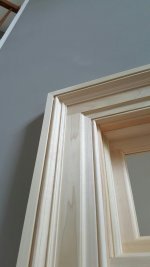
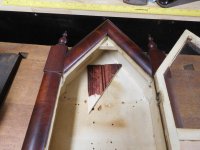
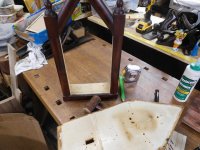
rrich--Looking good. The crack is just fine. Wood is wood and we all know that wood is not perfect. Tearouts, cracks and other defects are there to remind us that our projects are hand built. I call these defects "charm".
 
To avoid these ads, REGISTER NOW!

ez-duzit

Well-known member
Joined
Jun 24, 2013
Messages
5,095
Location
Marina del Rey
1--carefully mask the crack, on both sides, and drizzle some WEST epoxy into it until it won't absorb any more. Run a putty knife over it and remove the masking tape before it kicks.
 

rrich1

Well-known member
Joined
Oct 7, 2015
Messages
793
Shelf through morstises are done. Overall I'm happy with them. The other side has a gap that I need to fill. I first used a Forster bit to hog out most of the mortise and then chiseled the rest out. Next up before glue up is to mortise for the hinges. If I were smart I would have ordered them weeks ago. But I'm not and ordered them last night. Hopefully they will arrive soon. IMG_20180426_153616_964.jpgIMG_20180426_153616_965.jpg

Sent from my Pixel XL using Tapatalk
 

neilc

Well-known member
Joined
Jan 17, 2014
Messages
94
Location
Chicagoland
Drives - check out Slicer for Autodesk Fusion 360. It will let you take an organic shape and convert into progressive cuts in panels for assembly. And it's free for makers.
 
OP
J

jimreed2160

Well-known member
Joined
Aug 7, 2016
Messages
3,589
Location
Tallahassee FL
Clock project

Work continues but there is not a lot to photograph. I did a test piece and found that the Minwax mahogany stain matched the mahogany clock well. So I stained the beadboard and shot it with poly. Next task is to install it in the clock. Working in there is pretty tight and the pieces have to go in unassembled. It is a lot like working on a ship in a bottle.

I would like to do a trial fit, but that may not be possible without a lot of trouble. Once I get it all inside and pieced together, I don't think I can easily get it out again. I may have to smear glue on the inside back of the clock and hope for the best.
 

Attachments

  • DSCN6502.jpg
    DSCN6502.jpg
    135.2 KB · Views: 48
  • DSCN6503.jpg
    DSCN6503.jpg
    154.9 KB · Views: 54

Unruh

Well-known member
Joined
Aug 12, 2017
Messages
1,431
Location
Silverdale, Washington
Hey all I have a question. I’m a teacher and one of the summer clubs we have at my school is woodworking club. The club is a week long and I was wondering if anyone had an idea for an easy project that is different than the standard birdhouse. The club is only week long. No power tools. The kids are pretty young, 7,8,and 9.

The first project I have planned is a mosquito house.
 

Attachments

  • 2145F4DD-6724-4F63-AE57-3780D9C57459.jpg
    2145F4DD-6724-4F63-AE57-3780D9C57459.jpg
    121 KB · Views: 52
Last edited:

rrich1

Well-known member
Joined
Oct 7, 2015
Messages
793
Today I I cleaned up the shelf a little bit and got rid of the frays on the ends. If I would have done my cuts in a different order it would have been much cleaner. Oh well, it won't be seen.

I used my router table to rabbet the back sides of the carcass to accept the back panel. I then got the back pieces cut. The bottom will be the French cleat that holds the whole cabinet up. The seem is hidden by the shelf. I used my new Makita cordless track saw today and holy ****! I love this saw. The cuts on 1/2" plywood were so clean and crisp. I also used the track saw to cut the 40 angle for the cleat. Making progress!

My hinges will be here tomorrow. I will cut and mortise those in. After I do that I will glue the cabinet carcass together.

My dove tail guide will also be here today. I will use that on the doors this weekend too. IMG_20180427_124632.jpgIMG_20180427_124647.jpgIMG_20180427_124653.jpgIMG_20180427_123145.jpgIMG_20180427_123156.jpg

Sent from my Pixel XL using Tapatalk
 

drivesitfar

Well-known member
Joined
Oct 23, 2013
Messages
36,006
Location
Pacific Northwest
NeilC: thanks for the tip and here's the link to the website in case others want a source to get some plans for some cool ideas: https://www.autodesk.com/

ALL: I know a few young guys locally that have a place where you can learn how to do CNC, Woodworking, Welding and other skills and if any of you are interested in learning and live close to Seattle you can PM me for their website.

my cedar material survived ok for sitting under a tarp for 3 years and only issue was a few of the 1x2's and 2x4's warped a bit. also had a rat's nest to remove, but now i've got some good fencing material that you just can't go to any store and buy. i'd already stored it for a year with slats while it dried and the project went on hold when i had an emergency gall bladder removal surgery a few years ago and then just got put on the back burner. hopefully fence building will start soon cause I hate working outside in the rain.
 

Attachments

  • moving cedar off of small galvanized rack to tall rack 1 (2).jpg
    moving cedar off of small galvanized rack to tall rack 1 (2).jpg
    146.5 KB · Views: 58
  • moving cedar off of small galvanized rack to tall rack 2 (2).jpg
    moving cedar off of small galvanized rack to tall rack 2 (2).jpg
    148.4 KB · Views: 57
  • moving cedar off of small galvanized rack to tall rack 5 (2).jpg
    moving cedar off of small galvanized rack to tall rack 5 (2).jpg
    143 KB · Views: 55
  • moving cedar off of small galvanized rack to tall rack (2).jpg
    moving cedar off of small galvanized rack to tall rack (2).jpg
    146.3 KB · Views: 50

CRSINMICH

Well-known member
Joined
Aug 15, 2015
Messages
2,397
Location
Southeastern Michigan
Unruh: The first woodworking project I remember doing was a 6" ruler. I had to cut the wood to length, score the inch, half inch, and quarter inch divisions with a knife, and stamp the numbers. When Boiled Linseed Oil was applied the numbers and divisions darkened. At the age range you will be working with, you might want to use old butter knives to do the scoring. Have band-aids handy too.
 

Unruh

Well-known member
Joined
Aug 12, 2017
Messages
1,431
Location
Silverdale, Washington
Unruh: The first woodworking project I remember doing was a 6" ruler. I had to cut the wood to length, score the inch, half inch, and quarter inch divisions with a knife, and stamp the numbers. When Boiled Linseed Oil was applied the numbers and divisions darkened. At the age range you will be working with, you might want to use old butter knives to do the scoring. Have band-aids handy too.

That is a great idea. Thank you! I’ll have them do that day one and then they can use them during the week for measuring.
 

turbowoodworker

Well-known member
Joined
Mar 18, 2012
Messages
3,522
Location
Apex NC
One of my first projects as a scout was a tool caddy. You know the old style with open top, dowel handle, etc. Simple project for a short class.
 
OP
J

jimreed2160

Well-known member
Joined
Aug 7, 2016
Messages
3,589
Location
Tallahassee FL
Unruh--Good luck with the kids. Good projects for that age group can be hard to find. My granddaughters loved working on Harry Potter wands at that age. All it takes is a few scraps, some dowels, glue and glitter.
 

Unruh

Well-known member
Joined
Aug 12, 2017
Messages
1,431
Location
Silverdale, Washington
One of my first projects as a scout was a tool caddy. You know the old style with open top, dowel handle, etc. Simple project for a short class.


Another great idea. Thanks for the reply.


Unruh--Good luck with the kids. Good projects for that age group can be hard to find. My granddaughters loved working on Harry Potter wands at that age. All it takes is a few scraps, some dowels, glue and glitter.

Jim that does sound like fun. I have plenty of scraps!
 

CRSINMICH

Well-known member
Joined
Aug 15, 2015
Messages
2,397
Location
Southeastern Michigan
TWO MORE ITEMS KEPT WITHIN REACH AT MY BENCH​
A clean dry cloth and some band-aids will have you back working in a minute or two without adding too much of your DNA to the project.

Today's injury was quite minor but, when you get old, doctors prescribe blood thinners like they were M&M's. Even a slight nick can become messy.

Until I looked at the price tag, I didn't realize how long I hold onto things. Woolworth's? 69 cents?
 

Attachments

  • Two bench items.jpg
    Two bench items.jpg
    95.1 KB · Views: 38
OP
J

jimreed2160

Well-known member
Joined
Aug 7, 2016
Messages
3,589
Location
Tallahassee FL
CRS--Nice to have first aid nearby. At our age, time does seem to zoom by. The tip off on the Band-aids is the metal box. I haven't seen one of those in years.

To keep track of the time thing, I always date my bottle of glue and pitch it at 5 years if it is still around. I also date the multitude of rechargeable tool batteries. Some of those get flaky at 5 years.
 
OP
J

jimreed2160

Well-known member
Joined
Aug 7, 2016
Messages
3,589
Location
Tallahassee FL
Clock project

The task today was to insert the new beadboard back into the Gothic steeple clock. It just did not look right to me so I smacked the back with a mallet to see if it would budge. Well, sometimes luck is your friend and the back came right off. It was pinned in place with cut nails a long time ago. Judging from the nails and from the thickness of the back (1/2" pine), I would date the clock at around 1850. Antique furniture and frames from about 1875 on used thin sliced poplar that was cut like veneer.

I was able to scrape the white paint from the case without much problem just by using a pocketknife. The soft pine back, however, did not want to give up so easily. Even my LN scraper was not much use so I finally just sanded it down. The top will be concealed by the dial but the bottom will be open.

Someone cut an access hole. I found an old pine scrap and cut a patch. In addition, one of the corners was cracked. I glued both into place.
 

Attachments

  • DSCN6518.jpg
    DSCN6518.jpg
    151.3 KB · Views: 44
  • DSCN6517.jpg
    DSCN6517.jpg
    112.5 KB · Views: 41
  • DSCN6519.jpg
    DSCN6519.jpg
    145.4 KB · Views: 42
  • DSCN6521.jpg
    DSCN6521.jpg
    145.2 KB · Views: 41
  • DSCN6523.jpg
    DSCN6523.jpg
    115.7 KB · Views: 41

PelicanPines

ALLIANCE MEMBER
Joined
Apr 30, 2014
Messages
38,107
Location
New Jersey, USA, Earth, My own reality
TWO MORE ITEMS KEPT WITHIN REACH AT MY BENCH​
A clean dry cloth and some band-aids will have you back working in a minute or two without adding too much of your DNA to the project.

Today's injury was quite minor but, when you get old, doctors prescribe blood thinners like they were M&M's. Even a slight nick can become messy.

Until I looked at the price tag, I didn't realize how long I hold onto things. Woolworth's? 69 cents?

Hit my finger with a brand new 3" Spyder Hole Saw, while drilling into a desk... to install an outlet and USB port... blood thinners... bled so bad, I filled a paper towel...

I was using Hot Glue to mount a back board to drill the hole... the Hot Glue worked at closing my finger... burned a bit but I stopped leaking.

I love those old metal bandaid boxes...
 

Bob Heine

ALLIANCE MEMBER
Joined
Oct 24, 2009
Messages
10,705
Location
Boca Raton, Florida
I have a much newer metal box. My wife has the old one somewhere -- it still has a few of the old Band-Aids (the ones with the little red thread to tear the paper sleeve open). I get grief for dribbling blood inside the house so I use a piece of paper towel and blue painter's tape in the garage or workshop. I should probably buy some beige tape so my wounds aren't so obvious.
attachment.php
 

Attachments

  • Band-Aid Box.jpg
    Band-Aid Box.jpg
    87.1 KB · Views: 334

CRSINMICH

Well-known member
Joined
Aug 15, 2015
Messages
2,397
Location
Southeastern Michigan
Pelican: I hope your finger healed okay. I never would have thought of gluing a sliced finger. It only burned a bit, you say? I might have to remember to plug in the glue gun before I start a project.

Bob: My shop is in the basement and there are laundry tubs only steps away so my only concern is dribbling on whatever project I'm working on. That could ruin the look of the finish. There are a few red thread band-aids in my container too.

jim: I've been following your clock rehab posts. I tried to comment once before but my computer had a mini crash. Let's see what happens this time. I have a steeple clock too. I got it for my wife when we were courting. It works and it seems to be a little older than yours. It's a little cruder at least. I can't tell for certain but there seems to be some veneer on the front face. Something about the grain orientation doesn't look natural.
 

Duker

Well-known member
Joined
Sep 25, 2010
Messages
10,861
Location
Livingston, TX
Hit my finger with a brand new 3" Spyder Hole Saw, while drilling into a desk... to install an outlet and USB port... blood thinners... bled so bad, I filled a paper towel...


I was using Hot Glue to mount a back board to drill the hole... the Hot Glue worked at closing my finger... burned a bit but I stopped leaking.


I love those old metal bandaid boxes...


Ditto on the blood thinners... I keep bottles of Cyanoacrylate aka “super glue” all around shop to close up cuts. My son when he was about 2 (now 22) fell and put a little gash into his forehead. My wife and I took him to the doctor and he looked at it and said no need for stitches and closed the cut up with a little bottle of something. I asked if I could see the bottle and when I smelled the very familiar scent as I use it all the time in turning pens or filling voids I went I’ll be damned....super glue.... been using it for cuts ever since.


Sent from my iPad using Tapatalk Pro
 
To avoid these ads, REGISTER NOW!

rlitman

Well-known member
Joined
Oct 18, 2010
Messages
24,591
Location
Long Island
Ditto on the blood thinners... I keep bottles of Cyanoacrylate aka “super glue” all around shop to close up cuts. My son when he was about 2 (now 22) fell and put a little gash into his forehead. My wife and I took him to the doctor and he looked at it and said no need for stitches and closed the cut up with a little bottle of something. I asked if I could see the bottle and when I smelled the very familiar scent as I use it all the time in turning pens or filling voids I went I’ll be damned....super glue.... been using it for cuts ever since.


Sent from my iPad using Tapatalk Pro

Dermabond is 2-Octyl Cyanoacrylate. Your super glue is Ethyl Cyanoacrylate.
The Ethyl form can cause chemical and physical burns as it cures, and is more brittle.

Real 2-Octyl Cyanoacrylate is sold at Home Depot under the name Liquid Skin:
https://www.homedepot.com/p/Liquid-Skin-Pro-2-g-Liquid-Bandage-Twin-Pack-002070/206643332

In all the Home Depots by me, they have it in the aisle with the gloves, in the next shelf, near the safety glasses and ear muffs.
 

CRSINMICH

Well-known member
Joined
Aug 15, 2015
Messages
2,397
Location
Southeastern Michigan
Duker and rlitman: That's great information. Since my wife is a nurse practitioner, I've known about skin glues for some time. I just didn't think of it for home use. Let's see now: clean dry cloth, band-aids, glue gun, and skin glue. Maybe I'll keep a needle and thread handy too, just in case I want to do it old school.
 

Unruh

Well-known member
Joined
Aug 12, 2017
Messages
1,431
Location
Silverdale, Washington
Duker and rlitman: That's great information. Since my wife is a nurse practitioner, I've known about skin glues for some time. I just didn't think of it for home use. Let's see now: clean dry cloth, band-aids, glue gun, and skin glue. Maybe I'll keep a needle and thread handy too, just in case I want to do it old school.

If you are going that way, you better add a flask of whiskey as well.:)
 

cheechi

Well-known member
Joined
Feb 29, 2012
Messages
4,384
Location
Triad, NC
I have found liquid skin is kind of dependent on where it is, as I tend to get most cuts on my hands sometimes a bandaid is less awkward than using it. But I've been using it for years when applicable.

I prefer the 3M Nexcare waterproof bandages as they tend to stay on the best especially around the side of your palm or finger. They aren't as good on fingertips or knuckles.
 

CRSINMICH

Well-known member
Joined
Aug 15, 2015
Messages
2,397
Location
Southeastern Michigan
BACK TO WOODWORKING​
I hesitate to do this because the last time I posted a similar link on another thread it stirred up a hornet's nest.​
Here is a link to a video by James Wright of Wood by Wright. He tested several common types of wood glues.

DISCLAIMER: I'm NOT making any claims for his testing. I'm only providing a link for your consideration: https://www.youtube.com/watch?v=ZoaTZY5cSQE
 
Last edited:
OP
J

jimreed2160

Well-known member
Joined
Aug 7, 2016
Messages
3,589
Location
Tallahassee FL
Glues

CRS--Thanks for the video link. I always like things that confirm my practices and I note that my go-to Titebond III was outstanding in his tests.

As for skin glue, I do feel compelled to post a little non woodworking info here because of my background. In my early days in IT, I found myself working as the entire IT department for a start up company that preserved human tissue. I even wrote a human tissue tracking system--but I digress. That same company worked for years on human body glue. They were more interested in the surgical glue market but the skin glue application was also an item of interest. I was very involved in the technology and research for years and could write a book, but here is the skinny. Superglue is fine for gluing outer layers of skin because it provides excellent wound closure. The issue is that it crystalizes and cannot be absorbed by the body. That is OK for superficial skin where the glued area sloughs off in time as the skin revitalizes itself.

So glue those superficial cuts if you need to stop weeping blood. Just watch where you put the clamps.
 

Duker

Well-known member
Joined
Sep 25, 2010
Messages
10,861
Location
Livingston, TX
Dermabond is 2-Octyl Cyanoacrylate. Your super glue is Ethyl Cyanoacrylate.
The Ethyl form can cause chemical and physical burns as it cures, and is more brittle.

Real 2-Octyl Cyanoacrylate is sold at Home Depot under the name Liquid Skin:
https://www.homedepot.com/p/Liquid-Skin-Pro-2-g-Liquid-Bandage-Twin-Pack-002070/206643332

In all the Home Depots by me, they have it in the aisle with the gloves, in the next shelf, near the safety glasses and ear muffs.


Yeah, I should have made or stated the difference between the two compounds.

However, i believe if my memory serves me right it was the original methyl-2 glues that caused what could be severe skin reactions. It was also used in man made Hyde glues etc. I don’t think you will find those versions in consumer grade products. The reaction or burn most people feel is the heat from the chemical reaction as it hardens. Ethyl versions have been used in dental industry for bone grafts etc for many years. The new liquid skin products do offer much more flexibility and probably should be in my first aid kit in the shop.
 
OP
J

jimreed2160

Well-known member
Joined
Aug 7, 2016
Messages
3,589
Location
Tallahassee FL
Clock

I had a chance to work on the clock today since the glue was dry on my patch. I cut the large block down with my bandsaw and then planed it with a Bedrock #603. Then the screw holes looked larger so I whittled some pointed sticks and hammered them into the holes. I am hoping to match everything with stain but almost anything would look better than a big hole surrounded by tiny holes.
 

Attachments

  • DSCN6524.jpg
    DSCN6524.jpg
    150.5 KB · Views: 41
  • DSCN6525.jpg
    DSCN6525.jpg
    108.8 KB · Views: 38
  • DSCN6526.jpg
    DSCN6526.jpg
    121.4 KB · Views: 38
  • DSCN6527.jpg
    DSCN6527.jpg
    147.8 KB · Views: 40
  • DSCN6528.jpg
    DSCN6528.jpg
    115.2 KB · Views: 41

rlitman

Well-known member
Joined
Oct 18, 2010
Messages
24,591
Location
Long Island
Clumsy Glue; I like that one!

Yeah, it's slow to dry. Oh, and I forgot to mention one thing. The Liquid Skin cap doesn't seal well. It will leak out if you don't store it upright. And yes, the respirators are in the same bay too.

But I've used it on myself and children with much success. Far less ouch factor than New Skin (THAT stuff really smarts).
 
OP
J

jimreed2160

Well-known member
Joined
Aug 7, 2016
Messages
3,589
Location
Tallahassee FL
Box of rabbets

I was cleaning up yesterday and found a big surprise box of rabbet planes. It inspired me to do more organizing. Next project is to replace my original wall of inefficient pegboard with storage cabinets. The first three are on order and should come in next week.

So later I stopped organizing and played with my newfound rabbets. The box was filled with Stanley side rabbet planes. Made from 1896 until 1941, the #98 and #99 are in pairs. The #98 cuts right handed and the #99 cuts left handed. They are very handy for enlarging grooves. I use them on drawer sides to enlarge a tight groove.

Some of these are missing parts and some just need cleaning. Projects abound in my plane boneyard but this organizing is bringing much needed order to the chaos.
 

Attachments

  • DSCN6529.jpg
    DSCN6529.jpg
    153.8 KB · Views: 57
  • DSCN6530.jpg
    DSCN6530.jpg
    151.3 KB · Views: 62
OP
J

jimreed2160

Well-known member
Joined
Aug 7, 2016
Messages
3,589
Location
Tallahassee FL
Not woodworking

OK. No woodworking in the shop today because I am preparing for the new cabinets. This change should bring a little more order to the chaos. I removed a shelf which was obscuring the window and was then able to wash the window and install the new blinds. I bought matching blinds two years ago when I changed out the previous 40 yo set. Nice to get the spare hung at last. Then I took down the messy pegboard so the new cabinets will have a new home.

The space between the windows is 84" and the two cabinets are 30" each. If I allow 6" inset from each window then I will have a 12" area for a shelf between them. If I bring then together, I can allow 12" on each side.

Losing the pegboard is no big deal because very few of those tools get frequent use. I am liking tool boxes more and more.
 

Attachments

  • DSCN6568.jpg
    DSCN6568.jpg
    150.4 KB · Views: 75
  • DSCN6572.jpg
    DSCN6572.jpg
    134.8 KB · Views: 62
  • DSCN6574.jpg
    DSCN6574.jpg
    122.1 KB · Views: 62

rrich1

Well-known member
Joined
Oct 7, 2015
Messages
793
Got the carcass glued up today. It went pretty smoothly. It's square but I need to plane the joints flush. I prefinished the inside pieces with one coat of shellac to help with glue squeeze out.

Yesterday I routed out the spot for the hinges. I finished the fit with some chisel work. All fit nice and flush.

Before work today I routed out the hinges on the door sections and I started the dovetails with my new Katz Moses dovetail jig. Very happy with it so far. Only complaint is it is very slick and moves slightly. IMG_20180430_123051.jpgIMG_20180430_123148.jpgIMG_20180430_144243.jpegIMG_20180430_123136.jpg

Sent from my Pixel XL using Tapatalk
 

jdpflyer

Active member
Joined
Dec 11, 2013
Messages
35
Location
Newnan, Ga
A little woodworking today. I'm adding an addition on my shop and let a 1X6 slip a little while I was installing it. I already had about 10 screws in it so I figured I would hit it with my jigsaw when I finished, but then I remembered a box of hand planes I inherited from my wife's step father. All of them are rust covered and in pretty sad shape but I picked out the one that appeared to be in the best shape expecting to just hack at the board until it was close enough. It was actually fairly sharp and did a decent job. Guess I need to restore this one and put it to work!
 

Attachments

  • image.jpg
    image.jpg
    151.1 KB · Views: 60

wrenchguy

Well-known member
Joined
Sep 22, 2011
Messages
4,697
Location
NW Indiana
Latest grandson in speedboat rocker i built years back. Its been in new england last couple years. The pilot is 6 months old now.


CRSINMICH

Well-known member
Joined
Aug 15, 2015
Messages
2,397
Location
Southeastern Michigan
wrenchguy: That's a terrific boat rocker. Is it modeled after a specific ChrisCraft? The pilot should have lots of fun in that. Ya done good, Grandpa!

jdp: Trustworthy was a Sargent brand. In general their tools were good users. Sargent manufactured some of Craftsman's block planes. Not sure if they made any other tools for Craftsman.
 
Last edited:

jar944

Well-known member
Joined
Jul 26, 2010
Messages
5,905
Location
Northern VA
Ran a bunch of custom moulding for the French doors and cased opening in my house. 60' per door of casing (x3 since it's a 3 piece built up casing and 142' of stop for just over 500 lineal feet of moulding for 2 doorways.
 

Attachments

  • 20180324_173110-3984x2241.jpg
    20180324_173110-3984x2241.jpg
    152.2 KB · Views: 68
  • 20180324_174345-3984x2241.jpg
    20180324_174345-3984x2241.jpg
    127 KB · Views: 60
  • 20180325_151538-2241x3984.jpg
    20180325_151538-2241x3984.jpg
    93.6 KB · Views: 62
  • 20180325_153733-3984x2241.jpg
    20180325_153733-3984x2241.jpg
    146.5 KB · Views: 61
  • 20180325_213424-3984x2241.jpg
    20180325_213424-3984x2241.jpg
    99 KB · Views: 63
  • 20180329_205000-3984x2241.jpg
    20180329_205000-3984x2241.jpg
    102.4 KB · Views: 58
  • 20180407_144254-2241x3984.jpg
    20180407_144254-2241x3984.jpg
    40.8 KB · Views: 64

jar944

Well-known member
Joined
Jul 26, 2010
Messages
5,905
Location
Northern VA
And the actual installed casing
 

Attachments

  • 20180407_144213-3984x2241.jpg
    20180407_144213-3984x2241.jpg
    125.8 KB · Views: 79
  • 20180401_155659.jpg
    20180401_155659.jpg
    127.1 KB · Views: 78
  • 20180429_082515-3984x2241.jpg
    20180429_082515-3984x2241.jpg
    75.4 KB · Views: 76
  • 20180429_134606-2241x3984.jpg
    20180429_134606-2241x3984.jpg
    62 KB · Views: 72
  • 20180429_214416.jpg
    20180429_214416.jpg
    91.4 KB · Views: 75
  • 20180429_133839.jpg
    20180429_133839.jpg
    108.2 KB · Views: 71
To avoid these ads, REGISTER NOW!
Top Bottom