To avoid these ads, REGISTER NOW!

Woodworking 101--Tools and Tips

wrenchguy

Well-known member
Joined
Sep 22, 2011
Messages
4,697
Location
NW Indiana
not modeled after any traditional builders design. just a made to show off the african mahogany drops i had. I been messing with old varnished speed boats 50 years and like wood. this 1 i made with side to side rockers shown above. when the child is older i change out the rockers so it rocks "big time" front and aft, like a rocking horse. thanks 4 looking.


my oldest grandson in sailor suit 5 years ago.
 
To avoid these ads, REGISTER NOW!
OP
J

jimreed2160

Well-known member
Joined
Aug 7, 2016
Messages
3,589
Location
Tallahassee FL
jdp--Good work with the plane. I vote for fixing them up a bit.

jar--Outstanding trim work.

wrench--Ahoy there. Good work with the scraps.
 

ptgarcia

Well-known member
Joined
Nov 15, 2016
Messages
1,202
Location
Alta Loma, CA
not modeled after any traditional builders design. just a made to show off the african mahogany drops i had. I been messing with old varnished speed boats 50 years and like wood. this 1 i made with side to side rockers shown above. when the child is older i change out the rockers so it rocks "big time" front and aft, like a rocking horse. thanks 4 looking.


my oldest grandson in sailor suit 5 years ago.


Bitchen!
 
OP
J

jimreed2160

Well-known member
Joined
Aug 7, 2016
Messages
3,589
Location
Tallahassee FL
More clock

We left the clock with small dowels in the unsightly screw holes. Well the glue is dry by now and I used my inexpensive contractor's flush saw to cut off the waste. I was careful and did not leave sawtracks.

Next task is to build a box for the quartz works and then finish it and the repaired back.
 

Attachments

  • DSCN6576.jpg
    DSCN6576.jpg
    148.2 KB · Views: 48
  • DSCN6577.jpg
    DSCN6577.jpg
    136.4 KB · Views: 43
  • DSCN6578.jpg
    DSCN6578.jpg
    148.2 KB · Views: 46

rrich1

Well-known member
Joined
Oct 7, 2015
Messages
793
Chop chop. Got the tails on the doors done today before work. Up next are the pins. IMG_20180501_151223_528.jpeg

Sent from my Pixel XL using Tapatalk
 
OP
J

jimreed2160

Well-known member
Joined
Aug 7, 2016
Messages
3,589
Location
Tallahassee FL
Cabinet prep

I prepped the wall today for my cabinets. Decided to hang them together and leave a foot on each side by the windows. I will either lag them to the walls or use French cleats if the lags and holes don't line up correctly.

The handiest tool I used was my 6 foot level from HF. I was browsing in the store one day and decided I needed one of those. It has gotten a surprising amount of use. Yes, I know you can just put a level on a long board but this thing is really nice for a one man show.

My stud finder was also very helpful. Now everything is marked and ready to go.
 

Attachments

  • DSCN6579.jpg
    DSCN6579.jpg
    73.9 KB · Views: 43

BMR24

Well-known member
Joined
Oct 2, 2017
Messages
234
Location
Rocky Mountains Colorado
I was very generously given an old wood lathe by a fellow Gj member, and I'm itching to try it out. Trouble is he couldn't find the turning chisels, and while I don't want cheap ****, I don't want to spend lots of money on something just to try it out, anyone have any insight on a good middle ground set of turning chisels? If anyone has a used set that they might want to sell I'd be interested in that too
 
OP
J

jimreed2160

Well-known member
Joined
Aug 7, 2016
Messages
3,589
Location
Tallahassee FL
BMR--Good score on your lathe. My dad bought a lathe and played with it enough to really scare himself. Years later he bought another and continued to scare himself enough that he gave it to me. I started out slowly and carefully and learned to love turning.

As it turns out (see what I did there?), his problem was his original chisel set. He had a nice set of three carbide tipped turning chisels that were too small for his projects. I think they were made for working on very small projects like chessmen. Anyway, once I got some REAL chisels, my turning really improved and the scary feelings subsided.

To start you need a skew chisel. It should be at least 1" but 1 1/2" is better. You also need a gouge that is at least that size. My favorite lathe tool is a massive gouge that is about 3" wide at the tip and about 18-24" long. The other chisel you need is a parting chisel. These three should be enough for you to shape some wood and decide if turning is for you.

I went to ebay and searched "lathe chisel set". There are lots of offerings. Maybe one of your first projects could be turning new handles for your chisels. I find that the easiest handles to use are as big as small baseball bats. Good luck with your lathe.
 

Shop Dad

Well-known member
Joined
Nov 5, 2014
Messages
160
Location
Princeton, NJ
You can get older Craftsman lathe tools very cheap o Craigslist or eBay. I started on a set my neighbor gave me and they were a great starter set.
 

rrich1

Well-known member
Joined
Oct 7, 2015
Messages
793
Doors are all dovetailed! Ready for glue next. I finished chiseling out the mortises for the hinges today as well. Feeling accomplished! IMG_20180502_151154_256.jpgIMG_20180503_141220.jpgIMG_20180503_142735_321.jpg

Sent from my Pixel XL using Tapatalk
 
OP
J

jimreed2160

Well-known member
Joined
Aug 7, 2016
Messages
3,589
Location
Tallahassee FL
Wall cabinets

OK. More shop organization than woodworking but wood will be involved. I got a msg last night that cabinets were in so I took a ride over to HD. Best time to go is Friday evening because weekend is usually packed out. The dude was skeptical about all of it fitting in my truck but I was confident. "You can haul lots of $&it in that truck", sez I.

They actually fit better in the truck than they did in my cluttered garage shop. The mission today is to get at least two of them hung. I bought a box of 100 lag screws while I was there so I think I am covered in the hardware dept. Time to go eat some Wheaties.
 

Attachments

  • DSCN6598.jpg
    DSCN6598.jpg
    158.3 KB · Views: 76
  • DSCN6599.jpg
    DSCN6599.jpg
    156.1 KB · Views: 76
OP
J

jimreed2160

Well-known member
Joined
Aug 7, 2016
Messages
3,589
Location
Tallahassee FL
Hanging time

Hanging these steel cabinets is simple with lag screws but I thought I might use French cleats if the studs were not placed correctly. It turns out that the cabinets have four holes conveniently drilled at 8" intervals on the top and bottom. These will work just fine with no need for additional holes or cleats. But they weigh about 30 lbs each. I attached a ledger board to hold them up and planned to use my shoulder to pin them against the wall.

Specs--1/8" pilot hole for the 1/4x1 1/2" lag screw. Two on top and two on bottom with a fender washer. 7/16" hex head.

But the door was in the way when I started with the outside cabinet. I lowered it and removed the offending door. It was held with just three screws so that was not a big deal. Bonus is that it took a little weight off the cabinet and that was welcome.

I used a 3/8" ratchet flex shaft extension and it really came in handy because of the tight quarters. I drove it most of the way home and then tightened with a hand ratchet so I did not strip out the lag.
 

Attachments

  • DSCN6600.jpg
    DSCN6600.jpg
    118.8 KB · Views: 40
  • DSCN6601.jpg
    DSCN6601.jpg
    148 KB · Views: 48
  • DSCN6602.jpg
    DSCN6602.jpg
    121.1 KB · Views: 43
  • DSCN6603.jpg
    DSCN6603.jpg
    99.7 KB · Views: 51
OP
J

jimreed2160

Well-known member
Joined
Aug 7, 2016
Messages
3,589
Location
Tallahassee FL
Cabinets

When I measured the cabinets against the studs, I found that there would be a 1 1/2" gap between them. I figured that it would look just fine. Installation was uneventful and I am happy with how they turned out. My goal is to contain some of the clutter that keeps me from using the benchtop. Trust me, FSD is REAL!

The third cabinet goes further down the wall and I need to remove that pegboard and mark the studs to prep. I am calling it a day because it is already 80 degrees in the shop at 11:30am.

Very pleased thanks to HD and their Gladiator line. I hope to get organized and return to woodworking soon.
 

Attachments

  • DSCN6604.jpg
    DSCN6604.jpg
    129.7 KB · Views: 47
  • DSCN6605.jpg
    DSCN6605.jpg
    123.7 KB · Views: 47
  • DSCN6606.jpg
    DSCN6606.jpg
    150 KB · Views: 49
  • DSCN6607.jpg
    DSCN6607.jpg
    146.3 KB · Views: 46
To avoid these ads, REGISTER NOW!

Bob Heine

ALLIANCE MEMBER
Joined
Oct 24, 2009
Messages
10,705
Location
Boca Raton, Florida
Jim, it didn't occur to me that you were putting up Gladiator cabinets. With 24-inches of blank space in that spot you could have put the matching Gladiator cube. It would leave a 6-inch space below (or above) the other two cabinets. With the space below the cabinet, that would be a decent place for a metal shelf for a phone and cup of coffee -- a little sawdust seasoning in my morning brew is a good way to start the day.
attachment.php


As usual, my timing is almost perfect. Amazon says it has a few left...

https://www.amazon.com/dp/B00ZAJA4NO/?tag=atomicindus08-20
 

Attachments

  • Gladiator 24.jpg
    Gladiator 24.jpg
    107.7 KB · Views: 401
OP
J

jimreed2160

Well-known member
Joined
Aug 7, 2016
Messages
3,589
Location
Tallahassee FL
Bob--That is a cute little cabinet. I got three of these for the wall but the third one goes over near the electrical service box. It does not obstruct the box but code requires 30" of clearance and I would have about 25". The cube would solve that problem. Hmmmm...

Well, the thinking did not take long. Now Amazon just has two left.
 
Last edited:
OP
J

jimreed2160

Well-known member
Joined
Aug 7, 2016
Messages
3,589
Location
Tallahassee FL
More organization

OK. Time for shop fun. And what could be more fun than freestyle carpentry using scraps?!? One of the goals of this project is to clear the clutter from my workbench and one big piece of clutter is the big honkin' toolbox. It needs a new home. And its little brother from another mother is on the floor. So I will build a rack for them on the newly cleaned low table.

I picked up some "cabinetry screws" at HD that look a lot like the Kreg screws. They seemed like they might be a cut above the drywall screws. Here are some pictures of them alongside the Kregs. The Kreg is 1 1/4 and the other is 1 1/2. Kregs are square drive and these are Spax. Other than a larger head, they are very similar and easy to drive. This is their first test. I used the Kreg to make three blocks from 2x4 scraps and then attached some furring strips and a piece of plywood to those.
 

Attachments

  • DSCN6608.jpg
    DSCN6608.jpg
    142 KB · Views: 55
  • DSCN6610.jpg
    DSCN6610.jpg
    140.1 KB · Views: 53
  • DSCN6609.jpg
    DSCN6609.jpg
    132.5 KB · Views: 51
OP
J

jimreed2160

Well-known member
Joined
Aug 7, 2016
Messages
3,589
Location
Tallahassee FL
Fixing mistakes

When rushing through freestyle carpentry in an 80 degree shop, mistakes can be made. I forgot to make allowance for the top boards and the tool box buckles did not have enough clearance.

So why take it apart and fix it the right way? That is no fun. I just dogged it to the workbench and went to town with my scrub plane. It was another ten minutes of fun. My trusty #4 finished the job.

I used a clamp as a depth gauge and it worked well. All three pieces got taken down the same and the stand did not wobble. Best part was when I put the boxes back in place and opened the lids.

"We have clearance, Clarence."
 

Attachments

  • DSCN6611.jpg
    DSCN6611.jpg
    158.4 KB · Views: 95
  • DSCN6612.jpg
    DSCN6612.jpg
    149.6 KB · Views: 85
  • DSCN6613.jpg
    DSCN6613.jpg
    150.3 KB · Views: 93
  • DSCN6614.jpg
    DSCN6614.jpg
    155.9 KB · Views: 86
OP
J

jimreed2160

Well-known member
Joined
Aug 7, 2016
Messages
3,589
Location
Tallahassee FL
Shop organization

Well thanks to Bob's timely message, my plan has been revised. I ordered the smaller cabinet for the workbench beside the breaker box and will place cabinet #3 over cabinetmakers bench #2. It replaces a handy box I cobbled up from plywood. As with most quickly built shop furniture, it was functional but lacking in eye appeal.

The first task was to empty out all the paint. This cabinet is rattlecan central. I filled two tubs with stuff. I also had to remove a pegboard on one end. No big deal because it held rarely used stuff.

At this point, I have a clean wall with the studs marked out and with a level line for the temporary ledger board.

It is 80 in the garage and I am in tee shirt #3 for the day. Summer has arrived.
 

Attachments

  • DSCN6625.jpg
    DSCN6625.jpg
    150 KB · Views: 52
  • DSCN6626.jpg
    DSCN6626.jpg
    146.5 KB · Views: 50
  • DSCN6627.jpg
    DSCN6627.jpg
    144.3 KB · Views: 48

Bob Heine

ALLIANCE MEMBER
Joined
Oct 24, 2009
Messages
10,705
Location
Boca Raton, Florida
Jim, I'm glad the cabinet is going to help (not financially but hey!).

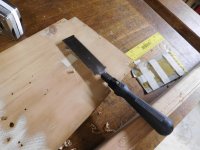
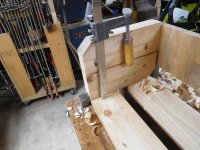
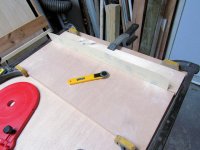
I had a minor screw-up in my Musical Ice Box project. It's all 23/32" plywood and I bought a 23/32 router bit to cut a dado for a shelf. Used my Bora guide and everything looked perfect. On closer examination, the dado is deeper at one end, almost 1/8" deeper. You can see the change in plies on the right side.
attachment.php


I decided to quit rather than continue (and make matters worse). My first thought was to set the router depth the 1/8" deeper and do the whole dado over again. That was yesterday.

Today I realized I had a zero chance of re-routing the dado by machine without making it wider. I checked my hand plane collection (2) and nope, I don't have a dado or router plane. After deciding not to bid on the already too expensive eBay planes and not order the $159 router plane set, I tried the minimal cost approach.

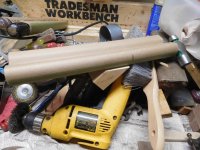
Clamped a 22-inch length of 120-grit PSA paper between a 23/32" plywood off-cut and a 3/4" scrap of one-by-four. The two-inch section of bare plywood ensures I can get the piece started in the dado without the sandpaper scraping the sides. Cut the paper with a rolling cutter blade and stuck the sandpaper to the edge of the plywood.
attachment.php


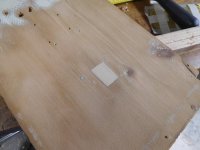
Because one end was already deeper, I scored the ply at the bottom of the dado and chiseled the layer of ply at the bottom to match the deep end. Now it's just sand and chisel until the whole slot is even.
attachment.php
 

Attachments

  • Audio Cabinet 19.jpg
    Audio Cabinet 19.jpg
    66.1 KB · Views: 331
  • Audio Cabinet 20.jpg
    Audio Cabinet 20.jpg
    81.8 KB · Views: 334
  • Audio Cabinet 22.jpg
    Audio Cabinet 22.jpg
    82.9 KB · Views: 329
OP
J

jimreed2160

Well-known member
Joined
Aug 7, 2016
Messages
3,589
Location
Tallahassee FL
Bob--All I can say is "OUCH!". I guess that is why I dislike routers. Stretch too far or forget to tighten some screw and that carbide rips amuck right through your precious project wood. At least yours went shy instead of too deep. And 1/8 is not too much to recover.

As for a handplane solution, the plywood limits your choices. I would tackle it with a #46 skew plane or a smaller sized #39 skew dado. Good thing about dados is that you really do not need the exact size. A smaller plane can swim in the lane and get the job done once you have defined the sides.

Good luck. Just think of the sandpaper dust as VERY small shavings.
 

rrich1

Well-known member
Joined
Oct 7, 2015
Messages
793
Last night I sanded the dovetails and filled the gaps with glue. The sawdust from sanding filled the gaps leaving a good looking joint.

Today I got the part for the plane til cut out. Two triangle supports underneath support the til. Also got the back cut and put in.

This week I resawed a piece of tigerwood for the panels. Trying to figure out the best book match and thickness for veneering. I'll get some pics later of that. IMG_20180507_133304.jpgIMG_20180507_133255.jpg

Sent from my Pixel XL using Tapatalk
 
OP
J

jimreed2160

Well-known member
Joined
Aug 7, 2016
Messages
3,589
Location
Tallahassee FL
Wall cabinet update

Well, I am sure that those of you following along at home are breathless for an update on the cabinets. To summarize, two of the Gladiator 30" cabinets have been hung and another is in staging. Meanwhile, shippers have a 24" in transit as well as a 30" x 72" double door floor cabinet.

Today's task was to clear the wall for the 24". I got that done in spite of the 80+ degree temps. There have been unintended consequences. My shop, which usually looks like a bomb went off and filled all of the flat surfaces with debris, now looks like TWO bombs went off and kicked up debris from the street. Project work has been pretty much halted at this point. :willy_nil

But I will find a way. I need to crank out two Harry Potter wands for grandkids and that is a priority. Their interest is hot now but could change in a minute.

Here are the photos. Before and after. You will notice the breaker panel that I do not want to obstruct. Maybe I should paint it. Is there a favorite OSHA color for service panels?
 

Attachments

  • DSCN6575.jpg
    DSCN6575.jpg
    142.2 KB · Views: 50
  • DSCN6678.jpg
    DSCN6678.jpg
    92 KB · Views: 55

BobLon

ALLIANCE MEMBER
Joined
Apr 19, 2017
Messages
141
Location
Florida
Last night I sanded the dovetails and filled the gaps with glue. The sawdust from sanding filled the gaps leaving a good looking joint.

Today I got the part for the plane til cut out. Two triangle supports underneath support the til. Also got the back cut and put in.

This week I resawed a piece of tigerwood for the panels. Trying to figure out the best book match and thickness for veneering. I'll get some pics later of that. IMG_20180507_133304.jpgIMG_20180507_133255.jpg

Sent from my Pixel XL using Tapatalk

Those dovetails look nice. I've never hand cut dovetails before but when I get my shop finished I will have to try some.

Haven't had a shop for a couple three years now and you guys are really making me itchy to make saw dust.
BobL.
 
OP
J

jimreed2160

Well-known member
Joined
Aug 7, 2016
Messages
3,589
Location
Tallahassee FL
Bob--I encourage you to get back into your shop. My last year of work was pretty hectic and full of life crises. When I retired, I stayed out of the shop for almost six months. Then I found a project and got my mojo back. Gotta admit that I am a happy camper when I get to spend time out there--even in this Florida heat.

So my recommendation is to find a project and see where it takes you. Good luck.
 
OP
J

jimreed2160

Well-known member
Joined
Aug 7, 2016
Messages
3,589
Location
Tallahassee FL
Prototype hammer stand

Not fine woodworking but necessary scratch carpentry from the scrap bin. When I took down the pegboard, I realized that the only tools I used frequently were my ball peen hammers. I also noticed that there is a gap between the back of the bench and the wall. Hmmmm...wasted space. The foundation ledge keeps the bench a few inches from the wall.

So I used some scraps and the packing tubes from my cabinets and came up with this mess. It is really a proof of concept. If it works well, I will build it from PVC pipe or plywood.
 

Attachments

  • DSCN6680.jpg
    DSCN6680.jpg
    154.4 KB · Views: 77
  • DSCN6679.jpg
    DSCN6679.jpg
    125.4 KB · Views: 97
  • DSCN6681.jpg
    DSCN6681.jpg
    129.3 KB · Views: 85
  • DSCN6682.jpg
    DSCN6682.jpg
    148.7 KB · Views: 78

rrich1

Well-known member
Joined
Oct 7, 2015
Messages
793
Cut the veneers today for the front door panels. Resawed tigerwood for some bookmatched veneer. More curl in it and the camera can pick up. Should look really good with finish. The drawer fronts will also be tigerwood and the curl is much more prevalent on the off cuts from these peices. IMG_20180508_132937_052.jpgIMG_20180508_122336.jpgIMG_20180508_132937_053.jpg

Sent from my Pixel XL using Tapatalk
 

Bob Heine

ALLIANCE MEMBER
Joined
Oct 24, 2009
Messages
10,705
Location
Boca Raton, Florida
Bob--All I can say is "OUCH!". I guess that is why I dislike routers. Stretch too far or forget to tighten some screw and that carbide rips amuck right through your precious project wood. At least yours went shy instead of too deep. And 1/8 is not too much to recover.

As for a handplane solution, the plywood limits your choices. I would tackle it with a #46 skew plane or a smaller sized #39 skew dado. Good thing about dados is that you really do not need the exact size. A smaller plane can swim in the lane and get the job done once you have defined the sides.

Good luck. Just think of the sandpaper dust as VERY small shavings.
Jim, I think it was a nick in the plastic guide plate that kept the router from dropping all the way into the hole.

I will keep an eye out for a #39 skew dado (3/8") but for now it's going to be a 1/4" chisel, box cutter and sanding block. Finished fixing it today and cut the dado in the opposite panel as well (router and guide worked perfectly).
That isn't the router's fault. A router plane or shoulder plane would make quick work of the fix.
EZ-duzit, I know, the tool behind the tool is at fault. At least this thread kept me from doing more damage. The plane will be a future addition to my small collection of woodworking hand tools.
Bob--I encourage you to get back into your shop. My last year of work was pretty hectic and full of life crises. When I retired, I stayed out of the shop for almost six months. Then I found a project and got my mojo back. Gotta admit that I am a happy camper when I get to spend time out there--even in this Florida heat.

So my recommendation is to find a project and see where it takes you. Good luck.
Jim, I agree completely. I have been retired for 24-, make that 19 years. I have been doing projects on the cars, house and yard the whole time. My recent focus was to teach myself to weld and now I'm trying my hand at some crude cabinetry.

The next three wood projects in line are tool cabinets: 1) a wheeled base for the table saw, 2) a wheeled base for the router table, and 3) a wheeled base with flip-top for the 12-inch compound miter saw. Somewhere in there I need to make a wheeled base for the metal chop saw but obviously that one needs to be made of steel. The whole reason for the slow-speed carbide blade chop saw is to cut steel.
 
OP
J

jimreed2160

Well-known member
Joined
Aug 7, 2016
Messages
3,589
Location
Tallahassee FL
rrich--Love those panels. The bookmatching adds a little flair.

Bob--Keep plugging away on those projects. The stuff on your list should make the shop more productive and thus more fun.

As excited as I am about my new cabinets, I am keenly aware that as new things come into my crowded shop, old things need to go out. To that end I made a run today out to the county hazardous waste dump. Just a small quantity of old paint and fluorescent tubes can eat up a big corner of the garage in no time. Add two unused electric weed whackers and you suddenly have a load that is worth the trip.
 

BobLon

ALLIANCE MEMBER
Joined
Apr 19, 2017
Messages
141
Location
Florida
I have been working 'on' the shop but not 'in' it. Moved twice in the last year. Now we are in our 'forever' home. It came with a good sized metal shed and I have been framing out the inside for my shop.

So far I have the walls up, 25K btu AC installed. Electrical mostly done. Now working on ceiling joists. Then insulation and wall panels.

Actually looking forward to being able to set it up and get my tools moved in and tweaked.

I retire at the end of this month so once I get there I should have plenty of QST in my future :bounce::beer:

BobL.
 
OP
J

jimreed2160

Well-known member
Joined
Aug 7, 2016
Messages
3,589
Location
Tallahassee FL
Bob--Since you have 30 more days in the hole, we will not pester you for pictures of your new shop. But after that we need photographic proof of your progress. You might even consider starting your own thread--most of the shop builds are in the Gallery section.

Otherwise welcome to this thread. Actual woodworking does take place here...sometimes.
 
To avoid these ads, REGISTER NOW!
Top Bottom